Imagine you are sitting in the driver seat of your car, waiting for the traffic light to turn green. Instead of a smooth, gentle hum, your vehicle starts to shake. The dashboard vibrates, the steering wheel trembles in your hands, and the engine sounds like it is gasping for breath. You look down at the tachometer and notice the needle bouncing up and down unpredictably. Your car has a classic case of a rough idle.
When your engine runs poorly while sitting still, it can feel like a massive, expensive mechanical failure is about to happen. You might already be visualizing a massive repair bill from a local mechanic. However, the culprit behind this annoying and stressful shaking is often a tiny, delicate electronic component hiding right inside your air intake system. That component is the Mass Air Flow sensor, which people usually call the MAF sensor. Over time, this little device gets coated in dust, oil, and road grime, which completely throws off your engine computer.
The great news is that you do not need to be a professional mechanic with decades of experience to fix this issue. You can restore your smooth ride right in your own driveway using just a few basic tools and a special cleaning spray. This comprehensive, step-by-step guide will walk you through the entire process of locating, removing, cleaning, and reinstalling your Mass Air Flow sensor. By the time you finish reading, you will know exactly how to give your car engine a breath of fresh air and eliminate that frustrating rough idle for good.
Understanding Your Car Breathing System and the MAF Sensor
To understand why a dirty sensor causes your car to shake, it helps to think of your engine like a human runner. Just like you need to breathe in the right amount of oxygen to run a marathon, your car engine needs a precise mixture of air and gasoline to run smoothly. If a runner cannot get enough air, they slow down and struggle. If an engine gets the wrong amount of air, it stumbles, misfires, and idles poorly.
Your vehicle relies on an internal combustion engine, which means it creates power by burning fuel inside closed cylinders. For this burn to be completely efficient, the engine computer needs to maintain a strict balance between air and fuel. This balance is known as the stoichiometric ratio, which translates to roughly fourteen and a half parts of air for every single part of fuel. If there is too much air, the engine runs lean, causing a rough idle and potential stalls. If there is too much fuel, the engine runs rich, wasting gasoline, producing black smoke, and damaging your exhaust components.
This is where the Mass Air Flow sensor steps onto the stage as the ultimate gatekeeper. Installed along the plastic piping that carries fresh air from your outside environment into the heart of the engine, the MAF sensor has one critical job. It measures the exact weight and volume of the air entering the system at any given microsecond. It translates this measurement into an electronic signal and beams it directly to the engine control unit, which is the brain of your car. Based on this constant stream of data, the computer calculates exactly how many drops of fuel to spray into the cylinders.
How the Sensor Actually Works
Most modern vehicles utilize a hot-wire style MAF sensor. Inside the plastic housing of the sensor, you will find one or two incredibly thin wires suspended in the stream of rushing air. The engine computer sends an electrical current through these wires to heat them up to a specific, high temperature.
As you press down on the gas pedal and the throttle valve opens, outside air rushes past these glowing wires. The passing air acts just like a cool breeze on a hot summer day, chilling the wires down. The more air that enters the engine, the more the wires cool off.
To keep the wires at their target temperature, the computer has to send more electrical current through them. By measuring exactly how much extra electricity it takes to keep those wires hot, the computer can deduce the exact mass of the air passing through the tube. It is a brilliant, elegant system, but it relies entirely on the air making direct, clean contact with those microscopic wires.
Why Dirt is the Ultimate Enemy
Because the MAF sensor lives right in the path of oncoming air, it is exposed to everything the road throws at your vehicle. Even though your engine air filter catches large leaves, bugs, and coarse dirt particles, microscopic bits of debris still manage to slip through.
Over thousands of miles of driving, a thin layer of contamination begins to build up on the delicate heating wires. This contamination usually consists of fine road dust, pollen, and oily vapors that drift backward through the intake manifold after you turn the engine off. If you happen to use a reusable, washable fabric air filter that requires oiling, applying even a tiny bit too much oil during maintenance can cause oil droplets to fly down the intake tube and coat the sensor wires instantly.
When dirt and oil bake onto the hot wires, they form an insulating blanket. This blanket prevents the passing air from cooling the wires down efficiently. As a result, the computer thinks far less air is entering the engine than there actually is. The computer then reduces the amount of fuel sprayed into the cylinders, creating a lean condition that starves your engine and causes the violent, sputtering vibrations you experience during a rough idle.
The Warning Signs of a Contaminated Mass Air Flow Sensor
A rough idle is the most common and noticeable symptom of a dirty MAF sensor, but it is rarely the only sign your car will give you. Because this sensor acts as the primary sensory organ for the engine computer, a failure here ripples across your entire driving experience. Recognizing these signs early can help you diagnose the problem before it leaves you stranded on the side of the highway.
The Dreaded Check Engine Light
Whenever the engine computer receives signals from a sensor that seem physically impossible or outside normal operating parameters, it illuminates the check engine light on your dashboard. If your MAF sensor is filthy, the computer will quickly realize that the oxygen sensor readings in the exhaust do not match the air calculations from the intake.
If you hook up an onboard diagnostics scanner to the port beneath your steering wheel, a dirty MAF sensor will typically trigger specific diagnostic trouble codes. Codes ranging from P0100 through P0104 directly point to a malfunction within the mass air flow circuit. Additionally, you might see codes like P0171 or P0174, which signify that the system is running too lean. Seeing these codes together is a massive clue that your sensor simply needs a thorough cleaning rather than an expensive replacement.
Engine Hesitation and Stumbling
Have you ever pressed your foot down on the gas pedal to pull out into traffic, only for your car to pause for a terrifying second or two before finally accelerating? This hesitation is a classic symptom of a dirty MAF sensor. When you open the throttle quickly, a massive wave of air rushes into the engine. If the sensor wires are coated in grime, they cannot register this sudden rush of air fast enough. The computer continues to feed the engine a tiny amount of fuel while the cylinders are flooded with air, causing the engine to stumble and gasp before it finally catches up.
Poor Fuel Economy
When a sensor sends faulty data, the engine computer often drops into a protective backup mode often referred to as a limp mode or fail-safe mode. In this state, the computer stops trying to calculate the perfect air-to-fuel ratio and instead dumps extra fuel into the engine to prevent it from running too lean and damaging itself. You will notice your fuel gauge dropping much faster than usual, forcing you to visit the gas station far more frequently.
Black Exhaust Smoke and Rich Odors
If the dirty sensor causes the computer to overcompensate by pumping massive amounts of extra gasoline into the combustion chambers, not all of that fuel will burn completely. The unburned gasoline gets pushed out into your exhaust system, where it can create puffs of dark black smoke from your tailpipe. You might also notice a strong, pungent smell of raw gasoline or rotten eggs wafting around your car when you park, which indicates that your catalytic converter is being overwhelmed by excess fuel.
Hard Starting Conditions
An engine requires a very specific, rich mixture of fuel to spark to life when it is cold. If your MAF sensor is sending skewed data to the computer right as you turn the key, the computer might not deliver enough fuel to get the fire started. You might find yourself cranking the engine over and over again for several seconds before it finally sputters to life, or the engine might start up for a brief moment and immediately die unless you keep your foot pressed on the gas pedal.
Gathering Your Tools and Supplies
Before you roll up your sleeves and pop the hood of your car, you need to gather the correct supplies. Working on modern automotive electronics requires precision, and using the wrong materials can instantly destroy a delicate sensor, turning a simple cleaning job into an expensive replacement job.
Here is a comprehensive checklist of everything you will need to complete this task successfully:
- A can of dedicated Mass Air Flow Sensor Cleaner: This is the absolute most important item on the list. You cannot use brake cleaner, carburetor cleaner, WD-40, or electronics cleaner. MAF sensor cleaner is specifically formulated to evaporate instantly without leaving any chemical residue behind, and it does not contain harsh solvents that can dissolve the delicate plastic housing or ruin the internal bonding wires of the sensor.
- A set of screwdrivers: You will generally need a medium-sized flathead screwdriver and a Phillips-head screwdriver to loosen the hose clamps and mounting screws that hold your intake tubing and sensor in place.
- Torx or security bits: Many modern car manufacturers, especially European and American brands, secure the MAF sensor to its housing using specialty screws known as Torx or tamper-proof Torx bits, which look like five-pointed or six-pointed stars with a small pin in the middle. Check your sensor ahead of time to ensure you have the right bit.
- Clean, lint-free microfiber towels: You will want a clean surface to place your sensor on while you work, and a towel to wipe down the exterior plastic housing. Never use paper towels or old cotton rags, as they shed tiny fibers that can stick to the sensor wires.
- Nitrile or latex gloves: This keeps the oils from your skin off the sensor components and protects your hands from the chemical cleaner.
- Safety glasses: The specialized cleaning spray comes out of the aerosol can with a lot of pressure, and you absolutely do not want back-spray bouncing off the plastic housing and landing in your eyes.
What Never to Use
When it comes to cleaning a mass air flow sensor, knowing what to avoid is just as crucial as knowing what to use. The internal components of the sensor are incredibly fragile. You must never touch the actual sensor wires with your fingers, cotton swabs, toothbrushes, or rags of any kind. The physical pressure from a soft cotton swab is more than enough to snap the microscopic wires instantly, completely destroying the unit. Additionally, avoid using compressed air from a high-pressure garage compressor, as the intense blast of air can bend or break the internal components. Stick strictly to the chemical spray action of the dedicated MAF cleaner.
Detailed Step-by-Step Guide to Cleaning Your MAF Sensor
Now that you understand how the system works and you have all your tools laid out on your workbench, it is time to get your hands dirty and fix that rough idle. Follow these steps carefully, take your time, and remember that patience is your best friend during this process.
Step 1: Ensure Total Safety and Turn Off the Engine
Safety should always be your top priority whenever you work on a vehicle. Park your car on a flat, level surface like a concrete driveway or garage floor. Engage the parking brake firmly so the vehicle cannot roll while you are working under the hood.
Turn off the engine, remove the key from the ignition, and let the vehicle sit for at least fifteen to twenty minutes. This cooling period is important because the engine components get incredibly hot during operation, and you will be working directly over the engine bay. Furthermore, letting the car sit ensures that the engine computer completely enters sleep mode, reducing the risk of causing an electrical short circuit when you unplug the sensor.
For an extra layer of safety, pop your hood, locate your car battery, and use a small wrench to disconnect the negative battery terminal, which is usually marked with a minus sign. Disconnecting the battery ensures that no electrical power can flow through the system while you are disconnecting components, and it also helps reset the computer memory so it can relearn the clean sensor values later.
Step 2: Locate the Mass Air Flow Sensor
Open your hood and secure it safely with the prop rod. Now, you need to find the MAF sensor. Look for your engine air filter housing, which is typically a large, black plastic box located on either the driver side or passenger side of the engine bay.
Extending from this air filter box is a thick, flexible black plastic or rubber hose that routes directly to the engine intake manifold. The Mass Air Flow sensor is located right between that air box and the intake hose. It looks like a small plastic rectangular box or a cylindrical tube inserted directly into the air duct. You will easily spot it because it has an electrical wiring harness plugged directly into its top or side.
Step 3: Disconnect the Electrical Harness
Before you remove any screws, you must disconnect the wiring plug that connects the sensor to the main computer harness. This is often the trickiest part of the entire job because automotive electrical connectors are designed to lock together tightly to withstand engine vibrations.
Examine the plastic connector closely. You will see a small locking tab that needs to be pressed, pulled, or slid back to release the lock. Gently press down on the release tab with your thumb or a small flathead screwdriver. While holding the tab down, firmly wiggle the plastic plug and pull it away from the sensor.
Always pull directly on the plastic plug housing itself. Never pull on the colored electrical wires leading into the plug, as you can easily pull the copper wires out of their metal pins, creating a difficult electrical wiring issue that will require expert repair.
Step 4: Remove the Sensor from the Intake Tube
With the wiring harness safely tucked out of the way, you can now remove the sensor itself. Depending on your specific make and model of vehicle, you will encounter one of two setups.
In some cars, the sensor is a small drop-in module held in place by two small screws on the top of the intake tube. In other vehicles, the sensor is permanently housed inside a short, removable section of the plastic air intake pipe, which is held in place by large metal hose clamps on either end.
If you have the drop-in style, use your screwdriver or Torx bit to carefully remove the two mounting screws. Place these screws in a small cup or magnetic tray so they do not roll off the engine and vanish into the depths of your under-car splash shields. Gently pull the sensor straight up and out of the plastic tube. You might feel a bit of resistance, which is normal, as there is usually a small rubber O-ring around the base of the sensor that seals out unmetered air.
If your vehicle uses the full-housing style tube, use a flathead screwdriver or a small socket wrench to loosen the metal hose clamps securing the intake pipe. Once loose, gently twist and pull the plastic tube free from the surrounding intake hoses, and carry the entire assembly over to your clean workspace.
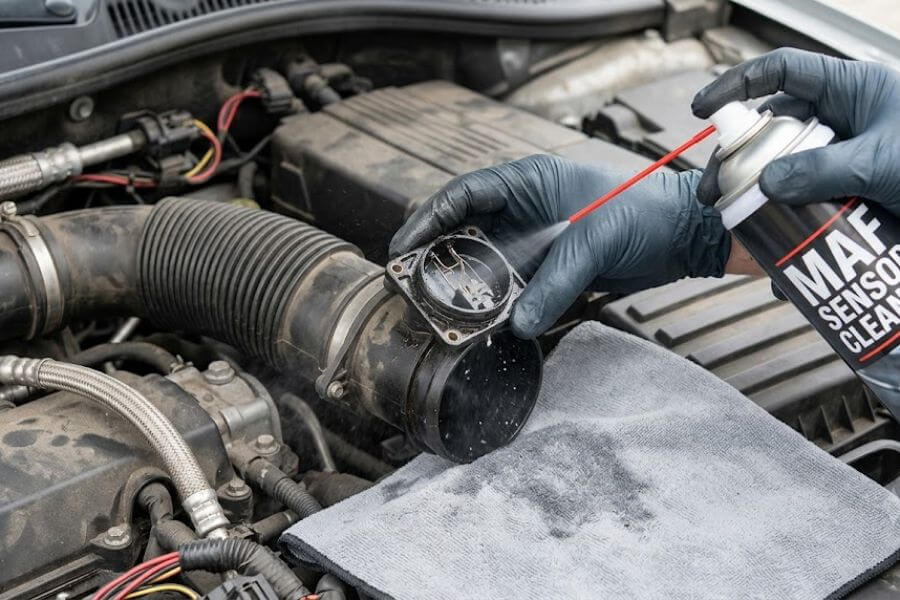
Step 5: Spray the Sensor Thoroughly
Take your sensor or sensor assembly over to your clean workspace and lay down a clean microfiber towel. Hold the sensor in your hand by its plastic outer body, making sure your fingers stay far away from the delicate internal wires.
Pick up your can of dedicated Mass Air Flow Sensor Cleaner and shake it vigorously for a few seconds. Hold the can roughly four to six inches away from the sensor components. Aim the spray nozzle directly inside the plastic chamber where the tiny heating wires or metal plates are located.
Press down on the spray button to deliver a series of short, intense blasts of chemical cleaner directly onto the wires. Ensure you spray the wires from multiple angles to wash away all traces of baked-on dust, grease, and oil. Do not be afraid to use a generous amount of spray. The fluid should run off the sensor freely, carrying the dark contaminants along with it onto the towel below. Make sure to also spray the temperature sensor bulb, which often looks like a tiny glass bead or matchstick located right next to the main wires.
Crucial Warning Note: Under no circumstances should you ever touch those internal wires with any physical tool. Do not scrub them with a brush, do not wipe them with a cloth, and do not poke them with a toothpick. The liquid spray alone is powerful enough to dissolve and wash away the dirt. Physical contact will ruin the sensor.
Step 6: Let the Sensor Dry Completely
Once you have thoroughly rinsed the sensor with the chemical cleaner, place it down carefully on your clean, dry microfiber towel. Because the specialized cleaner is formulated with highly volatile solvents, it will begin evaporating almost immediately.
However, you must let the sensor air dry completely before reinserting it into your car. This drying process typically takes anywhere from fifteen to thirty minutes, depending on the temperature and humidity levels in your workspace. Do not try to speed up the process by using a hair dryer, a heat gun, or a high-pressure air compressor, as you risk melting the plastic parts or shattering the ultra-thin sensor elements. Take a short break, grab a glass of water, and simply let nature do its work.
Step 7: Inspect the Sensor and Clean the Intake Housing
While you are waiting for the sensor to dry completely, take a moment to look down inside your car air intake tubing using a flashlight. If you see a layer of black dust, leaves, or oily film inside the pipe where the sensor sits, use a clean microfiber cloth lightly dampened with a bit of the cleaner to wipe the interior of the tube clean. This ensures that as soon as you reinstall your pristine sensor, it won’t instantly get coated in old dust sitting inside the intake path.
Pick up your dry MAF sensor and look closely at the internal elements in a well-lit area. The tiny wires should look shiny, metallic, and completely free of any dull gray fuzz or black speckles. If you still spot signs of dirt or oil contamination, give the sensor another heavy round of chemical spray blasts and allow it to dry once more.
Step 8: Reinstall the Sensor and Reconnect everything
Once the sensor is completely dry and perfectly clean, it is time to put everything back together in the exact reverse order that you took it apart.
If you have a drop-in style sensor, check to make sure the small rubber sealing O-ring is seated perfectly flat around the plastic base. If the O-ring is dry or twisted, flatten it out so it can form an airtight seal. Carefully lower the sensor straight down into its mounting hole on the intake tube, ensuring you face it in the correct direction. Most sensors have a small arrow stamped on the plastic housing that shows the direction of airflow. This arrow must always point away from the air filter box and toward the engine.
Insert the mounting screws by hand to avoid cross-threading them. Use your screwdriver or Torx bit to tighten the screws down until they are snug. Be very careful not to overtighten them, as the metal screws can easily strip out or crack the soft plastic threads of the intake tube.
If you removed the entire pipe housing section, slip the plastic tube back into the intake hoses, align the alignment tabs if present, and tighten down the large metal hose clamps firmly with your flathead screwdriver or socket wrench.
Once the sensor is physically secure, grab your electrical wiring harness plug. Line up the plastic guides and push the plug firmly into the sensor socket until you hear a distinct clicking sound, which confirms that the plastic locking tab has engaged securely. Give the wire a very gentle tug to ensure it cannot vibrate loose while you drive.
Step 9: Reconnect the Battery and Start the Engine
With everything under the hood completely reassembled and verified, take your small wrench and reconnect the negative cable to your car battery terminal. Tighten the nut down until the terminal clamp cannot be twisted or moved on the battery post.
Close your vehicle hood securely, get into the driver seat, and turn the ignition key to the run position without starting the engine. Leave it there for about ten seconds to allow the fuel pump to prime and give the engine computer a moment to boot up properly.
Now, turn the key the rest of the way to start the engine. Do not touch the gas pedal. Because you disconnected the battery, your engine computer has cleared its temporary memory cache, including the bad fuel adjustments it made to compensate for the dirty sensor.
The engine might initially start up with a slightly high idle speed or sputter for a brief moment as the computer calibrates its sensors. Within a minute or two, the engine should settle down into a beautifully consistent, smooth, and quiet idle. The shaking dashboard and trembling steering wheel should be completely gone.
Step 10: Perform a Diagnostic Test Drive
To complete the entire process, take your vehicle out for a short test drive around your neighborhood. Drive the car under various conditions. Take it through quiet residential streets with plenty of stop signs where you can evaluate the idle quality, and then pull onto a faster road where you can safely accelerate up to highway speeds.
Pay close attention to how the vehicle responds when you press down on the accelerator pedal. The hesitation, stumbling, and sluggish feeling should be entirely replaced by crisp, immediate throttle response. Drive for at least ten to fifteen miles to give the engine computer enough time to complete its internal self-tests and confirm that the check engine light remains off.
Summary Table of MAF Sensor Cleaning Steps
| Step Number | Action Item | Key Tools Needed | Critical Safety / Success Rule |
| Step 1 | Prep and Safety | Wrench for battery | Let engine cool; disconnect negative battery terminal. |
| Step 2 | Locate Sensor | Flashlight | Look between the air filter box and the engine intake hose. |
| Step 3 | Unplug Harness | Hands / Flathead | Press locking tab; pull plug body, never pull the wires. |
| Step 4 | Remove Sensor | Screwdriver / Torx bit | Put screws in a safe tray; pull sensor out straight and gently. |
| Step 5 | Spray Clean | MAF Sensor Cleaner | Spray wires from multiple angles; never touch wires with tools. |
| Step 6 | Dry Time | Air and Patience | Let dry for 15 to 30 minutes; do not apply artificial heat. |
| Step 7 | Housing Clean | Microfiber cloth | Wipe out dust from inside the main plastic intake tube. |
| Step 8 | Reassembly | Screwdriver / Torx bit | Ensure airflow direction arrow points toward the engine. |
| Step 9 | Power and Start | Wrench / Key | Reconnect battery; let car idle smoothly to calibrate. |
| Step 10 | Test Drive | Your car and Road | Drive 10 to 15 miles to check response and clear system codes. |
Long-Term Maintenance and Prevention Tips
Cleaning your Mass Air Flow sensor is an excellent, cost-effective way to fix an active rough idle, but the best approach is to prevent the sensor from getting heavily contaminated in the first place. Incorporating a few simple habits into your regular vehicle maintenance schedule will keep your intake system pristine and ensure your engine runs efficiently for years to come.
Change Your Engine Air Filter Regularly
Your engine air filter is the first and most important line of defense protecting your MAF sensor from the harsh outside world. A worn-out, torn, or completely clogged air filter allows dirty air to bypass the filtration element entirely, sending a constant stream of gritty road dust directly onto your delicate sensor wires.
Inspect your engine air filter every time you change your engine oil, or roughly every five thousand to seven thousand miles. If you hold the filter up to a bright light and cannot see light passing through the paper pleats, or if the filter looks gray, dusty, and full of debris, replace it immediately with a high-quality aftermarket or factory replacement filter. Changing your air filter regularly is a simple habit that extends the life of your sensor significantly.
Be Extremely Careful with Oiled Performance Air Filters
Many automotive enthusiasts enjoy installing reusable fabric air filters because they can provide excellent airflow and last the lifetime of the vehicle. These filters rely on a special sticky oil applied to the cotton gauze to trap microscopic dust particles.
While these filters are highly effective when serviced correctly, they are the number one cause of premature MAF sensor contamination. When car owners wash these filters, they often apply far too much oil during the re-oiling process. When you start the engine, the high-velocity air rushing through the filter pulls the excess oil out of the fabric and sprays it directly onto the MAF sensor wires.
If you use a washable filter, always follow the manufacturer instructions exactly. Apply the oil sparingly, and let the filter sit on a workbench for several hours or overnight to allow the oil to wick completely into the fabric before installing it back into your vehicle intake box.
Clean the MAF Sensor Preventatively
You do not have to wait for your car to start shaking violently at traffic lights to clean your sensor. A fantastic practice is to clean your Mass Air Flow sensor preventatively every single time you replace your engine air filter.
Since you already have to open up the air filter housing to swap the filter, the sensor is completely exposed and easily accessible. Taking an extra five minutes to give the sensor wires a quick rinse with your specialized spray cleaner ensures that dirt never has the chance to build up and form a thick, heat-insulating crust.
Check for Intake Air Leaks
Sometimes, a rough idle persists even after you have cleaned your MAF sensor perfectly. If this happens, you might have an unmetered air leak, often called a vacuum leak, somewhere in your intake system.
If there is a crack, tear, or loose connection in the rubber intake hose located after the MAF sensor but before the engine throttle body, outside air will get sucked directly into the engine through that crack. Because this extra air bypassed the sensor entirely, the MAF sensor never measured it, and the computer cannot add the correct amount of fuel to balance it out. Inspect your rubber intake hoses carefully for dry rot, fine cracks in the flexible accordion folds, and loose hose clamps. Replacing a cracked rubber hose can instantly fix a lingering rough idle.
Frequently Asked Questions
Can I use electronics cleaner or rubbing alcohol if I do not have specific MAF cleaner?
No, you should never use regular electronics cleaner, rubbing alcohol, brake cleaner, or carburetor cleaner to clean a Mass Air Flow sensor. While electronics cleaner might seem like a safe alternative, many brands contain chemical solvents that can degrade or dissolve the sensitive plastics used to build automotive sensor housings. Furthermore, some electronics cleaners leave behind a microscopic anti-corrosive lubricant residue. While that lubricant is fantastic for volume knobs or computer switches, it will coat your MAF sensor wires, instantly bake onto the hot metal, trap dust, and make your rough idle significantly worse than it was before. Dedicated MAF cleaner is uniquely engineered to clean thoroughly and dry instantly without leaving any residue whatsoever.
How often should I clean my Mass Air Flow sensor to prevent a rough idle?
A good rule of thumb is to clean your Mass Air Flow sensor every six months or every time you replace your engine air filter, which typically happens every twelve thousand to fifteen thousand miles for most average drivers. If you frequently drive on dirt roads, through dusty construction zones, or in highly polluted urban areas, your sensor will get dirty much faster, and you may want to clean it every time you change your engine oil. Incorporating this quick task into your routine maintenance prevents grime from baking onto the wires, preserving your smooth idle and maximizing your fuel economy.
Is it possible to permanently break the sensor while trying to clean it?
Yes, it is entirely possible to break the sensor if you do not follow the safety rules carefully. The internal components of a Mass Air Flow sensor are microscopic and incredibly fragile. The most common way people destroy their sensors is by attempting to physically scrub the wires using a cotton swab, a small brush, or a soft cloth. The physical pressure from these items will snap or bend the wires instantly, requiring you to purchase an expensive new replacement module. You can also damage the sensor by spraying it with high-pressure compressed air or failing to let it dry completely before turning on the car ignition. As long as you stick strictly to using the chemical spray action of the cleaner and let it air dry naturally, your sensor will remain completely safe.
What should I do if cleaning the MAF sensor does not fix my rough idle?
If you have thoroughly cleaned your sensor, allowed it to dry, reinstalled it correctly, and your vehicle still suffers from a rough idle, the issue likely lies elsewhere in your engine management system. A rough idle can be caused by a variety of interconnected components. You should check for vacuum leaks, which are cracks or tears in the rubber intake hoses that allow unmetered air into the engine. Other common culprits include fouled or worn-out spark plugs, clogged fuel injectors, a dirty throttle body plate, or a failing idle air control valve. If your check engine light is still illuminated, visit a local auto parts store to have them scan the specific error codes, which will give you a clear roadmap to locate the true problem.
Why does my car run worse or stall immediately after I cleaned the sensor?
If your car runs worse, sputters, or refuses to stay running immediately after you complete the cleaning process, there are usually three common mistakes to check for. First, make sure you allowed the sensor to dry completely. If the internal wires are still damp with liquid cleaner when you turn the key, the sensor cannot read airflow correctly and will send scrambled data to the computer. Second, verify that you installed the sensor in the correct direction. If you accidentally put the sensor or the housing tube in backward, the airflow arrow will point the wrong way, confusing the computer completely. Finally, double-check that you plugged the electrical wiring harness connector in firmly until it clicked, and ensure you did not leave any loose hose clamps that could create a massive air leak.


