Imagine you are driving down the road, listening to your favorite music, and enjoying a perfect afternoon. Suddenly, a bright amber light pops up on your dashboard. It is the dreaded check engine light. Your heart sinks a little bit. You might start wondering how much this unexpected surprise is going to cost you at the local repair shop.
Before you panic or rush to schedule an expensive mechanic appointment, take a deep breath. Very often, that warning light is caused by a tiny but incredibly important part called an oxygen sensor. More specifically, it is often the upstream oxygen sensor that needs some attention.
Replacing this part yourself is completely doable, even if you have never worked on a car before. This detailed guide will walk you through the entire process from start to finish. You will learn what this part does, how to figure out if it is broken, and exactly how to swap it out for a new one. By the end of this guide, you will feel like a confident backyard mechanic, and you will save a significant amount of money along the way.
Understanding Your Vehicle Oxygen Sensor
To fix a problem, it helps enormously to understand how the part works and why your vehicle relies on it. Your car engine is essentially a giant air pump that burns a mixture of gasoline and oxygen. To run efficiently, keep power high, and keep emissions low, the engine needs a very specific ratio of air to fuel.
What Does the Upstream Sensor Do
The upstream oxygen sensor, which people frequently call the sensor one, lives in your exhaust system before the catalytic converter. Its primary job is to spy on the exhaust gases coming straight out of the engine cylinders. It measures how much unburned oxygen is left over after the combustion process.
The sensor turns this measurement into a tiny electrical voltage signal and sends it directly to your vehicle computer. If the exhaust has too much oxygen, the engine is running lean, meaning it has too much air and not enough fuel. If there is too little oxygen, the engine is running rich, meaning it has too much fuel and not enough air. The computer reads this information constantly and adjusts the fuel injectors in real time to keep the balance perfect.
Upstream Versus Downstream Sensors
Most modern vehicles have at least two oxygen sensors, and some have four or more depending on how many cylinders the engine has. It is vital not to mix up the upstream and downstream sensors because they perform totally different jobs.
The upstream sensor sits before the catalytic converter, which is the big metal canister that cleans up exhaust pollution. This sensor is the active manager that tells the engine computer how to adjust the fuel mix.
The downstream sensor sits after the catalytic converter. Its only job is to monitor how well the catalytic converter is cleaning the exhaust. It does not control how the engine runs. Because the upstream sensor is constantly subjected to raw, hot exhaust gases right out of the engine, it tends to wear out much faster than the downstream one.
The Science of the Sensor
Inside that small metal plug is a ceramic element coated with platinum. When this element gets extremely hot, it reacts chemically with the oxygen molecules in the exhaust. This chemical reaction generates a small electrical voltage, usually fluctuating between 0.1 volts and 0.9 volts.
When the sensor gets old, covered in soot, or damaged by oil, it loses its ability to create this voltage accurately or quickly. When that happens, your engine computer is essentially forced to operate in the dark, guessing how much fuel to use based on pre-programmed estimates rather than real-time conditions.
Symptoms of a Failing Upstream Oxygen Sensor
Your car is excellent at communicating when something goes wrong. If your upstream oxygen sensor is starting to fail, you will likely notice several distinct warning signs. Paying attention to these clues early can prevent more severe damage to other engine components.
The Check Engine Light
The most obvious clue is that bright warning light on your dashboard. Your vehicle computer constantly runs self-checks on every sensor. If the upstream oxygen sensor stops sending a signal, sends a signal that makes no sense, or reacts too slowly, the computer immediately turns on the check engine light.
While many different issues can trigger this light, an oxygen sensor code is among the most common reasons. You can pinpoint this exactly by reading the trouble codes, which we will discuss later.
Poor Fuel Economy
Have you noticed that you are visiting the gas station much more often than usual? A bad upstream sensor often defaults to telling the computer that the engine is running lean, even when it is not.
To protect the engine, the computer responds by dumping extra gasoline into the cylinders. This causes your fuel economy to plummet. You might find yourself losing several miles per gallon suddenly, which adds up to a lot of wasted money over time.
Rough Idle and Engine Misfires
When the air-to-fuel ratio is incorrect, your engine will struggle to run smoothly. When you are sitting at a red light or idling in a parking lot, you might feel the car shake, vibrate, or stumble.
The engine speed might bounce up and down on the dashboard gauge. In severe cases, the incorrect fuel mixture can cause engine misfires, making the vehicle jerk or feel incredibly sluggish when you try to accelerate.
Black Smoke and Foul Odors
When an engine burns way too much fuel because of a faulty sensor, that unburned gasoline has to go somewhere. It gets pushed out into the exhaust system.
You might notice black smoke coming out of your tailpipe when you accelerate. You might also notice a strong, unpleasant smell that resembles rotten eggs or sulfur. This smell indicates that the excess fuel is overloading and overheating your catalytic converter, which can ruin it completely if left ignored.
Essential Tools and Materials
Before you roll up your sleeves and get your hands dirty, you need to gather your gear. Having everything ready ahead of time ensures you will not have to stop halfway through the job to run to the store.
Safety Equipment
Safety must always come first when you are working on a mechanical project. You will be working around heavy machinery and potentially sharp metal components.
- Safety Glasses: These protect your eyes from falling rust, dirt, and dripping fluids under the vehicle.
- Mechanic Gloves: Heavy-duty gloves protect your knuckles from scrapes and insulate your hands against residual engine heat.
- Jack Stands: Never, under any circumstances, crawl under a vehicle supported only by a hydraulic floor jack. You need heavy-duty jack stands to securely hold the weight of the vehicle.
- Wheel Chocks: Place these behind the tires remaining on the ground to stop the vehicle from rolling while you work.
Diagnostic Tools
To figure out exactly what is wrong, you need a way to talk to your car computer.
- OBD2 Scanner: This is a small electronic tool that plugs into a port under your dashboard. It reads the specific error codes stored by your car computer. You can find affordable basic scanners online, or you can borrow one for free at most local auto parts stores.
- Digital Multimeter: This device measures electrical voltage, resistance, and current. You will use it to test the actual electrical signals coming out of your old sensor to prove it is broken.
Hand Tools for the Job
Removing an oxygen sensor requires a few specific items because these parts live in a very harsh, hot environment and get rusted into place.
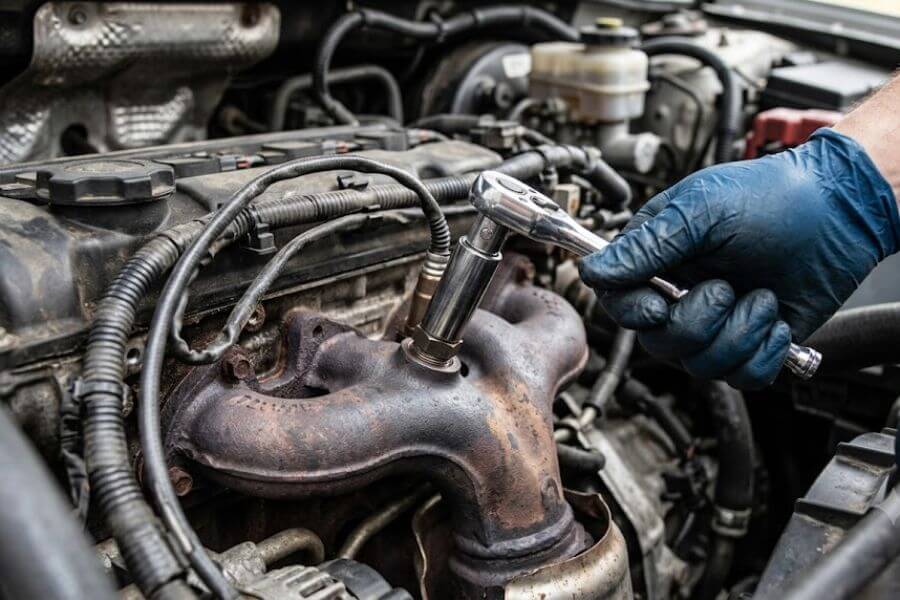
- Oxygen Sensor Socket: This is a special, heavy-duty deep socket that features a cutout slot running down the side. This slot allows you to slide the socket directly over the sensor body without pinching or cutting the attached electrical wires.
- Ratchet Wrench and Breaker Bar: A standard long ratchet handle provides leverage, but a long breaker bar provides extra twisting force for stubborn, rusted sensors.
- Penetrating Oil: A high-quality rust-penetrating spray is your absolute best friend for this project. It seeps into the tight threads to loosen years of heat-induced rust.
- Anti-Seize Lubricant: This special metallic paste goes onto the threads of your new sensor. It ensures that the new part will not fuse to the exhaust pipe, making it possible to remove in the future if necessary.
- Wire Brush: Useful for cleaning away loose rust and debris around the mounting area before you install the new part.
Step-by-Step Diagnostic and Testing Process
Just because a check engine light indicates an oxygen sensor issue does not mean you should blindly buy a new part. Sometimes a broken wire, a blown fuse, or an engine vacuum leak can trick the computer into throwing an oxygen sensor code. Testing the sensor first ensures you are fixing the actual problem.
Step 1: Read the Trouble Codes
Locate the OBD2 port under your driver-side dashboard. It looks like a wide, plastic plug receptor. Plug your OBD2 scanner into this port, and turn your vehicle ignition key to the run position without starting the engine.
Follow the on-screen prompts on your scanner to read codes. Write down any codes that appear. Here is a helpful guide to common codes you might see:
| Diagnostic Trouble Code | What It Means |
| P0130 | Upstream Oxygen Sensor Circuit Malfunction |
| P0131 | Upstream Oxygen Sensor Low Voltage (Lean Signal) |
| P0132 | Upstream Oxygen Sensor High Voltage (Rich Signal) |
| P0133 | Upstream Oxygen Sensor Slow Response |
| P0134 | Upstream Oxygen Sensor Circuit No Activity Detected |
| P0135 | Upstream Oxygen Sensor Heater Circuit Malfunction |
If you see codes ranging from P0130 to P0135, you have confirmed that the problem lies specifically with Bank 1, Sensor 1, which is your upstream sensor. If your car has a V6 or V8 engine, you might see codes from P0150 to P0155, which point to Bank 2, Sensor 1. Bank 1 is always the side of the engine that contains the number one cylinder.
Step 2: Visual Inspection
Pop the hood of your vehicle, secure it safely, and locate the upstream oxygen sensor. It looks similar to a metal spark plug screwed directly into the thick exhaust manifold pipe before the catalytic converter.
Carefully look at the wires leading away from the sensor. Are they melted from touching the hot exhaust? Are they frayed, cut, or chewed by pests? Check the plastic electrical connector to ensure it is snapped tightly into place and not corroded or full of dirt. If the wires are physically ruined, the sensor cannot communicate with the computer.
Step 3: Bench Testing the Internal Heater
Most modern oxygen sensors contain an internal heating element. This heater warms up the sensor rapidly when you first start the car, allowing it to begin working within seconds rather than waiting for the entire engine to get hot. If this heater breaks, the sensor will throw a code.
To test the heater, disconnect the plastic electrical plug. Set your digital multimeter to measure resistance, which is indicated by the Omega symbol ($\Omega$). Look up your vehicle specific wiring diagram to identify the two heater wires, which are usually the same color, often white or black.
Touch your multimeter probes to the corresponding metal terminals inside the disconnected sensor plug. A healthy heating element should show a low resistance reading, usually between 2 and 30 ohms. If your multimeter displays an infinity reading, an open circuit icon, or zero resistance, the internal heating wire is snapped, and you must replace the sensor.
Step 4: Live Voltage Testing
If the heater passes inspection, you can test the actual live voltage output of the sensor. Reconnect the electrical plug. To test the voltage while the engine runs, you will need to perform a back-probe method, sliding thin pins into the rear of the plastic connector to touch the wires, or use a scanner that shows live data stream graphics.
Set your multimeter to measure low direct current voltage ($DC\ V$). Start the vehicle and let it idle for several minutes until it reaches normal operating temperature. Touch your positive multimeter probe to the sensor signal wire terminal and the negative probe to a clean metal spot on the car frame for a ground connection.
Watch the numbers closely. A properly functioning upstream sensor should constantly and rapidly bounce back and forth between roughly 0.1 volts and 0.9 volts. This rapid dancing shows the sensor is actively responding to changing exhaust conditions. If the voltage stays completely frozen at one number, such as exactly 0.45 volts, or moves incredibly sluggishly over several seconds, the sensor is dead or dying.
Detailed Removal Procedure
Now that your diagnosis has proven that the upstream oxygen sensor is truly faulty, it is time to remove it. Because these parts experience extreme temperature swings, they like to weld themselves into place with rust. Following these steps carefully prevents you from breaking things or stripping the delicate threads.
Step 1: Prep and Safety Setup
park your vehicle on a completely flat, hard concrete surface. Park your car, engage the emergency parking brake firmly, and place wheel chocks behind the rear tires. If you need to lift the vehicle to reach the exhaust pipe, use a high-quality hydraulic jack to lift the front end, then lower it carefully onto heavy-duty jack stands. Shake the vehicle gently to verify it is absolutely rock-solid before climbing underneath.
Crucial Warning: Never attempt this job right after driving. The exhaust system can reach temperatures over 1000 degrees Fahrenheit. Let the vehicle sit for at least two to three hours until the exhaust pipes are completely cool to the touch.
Step 2: Apply Penetrating Oil
Locate the stubborn sensor. Spray a generous amount of high-quality penetrating oil right around the base of the sensor where the metal threads screw into the exhaust pipe.
Allow the oil to sit and soak into the threads for at least fifteen to twenty minutes. If your car is older or heavily rusted from winter road salt, apply a second coat and wait a little longer. This step softens the rust and prevents the sensor from stripping the threads out of your expensive exhaust pipe during removal.
Step 3: Disconnect the Electrical Harness
Follow the wire leading out from the top of the sensor up to where it connects to the main vehicle wiring harness. This plastic plug features a locking tab to prevent it from vibrating loose while driving.
Press down firmly on the plastic locking clip with your thumb or a small flathead screwdriver, then gently pull the two halves of the plug apart. Do not yank on the actual wires, or you could tear them out of the plastic housing.
Step 4: Position the Specialty Socket
Take your dedicated oxygen sensor socket and slide the attached electrical wire through the long cutout slot in the side of the socket. Lower the socket down over the body of the sensor until it seats securely and squarely over the hexagonal metal nut base. Ensure the socket is pushed all the way down so it does not slip and round off the corners of the nut.
Step 5: Break the Rust Loose
Attach your long breaker bar or a heavy-duty ratchet handle to the socket. Ensure you are turning the wrench counter-clockwise, which is the standard direction to loosen a bolt. Apply smooth, firm, steady pressure. Do not jerk or hit the wrench violently with a hammer, as this sudden shock can snap the sensor body completely off, leaving the threaded core stuck inside the pipe.
As you apply steady force, you should feel the rust break with a distinct pop. Once it breaks loose, use your regular ratchet or turn the socket by hand to carefully unscrew the old sensor completely out of the port hole.
Installing the New Upstream Sensor
With the old, worn-out part successfully removed, you are past the hardest part of the project. Now you can focus on installing the fresh new component properly to ensure it lasts for tens of thousands of miles.
Step 1: Compare the Old and New Parts
Hold your old sensor side by side with your replacement part. Verify that the overall length of the metal body matches, that the threaded end is the exact same diameter, and that the plastic electrical plug matches perfectly. Count the number of wires on both parts to ensure they are identical.
Step 2: Clean the Exhaust Threads
Look inside the threaded hole on your exhaust pipe where the sensor lives. Use a small wire brush or a clean cloth to wipe away any loose flakes of rust, carbon soot, or debris. Clean threads ensure the new sensor seats flush and seals tightly, preventing dangerous exhaust leaks.
Step 3: Apply Anti-Seize Lubricant
Many high-quality replacement sensors come with a small amount of metallic anti-seize paste already pre-applied to the threads out of the box. If yours does not, apply a very small dab of copper or nickel anti-seize compound around the threads of the new sensor.
Important Precaution: Keep the anti-seize paste strictly on the metal threads. Do not let any of the paste touch the slotted metal tip or the small holes at the top end of the sensor. If this grease gets onto the inner element, it will contaminate and instantly ruin your brand-new sensor.
Step 4: Hand-Thread the Sensor
Carefully insert the new sensor into the exhaust port hole. Begin spinning it clockwise using only your fingers. Threading the part by hand for the first few full turns ensures that the threads are aligned perfectly. If you feel sudden resistance after only half a turn, stop immediately. You are cross-threading the part, which will destroy the delicate threads. Back it out and try again until it spins smoothly by hand.
Step 5: Torque to Specification
Once the sensor is snug against the pipe, slide your special oxygen sensor socket back over the body and wires. Attach a torque wrench to the socket. Tighten the sensor to the manufacturer specified torque setting, which is typically found in your repair manual and usually ranges between 30 and 35 foot-pounds.
If you do not own a torque wrench, tighten the sensor with a regular wrench until it is snug, then give it an additional quarter to half turn to crush the metal sealing washer tightly against the exhaust pipe. Do not over-tighten, or you will distort the housing.
Step 6: Route and Connect the Wiring
Route the electrical wire along the exact same path the original wire took. Make sure the wire is not twisted tightly and has a bit of slack so it can move as the engine moves on its rubber mounts.
Keep the wire clear of sharp metal edges and away from the hot exhaust pipe. Push the new plastic plug firmly into the vehicle engine wiring harness connector until you hear a solid, reassuring click. This click confirms that the safety locking tab has engaged.
Verifying the Repair
Your new part is installed, but your job is not quite done until you confirm that the vehicle computer recognizes the fix and that the engine is running correctly.
Step 1: Clear the Fault Codes
Remove your tools from under the car, remove the jack stands, and lower the vehicle safely back down to the ground. Plug your OBD2 scanner back into the diagnostic port under the dashboard. Turn the key to the run position. Navigate to the code clearing menu on your scanner and press enter to wipe the old trouble codes out of the computer temporary memory. This will turn off the check engine light on your dashboard.
Step 2: Initial Engine Test Run
Ensure the vehicle transmission is in park or neutral with the emergency brake set. Start the engine. Let the vehicle idle while you step outside and listen closely near the area where you installed the sensor. You should not hear any ticking or blowing sounds, which would indicate an exhaust leak around the new threads. Look underneath to make sure no wires are drooping down toward hot components.
Step 3: Perform a Drive Cycle
Your vehicle computer needs time to relearn its fuel strategies with the new sensor sending fresh data. Take the vehicle out for a twenty to thirty minute test drive. Mix up your driving style by spending some time stop-and-go in residential neighborhoods, followed by at least fifteen continuous minutes at highway speeds.
This mix of driving completes what mechanics call a drive cycle, allowing the computer internal monitor programs to run their diagnostic checks. If your check engine light remains off and your car accelerates smoothly without stumbling, your project is a complete success.
Frequently Asked Questions
Can I drive my vehicle with a broken upstream oxygen sensor?
You can technically drive your vehicle with a broken upstream oxygen sensor for a short period, but it is highly inadvisable to do so for long. When the sensor fails, the engine computer loses its ability to accurately measure the air-to-fuel ratio. The computer defaults to a safe operating mode that injects an excessive amount of fuel into the engine to prevent damage from running lean.
Driving in this state causes severe fuel inefficiency, costing you extra money at the pump. More importantly, all that unburned excess fuel travels down your exhaust system and enters your catalytic converter. This causes the catalytic converter to overheat drastically, which can melt its internal ceramic structure within a few weeks. Replacing a ruined catalytic converter is significantly more expensive than replacing an oxygen sensor early.
Why is my new oxygen sensor throwing the exact same error code after installation?
If you installed a new sensor and the check engine light returns with the exact same trouble code, it usually means the sensor itself was not the root cause of the failure. Remember that the computer monitors the entire electrical circuit, not just the physical plug. A broken or melted wire further up the harness, a corroded ground connection, or a blown fuse dedicated to the oxygen sensor heater circuit can trigger the code.
Additionally, an engine issue such as a cracked vacuum line, an exhaust manifold leak right upstream of the sensor, or a leaking fuel injector can introduce extra air or fuel that forces the sensor completely outside its normal operating range. The computer sees this extreme reading and assumes the sensor is broken, when the sensor is actually just reporting a real engine problem.
What is the difference between an oxygen sensor and an air-fuel ratio sensor?
While they look almost identical from the outside and live in the same location, traditional oxygen sensors and modern air-fuel ratio sensors operate differently. A traditional oxygen sensor works like a narrow-band switch. It can only tell the computer whether the engine is running too rich or too lean, bouncing back and forth like a pendulum.
An air-fuel ratio sensor, often called a wide-band sensor, is much more sophisticated. It measures the exact amount of oxygen in the exhaust linearly. This allows it to tell the computer precisely how rich or how lean the engine is running. Vehicles with wide-band sensors can adjust their fuel mixtures with incredible precision. You must always replace your faulty sensor with the exact type originally specified for your vehicle, as they are not interchangeable.
How long do upstream oxygen sensors usually last before wearing out?
In most modern vehicles, an upstream oxygen sensor is designed to last between 60,000 and 100,000 miles. Over time, the internal ceramic element is subjected to millions of heating and cooling cycles, alongside constant exposure to harsh exhaust chemicals, which naturally degrades its sensitivity.
However, certain engine problems can cause a sensor to fail prematurely. If your engine burns oil due to worn piston rings or valve seals, or if internal coolant leaks into the combustion chamber from a blown head gasket, those fluids leave heavy chemical deposits on the sensor tip. This instantly coats the sensor, blocking the exhaust gases from reaching the measuring element and ruining the part long before its normal lifespan.
Can I clean a dirty oxygen sensor instead of replacing it?
Attempting to clean a dirty oxygen sensor with chemicals like brake cleaner, gasoline, or an aerosol spray is generally ineffective and can actually cause further damage. The delicate platinum plating on the internal ceramic element is incredibly sensitive to chemical contamination.
While spraying the outside might remove surface soot, it cannot restore the chemically degraded components deep inside the metal housing. Given the amount of time and effort required to safely raise your car and remove the stubborn sensor, installing a reliable new component is always the smart choice to ensure your engine runs efficiently and your check engine light stays off for years to come.
