
Picture this: You are sitting in the driver’s seat, you turn the key or push the start button, and instead of that smooth, familiar purr, your car shudders. The engine stumbles. Maybe the check engine light flashes on the dashboard like an angry little orange beacon. Your heart sinks a bit because you start thinking about mechanics, towing trucks, and massive repair bills that could drain your fun fund.
But hold on a second. Do not panic, and do not reach for your phone to call a repair shop just yet. You can handle this yourself right in your own driveway or garage.
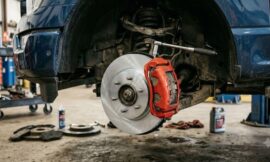
Most of the time, a sputtering engine is just crying out for a fresh set of spark plugs and brand-new ignition coils. If you drive a modern car, crossover, or minivan with a transverse V6 engine, this project is the ultimate badge of honor for a backyard mechanic. It looks intimidating when you first lift the hood, but by breaking it down step by step, you can master this job.
This guide will walk you through every single turn of the wrench, every hidden bolt, and every secret trick to make your V6 engine run like it just rolled off the factory floor. Grab your favorite snacks, put on some good music, and let us dive into the wonderful world of DIY garage therapy.
What on Earth is a Transverse V6 Engine Anyway?
Before you start grabbling for tools, it helps to understand what you are actually looking at when you pop the hood. Vehicles come in all shapes and sizes, and their engines are placed inside the engine bay in two main ways: longitudinal and transverse.
A longitudinal engine sits front-to-back. If you stand in front of the bumper, the engine looks like a long block pointing straight at you. This setup is super common in big trucks and rear-wheel-drive sports cars. It gives you tons of room on both sides of the engine block to reach components.
A transverse engine is a completely different story. It is mounted sideways. This means the front of the engine is actually facing the passenger-side wheel arch, and the back of the engine is facing the driver-side wheel arch. Car manufacturers love this design for front-wheel-drive cars, minivans, and compact SUVs because it saves an incredible amount of space. By turning the engine sideways, engineers can shrink the front end of the vehicle and create way more room inside the cabin for you and your friends.
But there is a catch. Because a V6 engine has two sides (or banks) of three cylinders shaped like a letter “V”, turning it sideways creates a unique challenge for maintenance.
- The Front Bank (Cylinders 2, 4, 6): This side of the engine faces the radiator at the very front of your car. It is staring right at you when you open the hood. You have wide open spaces here, making it a total breeze to work on.
- The Rear Bank (Cylinders 1, 3, 5): This side faces the dashboard and the inside of the cabin. It is completely buried underneath a huge metal or plastic air intake piece called the plenum or intake manifold.
Because the rear bank is tucked away in the shadows under that heavy intake manifold, many people get scared away from ever trying to change their own plugs. But do not let that hidden rear bank fool you. Once you learn how to carefully remove that top intake layer, the job becomes a straightforward puzzle that anyone can solve with a little patience.
The Science Behind the Spark: Why These Parts Matter
To feel truly confident while working, you should know exactly what these parts do for your vehicle. Your engine runs on a series of tiny, perfectly timed controlled explosions. Air and gasoline mix together inside the cylinders, and that mixture needs to ignite to push the pistons down and turn your wheels.
Your car battery only outputs twelve volts of electrical power. Twelve volts is fine for charging your phone or blasting the radio, but it is nowhere near strong enough to create an electrical spark through a dense cloud of fuel and compressed air.
This is where the ignition coil comes to the rescue. The ignition coil acts like a massive power amplifier. It takes that small twelve-volt electrical signal from your battery and converts it into a mind-boggling thirty thousand to fifty thousand volts of pure electrical energy.
Once that massive surge of voltage is created, the ignition coil passes it directly down into the spark plug. The spark plug has a tiny metal tip with a small gap at the bottom. When the thousands of volts of electricity reach that gap, the power jumps across the empty space, creating a bright blue bolt of artificial lightning. That tiny lightning bolt ignites the fuel, creates the power stroke, and sends you cruising down the highway.
Over time, these parts wear down. Spark plugs endure millions of intense explosions and extreme heat cycles. The metal tips slowly erode away, making the gap wider and wider. If the gap gets too wide, the electricity cannot jump across it anymore.
At the same time, ignition coils are subject to intense engine heat and constant electrical stress. The internal wiring can degrade, or the rubber boot that seals the spark plug can crack, allowing electricity to leak out into the engine block instead of traveling to the plug. When this happens, you get a condition called a misfire, which causes your car to shake, lose acceleration power, and waste gas. Replacing them together restores perfect harmony to your engine.
Gathering Your Gear: The Ultimate Tool and Parts Checklist
You do not want to be stuck halfway through a project with your engine completely torn apart only to realize you are missing a specific tool. Taking the time to gather everything beforehand keeps you organized, calm, and in total control. Here is a comprehensive breakdown of everything you will need to get this job done from start to finish.
Safety First: Essential Protective Equipment
Working on cars is an amazing hobby, but protecting your body is always the number one priority. Never skip out on basic safety gear.
- Mechanic Gloves: A good pair of form-fitting gloves protects your knuckles from sharp metal edges under the hood and keeps grease from soaking into your skin.
- Safety Glasses: You will be spraying cleaning fluids and working around flying debris or hidden dust. Keep your eyes shielded at all times.
- Closed-Toe Shoes: Dropping a heavy metal socket wrench on a bare foot can ruin your entire weekend. Wear sturdy boots or old sneakers.
The Mechanical Tool Box
You do not need a multi-thousand-dollar tool chest to accomplish this task. A standard mechanic socket set combined with a few specialized items will work beautifully.
- Socket Wrenches (Ratchets): A three-eighths-inch drive ratchet is the sweet spot for automotive work. Having a smaller one-quarter-inch ratchet is also fantastic for those tiny, tight bolts around wire brackets.
- Socket Extensions: You will need a variety of extension bars (three-inch, six-inch, and ten-inch lengths). These allow your wrench to reach deep down into the engine valleys where the spark plugs live.
- Metric Socket Set: Most modern cars use metric fasteners. Make sure you have sizes ranging from eight millimeters up to fifteen millimeters.
- Specialized Spark Plug Socket: A standard deep socket will not work well here. You need a dedicated spark plug socket (usually five-eighths of an inch or thirteen-sixteenths of an inch). These special sockets have a rubber insert or a strong magnet inside that grips the porcelain body of the spark plug, preventing it from dropping and breaking when you pull it out.
- Torque Wrench: This is a non-negotiable tool for this job. A torque wrench allows you to tighten bolts to an exact measurement specified by the car manufacturer. Overtightening can strip the soft aluminum threads inside your engine, while undertightening can cause parts to rattle loose.
- Pliers and Screwdrivers: A pair of needle-nose pliers is excellent for squeezing stubborn plastic wire clips, and a flat-head screwdriver helps pry off vacuum hoses.
Crucial Chemical Helpers and Replacement Parts
The correct fluids and replacement pieces make all the difference between a smooth installation and a frustrating headache.
- New Spark Plugs: Always purchase the exact type of plug recommended by your vehicle owner manual. For modern V6 engines, iridium or platinum plugs are standard because they last for an incredibly long time and handle heat exceptionally well.
- New Ignition Coils: Buy a complete matching set of six coils. If one coil is failing, the other five have lived through the exact same mileage and stress, meaning they will likely fail soon too. Replacing them all at once saves you from having to tear the engine apart a second time next month.
- Dielectric Grease: This is a clear, silicone-based grease that does not conduct electricity. You apply a tiny dab inside the rubber boot of the new ignition coils. It stops moisture from getting inside and prevents the rubber from fusing to the spark plug over time.
- Anti-Seize Lubricant: A silver or copper paste applied very sparingly to the metal threads of the spark plugs. It ensures that the steel threads of the plug do not permanently bind or weld themselves to the aluminum engine head.
- Throttle Body Cleaner or Brake Cleaner: Excellent for blasting away carbon buildup and grease from the metal parts you remove.
- New Intake Manifold Gaskets: Since you have to lift the upper intake manifold to reach the back three spark plugs, you must replace the rubber gaskets underneath it. Reusing old, squished gaskets causes air leaks, which will make your engine run terribly.
Setting Up Your Workspace for Success
Before you touch a single bolt, you need to prepare your environment. A clean, organized workspace prevents mistakes, keeps you focused, and guarantees that no rogue screws find their way into places they should not be.
Preparing the Vehicle
First, park your vehicle on a flat, level surface like a garage floor or a flat driveway. Pull the emergency parking brake up as tightly as possible to ensure the vehicle cannot roll anywhere.
Open the hood and secure it safely with the prop rod, or verify that the hood struts are holding it up firmly. If you are working outside, try to choose a clear day with no rain or high winds that could blow leaves and dirt into your open engine.
Crucial Rule: Never work on a hot engine. If you just drove the car, let it sit for at least two hours until the metal parts are completely cool to the touch. Aluminum engine parts expand when they are hot. If you try to remove spark plugs from a hot aluminum cylinder head, you can easily strip out the delicate metal threads, leading to an incredibly expensive repair shop fix.
Disconnecting the Battery Power
Whenever you perform work on an engine that involves electrical systems, you must cut the power. You do not want any accidental short circuits or surprise sparks while you are holding metal tools.
Locate your car battery. Use a small wrench (usually ten millimeters) to loosen the nut on the negative battery terminal cable. The negative terminal is marked with a minus sign (-) and usually has a black cable. Slide the cable completely off the metal post and tuck it down to the side where it cannot accidentally bounce back up and touch the battery post.
Organizing Your Parts and Hardware
As you take pieces off the engine, you will end up with dozens of different bolts, nuts, and brackets. If you just throw them all into a big pile on the ground, you will have a nightmare trying to figure out where they go when it is time to rebuild everything.
Get a large piece of cardboard or a few plastic sandwich bags. Label each bag or section of cardboard with a marker (such as “Front Bank Bolts,” “Intake Manifold Screws,” or “Vacuum Hose Brackets”).
When you remove a bolt, place it directly into its matching bag. Another fantastic trick is to take photos with your smartphone before and after every single step. If you forget how a wire harness was routed or where a hose attached, you can just flip through your photos to see exactly how it looked originally.
Step-by-Step Breakdown: The Front Bank (The Easy Side)
We will start with the front bank of cylinders because it is wide open and easy to see. This lets you practice the basic technique of swapping a spark plug and coil before you tackle the more complex rear bank.
   [ FRONT OF VEHICLE / RADIATOR ]
-----------------------------------------
   Coil/Plug #2    Coil/Plug #4    Coil/Plug #6  <-- Wide open, easy access!
-----------------------------------------
               ENGINE BLOCK
-----------------------------------------
   Coil/Plug #1    Coil/Plug #3    Coil/Plug #5  <-- Tucked under intake manifold
-----------------------------------------
   [ REAR OF VEHICLE / DASHBOARD ]
Step 1: Removing the Engine Cover
Most modern vehicles feature a decorative plastic cover over the top of the engine. This cover suppresses engine noise and makes things look neat, but it blocks your view of the working components.
Look closely at how your cover is attached. Some covers simply snap into place over rubber studs. For these, you just grip the edges firmly and pull straight up until they pop free. Other covers are held down by a few small nuts or bolts hidden under small plastic caps. Use your socket wrench to remove these fasteners, lift the cover off, and set it aside in a safe spot.
Step 2: Unplugging the Ignition Coil Electrical Harness
Now look down at the cylinder head facing the radiator. You will see three identical plastic blocks lined up in a row. These are your front three ignition coils. Each coil has a bundle of wires plugging into it through a plastic clip connector.
Plastic connectors become very brittle over time due to intense engine heat. Do not yank or pull on the wires themselves. Instead, press down firmly on the little plastic release tab with your thumb or a pair of needle-nose pliers.
While holding the tab down, gently wiggle and slide the plastic plug backward out of the coil. If the connector feels completely stuck, spray a tiny drop of lubricating cleaner into the seam to help it slide apart smoothly. Repeat this for all three front coils.
Step 3: Extracting the Ignition Coil
Each ignition coil is held firmly down onto the engine block by a single bolt (usually a ten-millimeter bolt). Use your socket wrench to remove this bolt completely and drop it into your labeled parts bag.
Once the bolt is gone, grab the top of the ignition coil. Twist it slightly left and right to break the seal of the rubber boot inside the spark plug well. Then, pull straight up with a steady, firm motion.
The coil will slide out of the deep tunnel like a sword out of a sheath. Inspect the old coil boot for any signs of cracks, burning, or oily residue, then set it aside.
Step 4: Prepping the Spark Plug Well
Before you lower your spark plug socket down into that dark hole, grab a flashlight and peer inside. You want to make sure there is no dirt, sand, small pebbles, or pooling engine oil sitting at the bottom of the tube.
If there is debris down there, inserting your socket will smash the dirt down into the threads, or worse, the dirt will drop straight into your open engine cylinder once the plug is removed.
Use a can of compressed air or a shop vacuum with a narrow attachment to blast or suck out any unwanted debris from the hole until it is completely clean.
Step 5: Removing the Old Spark Plug
Attach your specialized spark plug socket to a long extension bar and snap it onto your ratchet. Lower the socket straight down into the deep well until you feel it slide over the hexagonal metal nut portion of the spark plug. Press down gently to ensure the rubber insert or magnet inside the socket gets a secure grip on the plug.
Turn your ratchet counterclockwise (to the left) to loosen the plug. It might take a bit of force to break it loose initially, and you might hear a small squeak. Keep spinning the ratchet smoothly until the plug is completely unthreaded.
Lift your extension bar straight up out of the hole. Because of your specialized socket, the old spark plug will come out clinging tightly to the tool.
Step 6: Gapping and Preparing the New Spark Plug
Take one of your shiny new spark plugs out of its box. Even though modern plugs come pre-gapped from the factory, they can occasionally get bumped or dropped during shipping, which can smash the delicate metal tip and ruin the gap distance.
Use a dedicated spark plug gap gauge tool to double-check the spacing between the center electrode tip and the curved ground electrode above it. Compare this measurement to the specification listed in your owner manual or on the auto parts store receipt.
Next, apply a tiny, pea-sized bead of anti-seize lubricant onto the metal threads of the new plug. Use your gloved finger to smear the paste evenly across the threads.
Important Warning: Do not get any anti-seize paste on the white porcelain body of the plug or on the metal tip where the spark happens. This will cause the electricity to short out and create a nasty misfire.
       [   ]  <-- White Porcelain Body (Keep Clean!)
      /     \
     |_______|
     |  |||  | <-- Metal Threads (Apply thin layer of anti-seize here)
     |  |||  |
      \_____/
        | |   <-- Spark Electrode Tip (Keep completely clean!)
Step 7: Installing the New Spark Plug
Push the white porcelain end of your new prepped spark plug firmly into your spark plug socket so it stays held in place.
Lower the extension bar straight down into the cylinder well. Do not use your ratchet wrench yet. Instead, turn the extension bar using only your bare fingers clockwise (to the right). By spinning the tool by hand, you can feel exactly how the threads are lining up.
The plug should spin smoothly with almost zero resistance. If it feels stiff or binds up after just one turn, stop immediately. Back it out and try again. This means it was cross-threading, which can ruin your engine block.
Once you have spun the plug by hand as far as it will go, attach your torque wrench to the extension bar. Look up the specific torque rating for your vehicle (usually between ten to fifteen foot-pounds of torque). Tighten the plug slowly until you hear or feel the torque wrench click. This ensures the plug is seated perfectly without stretching the metal.
Step 8: Installing the New Ignition Coil
Grab your matching brand-new ignition coil. Take your tube of dielectric grease and squeeze a tiny amount (about the size of a grain of rice) inside the opening of the long rubber boot at the bottom. Smear it around the inner rim with a clean cotton swab. This grease keeps moisture out and stops the boot from sticking down the road.
Push the new ignition coil straight down over the top of the newly installed spark plug. Press down firmly until you feel it seat securely onto the top tip of the plug.
Line up the mounting bolt hole on the coil with the hole on the engine block. Reinstall the small retaining bolt and snug it up gently with your wrench until it is firm. Do not overtighten this bolt, as the plastic mounting tab on the coil can crack if squished too hard.
Finally, slide the plastic electrical wire harness connector back onto the top plug of the coil. Push it in until you hear a satisfying click sound, which means the locking tab has engaged.
Congratulations, you have just completed your very first cylinder. Repeat these exact steps for the remaining two front cylinders. Once the front row is done, take a deep breath and get ready to conquer the back row.
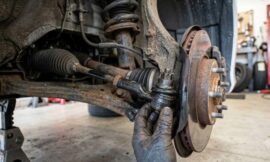
Mastering the Rear Bank: Navigating the Intake Manifold
This is the phase of the project where you truly transform into an advanced home mechanic. The back three cylinders are hiding directly underneath the massive upper intake manifold plenum. To get to them, we need to carefully unbolt and lift this large component out of the way.
Step 1: Clearing the Airways (Intake Piping)
To get the manifold out, you first need to disconnect the large flexible plastic or rubber air duct tubes that connect your vehicle air filter box to the engine engine throttle body.
Use a flat-head screwdriver or a socket to loosen the metal hose clamps holding this large rubber boot in place. Unclip any small breather tubes connected to the sides of this main air duct. Once the clamps are loose, wiggle the large rubber intake pipe off the throttle body and remove it from the car completely. This opens up an incredible amount of visibility and working room.
Step 2: Unplugging Vacuum Hoses and Sensor Wires
The intake manifold is the central hub for many vacuum lines and electrical sensors that help your car monitor airflow. Look around the entire perimeter of the upper manifold for any attached wires or small hoses.
- Label Everything: This is where your labeling skills shine. Use strips of masking tape to label every single hose and wire you remove (such as “Hose A to Back Left,” “Sensor B to Throttle Body”).
- Disconnect Gently: Squeeze hose clamps with your pliers and slide them back, then gently twist the rubber hoses to break their crusty grip before pulling them off. Unplug any electrical connectors from the throttle body and map sensors by releasing their plastic locking clips.
Step 3: Removing Support Brackets
Engineers want to ensure the intake manifold does not vibrate while you drive, so they place sturdy metal support brackets around the back and sides of it. These brackets are often hidden from plain sight.
Feel around the back side of the manifold near the firewall (the wall separating the engine from the interior cabin). You will likely find one or two metal brackets bolted from the engine block to the intake plenum. Use your socket wrench to remove these bolts. Sometimes access is tight here, so using a smaller quarter-inch drive ratchet helps immensely.
Step 4: Unbolting the Upper Intake Manifold
Now look at the very top center of the intake manifold. You will see a pattern of long bolts or nuts running down the middle or around the perimeter holding it down to the lower section of the engine.
Crucial Technique: Look up the removal sequence for your specific car model if possible, or loosen the bolts in a crisscross pattern starting from the outside edge and moving inward. This prevents the large aluminum or plastic manifold from warping due to uneven stress release.
Carefully lift all the long bolts out and place them in their own dedicated parts bag. Double-check that you have not missed any hidden fasteners.
Step 5: Lifting the Manifold and Protecting the Engine
Gently grab the edges of the upper intake manifold and give it a slight wiggle. It should feel loose and ready to lift. If it feels completely rock-solid, stop and look around for a hidden bolt or support bracket you might have missed.
Lift the manifold straight up and away from the engine. Set it down on a soft towel on your workbench or a clean patch of grass so the flat bottom surface does not get scratched.
Now, look down at the engine where the manifold used to sit. You will see six open oval holes leading straight down into the deep core of your engine. These are your intake ports.
Emergency Warning: If a tiny screw, washer, or dirt particle drops down into one of these open intake ports, it will fall straight onto the engine valves and cause catastrophic, engine-destroying damage the moment you start the car.
Immediately take some clean shop towels, microfiber cloths, or clean rags and stuff them firmly into each of those open intake holes. This creates an impenetrable barrier that keeps your engine completely safe while you work on the spark plugs.
       [ OPEN LOWER INTAKE PORTS ]
  ( O )    ( O )    ( O )    ( O )    ( O )    ( O )
    |        |        |        |        |        |
  [STUFF CLEAN RAGS INTO ALL SIX HOLES IMMEDIATELY!]
Step 6: Swapping the Rear Plugs and Coils
With the massive manifold gone, look into the dark recess near the back firewall. You will see the rear three ignition coils lined up and waiting for you.
Because you practiced on the front bank, you are already an expert at this part. Follow the exact same procedure you used before:
- Unplug the plastic wire connector clip.
- Unbolt the coil retaining bolt.
- Pull the old coil straight out.
- Clean out any dust or debris from the deep well tube.
- Unscrew the old spark plug using your specialized socket.
- Check the gap on the new plug and apply a small touch of anti-seize to its threads.
- Hand-thread the new plug in, then torque it to the correct specification.
- Apply dielectric grease to the new coil boot, push it into place, bolt it down, and reconnect the wire harness.
Do this for all three rear cylinders one by one. Take your time, work methodically, and enjoy the process.
Reassembling the Beast: Putting It All Back Together
Now that all six cylinders have brand-new spark plugs and ignition coils installed, it is time to rebuild your engine bay. Reassembly is mostly the exact reverse of disassembly, but there are a few highly critical steps you cannot afford to skip.
Step 1: Gasket Replacement and Preparation
Look at the bottom side of the upper intake manifold you removed, or look at the mating surface on the lower intake block. You will see old rubber gaskets sitting inside a grooved channel.
Use a plastic prying tool or your fingers to pull the old, flattened rubber gaskets out of their tracks. Throw them away.
Take your new intake manifold gaskets out of their packaging. Use a clean cloth sprayed with a bit of throttle body cleaner to wipe down the grooved channels until they are totally free of oil and grit.
Press the new rubber gaskets firmly into the tracks. They should sit slightly raised above the metal edge, creating a perfect, springy seal.
Step 2: Removing the Safety Rags
Before you even think about lifting the manifold back into place, reach down and pull every single shop towel out of those six open intake ports. Count them as you pull them out to ensure you leave absolutely nothing behind inside the engine.
Step 3: Seating the Manifold and Torquing the Bolts
Carefully pick up your upper intake manifold, hold it completely level, and lower it straight down onto the engine block, aligning it perfectly with the bolt holes and the new gaskets.
Drop all the manifold bolts back into their designated holes by hand.
Crucial Technique: To get a perfect seal without warping the manifold or crushing the new gaskets unevenly, you must tighten these bolts in a specific sequence. Start with the center bolts and work your way outward in a spiral or crisscross pattern. Tighten them in stages. First, snug them all up gently by hand, then use your torque wrench to tighten them to the exact manufacturer specification (typically around fifteen to twenty foot-pounds).
   [ INTAKE MANIFOLD BOLT TORQUE PATTERN EXAMPLE ]
     ( 5 )       ( 1 )       ( 3 )
       o           o           o

       o           o           o
     ( 4 )       ( 2 )       ( 6 )
   [Start at center (1 & 2) and work outward alternating sides!]
Step 4: Reconnecting the Lifelines (Hoses and Wires)
Now refer back to the photos you took on your phone and the tape labels on your components. Reattach every metal support bracket you unbolted from the back and sides.
Slide every vacuum hose back onto its matching metal port. Push them on all the way and slide the tension clamps back into their original locking positions using your pliers.
Plug all the electrical sensor wire connectors back into their sockets until you hear them click securely. Reinstall your large rubber air intake duct piping between the filter box and the throttle body, making sure the large circular hose clamps are tightened down firmly to prevent any unmetered air leaks.
Step 5: Final Check and Battery Reconnection
Take a minute to do a sweep of the engine bay. Look for any loose tools, stray rags, or extra parts sitting around. Everything should look neat, tidy, and exactly like it did before you started.
Go back to your car battery. Slide the negative terminal cable back onto the metal post. Tighten the nut securely with your small wrench until the cable cannot wiggle or twist on the post anymore.
Finally, reinstall your decorative plastic engine cover by snapping it back onto its mounting pins or tightening its small accent bolts. Double-check that your hood prop rod is secure, and you are ready for the grand finale.
The Moment of Truth: Starting and Testing
The hard work is officially finished. Now comes the most exciting part of any DIY project: reaping the rewards of your labor.
Walk around to the driver seat, get inside, and turn your key to the accessory position (where the dashboard lights turn on but the engine does not crank yet). Leave it there for about five seconds. This allows your car computer to wake up, reinitialize its sensors, and prime the fuel system.
Now, take a deep breath, press down on the brake pedal, and start the engine.
The engine should catch instantly and settle into a beautiful, steady, quiet idle. Watch your dashboard carefully. The flashing check engine light should disappear completely.
Let the vehicle run while parked for about five minutes. Walk around to the front of the car with the hood open and listen carefully. You want to hear a seamless, rhythmical hum with no hesitation, shaking, popping sounds, or strange whistling noises (which would indicate a loose vacuum hose).
If everything sounds great, close the hood securely and take your vehicle for a spin around the block. You will likely notice an immediate improvement in how crisply the car accelerates, how smooth it feels when stopping at red lights, and how responsive the throttle feels under your foot. You did it. You successfully serviced a complex transverse V6 engine all by yourself.
Helpful Component Summary and Torque Reference
To help you stay organized at a single glance during your project, use this handy reference table for the components and steps involved.
| Component Name | Primary Function | Maintenance Action | Tightening Method |
| Spark Plug | Creates the electrical lightning spark to ignite fuel inside cylinders. | Replace with new pre-gapped iridium or platinum plugs. | Torque wrench to exact factory specification by hand initially. |
| Ignition Coil | Amplifies 12V battery power up to 50,000V for the spark. | Replace as a full set of 6; apply dielectric grease inside boot. | Snug down mounting bolt gently until firm; clip wire harness. |
| Upper Intake Manifold | Channels clean air from air filter down into engine cylinders. | Unbolt and temporarily lift away to access rear cylinder bank. | Tighten bolts in a crisscross sequence starting from center out. |
| Manifold Gasket | Creates airtight seal between upper and lower intake sections. | Always discard old flattened gaskets and install fresh rubber ones. | Press firmly into clean grooved channels by hand. |
| Vacuum Hoses | Routes engine vacuum to various sensors and power systems. | Label and disconnect carefully; reattach firmly with original clamps. | Slide fully onto ports and secure with mechanical tension clips. |
Frequently Asked Questions
What happens if I do not replace the intake manifold gaskets when doing this job?
Reusing old intake manifold gaskets is a huge gamble that usually ends in frustration. When rubber gaskets spend years squished down between hot metal engine parts, they lose their natural springiness and become permanently flattened, hard, and brittle. If you lift the manifold and then bolt it back down on top of those old flattened gaskets, they will not be able to form an airtight seal anymore. This creates a condition known as a vacuum leak. Unmetered air will slip past the seal into the engine, causing your car to idle incredibly rough, stumble at stoplights, throw check engine codes for running lean, and potentially force you to take the entire top of the engine apart all over again just to fix the leak. Spending a few extra dollars on brand-new gaskets gives you absolute peace of mind.
How do I know if my engine misfire is caused by a spark plug or an ignition coil?
The most accurate way to pinpoint the exact culprit is by using a basic OBD2 pocket code scanner plugged into the port under your steering wheel dashboard. If the scanner displays a code like P0302, that means cylinder number two has a misfire. To determine whether the plug or the coil is broken, you can perform a simple swap test. Move the ignition coil from cylinder two over to cylinder four, clear the codes, and run the engine again. If the misfire code moves over to cylinder four (P0304), you know with absolute certainty that the ignition coil is dead and needs replacement. If the misfire stays on cylinder two (P0302) despite moving the coil, then the spark plug itself is failing, or there is an issue with that specific cylinder wiring.
Is it completely necessary to use a torque wrench when installing new spark plugs?
Yes, using a torque wrench is highly recommended for modern aluminum engines. Cylinder heads are made from soft aluminum metal which can easily stretch, warp, or strip if you use too much brute force with a standard wrench handle. If you overtighten a spark plug, you can literally strip the threads right out of the engine hole, or snap the spark plug body completely in half inside the cylinder head. On the flip side, if you undertighten the plug because you are scared of breaking it, the plug can rattle loose while you are driving down the road, allowing hot combustion gases to blast out of the cylinder well, which can destroy your ignition coil and ruin the engine threading. A torque wrench removes all the guesswork by letting you tighten everything perfectly every single time.
Why do transverse V6 engines use different spark plug removal steps compared to inline engines?
Inline engines (like those found in many compact four-cylinder cars) have all their cylinders lined up in a straight, single row pointing directly upward. When you open the hood of an inline engine car, everything is sitting right on top within easy arm’s reach with zero obstructions. A transverse V6 engine is much wider because it splits its six cylinders into two separate angled rows of three, and the entire engine is turned sideways to fit into a compact space. Because of this space-saving layout, the rear row of cylinders gets shoved far back against the firewall directly underneath the bulky air intake system. This requires the extra steps of removing vacuum lines, brackets, and the intake manifold plenum just to gain physical clearance to see and touch the rear components.
What should I do if a spark plug feels completely stuck and will not turn?
If you try to unscrew a plug and it feels completely frozen in place, never try to force it with a massive breaker bar or stomp on your wrench handle. Doing so will almost certainly snap the plug off, leaving the bottom half permanently welded inside your engine block. Instead, spray a generous amount of high-quality penetrating oil down into the spark plug well and let it sit undisturbed for at least thirty minutes to allow the fluid to seep deep down into the threads. After letting it soak, attach your wrench and try to gently wiggle it back and forth alternating between slight tightening and loosening motions to help the oil penetrate further. If it still refuses to budge, run the engine for just two to three minutes to get the metal barely warm to the touch, then try again. The slight heat expansion can often help release stuck threads safely.
