Imagine you are driving your truck down a muddy trail or cruising over snowy hills. Your vehicle handles the rough ground like a champion. You feel unstoppable behind the wheel. What makes that four-wheel-drive magic possible? A big part of the secret is a heavy metal box tucked under your vehicle called the transfer case. This amazing piece of machinery splits the power from your engine and sends it to both the front and back wheels. It is the heart of your off-road adventures.
Inside that metal box, gears spin fast and press hard against each other. To keep those gears from getting too hot or grinding themselves into dust, they need a special liquid. This liquid is called transfer case fluid. Over time, this fluid gets dirty, breaks down, and loses its slickness. When that happens, your gears can wear out quickly, leading to loud noises and expensive repairs.
The great news is that you can replace this fluid right at home in your own driveway. Taking care of this chore yourself saves you money and helps you understand how your vehicle works. You do not need to be a professional mechanic with decades of experience to get this done. With the right tools, a bit of patience, and a willingness to get your hands a little dirty, you can complete this task easily. Let us walk through the process together so you can keep your truck running smoothly for years to come.
Getting to Know Your Transfer Case
Before crawling under your truck, it helps to understand what you are actually working on. The transfer case is located right behind your transmission, usually near the middle of your vehicle’s underbelly. If you look underneath, you will see a large aluminum or iron housing. The driveshafts that go to your front and rear axles connect directly to this box.
When you shift your vehicle into four-wheel drive, the transfercase locks the front and rear driveshafts together. This forces all four wheels to spin at the same time, giving you maximum traction on slippery roads, deep sand, or rocky paths. Inside the housing, you will find a series of complex gears, or sometimes a heavy-duty chain, that moves the power along.
Because these parts move at incredible speeds, they create a massive amount of friction. Friction creates intense heat. The fluid inside acts as a cushion, a cooling agent, and a lubricant all at once. Without clean fluid, the metal parts would expand from the heat, weld themselves together, and completely destroy the system. Changing the fluid regularly is the single best way to protect this expensive component.
Recognizing the Warning Signs
How do you know when it is time to drop the old fluid? Vehicles often give you subtle hints when they need fresh fluids under the hood or chassis. Paying attention to these signs can save you from a breakdown on the highway or deep in the woods.
Unusual Noises under the Floorboards
If you start hearing a strange humming, whining, or growling sound coming from directly beneath your seats while driving, your transfer case might be crying out for help. This usually happens when the fluid level drops too low or when the fluid becomes thin and full of tiny metal shavings. When the fluid fails to coat the gears, the metal pieces scream as they rub together.
Shifting Difficulties
When you try to switch from two-wheel drive to four-wheel drive high or low, the lever or button should respond smoothly. If the system hesitates, pops back out of gear, or makes a harsh grinding noise during the shift, bad fluid is often the main culprit. Clean fluid allows the internal components to slide into place smoothly.
Mysterious Puddles
Keep an eye on the ground where you park your truck or SUV. If you spot a red, brown, or black puddle forming right under the middle of the vehicle, you likely have a leak. A leaking gasket or seal will drain the fluid over time, leaving the gears dry and vulnerable.
Maintenance Schedules
Even if your truck sounds perfect, you should still check your owner’s manual. Most manufacturers recommend replacing the transfer case fluid every thirty-thousand to sixty-thousand miles. If you tow heavy trailers, plow snow, or spend a lot of time off-road, you should change it even more frequently.
Gathering Your Essential Gear
A successful garage project starts with preparation. You do not want to be stuck under your truck with a open drain plug only to realize you are missing a crucial tool. Take some time to round up these items before you begin.
- Your Vehicle’s Owner’s Manual: This book is your ultimate guide. It tells you exactly what kind of fluid your vehicle needs and how many quarts it holds.
- Fresh Transfer Case Fluid: Always buy the exact type listed in your manual. Some vehicles use automatic transmission fluid, while others require specialized gear oil. Mixing up fluids can ruin the internal clutches.
- A Fluid Transfer Pump: Because the fill hole sits high up on the side of the case, you cannot just pour fluid straight out of the bottle. A cheap hand-operated pump that screws onto the top of your fluid bottle makes filling a breeze.
- Sockets and a Ratchet: You will need the right size socket or wrench to remove the drain and fill plugs. Many trucks use a large hex socket or even the bare square drive of a three-eighths-inch ratchet.
- A Catch Pan: You need a wide container to catch the old fluid as it streams out. Make sure it can hold at least two to three quarts of liquid.
- Safety Glasses: Drops of old oil and road dirt will fall from the bottom of your truck. Protect your eyes so you can see what you are doing.
- Nitrile Gloves: Mechanical fluids can irritate your skin and are tough to wash off. Wearing gloves keeps your hands clean and safe.
- Rags and Shop Towels: You will inevitably drop a bit of fluid or get some on your tools. Having plenty of towels nearby keeps your workspace clean.
- Brake Cleaner Spray: This spray dries quickly and removes greasy residue. It is perfect for cleaning off the plugs and the area around the case when you finish.
Finding the Perfect Workspace
Safety should always be your number-one priority when working on any vehicle. You need a workspace that minimizes risks and gives you plenty of room to move around comfortably.
First, look for a completely flat, level surface. A concrete garage floor or a flat asphalt driveway is perfect. Working on a slope is dangerous because your vehicle could roll or slip off its supports. A level surface also ensures that you get an accurate reading when you fill the transfer case back up with new liquid. If the truck is tilted, you might put in too much or too little fluid.
Once you park your truck in the right spot, turn off the engine and pull the parking brake up as tightly as you can. If your truck has an automatic transmission, slide the shifter into Park. For a manual transmission, leave it in first gear or reverse. Next, grab some wheel chocks, heavy blocks of wood, or bricks, and wedge them firmly behind and in front of your rear tires. This prevents the vehicle from shifting while you are underneath it.
Many large trucks and SUVs have enough ground clearance for you to slide underneath without lifting them up. If you do need more room, use a high-quality floor jack to lift the vehicle. Never rely on the jack alone to hold the weight of the truck. Always lower the vehicle onto heavy-duty jack stands placed under strong frame rails. Shake the truck gently before crawling under to make sure it is completely stable and solid.
Identifying the Fill and Drain Plugs
Now that you are safely positioned under the vehicle with your safety glasses on, look up at the transfer case. You will notice two large metal plugs screwed into the back-facing side of the housing. These plugs look like big bolts, or they might have a square or recessed hex hole in the middle.
It is absolutely vital that you tell these two plugs apart before you grab your wrenches. The plugs are almost always stacked vertically. One sits near the top or middle of the case, and the other sits right at the bottom edge.
| Plug Type | Location on Case | Primary Function |
| Fill Plug | Upper or Middle Position | Used to pour in fresh fluid and check fluid level |
| Drain Plug | Bottom Edge | Used to empty the old, dirty fluid from the case |
Take a shop towel and wipe away all the mud, road grime, and grease from around both plugs. Cleaning this area ensures that no dirt falls inside the transfer case when you remove the plugs. Dirt particles act like sandpaper inside the gears, so keeping things clean is highly important.
The Golden Rule of Fluid Changes
Before you turn a single bolt, you must learn the most important rule of DIY drivetrain maintenance: Always remove the fill plug first.
Imagine the frustration of loosening the bottom drain plug, letting all your old fluid pour out into the pan, and then discovering that the top fill plug is rusted solid or stripped completely. If that happens, your truck is stuck. You cannot drive it because it has no fluid, and you cannot put new fluid in because the fill hole is sealed shut. You would have to tow your truck to a professional mechanic just to get a plug removed.
By loosening and removing the top fill plug first, you guarantee that you have a way to put the fresh fluid back into the system. If the fill plug refuses to budge, you can stop right there, put your tools away, and drive your truck normally while you figure out a way to break the stubborn plug loose. This simple habit protects you from getting stranded in your own garage.
Loosening a Stubborn Plug
Because transfer case plugs spend years exposed to rain, snow, salt, and heat, they often get stuck tight. If you pull on your ratchet and nothing happens, do not panic. There are several smart tricks to break a stubborn bolt free without damaging it.
First, make sure your socket is sitting perfectly square on the plug. If the tool is tilted at an angle, it can slip off and round off the edges of the bolt, making it much harder to remove. Apply firm, steady pressure rather than yanking on the tool suddenly.
If it still will not move, spray the plug generously with a high-quality penetrating oil. Let the oil soak into the threads for fifteen to twenty minutes. This oil creeps into the tiny gaps between the metals and dissolves rust.
Another excellent trick is to use a longer wrench or a piece of metal pipe slipped over the handle of your ratchet. This pipe acts as a cheater bar, giving you much more leverage. With a longer handle, you can apply more turning force with less muscle power. Just remember to turn the plug counterclockwise to loosen it. Think of the old phrase: lefty-loosey, righty-tifty.
Draining the Old Fluid
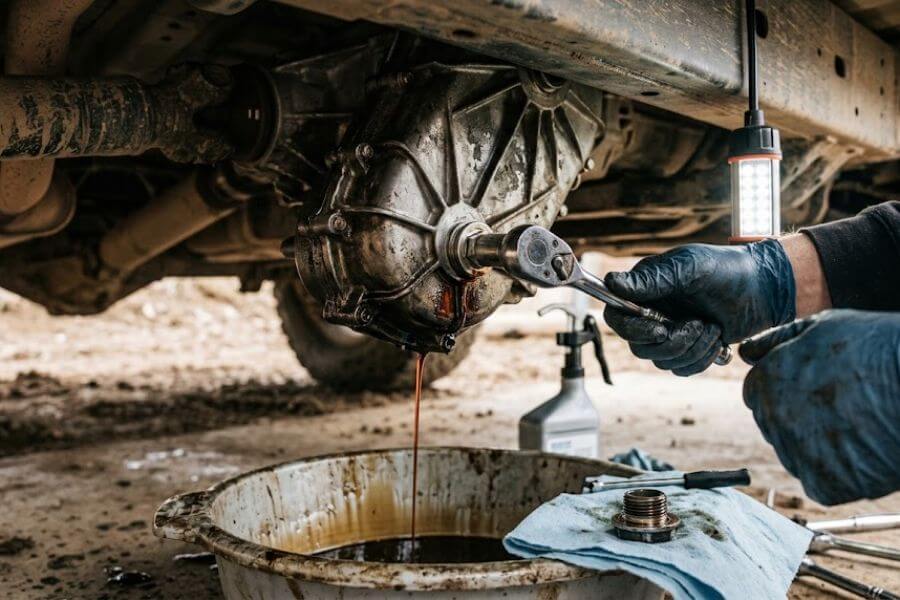
With the top fill plug successfully removed and set aside on a clean towel, you are ready to drain the old fluid. Position your catch pan directly underneath the bottom drain plug. Keep in mind that when the plug comes out, the fluid will not just drop straight down; it will shoot out in a stream toward the back of the truck before slowing down to a drip. Position your pan slightly backward to catch that initial rush.
Carefully fit your tool onto the bottom drain plug and turn it counterclockwise. As the plug gets loose, you can use your fingers to spin it the rest of the way. Keep a bit of forward pressure on the plug as you unscrew it so fluid does not leak out over your fingers early. When you reach the end of the threads, pull the plug away quickly.
Watch the fluid as it pours into the pan. This is a great time to inspect the health of your transfer case. Normal fluid might look dark red, brown, or amber, depending on the type used. If the fluid looks milky or creamy, water has snuck inside through a vent tube or a bad seal. If it smells burnt or looks completely black, the system has been running very hot.
Let the fluid drain completely. It will start as a heavy stream, slow down to a steady trickle, and eventually become a slow drip. Give it about ten to fifteen minutes to empty out as much of the old liquid as possible.
Inspecting the Plugs for Clues
While the last drops of oil are falling into your catch pan, take a close look at the plugs you removed. Many manufacturers use magnetic drain plugs. These magnets are designed to catch tiny pieces of metal debris that naturally wear off the gears over time.
It is completely normal to find a fine, gray paste coating the magnet. This paste consists of microscopic metal dust created during normal driving. Simply take a clean rag and wipe the magnet completely clean until the shiny metal underneath shows through.
However, if you find large metal chunks, broken gear teeth, or long silver slivers stuck to the magnet, you have a problem. This indicates that something inside the transfer case is breaking down or wearing out rapidly. If you see these large fragments, you should finish the fluid change but plan to have a mechanic inspect the internal gears soon before a major failure occurs.
Additionally, check the condition of the seal on the plug. Some vehicles use a soft copper or aluminum crush washer, while others use a rubber O-ring or special thread sealant. If your truck uses a crush washer, it is best to replace it with a new one to prevent future leaks. If it uses bare threads, you can apply a fresh wrap of Teflon tape or a dab of thread sealant to the threads before reinstalling.
Sealing Up the Bottom
Now that the old fluid has finished draining and your drain plug is clean, it is time to put the bottom plug back into place. Thread the drain plug back into its hole by hand first. Turning it with your fingers for the first few threads ensures that you do not cross-thread the bolt. Cross-threading happens when a bolt goes in crooked, stripping out the soft metal threads of the housing and creating a massive headache.
Once the plug is spinning in smoothly by hand, grab your wrench or socket to tighten it up. If you have a tool called a torque wrench, use it to tighten the plug to the exact specification listed in your owner’s manual. Tightening it correctly ensures the plug stays secure without crushing the housing.
If you do not own a torque wrench, tighten the plug until it feels snug and firmly seated, then give it just a small quarter-turn more. You want it tight enough so it will not vibrate loose while driving, but not so tight that you strip the threads or crack the metal case. Wipe the area clean with a splash of brake cleaner and a rag so you can spot any new leaks later.
Pumping in the Fresh Fluid
Now comes the fun part: giving your truck its fresh lubricant. Because the fill hole is positioned horizontally on the side of the housing, you cannot pour fluid directly from the bottle. You need to use your handy fluid transfer pump.
Uncap your new bottle of transfer case fluid and insert the long suction tube of the pump down into the bottom of the bottle. Screw or snap the pump cap onto the bottle neck so it stays steady. Next, take the flexible output hose of the pump and push it deep into the open upper fill hole on your transfer case. Make sure the hose is secure so it does not pop out and spray oil everywhere when you start pumping.
Begin pumping the handle of the transfer pump with smooth, steady strokes. Watch the fresh fluid move through the clear plastic tube and into the housing. If your vehicle requires more than one quart, your first bottle will eventually empty out. When that happens, simply move the pump over to your second bottle and continue the process.
Keep a close eye on the fill hole as you near the total amount of fluid recommended by your manual. You will know the transfer case is completely full when fresh fluid starts to trickle back out of the fill hole and down the side of the case. This means the fluid level has reached the exact bottom edge of the hole, which is the perfect fill mark. Stop pumping immediately when you see this spillover.
Closing and Final Cleaning
Let the extra fluid drip out of the fill hole for a minute or two until it slows down to a very light trickle. This guarantees that you have the perfect amount of liquid inside. Now, grab your clean top fill plug and thread it into the upper hole using your fingers, just like you did with the bottom plug.
Tighten the fill plug down firmly with your wrench or torque wrench to the correct specification. Now that both plugs are locked tight, step back and look at your handiwork. You will likely see some oily smudges and drips running down the side of the metal housing.
Grab your can of brake cleaner and spray the entire transfer case housing generously. The powerful spray will instantly dissolve the greasy oil and wash it away. Use a clean shop towel to wipe the metal dry. Cleaning the case thoroughly is a smart trick because it makes future inspections simple. If you look under your truck next week and see wet fluid, you will know instantly that you have a fresh leak to fix, rather than just old leftover puddles from your project.
The Test Drive and Inspection
Before you pack up your tools and call it a day, you need to verify that everything works flawlessly under real driving conditions. Remove the wheel chocks from your tires, slide out from under the vehicle, and pack away your drain pan safely.
Hop into the driver’s seat, buckle your seatbelt, and start up the engine. With your foot pressing firmly on the brake pedal, shift your transmission through its different gears: Park, Reverse, Neutral, and Drive. This helps spread the new fluid around the internal components.
Next, find a safe, open area with a loose surface like gravel, dirt, or grass where you can engage your four-wheel-drive system safely. Avoid shifting into traditional four-wheel drive on dry, hard concrete, as this can bind up the drivetrain. Shift your vehicle into four-wheel drive high, drive forward a short distance, and feel how smoothly the system locks in. If your vehicle has a four-wheel-drive low setting, stop completely, shift into neutral, and engage that gear as well to test the full range of motion. Listen closely for any strange whines or clunks. The truck should feel strong, quiet, and responsive.
After a short five-minute drive, return to your flat parking spot, shut off the engine, and pull the parking brake. Slide back under the truck with a flashlight and look closely at both the fill and drain plugs. Check for any tiny beads of fluid forming around the threads. If the plugs look completely dry, your job is complete. You have successfully protected your vehicle’s drivetrain.
Disposing of the Old Fluid Responsibly
The final step of any automotive project happens away from the vehicle. Used vehicle fluids are highly toxic to the environment and must be handled with care. Never pour old oil down a storm drain, into the trash canister, or directly onto the ground. Doing so can contaminate drinking water and harm local wildlife.
Carefully pour the old fluid from your wide catch pan into an empty plastic jug, such as your empty fresh fluid bottles or an old clean milk container. Make sure the cap screws on tightly so it will not spill in the back of your car.
Take this container to an automotive parts store or a local household hazardous waste recycling center. Most auto parts stores will accept your used oil completely free of charge and dump it into a massive recycling vat. This old oil gets cleaned up and processed into new lubricants or fuel, keeping our planet clean and beautiful.
Frequently Asked Questions
What happens if I accidentally put the wrong fluid in my transfer case?
Using the incorrect fluid can cause severe, expensive damage to your transfer case very quickly. Internal parts like clutches, bearings, and chains rely on specific fluid thickness and chemical additives to work right. If you realize you used the wrong oil, do not drive the vehicle. Drain the incorrect fluid out completely, replace it with the exact product recommended in your manual, and run the vehicle briefly before changing it one more time to flush out any leftover wrong fluid.
Can I change my transfer case fluid without lifting my vehicle on jack stands?
Yes, if you own a larger truck or a lifted SUV with plenty of ground clearance, you can often slide right under the vehicle while its tires are resting firmly on the ground. This makes the job much quicker. Just make sure the parking brake is set and the wheels are chocked so the truck cannot move while you are underneath it. If you feel cramped or cannot reach the plugs comfortably, use jack stands to create a wider, safer workspace.
Why is my fresh transfercase fluid leaking out of the plug even though I tightened it?
A leak after a fluid change usually means the plug is not sealing correctly against the metal housing. This happens if you forgot to install a new crush washer, if the old rubber O-ring is torn, or if the threads need a fresh application of thread sealant or Teflon tape. It can also happen if dirt got trapped between the plug and the case. To fix this, you will need to clean the area, remove the leaking plug, replace the seal, and tighten it back up to the correct torque.
How often should I check the fluid level inside my transfer case between changes?
It is a smart habit to check your fluid level every time you change your engine oil, or roughly every five-thousand to seven-thousand miles. To check it, simply remove the top fill plug while the truck is parked on level ground. Reach your finger inside the hole; the fluid should sit right at the very bottom edge of the opening. If you cannot feel any fluid, the level is low, and you should add more before driving.
Is transfer case fluid the exact same thing as transmission fluid?
Not always, though some vehicles do share them. While many modern trucks use automatic transmission fluid inside their transfer cases, many others require heavy gear oils or highly specialized manufacturer fluids. Transmission fluids and transfer case fluids perform different jobs and handle different amounts of pressure. Always read your owner’s manual to find out exactly what your unique system requires.
