You are driving down the road, enjoying your favorite music, when you notice a strange sound. It starts as a faint, low hum. Over the next few days, that hum grows into a loud growl, similar to the sound of an airplane taking off. When you turn the steering wheel to one side, the noise gets louder. When you turn the other way, it disappears completely.
Your car is trying to tell you something important. That deep, rhythmic noise is the classic cry for help from a failing front wheel bearing hub assembly.
The wheel bearing hub assembly is a critical part of your vehicle. It keeps your wheel attached to the car and allows it to spin smoothly at high speeds. When it begins to fail, it creates friction, heat, and that irritating noise. If you ignore it for too long, the wheel could eventually lock up or even separate from the vehicle while you are driving.
Taking your car to a professional mechanic is always an option, but it can cost hundreds of dollars in labor fees alone. Fortunately, this is a repair you can handle right in your own driveway or garage. By doing the work yourself, you save money, gain valuable mechanical experience, and build a stronger bond with your machine.
This guide walks you through every step of the process. Grab your tools, put on your safety glasses, and let us get that smooth, quiet ride back.
Safety First before Starting
Working on a vehicle requires careful attention to safety. Since you will be lifting a heavy machine off the ground and working underneath it, you must take specific steps to protect yourself. Never rush the setup process. Spending an extra ten minutes preparing your workspace can prevent accidents.
Park on Level Ground
Always park your vehicle on a flat, solid surface like a concrete driveway or a garage floor. Never attempt to lift a car on dirt, gravel, or an incline. If the ground is uneven, the jacks can slip, causing the vehicle to fall. Once the car is in position, set the parking brake as tightly as possible to keep the rear wheels from rolling.
Block the Wheels
Even with the parking brake engaged, the vehicle can still shift. Place heavy wheel chocks behind and in front of the rear tires. If you do not have professional wheel chocks, you can use thick blocks of wood or heavy bricks. This simple step ensures the car remains stationary while you work on the front end.
Use Quality Support Equipment
Never rely solely on a hydraulic floor jack to hold the car up while you work. Jacks are designed to lift vehicles, not to support them for long periods. Always use heavy-duty jack stands rated for your vehicle’s weight. Once you lower the car onto the jack stands, give the vehicle a gentle shake to verify that it is completely stable before you crawl underneath.
Wear Personal Protective Gear
Your hands and eyes need protection throughout this repair. Automotive components are covered in road grime, brake dust, and rust. Wear sturdy safety glasses to keep falling debris out of your eyes when you look up into the wheel well. Mechanics gloves protect your knuckles from scrapes and keep your hands clean from grease.
Tools and Materials Gathering
Before you loosen a single bolt, gather all the necessary tools and supplies. Having everything within arm’s reach prevents frustration and keeps you from getting stuck halfway through the job. Most of these items are standard tools that every home mechanic should own.
Required Hand Tools
You will need a comprehensive socket set that includes both metric and standard sizes. Most modern vehicles use metric fasteners. A long breaker bar is essential for loosening stubborn, rusted bolts. You will also need a reliable ratchet, a selection of extensions, and a set of open-end wrenches.
Specialty Equipment
A torque wrench is non-negotiable for this project. Every bolt you remove must be tightened back to the exact specifications set by the manufacturer to ensure safety. You will also need a large axle nut socket. These sockets are much larger than standard sizes, often ranging from twenty-seven millimeters to thirty-six millimeters. Check your vehicle’s manual or measure the nut beforehand to ensure you have the correct size.
Chemicals and Cleaners
Rust is your main enemy during an undercar repair. Penetrating oil is necessary to loosen seized threads. A can of brake cleaner helps remove grease and grime from the components. You should also have a tube of high-quality anti-seize lubricant to apply to the bolts during reassembly, which makes future repairs much simpler.
Replacement Components
Make sure you have the correct replacement hub assembly before you begin. Check your vehicle’s year, make, model, and engine size when purchasing the part. Some vehicles have different hub designs depending on whether they are two-wheel drive or four-wheel drive, or whether they have anti-lock braking systems. Look for a replacement unit that includes a new axle nut and a preinstalled wheel speed sensor if your vehicle requires one.
| Tool Name | Primary Purpose | Necessity Level |
| Floor Jack | Lifting the vehicle safely | Essential |
| Jack Stands | Supporting the vehicle weight | Essential |
| Breaker Bar | Loosening tight or rusted bolts | High |
| Torque Wrench | Tightening bolts to exact spec | Essential |
| Axle Nut Socket | Removing the central hub nut | Essential |
| Penetrating Oil | Breaking down rust on threads | High |
| Wire Brush | Cleaning corrosion off parts | Medium |
Loosening the Wheel and Axle Nut
The first actual work on the car happens while the vehicle is still resting on the ground. The weight of the vehicle prevents components from spinning while you apply large amounts of force to the lug nuts and the axle nut.
Loosen the Lug Nuts
Take your breaker bar and the correct socket for your wheel’s lug nuts. Turn each nut counter-clockwise just enough to break the initial resistance. Do not remove the nuts completely yet. You want them loose enough to turn with a standard ratchet later, but tight enough to keep the wheel secure while the car is still on the ground.
Pop the Dust Cap
If your wheels have a center cap that covers the axle nut, pry it off carefully using a flathead screwdriver. This reveals the large axle nut in the very center of the wheel hub assembly. On some vehicles, you may need to remove the entire wheel to access this nut, but if your wheel style allows access with the wheel on, it makes the job much simpler.
Address the Axle Nut Retainer
Many manufacturers use a locking mechanism to keep the axle nut from backing off over time. This could be a cotter pin passing through the axle shaft or a small indented section on the lip of the nut that is bent into a groove on the shaft. Use a pair of needle-nose pliers to remove a cotter pin, or use a small chisel and hammer to lift the bent metal lip out of the keyway.
Break the Axle Nut Loose
Fit your large axle nut socket onto the breaker bar. Slide the socket over the central axle nut. Because this nut is tightened with incredible force at the factory, you will need to apply significant muscle power. Position your body so you can pull upward or push down using your leg muscles rather than straining your back. Turn the nut counter-clockwise until you feel it break loose. Spin it out a few turns, but leave it on the shaft for now to protect the threads during the next steps.
Lifting and Securing the Vehicle
Now that the tightest fasteners are loosened, you can safely lift the vehicle to gain full access to the suspension and braking components. Take your time during this step to create a solid, secure work area.
Position the Floor Jack
Locate the factory-approved lift points for your vehicle. These are usually reinforced metal ridges along the rocker panels beneath the doors, or specific structural frames under the front of the car. Check your owner’s manual if you are unsure where these points are. Slide the floor jack under the lift point and slowly pump the handle until the jack contacts the frame.
Raise the Car
Carefully pump the jack to lift the front of the vehicle into the air. Raise it high enough so that the front tire clears the ground by at least a few inches, giving you plenty of room to work and maneuver tools underneath. Watch the car as it rises to ensure the jack stays centered on the lift point.
Install the Jack Stands
Slide your jack stands under solid structural locations, such as the vehicle’s frame rails or the front subframe. Never place jack stands under thin floorboards, oil pans, or moving suspension components like control arms. Once the stands are correctly positioned, slowly lower the floor jack until the full weight of the vehicle rests firmly on the stands.
Test the Stability
Before you remove the floor jack completely, step back and give the bumper of the car a firm push. The vehicle should not shift, wobble, or creak. If it moves at all, jack the car back up, adjust the placement of your stands, and lower it again. Your life depends on the stability of these stands, so make absolutely sure the vehicle is secure. Once stable, you can leave the floor jack lightly touching a backup lift point as an extra layer of safety.
Removing the Wheel and Brake Components
With the car securely supported, you can remove the wheel and clear away the braking system to expose the wheel bearing hub assembly.
Remove the Front Tire
Spin the loosened lug nuts off the wheel studs by hand or with a standard ratchet. Set the nuts aside in a small tray or cup so they do not roll away. Carefully pull the wheel off the hub assembly. Roll the tire to the side of your workspace, or slide it underneath the vehicle frame next to your jack stand as an additional safety cushion.
Inspect the Brake Assembly
Take a moment to look at the brake system. You will see a large metal disc, called the rotor, clamped by a metal housing holding the brake pads, called the caliper. The caliper is connected to the vehicle by a flexible rubber brake hose. This hose carries hydraulic fluid and must never be stretched, twisted, or forced to support the heavy weight of the brake caliper.
Remove the Brake Caliper Assembly
Locate the caliper mounting bolts on the back side of the steering knuckle. These are usually large, heavy bolts. Use your breaker bar or a long ratchet to loosen them. Once loose, spin them out and set them aside. Carefully lift the caliper off the brake rotor.
Secure the Caliper Safely
Immediately hang the brake caliper from a sturdy suspension component, such as the upper control arm or the coil spring. Use a heavy-duty mechanic’s wire, a sturdy bungee cord, or a strong zip-tie to support its weight. Ensure there is absolutely no tension on the rubber brake line. Let the caliper hang securely out of your way.
Slide Off the Brake Rotor
With the caliper removed, the brake rotor should slide right off the wheel studs. If your vehicle has been exposed to winter salt or heavy rain, the rotor might be rusted tight to the face of the hub assembly. If it will not budge, tap the flat center section of the rotor between the wheel studs gently with a rubber mallet or a piece of wood. The vibration will break the rust bond, allowing you to pull the rotor free. Set the rotor aside on a clean surface to keep grease off the braking face.
Disconnecting the Electronics and Axle
Modern vehicles feature advanced safety systems that monitor wheel speed. Before removing the mechanical parts, you must safely disconnect these electronic components to avoid damaging them.
Locate the ABS Wheel Speed Sensor
Look behind the steering knuckle for a small electrical wire that routes directly into the back or side of the wheel bearing hub assembly. This is the Anti-lock Braking System sensor wire. It monitors how fast the wheel spins and relays that information to the car’s computer.
Unplug the Electrical Connector
Trace the sensor wire away from the hub until you find the plastic electrical connector plug. Press the locking tab on the plastic housing and gently pull the connector halves apart. Do not pull on the wires themselves, as you can tear them out of the plastic plug. If the wire is held along the suspension arm by small plastic clips, carefully pry those clips open using a trim tool or a flathead screwdriver.
Push the CV Axle Inward
Return to the center axle nut that you loosened earlier. Spin the nut completely off the threaded shaft of the Constant Velocity axle, also known as the CV axle. The axle shaft has splines that slide into the center of the wheel hub. Take a brass punch or a block of wood, place it against the center tip of the axle shaft, and strike it firmly with a hammer.
Important Note: Never strike the tip of the axle shaft directly with a steel hammer, as you will deform the threads and ruin the axle.
The axle should slide inward toward the transmission, moving back an inch or two within the hub assembly. If it moves freely, you are ready to proceed. If it is frozen solid, apply generous amounts of penetrating oil to the splines and let it sit for fifteen minutes before trying again.
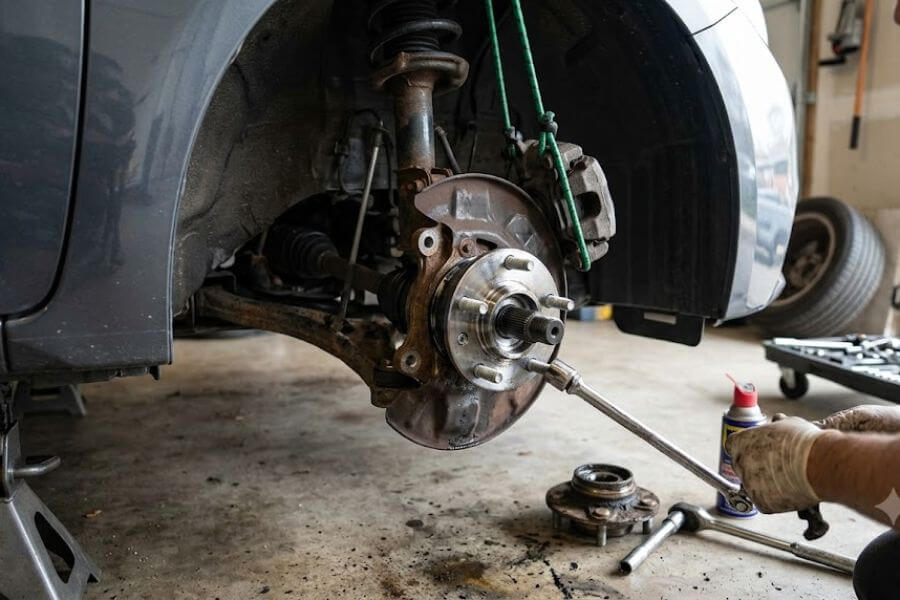
Unbolting the Bad Hub Assembly
Now you have reached the core part of the project. The wheel bearing hub assembly is typically held to the steering knuckle by three or four large bolts accessible from the backside of the assembly.
Gain Access to the Rear Bolts
To reach the hub bolts easily, turn the steering wheel completely to one side. If you are working on the driver’s side, turning the steering wheel all the way to the right or left will angle the back of the steering knuckle outward, providing a clear line of sight and more room for your tools.
Clean the Bolt Heads
The bolts holding the hub assembly have spent years exposed to water, mud, and road debris. They are likely covered in rust and dirt. Use a stiff wire brush to clean around the heads of these bolts. Spray each bolt liberally with penetrating oil. Let the oil soak into the threads for a few minutes to reduce the risk of stripping or snapping a bolt.
Break the Hub Bolts Free
Select the correct socket size and attach it to your breaker bar or a long-handled ratchet. Position the socket squarely over the first hub bolt. Apply firm, steady pressure until the bolt breaks loose. Because space is limited inside the wheel well, you may need to use an extension or a universal joint socket adapter to get a clean angle on the bolt heads. Loosen all the hub bolts evenly, but do not remove them completely just yet. Leave a few threads engaged on each bolt to catch the hub assembly when it finally breaks free from the steering knuckle.
Removing the Stubborn Hub from the Knuckle
Even with the mounting bolts loosened, the hub assembly will usually refuse to fall out. Aluminum steering knuckles and steel hub assemblies create a chemical reaction over time called galvanic corrosion, which glues the parts together.
The Hammer and Punch Technique
If the hub is stuck, take a heavy hammer and a large chisel or punch. Position the tip of the punch against the solid metal lip of the old hub assembly, away from the delicate areas. Strike the punch firmly with the hammer to jar the hub and break the corrosion bond. Alternate sides, striking the top, bottom, left, and right, to rock the hub out of its recess evenly.
The Bolt Press Trick
If hitting it does not work, you can use the power of the bolts themselves to press the hub out. Back the hub bolts out so there is about a quarter-inch of space between the bolt head and the steering knuckle. Place a small metal spacer or an old socket between the bolt head and a solid, non-moving part of the car’s frame or suspension behind it. Have a helper gently turn the steering wheel. The hydraulic power of the steering system will push the bolt against the spacer, forcing the hub assembly out of the knuckle.
Pulling the Assembly Free
Once the hub breaks loose from its corroded seat, remove the rear mounting bolts completely. Support the heavy hub assembly with one hand as you slide it off the splined shaft of the CV axle. Be careful not to pull the CV axle out of the transmission housing while doing this. Once the hub is free, lift it away from the car and set it on your workbench.
Preparing the Knuckle for the New Hub
You cannot simply bolt the new hub assembly into a dirty, corroded steering knuckle. If you do, the new hub might sit unevenly, causing alignment issues or premature bearing failure. Take the time to clean the area thoroughly.
Clean the Bore
Look inside the round opening in the steering knuckle where the hub was seated. You will likely see a thick buildup of rust, scale, and old corrosion. Take a sheet of medium-grit sandpaper, emery cloth, or a wire brush attachment on a power drill, and scrub the interior surfaces of the bore. Clean it until you see smooth, shiny metal.
Clean the Axle Splines
Inspect the splines on the outer end of the CV axle shaft. Use a small wire brush to clean any dirt, rust, or debris out of the grooves. A clean set of splines ensures the new hub assembly slides into place smoothly without binding.
Apply Protective Lubricant
Once everything is clean and free of debris, wipe the inside of the knuckle bore and the axle splines with a clean rag. Apply a thin, even coat of high-quality anti-seize lubricant or clean chassis grease to the interior walls of the steering knuckle bore and along the axle splines. This layer of lubricant prevents future corrosion, seals out moisture, and ensures that if you ever have to replace this component again years down the road, it will slide apart effortlessly.
Installing the New Wheel Bearing Hub Assembly
With the workspace cleaned and prepped, you are ready to install your brand new wheel bearing hub assembly. Handle the new part with care, making sure not to drop it or damage the delicate internal seals.
Align the Components
Lift the new hub assembly into position. If your car has a metal brake dust shield that sits between the hub and the steering knuckle, make sure to position it correctly now. Align the hole in the dust shield with the opening on the steering knuckle. Check the orientation of the ABS wire or sensor port on the new hub, ensuring it faces the correct direction to connect with the vehicle’s wiring harness.
Slide the Hub Onto the Axle
Carefully guide the center hole of the new hub assembly over the splined shaft of the CV axle. Gently push the hub inward until the splines engage. The hub should slide along the axle smoothly. Push the hub all the way into the round bore of the steering knuckle until its mounting flange rests flat against the face of the knuckle or dust shield.
Start the Mounting Bolts by Hand
Reach behind the steering knuckle and insert the mounting bolts through the knuckle and into the back of the new hub assembly. Always start these bolts by hand. Turn them clockwise several full rotations to ensure the threads are properly engaged.
Safety Warning: Never use a power wrench or an impact gun to start these bolts, as you can easily cross-thread them and ruin your expensive new hub assembly.
Tighten the Bolts Sequentially
Once all the mounting bolts are started by hand, use your standard ratchet to snug them up. Tighten them in a criss-cross pattern, moving from one side to the opposite side rather than going around in a circle. This draws the hub into the steering knuckle evenly, preventing the assembly from cocking to one side and binding.
Torquing Fasteners to Specification
This is the most critical step of the entire project. Suspension and wheel components are subjected to extreme forces while driving. Guessing how tight a bolt is can lead to disaster. Under-tightened bolts can back out, while over-tightened bolts can stretch, weaken, and snap.
Research the Torque Values
Look up the exact torque specifications for your specific year, make, and model of vehicle. You need the torque values for the hub assembly mounting bolts, the brake caliper bracket bolts, and the large central axle nut. These numbers are measured in foot-pounds or Newton-meters.
Torque the Hub Assembly Bolts
Set your torque wrench to the specified value for the hub mounting bolts. Fit the socket onto the first bolt and pull the wrench with a smooth, steady motion until you hear or feel the wrench click. Move to the opposite bolt and repeat the process. Double-check every bolt a second time to ensure nothing was missed.
Reinstall the Brake Rotor and Caliper
Slide your clean brake rotor back onto the wheel studs. Untie your brake caliper from its temporary suspension hanger and slide it back over the rotor. Line up the caliper mounting bolts, start them by hand, and then use your torque wrench to tighten them to the exact factory specification.
Torque the Axle Nut
Thread the new axle nut onto the center of the CV axle shaft by hand. Use your ratchet to snug it down tight. To torque this nut correctly, you will need to prevent the hub from turning. You can have a helper sit in the vehicle and press the brake pedal firmly, or you can temporarily reinstall the wheel, lower the car until the tire contacts the ground, and torque it then. Set your torque wrench to the high torque value required for the axle nut—often well over one hundred foot-pounds—and pull steadily until the wrench clicks.
Secure the Locking Mechanism
If your new axle nut requires a cotter pin, slide a brand new pin through the hole in the axle shaft and bend the ends backward around the nut using your pliers. If it uses a crush-style locking lip, take a punch and a hammer to gently dent the metal lip of the nut down into the keyway slot on the axle shaft. This mechanical lock ensures the nut can never vibrate loose while driving.
Reconnecting Electronics and Reassembling the Wheel
With the main mechanical parts secured and torqued, you are ready to wrap up the project by finishing the electrical layout and putting the wheel back on.
Route the ABS Sensor Wire
Take the electrical wire for the wheel speed sensor and route it back along its factory path. Make sure the wire is not twisted or pulled tight when the steering wheel turns. Push the wire back into any plastic retention clips along the suspension arms. These clips keep the wire away from moving suspension parts and hot braking components that could melt or cut the insulation.
Plug in the Connector
Push the plastic electrical plug firmly into the vehicle’s main wiring harness until you hear a distinct clicking sound. Give the connector a gentle tug to verify that the locking tab is fully engaged.
Mount the Tire
Lift your front tire and wheel assembly and guide it back onto the wheel studs. Thread the lug nuts onto the studs by hand, turning them clockwise until they are snug against the wheel face.
Snug the Lug Nuts In a Star Pattern
Use your standard lug wrench or a ratchet to tighten the lug nuts until they are snug. Always tighten them in a star pattern. For a five-lug wheel, tighten the top nut, then the bottom right, then the top left, then the top right, and finally the bottom left. This star pattern ensures the wheel sits perfectly flat against the new hub face. Do not fully torque the lug nuts while the wheel is still in the air.
Lowering the Car and Final Torque
Now you can return the vehicle to the ground and complete the final tightening process to ensure your car is completely safe for the road.
Lift the Car off the Stands
Slide your floor jack back under the main lift point. Pump the handle to lift the vehicle off the jack stands. Carefully reach under the car and remove the jack stands, placing them safely out of the way.
Lower the Car Slowly
Slowly turn the release valve on your floor jack counter-clockwise to lower the car back down onto its tires. Do it gently so the vehicle does not drop too fast. Once the full weight of the vehicle is resting on the ground, roll the floor jack out from under the car.
Final Torque on Lug Nuts
Take your torque wrench and set it to the specific lug nut torque value for your car, which is typically between eighty and one hundred foot-pounds. Using that same star pattern, tighten each lug nut until the torque wrench clicks. Go around the wheel one final time in a circle, checking every nut to be absolutely certain you did not skip one.
Pre-Drive Inspection and Testing
Before you take your car out on the highway, perform a series of quick checks to verify that everything was put back together perfectly.
Pump the Brake Pedal
Sit in the driver’s seat and press the brake pedal down several times. When you removed and reinstalled the brake caliper, the brake pads may have shifted outward slightly. Pumping the pedal pushes the brake pads back into direct contact with the rotor.
Crucial Warning: The first pump will likely feel very soft and go all the way to the floor. Do not put the car in gear until the brake pedal feels firm and solid under your foot.
Turn the Steering Wheel
With the engine running and the car in park, turn the steering wheel all the way to the left and then all the way to the right. Listen for any rubbing or binding sounds. This confirms that your ABS wire and brake lines are safely routed and not catching on anything as the suspension swings.
Take a Low-Speed Test Drive
Drive out of your driveway and take a slow cruise down a quiet neighborhood street. Drive at fifteen to twenty miles per hour. Listen closely. The loud roar or growling noise should be completely gone. The car should track straight and feel smooth.
Perform a Higher Speed Test
If the low-speed test goes well, head out to a main road where you can safely speed up to forty or fifty miles per hour. Pay attention to the steering wheel. There should be zero vibration, shimmying, or unwanted noise. Test a few gentle lane changes to see if the steering responds crisply. When you return home, park the car, look into the wheel well one last time to check for any fluid leaks, and congratulate yourself on a job well done.
Component Comparison Table
When purchasing parts for this repair, you will encounter a few different styles of hub designs depending on your vehicle’s engineering. Understanding these differences helps you select the exact right part.
| Component Type | Common Features | Key Identification Points |
| ABS Integrated Hub | Built-in magnetic tone ring and preinstalled wire sensor | Has an electrical wire harness attached directly to the back |
| Non-ABS Hub | Smooth metal back with no electrical components | No wires, solid metal backing plate face |
| Driven Hub Assembly | Center bore features machined internal splines | Fits over a CV axle shaft on front-wheel or four-wheel drive cars |
| Non-Driven Hub Assembly | Center bore is completely smooth or holds a simple spindle | Found on the non-powered wheels of two-wheel drive vehicles |
Frequently Asked Questions
Can I replace just the bearing instead of the whole hub assembly?
On many modern vehicles, the wheel bearing and the hub are manufactured as a single, sealed unit. You must replace the entire assembly together. On some older vehicles, the bearing is a separate part pressed inside the steering knuckle. For those systems, you would need a heavy hydraulic shop press to push the old bearing out and press a new one in. Replacing the complete preassembled hub unit is much faster and requires fewer specialized specialty shop tools.
What happens if I tighten the new axle nut too much?
Over-tightening the central axle nut places extreme crushing force on the delicate internal bearings inside your new hub. This extra pressure creates massive friction and heat while you drive, which can destroy your brand new bearing in a matter of weeks. Always use an accurate torque wrench to tighten this nut to the exact manufacturer specification to avoid ruining your new part.
Why is my ABS dashboard warning light on after the repair?
If your anti-lock braking system light turns on after you finish the job, there is likely an issue with the wheel speed sensor. Double-check the electrical plug behind the steering knuckle to ensure it is snapped together tightly. Also, check the routing of the wire to make sure it did not get pinched or stretched while you were installing the heavy components. If the wire is fine, the sensor on the new hub assembly might be dirty or defective.
Should I replace both front wheel bearing hubs at the same time?
While it is not mandatory to replace both sides at once, it is often recommended. The driver’s side and passenger’s side wheel bearings travel over the exact same roads and cover the exact same mileage. If one bearing has worn out and failed, the bearing on the opposite side of the vehicle is likely nearing the end of its operational lifespan as well. Replacing them in pairs ensures your front suspension remains dependable.