Imagine pulling into your driveway after a long day, plugging your car into the wall, and waking up to a completely full tank of energy. That is the magic of having a Level 2 home charging station. While the basic cord that came with your car plugs into a standard wall outlet, it fills your battery at a snail-like pace. Upgrading to a Level 2 setup is like trading a garden hose for a fire hose. It delivers energy much faster, meaning your car is always ready for your next big road trip or daily drive.
Setting up one of these stations sounds like a massive project meant only for scientists, but it is actually a manageable process when you break it into clear steps. It does take planning, careful attention to safety, and an understanding of how electricity moves through your home. By learning what goes into the preparation and the installation, you can make smart choices, talk to professionals with confidence, and get your garage ready for the future of transportation.
Understanding Your Electric Vehicle Charging Options
Before you grab your tools or call a professional, you need to understand exactly what you are installing and why it makes such a big difference. Electric vehicle charging is generally broken down into three different tiers, known as levels. Each level uses a different amount of electrical power and fills your car battery at a completely different speed.
Level 1: The Standard Wall Outlet
When you first bring your electric car home, you might start by using the portable charging cord that fits into a regular three-prong household outlet. This is called Level 1 charging. It runs on a standard household electrical setup, which is 120 volts. Because regular outlets are designed for everyday household appliances like lamps, blenders, and phone chargers, they cannot push a massive amount of power all at once.
Level 1 charging gives you about three to five miles of driving range for every hour the car stays plugged into the wall. If you only drive a few miles a day to get to school or the local grocery store, this might be fine. But if you have a long commute, it could take over twenty-four hours to fully fill an empty battery. That is where the next level comes into play.
Level 2: The High-Power Home Upgrade
A Level 2 charging station is the sweet spot for home use. Instead of using a regular 120-volt plug, it runs on a 240-volt electrical circuit. This is the exact same type of heavy-duty power that your clothes dryer, central air conditioner, or electric kitchen stove uses. Because the voltage is twice as high, the electricity can push through the wires much faster.
With a Level 2 station, you can expect to add anywhere from twenty-five to sixty miles of range per hour of charging. This means almost any electric vehicle can go from completely empty to completely full in just four to eight hours. You can plug the car in when you go to bed, and it will be completely full before your morning alarm rings.
Level 3: The Super Fast Public Charger
You might hear people talk about public fast chargers that can fill a car in twenty minutes. These are Level 3 stations, also known as DC fast chargers. These machines use extreme amounts of power, often 480 volts or higher, and they cost tens of thousands of dollars to build. They are way too powerful and expensive for a standard neighborhood home, so Level 2 remains the ultimate champion for residential garages.
| Charging Level | Electrical Voltage | Miles Added Per Hour | Best Use Case |
| Level 1 | 120 Volts | 3 to 5 Miles | Short commutes and overnight charging |
| Level 2 | 240 Volts | 25 to 60 Miles | Everyday home charging for all drivers |
| Level 3 | 480+ Volts | 100+ Miles | Road trips and commercial highway stops |
Evaluating Your Home Electrical Panel
Now that you know why a Level 2 station is the way to go, you have to look at your house to see if it can handle the extra work. Think of your home electrical system like a giant tree. The main power line from the street is the trunk, and your electrical panel is where all the branches start. You need to make sure your panel has enough room for a brand-new, heavy-duty branch.
Checking the Total Amperage Capacity
Your main electrical panel, usually located in a garage, basement, or utility closet, has a specific limit on how much total electricity it can pull from the power company at one single moment. This total limit is measured in amperes, which people usually just call amps. Older homes might only have a 100-amp panel, while newer homes usually have a 200-amp panel.
To safely run a Level 2 charger, your home needs to have enough unused capacity. A Level 2 charger typically requires its own dedicated circuit breaker that handles anywhere from 40 to 60 amps. If you have a 100-amp panel and you try to run your air conditioner, your clothes dryer, your electric oven, and your car charger all at the exact same time, you could overload the main system. An electrician can perform a calculation to determine if your current panel can handle the load or if you need an upgrade.
Looking for Physical Space for New Breakers
Open up the metal door of your electrical panel and look at the rows of switches inside. Those switches are circuit breakers. A regular outlet uses a single-width breaker switch. Because a Level 2 charger uses 240 volts, it requires a double-width breaker. This means you need two empty slots right next to each other, or one above the other depending on how your panel is designed, to click the new breaker into place.
If your panel is completely jammed full of switches with absolutely no empty spaces left, you have a few options. A professional electrician might be able to replace some of your single switches with space-saving tandem breakers, which pack two switches into the space of one. If that is not possible, you might need to install a smaller secondary panel right next to the main one, which is called a subpanel, to create more physical space.
Understanding the Importance of a Dedicated Circuit
When you plug a laptop into a wall outlet in your bedroom, that outlet shares a circuit breaker with your bedroom lights, your hallway outlets, and maybe even the bathroom fan. If one thing causes a problem, everything on that circuit shuts off. This setup will not work for an electric car charger.
Your Level 2 station must have a dedicated circuit. This means the wires run directly from the electrical panel straight to the charger without stopping anywhere else along the way. No other appliances, lights, or outlets can be attached to those wires. This prevents other devices from interfering with the heavy flow of electricity needed to charge your car safely for hours at a time.
Choosing the Right Charger for Your Needs
Once you know your home can support the electricity, you get to do the fun part: picking out the actual charging unit. These devices are officially called Electric Vehicle Supply Equipment, or EVSE for short. They come in many different shapes, sizes, and styles, and picking the right one depends on where you live, how you drive, and how much you like modern technology gadgets.
Plug-In vs Hardwired Stations
One of the biggest choices you will make is how the station connects to your home wires. You can choose a plug-in style or a hardwired style. Each option has its own unique benefits.
A plug-in charger connects to a special heavy-duty wall outlet called a NEMA 14-50 or a NEMA 6-50 outlet. This looks like a giant version of a regular wall outlet. The biggest benefit of a plug-in unit is that it is not permanently attached to the house. If you decide to move to a new home, you can simply unplug the charger from the wall, take it with you, and plug it in at your new place. It also makes it very simple to replace the unit if it ever breaks down.
A hardwired charger does not use a wall plug at all. Instead, the electrical wires come straight out of the wall and go directly inside the charger housing, where they are permanently screwed into place. Hardwired systems are great because they can often handle higher electrical currents, allowing your car to charge even faster. They are also excellent for outdoor installations because there is no plug connection exposed to rainy or snowy weather, creating a much tighter seal against the elements.
Amperage and Charging Speed Choices
Chargers come in different power ratings, usually ranging from 16 amps up to 50 amps. The rule of thumb for electrical safety is that a circuit breaker must be rated for twenty percent more power than the appliance actually draws continuously. This is known as the eighty percent rule.
- If you buy a 32-amp charger, you need a 40-amp circuit breaker.
- If you buy a 40-amp charger, you need a 50-amp circuit breaker.
- If you buy a 48-amp charger, you need a 60-amp circuit breaker.
Choosing higher amperage means faster charging, but only if your car can accept that much power. Every electric vehicle has a built-in onboard charger that limits how fast it can take in energy. If your car can only accept 32 amps of power, buying a 48-amp charger will not make the car fill up any faster. Check your car owner manual to see its specific acceptance rate before spending extra money on a high-amperage station.
Smart Chargers vs Dumb Chargers
Just like phones and televisions, car chargers now come in smart versions. A basic or standard charger simply delivers electricity whenever it is plugged into a car. You plug it in, it starts charging, and it stops when the battery is full. It is simple, reliable, and usually costs less money up front.
A smart charger connects to your home wireless internet network. It allows you to track exactly how much energy you are using through a smartphone app. You can also set specific schedules so your car only charges during the middle of the night when electric companies often charge less money for power. Some smart chargers can even talk to your home solar panels, making sure your car only uses clean energy generated right on your roof.
Mapping the Ideal Installation Location
Before any wires are run, you need to map out exactly where the charger will live. This is a critical step because you want the cord to reach your car effortlessly without creating a dangerous tripping hazard for your family or visitors walking through the garage.
Considering Parking Positions and Port Locations
Every electric car has its charging port in a different spot. Some cars have the port right on the front nose, others have it near the driver-side front tire, and some have it in the back corner where a traditional gas tank opening would be. You need to look at where you park your car every day and find a spot on the wall that is closest to that port.
Keep in mind that you might change your parking habits in the winter, or you might eventually buy a second electric vehicle. Choosing a central location on the garage wall, perhaps between two garage bays, is often the best long-term strategy. This gives you the flexibility to charge multiple cars or park in different directions without stretching the cable to its absolute limit.
Measuring Cable Reach and Preventing Trip Hazards
Most Level 2 chargers come with a cable that is anywhere from eighteen to twenty-five feet long. While twenty-five feet sounds like a massive distance, it disappears quickly when you have to route the cable around the hood of a car or past lawnmowers and storage shelves.
You never want a charging cable to be pulled completely tight like a guitar string when it is plugged into your car. It should have plenty of slack so it rests flat on the ground. However, a long cable lying across a busy walkway can trip people up. Look for a location where the cable can lie out of the main walking paths, and ensure the charging station has a built-in holster or hook where you can neatly wrap the cord when you are finished using it.
Indoor vs Outdoor Installation Rules
If you do not have a garage, or if your garage is completely packed with storage, you can absolutely install a charging station outdoors on the side of your house or on a sturdy wooden post near your driveway. If you choose an outdoor spot, you must buy a charger that is specifically rated for outdoor use.
Look for a charger with a NEMA 3R or NEMA 4 rating. This certification guarantees that the plastic and metal housing can withstand heavy rain, blowing dust, sleet, and freezing ice without letting water touch the electrical parts inside. For outdoor setups, hardwiring the unit is highly recommended because it eliminates the risk of water seeping into a wall outlet socket over time.
Gathering Essential Safety Equipment and Tools
If you plan to assist with the preparation or if you are a homeowner working alongside a professional, having the right gear is non-negotiable. Working with electricity requires absolute respect, because even standard household currents can cause severe injuries if handled incorrectly.
Personal Safety Protection Gear
Before touching any tools, you need to protect your body. This starts with safety glasses to shield your eyes from flying drywall dust, metal shavings, or unexpected sparks. You also need a pair of heavy-duty leather work gloves to protect your hands while pulling stiff wires through tight spaces.
The most important safety items are insulated tools and rubber shoes. Never wear jewelry, rings, or metal watches while working on electrical projects, as metal conducts electricity instantly. Always wear thick, rubber-soled shoes to ensure you are properly insulated from the ground beneath you.
Essential Electrical Tools
To run wires and connect a high-voltage system, you need a specific set of tools designed for electrical work. A standard screwdriver and a pair of basic household pliers will not cut it for a project of this scale.
- Non-Contact Voltage Tester: This little pen-shaped tool glows bright red or makes a loud buzzing sound when it gets near live electricity. It is the most important safety tool because it verifies that a wire is completely dead before you touch it.
- Wire Strippers and Cutters: You need heavy-duty wire strippers that can cut through thick, low-gauge copper wires without damaging the metal strands inside.
- Conduit Benders and Cutters: If you are running wires along the surface of a garage wall, you will need to protect them inside metal or plastic tubes called conduit. A conduit bender allows you to create clean curves around corners.
- Torque Wrench: Electrical connections must be tightened to an exact specification set by the manufacturer. If a screw is too loose, electricity can arc and cause a fire. If it is too tight, it can crush the wire. A torque wrench ensures everything is perfectly secure.
Step-by-Step Preparation and Wiring Process
With all the plans drawn up and tools gathered, the actual physical work can begin. This process involves turning off the main power, mounting the hardware, running the heavy-duty wires, and making the final connections inside the electrical panel.
Step 1: Shutting Off the Main Power Supply
Safety begins at the main power source. Before opening up the electrical panel cover, you must turn off the giant main circuit breaker located at the very top of the panel. This switch shuts off the power to the entire house. Once you flip this switch, all your lights, appliances, and computers will turn off, so make sure your family knows ahead of time.
Even with the main breaker turned off, the thick wires coming straight from the utility company into the top of the panel are still live and full of dangerous electricity. Use your non-contact voltage tester on every single wire inside the panel to ensure there is absolutely no current flowing through the areas where you will be working. Double-check your tester on a known live outlet first to make sure its batteries are working correctly.
Step 2: Running the Conduit and Wires
Because a Level 2 charger pulls a large amount of power for hours on end, it requires thick, heavy-duty electrical wires. Most installations use 6-gauge or 8-gauge copper wires. These wires are much thicker and stiffer than the thin wires used for standard light switches.
If your garage walls are unfinished with the wooden studs exposed, you can drill holes through the center of the studs and run the wire through them. If your garage walls are covered in drywall or plaster, you cannot simply staple these thick wires to the surface. You must install a protective tube called conduit along the wall. Secure the conduit to the wall using metal straps every few feet, then use a special tool called a fish tape to pull the thick copper wires through the tube from the electrical panel all the way to the charger location.
Step 3: Mounting the Charging Station Housing
Hold the mounting bracket of your new charging station against the garage wall at a comfortable height, usually around four to five feet off the ground. Use a level tool to ensure the bracket is perfectly straight, then mark the screw holes with a pencil.
A heavy charging station combined with a twenty-five-foot cable can weigh quite a bit, and people will constantly be pulling on the cord. You cannot simply screw the bracket into weak drywall using plastic anchors. You must locate a solid wooden wall stud using a stud finder and secure the bracket directly into the wood using heavy-duty lag screws. If you are mounting to a brick or concrete block wall, you must use a masonry drill bit and expanding concrete anchors to ensure the station never pulls loose from the wall.
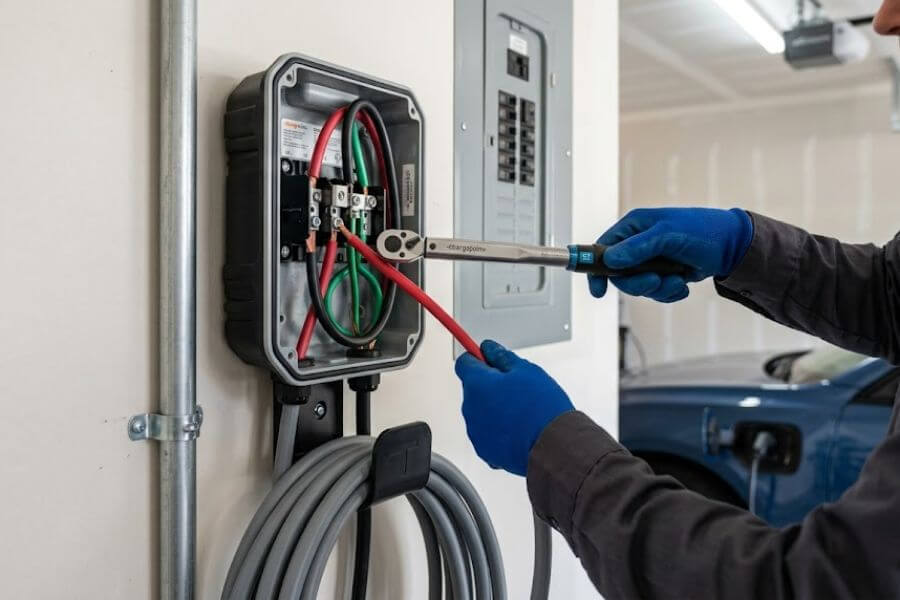
Step 4: Connecting the Wires to the Charger
Now that the box is securely on the wall and the wires have arrived through the conduit, it is time to hook them up inside the charger. Strip away the outer plastic insulation from the ends of the wires, exposing about half an inch of bare copper metal.
Inside a standard 240-volt setup, you will typically find three separate wires: two hot wires that carry the actual electrical current and one ground wire that acts as a safety shield. Insert the two hot wires, which are usually colored black and red, into the main power terminals inside the charger and tighten the screws using your torque wrench to the exact tightness listed in the manual. Connect the green or bare copper ground wire to the grounding terminal block. Hardwired units stop here, while plug-in units connect these exact same wires to the back of the heavy-duty wall outlet instead.
Step 5: Installing the New Double-Pole Breaker
Back at the electrical panel, you need to connect the other end of the wires to your brand-new double-pole circuit breaker. A double-pole breaker connects to both hot metal bars inside the panel, which is how it pulls a full 240 volts of power.
Connect the black wire to one screw on the breaker and the red wire to the other screw. Connect the green or bare ground wire to the long metal grounding strip inside the panel where all the other ground wires live. Once the wires are tightly secured to the breaker, carefully line up the breaker with the empty slots in your panel and push down firmly until it clicks securely onto the metal bus bars. Keep the breaker in the OFF position for now.
+-------------------------------------------------------------+
|               MAIN ELECTRICAL PANEL CONNECTIONS             |
|                                                             |
|  [Main Power Bars]                                          |
|         ||                                                  |
|         ||-----> [Double-Pole Breaker]                      |
|         ||         |              |                         |
|                    | (Black Hot)  | (Red Hot)               |
|                    v              v                         |
|             +----------------------------+                  |
|             |    PROTECTIVE CONDUIT      |                  |
|             |  ========================  |                  |
|             |  (Thick 6-Gauge Wires)     |                  |
|             +----------------------------+                  |
|                    |              |      |                  |
|                    |              |      v (Green Ground)   |
|                    v              v      ======> [Ground]   |
|             +----------------------------+                  |
|             |   LEVEL 2 CHARGING STATION |                  |
|             +----------------------------+                  |
+-------------------------------------------------------------+
Testing and First-Time Startup Procedures
With all the physical installation finished, it is time to close up the panels, turn the power back on, and run a series of safety checks before plugging the cord into your expensive electric vehicle.
Conducting the Visual Inspection
Before flipping any switches, take a step back and look over your entire work area with a critical eye. Ensure all electrical panel covers are screwed back on tightly so no live wires are exposed. Check that all conduit fittings are snug and that the charging station box is completely sealed shut. Clean up any metal shavings, drywall dust, or bits of stripped wire insulation that might be lying around the floor or inside the panel.
Turning the Power On Safely
Go back to your main electrical panel. Take a deep breath and flip the giant main circuit breaker back to the ON position. You will hear your house come back to life as refrigerator motors start up and lights turn on.
Next, move your eyes down to the brand-new double-pole breaker you installed for the car charger. Move that switch from OFF to ON. If the breaker instantly snaps back to the middle position with a loud pop, do not force it back on. This means there is a short circuit somewhere in your wiring, and you need to turn everything off immediately to recheck your connections. If the breaker stays firmly in the ON position, your installation is successful so far.
Reading the Indicator Lights
Walk over to your charging station on the wall. Most modern Level 2 chargers will run a quick self-test as soon as they receive power for the first time. You will see a series of LED lights flash across the front display panel.
Look at the user manual to see what the light patterns mean. Usually, a steady green or blue light means the station is turned on, healthy, and waiting for a vehicle to connect. If you see a flashing red light or an error code on a screen, it means something is wrong, such as a missing ground connection or a voltage issue. If the lights show a healthy status, you are officially ready to plug in your car and enjoy ultra-fast home charging.
Permitting, Regulations, and Professional Help
While many home improvement projects can be tackled completely by yourself on a weekend, adding a high-voltage electrical circuit to your home is a major electrical modification. You need to understand the legal and safety rules that govern this kind of work in your local community.
The Role of Local Building Permits
In almost every town, city, and county, the law requires you to get a building permit before adding a new 240-volt circuit to your home. Getting a permit means you are telling the local government what you plan to build, paying a small fee, and asking them to verify that your work is completely safe.
Once the installation is complete, a local city building inspector will come out to your house. They will look inside your electrical panel, examine the conduit, and check that the charger is mounted correctly. While this sounds like a hassle, it is actually a fantastic safety net. The inspector is a neutral expert whose only job is to make sure your home will not catch fire, giving you incredible peace of mind.
Why Hiring a Licensed Electrician is a Smart Move
If reading about wire gauges, panel capacity calculations, and double-pole breakers makes your head spin, that is a clear sign that you should hire a licensed professional electrician to handle the installation. Electricity is invisible and unforgiving, and making a small mistake can lead to dangerous shocks or electrical house fires.
A certified electrician does this work every single day. They can calculate your home electrical load in minutes, pull all the necessary permits for you, and complete the physical installation quickly and safely. Furthermore, many car manufacturers will only honor the warranty on your charging station if it was installed by a licensed professional.
Insurance and Home Valuations
Having a professional install your Level 2 station is also important for your home insurance policy. If an unpermitted, DIY electrical project causes damage to a house, an insurance company might refuse to pay for the repairs. Keeping copies of your professional electrician invoice and your signed city permit document proves that everything was done legally and safely. Additionally, having a permitted Level 2 charger professionally mounted in your garage is a massive selling point that can increase the financial value of your home when you decide to sell it down the road.
Maintaining Your Home Charging Station Over Time
Once your Level 2 charging station is up and running perfectly, it requires very little daily attention. However, because it sits in a busy garage and handles large amounts of power, performing a quick routine check-up a few times a year will ensure it keeps running safely for a long time.
Caring for the Cable and Plug
The most vulnerable part of any charging station is the long cable and the plastic handle that plugs into your car. Because this cord gets dragged across the dirty garage floor, stepped on, or run over by car tires, it takes a lot of abuse.
Every few months, take a clean cloth and wipe down the length of the cable to remove dirt, grease, and road salt. Look closely for any signs of deep scratches, cracks in the rubber insulation, or exposed copper wires. If you see any cuts or damage to the cord, stop using the charger immediately and get the cable replaced. Also, look inside the metal pins of the plug handle to make sure no dust, spiderwebs, or debris have crawled inside, which could block the connection to your car.
Managing Temperatures and Sun Exposure
Electricity creates heat naturally as it moves through wires. When your car is charging, the station and the cable will feel warm to the touch, which is completely normal. However, they should never feel burning hot or smell like melting plastic.
If your charger is installed outdoors, try to place it in a spot that gets some shade during the hottest parts of the day. Extreme summer heat can cause the charger to slow down its power delivery to protect its internal computer chips. In the winter, make sure to shake off any heavy snow or ice from the handle before plugging it into your vehicle to keep moisture completely out of the port.
Frequently Asked Questions
Can I install a Level 2 home EV charger myself or do I absolutely have to hire a professional?
You can legally install a Level 2 home charger yourself if you have a strong understanding of residential electrical systems, know how to safely shut down your main power panel, and strictly follow your local building codes. However, because this project involves working with high-voltage 240-volt electricity, thick wire gauges, and complex load calculations, hiring a licensed electrician is highly recommended for most homeowners. A professional ensures that everything complies with the National Electrical Code, handles the local permitting process, and guarantees the installation is completely safe, protecting your home insurance coverage and equipment warranties.
How much does it typically cost to prepare for and install a Level 2 charging station at home?
The total cost can vary widely depending on your existing home electrical setup. If your main panel already has plenty of unused amperage capacity and an empty slot right next to where you park your car, a professional installation might only cost a few hundred dollars plus the price of the charger itself. However, if your electrical panel is located on the opposite side of the house from your garage, running long distances of conduit and thick copper wire can increase the price. If your home has an older 100-amp service that requires a full upgrade to a modern 200-amp panel to handle the load, the total cost can increase significantly.
Is it better to choose a plug-in Level 2 charger or a permanently hardwired unit?
Neither option is universally superior, as the right choice depends on your specific lifestyle and setup. A plug-in charger offers fantastic flexibility because it plugs into a heavy-duty NEMA 14-50 outlet, allowing you to easily unplug the unit to take it with you if you move houses or send it in for repairs. On the other hand, a hardwired unit is permanently connected to your home wires, which eliminates a physical plug connection that could wear out over time. Hardwired stations are generally better for outdoor installations because they create a completely weatherproof seal, and they can often support higher amperages for faster charging speeds than plug-in models.
Will a Level 2 charging station damage my electric car battery if I use it every single night?
No, using a Level 2 charging station every single night will not damage your electric vehicle battery. In fact, Level 2 charging is considered the gentlest way to charge an electric car on a regular basis. The rapid battery degradation people worry about is typically caused by the extreme heat generated by public Level 3 DC fast chargers. Because Level 2 home chargers deliver power at a steady, moderate pace over several hours, the battery stays at a safe temperature. Most electric vehicles also feature advanced built-in thermal management software that monitors the battery health and automatically stops the flow of electricity the second the battery becomes completely full.
What size circuit breaker and wire gauge do I need to install for a standard 40-amp Level 2 charger?
To safely run a 40-amp Level 2 charger, you must follow the electrical safety standard known as the eighty percent rule, which states that a continuous electrical load should not exceed eighty percent of the maximum capacity of the circuit breaker. Therefore, a 40-amp charger requires a 50-amp double-pole circuit breaker. To safely carry that 50-amp current without overheating, you typically need to install thick 6-gauge copper wires inside your conduit. Always verify the specific wire type and distance requirements in your charging station installation manual, as long distances can sometimes require even thicker wires to prevent a drop in electrical voltage.
Can I share the existing 240-volt outlet used for my clothes dryer to charge my electric vehicle?
While it is technically possible to use a heavy-duty splitter or a smart switching box to share your clothes dryer outlet with a car charger, it is generally not recommended as a permanent solution. Traditional clothes dryer outlets are usually attached to 30-amp circuit breakers, which limits you to a slower 24-amp charging speed to avoid tripping the switch. Furthermore, these household outlets were designed for appliances that stay plugged in forever, so constantly plugging and unplugging a heavy car charger handle can cause the wall socket to loosen over time, creating a serious electrical fire hazard. A dedicated, newly installed circuit is always the safest option.