When you press down on the gas pedal of your vehicle, you might think you are directly pumping more fuel into the combustion chambers. In reality, you are doing something completely different. You are actually controlling the precise amount of air that enters the engine. The component responsible for this vital task is the throttle body. Located between your air filter housing and the intake manifold, this metal part acts as the primary gatekeeper for your engine’s breathing system.
Inside the housing sits a round metal plate known as the butterfly valve or throttle plate. This plate rotates on a central shaft. When your car is sitting still with the engine running, the plate remains almost completely closed, leaving only a tiny gap for a small stream of air to pass through so the vehicle can idle smoothly. The moment your foot presses the accelerator, a cable or an electronic signal forces this plate to swing open. The wider it opens, the more fresh air rushes into the intake manifold. Your vehicle’s main computer monitors this incoming airflow and instantly calculates the exact amount of fuel needed to match it, creating the perfect mixture for clean combustion.
Because this component sits at the very crossroads of fresh outside air and recycled internal engine gases, it occupies a highly sensitive position. Every single cubic foot of air your engine consumes must pass through this single passage. If the passage becomes restricted or the movement of the metal plate gets interrupted, your entire driving experience will quickly suffer. Understanding how this system works is the first step toward taking control of your vehicle’s maintenance and ensuring your engine always gets the clean breath of air it requires to run at its absolute best.
Why Carbon is Your Engines Worst Enemy
Over thousands of miles of driving, an invisible battle takes place inside your intake tract. While the air coming through your filter is clean, the air coming from inside your engine is a completely different story. Modern vehicles utilize specialized emission control systems designed to recycle internal gases back through the combustion cycle to protect the environment. While this is great for the planet, it can introduce a lot of sticky debris into your clean intake system.
The primary cause of this dark buildup is the positive crankcase ventilation system. This system takes pressurized oil vapors and blow-by gases from the crankcase and routes them straight back into the intake tract right before the throttle body so they can be burned away safely. These hot oil vapors carry microscopic particles of engine oil and partially burned fuel. When these hot vapors hit the relatively cool metal surfaces of the intake housing, they instantly begin to condense and settle.
At the same exact time, the exhaust gas recirculation valve may be feeding spent exhaust gases back into the system to lower combustion temperatures. These exhaust gases carry fine soot particles. When the sticky oil film from the crankcase meets the fine carbon soot from the exhaust, they bond together to create a dark, gummy layer of sludge. As your engine heats up and cools down over dozens of driving cycles, this sludge literally bakes onto the metal walls and the edges of the butterfly valve, hardening into a tough, crusty layer of pure carbon. This crust slowly shrinks the air passage and creates friction, preventing the valve from moving with the absolute precision required by your vehicle’s engine computer.
Signs Your Throttle Body Needs a Good Scrub
Your vehicle is highly communicative, and when carbon buildup begins to choke its air supply, it will drop clear hints that something is wrong. Paying close attention to these early warning signs can save you from a frustrating breakdown on the side of the highway or an expensive trip to a repair shop.
The first major sign you will likely notice is a rough or unstable idle. When you stop at a red light or sit in a parking lot, your engine speed should remain perfectly steady, usually hovering smoothly around seven hundred to eight hundred revolutions per minute. If carbon has built up around the edges of the throttle plate, it blocks the tiny, critical gap that allows idle air to pass through. Your engine will suddenly starve for air, causing the RPM needle to plunge downward. The vehicle might shake, shudder, or feel like it is about to turn off completely. To prevent itself from dying, the computer will quickly command the valve to open wider, causing the engine speed to suddenly spike upward before dropping back down again. This constant hunting for a steady idle is a classic cry for help.
Another clear sign is a distinct hesitation or stumbling feeling when you try to accelerate from a complete stop. As you step on the gas pedal, you expect an instant response. However, if a thick rim of sticky carbon has formed around the butterfly valve, the plate can actually become physically stuck in the closed position for a brief millisecond. You press the pedal, nothing happens for a moment because the valve is resisting the movement, and then the plate suddenly snaps open past the carbon ridge. This causes the vehicle to lurch forward awkwardly rather than moving away smoothly.
You might also notice a significant drop in your overall fuel economy. When the intake path is coated in bumpy, uneven carbon, the air flowing into your engine becomes highly turbulent rather than moving in a smooth, predictable stream. This chaotic airflow confuses the oxygen sensors and the mass airflow sensor, causing the engine computer to miscalculate the air-and-fuel mixture. To err on the safe side, the computer often injects extra fuel to prevent a dangerous lean condition, meaning you will find yourself filling up your gas tank much more frequently than usual. In severe cases, the restriction becomes so bad that the computer triggers a check engine light on your dashboard, storing specific fault codes related to airflow performance or idle control limits.
Tools and Materials You Need to Gather
Before you roll up your sleeves and open the hood of your vehicle, you must gather the correct equipment for the job. Having every single item arranged on your workbench before you start ensures you will not have to stop midway through the project to look for a missing tool.
First and foremost, safety requires top billing. You absolutely must wear high-quality safety glasses to shield your eyes from accidental chemical splashes. The specialized solvents used to dissolve baked-on carbon are incredibly strong and can cause severe injury if they come into contact with your eyes. You should also grab a pair of solvent-resistant nitrile gloves to keep the harsh chemicals and thick black carbon sludge off your skin.
For the actual cleaning process, you will need a dedicated can of aerosol throttle body cleaner. It is highly important to use a product specifically formulated for this task. Never substitute brake cleaner, carburetor cleaner, or general penetrating oils for this job. Carburetor cleaners are often too aggressive and can completely strip away the special protective teflon coatings applied to the inside of modern intake housings, while brake cleaners can degrade the sensitive rubber seals and delicate electronics built into modern assemblies.
To scrub away the stubborn crust, you will want a couple of soft-bristled brushes. A standard nylon toothbrush works beautifully for this job. Never use a brass, steel, or wire brush under any circumstances, as metal bristles will deeply scratch the soft aluminum housing and ruin the precise seal around the plate forever. You will also need several clean, lint-free microfiber towels to wipe away the dissolved sludge. Avoid using cheap paper towels that can tear apart and leave tiny wood fibers inside your intake tract. Finally, gather a basic set of hand tools, including a flathead screwdriver, a phillips-head screwdriver, and a small socket set with an extension bar to remove the intake clamps and mounting bolts.
Safety First Before You Begin
Working on an automobile requires an organized approach to personal safety and vehicle protection. You should always park your vehicle on a flat, level surface, engage the parking brake firmly, and remove the keys from the ignition entirely so there is zero chance of the electrical systems activating while your fingers are inside the intake components.
Allow the engine to cool down completely before you touch anything under the hood. The intake manifold and surrounding cooling hoses sit right next to the engine block and can retain burning heat for hours after a drive. Working on a boiling hot engine dramatically increases your risk of severe burns and can cause the cleaning solvents to evaporate instantly upon contact, releasing highly toxic fumes into the air around you. Always perform this task in a wide-open, well-ventilated space, such as an open driveway or a garage with the main door rolled completely up to ensure a constant supply of fresh air.
The final and most crucial preparation step is to disconnect the negative terminal of your vehicle’s car battery. Use an appropriate wrench to loosen the nut on the negative terminal clamp, slide the clamp completely off the battery post, and tuck it safely off to the side where it cannot accidentally spring back and make contact with the metal post. Disconnecting the battery achieves two critical goals. First, it completely eliminates the risk of an electrical short circuit if a tool accidentally touches a live wire. Second, and perhaps most importantly for modern vehicles, it cuts power to the electronic throttle actuator, ensuring the motorized butterfly valve cannot suddenly snap shut on your fingers while you are cleaning inside the bore.
Step-by-Step Guide to Accessing the Throttle Body
With your tools ready and the battery safely disconnected, you can now open the hood and locate the intake system. Look for the large, flexible black rubber or plastic ducting that runs directly from your plastic air filter box straight to the top or side of the engine. Follow this ductwork until you see where it connects to a silver aluminum housing. That aluminum housing is your destination.
To clear a path, you must carefully remove this large air intake duct. Start by identifying the metal worm-gear clamps or spring clamps holding the rubber duct onto the housing inlet. Use your flathead screwdriver or a small socket to loosen these clamps until they move around freely on the rubber. If there are any small vacuum lines, breathers, or PCV hoses attached to the side of the large plastic intake tube, carefully slide their tension clamps back and gently wiggle the hoses off their plastic barbs. Take your time during this step, as old plastic fittings can become brittle from years of engine heat and can snap easily if twisted too aggressively.
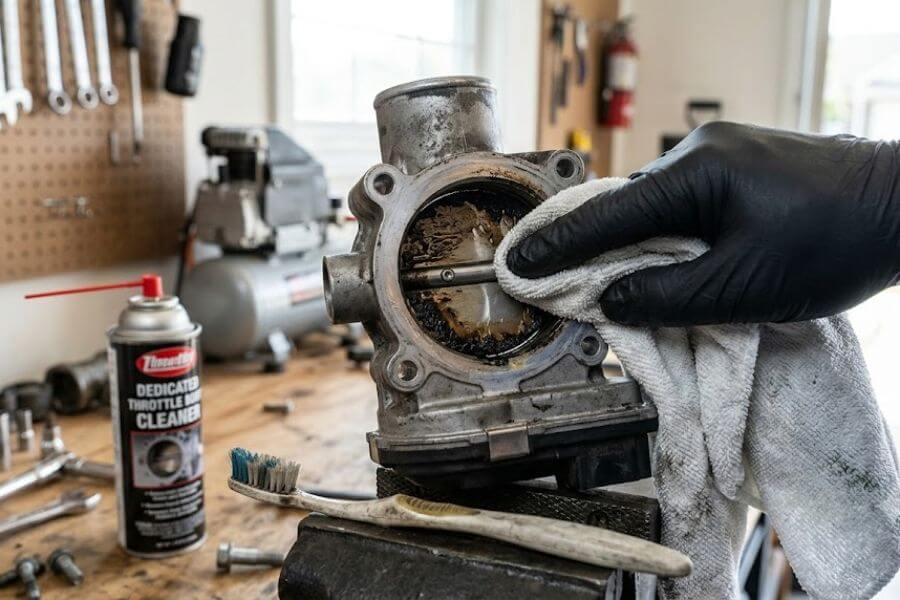
Once the clamps are loose and the secondary hoses are safely unhooked, gently grasp the large intake duct and wiggle it back and forth to break the seal against the metal housing. Slowly pull the duct off and lift it out of the engine bay, setting it down in a safe spot. As soon as the duct is removed, you will be able to look directly down into the throat of the intake system. Take a moment to inspect the condition of the open throat. You will likely see a dark ring of greasy, black residue rimming the area where the circular plate meets the round walls of the bore.
The Cleaning Process Explained in Deep Detail
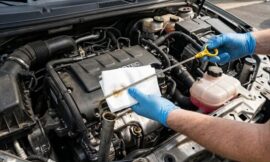
Now that you have a clear, unobstructed view of the component, it is time to begin the actual restoration work. Shake your can of specialized cleaner thoroughly. Spray a modest amount of the fluid directly onto your microfiber cloth until the fabric is damp but not dripping wet. Avoid spraying massive amounts of liquid directly into the housing while it is still mounted on the engine, as you do not want large puddles of chemical solvent pooling deep inside your intake manifold where it could cause hydro-locking issues later when you try to start the car.
Take your damp microfiber towel and use your fingers to wipe away the loose, oily film around the outer edges of the entrance. You will immediately notice the cloth turning completely black as it lifts the oily sludge away. Next, take your nylon toothbrush and spray the bristles directly with the chemical cleaner. Begin gently scrubbing the stubborn, crusty carbon rings located right where the throttle plate rests when it is fully closed. Use circular motions with the brush, letting the chemical formula break down the hardened carbon bonds rather than trying to scrape it away with pure physical force.
As you scrub, the carbon will transform into a thick, dark liquid sludge. Use a dry, clean section of your microfiber towel to frequently wipe this slurry out of the bore so it does not run deeper into the engine. Be incredibly meticulous around the central shaft pivots where the plate connects to the main housing outer walls. Carbon loves to pack tightly into these tiny pivot points, creating mechanical drag that makes it difficult for the return springs to do their job properly. Continue this process of spraying your brush, scrubbing gently, and wiping clean with the cloth until the bare, silver aluminum shine of the inner bore is fully restored.
Electronic vs Mechanical Throttle Bodies
Before you attempt to clean the back side of the butterfly valve, you must identify exactly what type of system your vehicle utilizes, as the cleaning technique changes completely depending on the design. Older vehicles use a purely mechanical setup, meaning a physical steel cable runs directly from your gas pedal through the firewall straight to a linkage arm on the side of the intake housing. If your car has this mechanical setup, you can safely use your fingers to manually press on the linkage arm to swing the butterfly valve wide open, allowing you to clean the backside of the plate and the deep sections of the bore without any risk of damaging internal components.
Modern vehicles built over the last two decades almost universally employ an electronic system, often referred to as drive-by-wire technology. In these advanced systems, there is absolutely no physical mechanical connection between your foot and the intake plate. Instead, a sensor on your gas pedal sends an electrical signal to the vehicle’s main computer, and the computer commands a highly sensitive, high-torque electric motor hidden inside a plastic side cover on the intake housing to move the plate via precision plastic and metal gears.
If your vehicle features an electronic setup, you must exercise extreme caution. Never use your fingers or a tool to manually force an electronic butterfly valve open. Forcing the plate open against the resistance of the internal electric motor can easily strip the fragile teeth on the internal gears, break the delicate return springs, or completely ruin the calibration of the digital position sensors. To clean behind an electronic plate safely without removing the entire assembly from the car, you should have a helper sit inside the vehicle with the battery temporarily reconnected and the key turned to the “On” position without starting the engine. Have your helper press the gas pedal down to the floor, which will cause the computer to safely command the electric motor to open the valve for you. If you are working completely alone, your absolute best option is to carefully unbolt the four main mounting bolts holding the entire housing to the intake manifold, disconnect the electrical wiring plug, and remove the unit from the car entirely so you can clean both sides of the plate safely without ever needing to force the mechanism open manually.
Reassembly and Making Everything Secure
Once the internal bore and both sides of the circular plate look completely spotless and shine like brand new metal, you can begin putting everything back together. If you removed the entire housing from the engine manifold to clean it on a workbench, check the condition of the rubber or paper gasket that seals the unit to the engine. If the gasket looks flattened, cracked, or dry-rotted, replace it with a new one to prevent dangerous vacuum leaks. Carefully align the housing back onto its mounting studs and hand-tighten the four mounting bolts. Use your socket wrench to tighten these bolts down in a criss-cross pattern, ensuring even pressure across the sealing surface so you do not warp the aluminum flange.
Next, lift the large black rubber air intake duct back into position. Carefully slide the rubber sleeve over the mouth of the clean intake housing, making absolutely sure that the rubber lip seats fully and evenly all the way around the metal opening. If the boot is twisted or bunched underneath where you cannot see it, unmetered air will slip past the seal into your engine, causing a rough idle and a lean code.
Slide the main worm-gear or spring clamps back into position over the designated slots on the rubber duct and tighten them down firmly until they are snug. Be careful not to over-tighten plastic clamps, as they can crack under excessive pressure. Reattach any small vacuum lines or PCV hoses to their respective plastic ports, ensuring they push all the way on and that their tension clips are seated firmly over the barbs. Finally, take your electrical wiring harness plugs for the sensors and press them firmly into their sockets until you hear a distinct clicking sound, which confirms the locking tab has engaged. Walk over to your vehicle’s battery, slide the negative cable clamp back onto the metal battery post, and tighten the holding nut firmly with your wrench until the clamp can no longer rotate or move on the post.
The Critical Idle Relearn Procedure
Now that your vehicle is fully reassembled and the battery is connected, you might think you are completely ready to hit the road. However, there is one last hidden step that is absolutely essential for cars equipped with electronic systems. Because your engine’s main computer is highly smart, it spent the last several months or years constantly adapting to the slow, progressive buildup of carbon inside the intake tract.
As the carbon layer slowly grew thicker and shrank the intake passage, the computer automatically commanded the electric motor to open the butterfly valve just a tiny fraction of a millimeter wider at idle to compensate for the restriction and keep the engine running smoothly. Now that you have completely scrubbed all that thick carbon away, that tiny gap is suddenly a massive open canyon. If you start the engine immediately without teaching the computer that the carbon is gone, a massive rush of unexpected air will pour into the engine, causing your car to idle at an alarmingly high speed, surge wildly up and down, or throw an immediate check engine light.
To fix this, you must perform what is known as an idle relearn procedure. This process forces the engine computer to erase its old, corrupted memory of the dirty carbon buildup and map out completely new baseline values based on the pristine, clean metal bore. The specific process varies slightly depending on the manufacturer of your vehicle. For many vehicles, you can perform a manual relearn by turning the ignition key to the “On” position for one full minute without cranking the engine, turning it back off for ten seconds, and then starting the engine and letting it sit completely undisturbed at a standstill for ten to fifteen minutes until it reaches full operating temperature. During this time, do not touch the gas pedal, do not turn on the air conditioning, and do not turn on the radio or headlights, as any extra electrical or mechanical load can interfere with the computer’s delicate calibration process. Over the course of those fifteen minutes, you will actually hear the loud, high idle slowly settle down, stepping downward lower and lower until it rests at a perfect, whisper-quiet purr.
Long-Term Maintenance Tips for a Clean Intake
To keep your newly restored engine performing at its absolute peak and prevent yourself from having to repeat this deep cleaning process anytime soon, you should adopt a few proactive vehicle maintenance habits. Carbon buildup is an ongoing reality of internal combustion engines, but you can dramatically slow down the speed at which it accumulates.
- Change Your Engine Air Filter Routinely: Your air filter is the first line of defense against the outside world. If you neglect your air filter and let it get completely packed with dirt, dust, and debris, it restricts the incoming airflow. This restriction creates a high vacuum environment inside the intake duct, which literally pulls extra oily crankcase vapors through the PCV system and deposits them directly onto your clean metal surfaces. Inspect your filter every six months and replace it the moment it looks grey or dusty.
- Use High-Quality Top Tier Fuel: While fuel does not directly spray onto the front of your throttle body in modern fuel-injected engines, using high-quality gasoline containing advanced detergent additives keeps your intake valves and combustion chambers much cleaner. Clean combustion means far less soot and fewer unburned hydrocarbons enter your exhaust stream, which drastically reduces the amount of sticky carbon that gets recycled back into your intake tract through the EGR system.
- Consider Installing an Oil Catch Can: For vehicles with direct-injection engines that are highly prone to heavy carbon buildup, installing an aftermarket oil catch can is an exceptional long-term upgrade. This device plumbs directly into the PCV line between the crankcase and the intake. It acts as a mechanical filter, cooling the hot oil vapors and trapping the sticky oil sludge inside an aluminum canister before it ever gets a chance to enter your clean intake system. You simply unscrew the canister and empty the trapped oil every time you change your engine oil.
Summary of the Entire Cleaning Journey
To help you visualize the entire transformation your vehicle goes through during this process, look at the detailed comparison below outlining the stark differences between a neglected intake system and a freshly restored one.
| Characteristic | Carboned Up Condition | Freshly Cleaned Condition |
| Airflow Characteristics | Highly turbulent, restricted, and unpredictable | Smooth, laminar, and perfectly optimized |
| Engine Idle Quality | Shaking, rough, fluctuating RPMs, prone to stalling | Perfectly steady, whisper-quiet, consistent RPMs |
| Throttle Pedal Feel | Sticky, hesitant, jerky initial acceleration | Instantaneous, highly crisp, linear response |
| Fuel Economy Performance | Poor, burns extra fuel due to computer confusion | Restored to original peak factory efficiency levels |
| Internal Bore Surface | Coated in a thick, sticky, black crust of sludge | Bright, bare, pristine silver aluminum metal |
| Component Stress | High stress on the electric actuator motor | Minimal stress, completely friction-free operation |
Frequently Asked Questions
Can I use regular WD40 or penetrating oil to clean the intake system?
No, you should never use general penetrating oils or multi-purpose lubricants like WD40 to clean your intake system. These products are designed to leave behind a protective, oily film to prevent rust and lubricate moving parts. If you spray them inside your intake system, that oily residue will stay behind on the metal walls and act like a giant magnet for incoming dust and dirt particles. Within a few hundred miles of driving, your system will clog up with a thick layer of sludge that is much worse than the original dry carbon you started with. Always stick strictly to dedicated cleaners that evaporate completely within seconds, leaving behind a perfectly dry, residue-free surface.
How often should I perform this maintenance procedure on my car?
For most standard passenger cars and trucks, checking and cleaning the system every thirty thousand to fifty thousand miles is an excellent maintenance schedule. However, if you primarily drive short distances where your engine never has a chance to reach its full operating temperature, or if you do a massive amount of stop-and-go driving in heavy city traffic, carbon will build up much faster. In those specific driving conditions, inspecting the intake tract once every year or every fifteen thousand miles is a smart habit to catch buildup before it starts harming your daily drive.
Why does my car idle so high immediately after I finished cleaning everything?
A high idle right after cleaning is completely normal and is almost always caused by the engine computer still using its old calibration memory. Before you cleaned the unit, the computer had to command the valve to stay open extra wide to fight past the thick rim of carbon blockages. Now that the carbon is gone and the path is completely clear, that same wide command lets in way too much air, causing the engine to rev high. Performing the idle relearn procedure described earlier will reset this memory and bring the engine speed back down to its proper factory level within a few minutes.
Is it completely safe to move the throttle plate on a car with a traditional mechanical throttle cable?
Yes, if your car uses a traditional mechanical steel cable linking the gas pedal directly to the side of the housing, it is entirely safe to move the plate manually with your hands while cleaning. There are no delicate electric motors or digital position gears inside a purely mechanical setup that can be stripped or broken by human force. Just be gentle and avoid letting the spring-loaded mechanism snap back closed violently, as the sharp metal edge of the plate slamming against the housing wall can nick the metal and create a permanent gap.
Will cleaning this component fix a check engine light on my dashboard?
If the check engine light was specifically triggered by fault codes related to poor idle control, air mass performance, or throttle position limits, then a thorough cleaning will very likely fix the issue and allow the light to turn off. Once the carbon is removed and the computer completes its relearn procedure, it will see that the airflow matches its targets perfectly, and it will turn off the dashboard warning after a few driving cycles. However, if your light is on due to a broken sensor, a bad spark plug, or a vacuum leak elsewhere in the engine, cleaning this specific part will not resolve those unrelated issues.