
Imagine you are driving down the open highway. The sun is shining, your favorite music is playing, and the road ahead looks completely clear. Suddenly, a tiny pebble flies up from the back tire of a big dump truck right in front of you. You hear a loud, sharp snap. Your heart sinks. Right there, directly in your line of sight, a small star-shaped fracture begins to form on your clean glass.
It is incredibly frustrating, but you do not have to head straight to an expensive mechanic. You can actually fix this minor annoyance yourself right in your own driveway. Taking care of it quickly prevents the damage from spreading into a massive crack that ruins the entire glass pane. With a professional-grade do-it-yourself resin package, you can restore the strength of your glass and make that ugly blemish nearly invisible. Let us walk through every single step to get your vehicle looking great again.
Getting to Know Your Windshield and the Damage
Before you open up your repair package, it helps to understand exactly what you are looking at. Your vehicle front glass is not like a standard window pane in your house. It is actually a sandwich made of three separate layers. You have an outer sheet of glass, a tough inner layer of clear plastic, and an inner sheet of glass. This special design keeps the glass from shattering into dangerous pieces during an accident.
When a stray pebble strikes your car, it almost always damages only the very outer layer. The impact pushes a tiny bit of glass inward, creating an empty pocket of air. This trapped air is actually what makes the spot look dark, black, or silver to your eyes. Your main goal during this process is to remove all that trapped air and replace it with a clear, liquid material that hardens under sunlight.
Identifying the Type of Chip
Not every single mark on your glass looks identical. Knowing exactly what kind of blemish you have tells you what to expect when the process is finished.
- The Bullseye: This looks like a dark circle with a clear center point. It features a smooth, round separation around the impact point. These are usually the most straightforward to fix because the cavity is wide open and accepts liquid easily.
- The Star Finish: This looks like a central point with several thin lines radiating outward like legs on a spider. These are highly dangerous because those tiny legs can grow into giant cracks at any moment if you hit a bump or experience a sudden temperature change.
- The Combination: This is a mix of both types. You will see a round crater with several small hairline fractures branching off in different directions.
- The Half Moon: This looks like a partial circle, forming a crescent shape. It is very similar to a bullseye but does not form a complete ring.
When Can You Do It Yourself
A good rule of thumb relies on the size of the damage. If the entire blemish can fit completely underneath a standard quarter, you are usually in excellent shape to fix it yourself. If you see lines that stretch out longer than a dollar bill, the structural strength of the pane is gone, and you will need a complete replacement.
Location matters quite a bit too. If the fracture sits directly along the very outer perimeter of the glass, within an inch or two of the black plastic frame, it is under an immense amount of physical pressure. These perimeter flaws expand rapidly and rarely hold onto a home remedy. Furthermore, if the damage penetrates through the inner plastic layer all the way to the inside of the cabin, a home package will not be able to fix it.
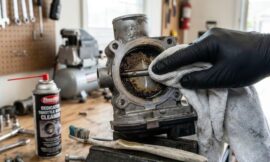
Gathering Your Supplies and Inspecting the Kit
When you purchase a high-quality repair package from a local automotive supply store, you will find a few specific tools inside the box. Every manufacturing brand bundles their items slightly differently, but they all rely on the exact same core scientific principles to achieve success.
| Item Name | What It Looks Like | What It Does |
| Repair Resin | A tiny plastic dropper bottle | The liquid plastic that fills the void and hardens |
| The Applicator Bridge | A plastic frame with three or four suction cups | Holds the injection tube perfectly steady over the center point |
| The Injection Tube | A hollow plastic cylinder that screws into the bridge | Pushes the liquid deep into the center of the fracture |
| The Plunger | A thin plastic screw or rod that goes inside the tube | Creates the pressure needed to force air out and resin in |
| Curing Strips | Small sheets of clear, flexible plastic | Covers the wet resin to block oxygen while it dries |
| Razor Blade | A standard single edge safety blade | Scrapes away excess hardened material at the very end |
Choosing the Best Workspace
You cannot complete this job just anywhere. The liquid plastic material inside your box is highly sensitive to ultraviolet light, which is the exact same type of light that comes directly from the sun. If you attempt this process outside on a bright, sunny afternoon, the liquid will harden inside your tools before it even has a chance to fill up the fracture.
Always park your automobile completely inside a dark garage or underneath a deep shade tree before you begin opening the bottles. The glass must also be close to a comfortable room temperature. If the surface feels hot to the touch because it has been sitting out in the summer sun, the liquid will boil and fail. If it is freezing cold in the middle of winter, the liquid will become thick like syrup and will not flow into the tiny microscopic cracks. Use your vehicle’s air conditioner or heater to bring the glass to a comfortable temperature before starting.
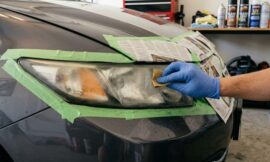
Prepping the Glass for a Perfect Bond
Any small speck of dust, microscopic grain of sand, or leftover moisture trapped inside the fracture will completely ruin your final results. If you leave dirt inside, the liquid plastic will stick to the grime instead of bonding directly to the clean glass. This creates a cloudy, messy spot that looks terrible and fails after a few weeks.
Cleaning the Impact Point
Take a sharp safety pin, a metal thumbtack, or the specialized scraping tool provided in your retail package. Carefully insert the sharp metal point directly into the absolute center of the impact crater. This spot is often called the pit.
Gently twist and pick at the area to dislodge any tiny, loose flakes of glass that are hovering inside the opening. You might hear a tiny crunching sound as small fragments break away. This is normal, but do not press down with immense force, or you might make the damage worse. Once you scrape out the loose bits, blow sharply on the spot with your mouth or use a can of compressed air to clear the dust out of the way.
Drying the Surface Completely
Moisture is an invisible enemy. Even if it has not rained recently, morning dew or humidity can trap water inside the deep recesses of the fracture. Liquid resin cannot mix with water. If water occupies the space, the resin will stay out.
If you suspect any moisture is present, use a standard handheld hair dryer on a medium heat setting. Hold the dryer about twelve inches away from the glass and warm up the area for two to three minutes. This evaporates any hidden liquid. Allow the glass to cool back down to room temperature before you introduce any of the chemical repair liquids.
Avoiding Chemical Cleaners
It is incredibly tempting to spray the entire windshield with a commercial blue glass cleaner before you start. Do not do this. Those spray cleaners contain specific chemicals, alcohol, and soaps that leave a thin film behind inside the cracks. That invisible film prevents the specialized resin from sticking permanently to the glass layers. Stick to a dry microfiber cloth and clean water if you need to wipe away fingerprints around the work zone.
Mounting the Applicator Apparatus
Now that your work zone is clean, dry, and cool, it is time to set up the mechanical delivery system. Most packages feature a plastic device with suction cups that anchors directly over the damage. This tool allows you to apply strong physical pressure without risking breaking the glass with your hands.
Aligning the Center Core
Look closely at your plastic bridge tool. It will feature a large central opening that is threaded like a nut. Screw the hollow injection tube into this opening just a few turns so it stays attached.
Position the tool so that the bottom of the hollow injection tube sits directly, perfectly over the top of the impact pit. Once you have the alignment dialed in, press the suction cups down firmly onto the surrounding glass so the tool locks in place.
Adjusting the Depth
Slowly turn the hollow injection tube clockwise, screwing it further down through the bridge toward the vehicle body. Watch the tool from a side angle as it lowers. You want the soft rubber tip at the bottom of the tube to touch the glass surface.
Once the rubber tip makes contact with the glass, turn the tube one-half turn extra. This extra bit of turning creates a tight, leakproof seal against the window. Look through the glass from the inside of your automobile cabin if possible. You should see the rubber ring flattened out slightly against the surface, creating a perfect circle around the impact crater. If it looks crooked, loosen the suction cups and realign the system.
Injecting the Resin Under Pressure
This part of the process requires patience and precision. You are about to initiate a two-part cycle that switches back and forth between pushing material into the glass and sucking air bubbles out.
Dropping the Liquid
Open your small bottle of liquid resin. Depending on the brand, you will need to add somewhere between three and six drops of liquid directly down into the top of the mounted injection tube.
Be careful not to spill the fluid on your vehicle’s painted hood or fenders, as it can damage automotive paint finishes. Once the drops are inside, let the tool sit still for one full minute. This allows the liquid to slowly slide down the dark tunnel of the tube and pool right on top of the open damage.
Inserting the Plunger
Take the solid plastic plunger screw and insert it into the top of the injection tube. Slowly turn it clockwise to thread it downward. As you screw the plunger in, it compresses the air inside the tube, forcing the liquid resin deep into the microscopic cracks of the glass.
Turn the plunger until it is almost completely tight. Stop when you feel a strong mechanical resistance. At this moment, the immense pressure is actively squeezing the thick fluid into every single tiny leg of a star fracture or throughout the dark ring of a bullseye.
The Waiting and Inspection Period
Leave the tool under pressure for at least ten to fifteen minutes. Do not touch the vehicle or slam the car doors during this timeframe. Walk around to the inside of your car, sit in the driver’s seat, and stare directly through the glass at the damage.
You should notice a dramatic change happening right before your eyes. The dark, cloudy, and black lines of the fracture should slowly start to fade away, becoming clear and nearly invisible. If you still see dark spots or thick black lines, it means air is still trapped inside the pocket.
Creating a Vacuum
If the dark spots remain, you need to draw the stubborn air out. Turn the solid plunger counterclockwise to back it out of the tube, but do not remove it completely.
This action creates a powerful vacuum effect that sucks the trapped air bubbles out of the glass cracks and pulls them up into the liquid column. Leave the tool in this vacuum state for about five minutes, then screw the plunger back down tightly to force fresh resin into the newly emptied spaces.
The Curing and Hardening Phase
Once the dark lines have vanished and the interior looks clear from inside the cabin, you are ready to set the repair permanently. The resin is still a liquid at this stage, and it will stay a liquid forever until it encounters ultraviolet radiation.
Removing the Bridge Device
Slowly loosen the solid plunger screw to release the internal pressure. Next, gently lift up on the small tabs of the suction cups to release their grip on the glass. Lift the entire bridge apparatus straight up and away from the window.
You will see a small puddle of wet, excess resin sitting right on top of the entry pit. Do not wipe this excess fluid away. It needs to remain there to fill up the surface crater completely so your window wipers do not catch on a dip later.
Applying the Clear Strips
Take one of the clear, shiny plastic curing sheets included in your retail package. Hold it by the very edges and place it directly on top of the wet puddle of resin.
Gently drop the sheet flat onto the liquid. Do not press down hard with your fingers, or you will squeeze all the useful fluid out of the pit. Instead, let the plastic sheet float smoothly on top of the wet spot. You can use the flat side of your razor blade to very gently slide across the plastic to push away any giant air bubbles that might be caught underneath the clear sheet.
Moving Into the Sunlight
Now it is time to trigger the chemical hardening process. If you have been working inside a dark garage, start up your car engine and slowly roll the automobile out into the direct afternoon sunshine.
If the sun is bright and high in the sky, the chemical reaction will finish in about ten to fifteen minutes. If it is an overcast, cloudy day, the hardening process might require twenty-five to thirty minutes to lock in completely. If you do not have a driveway or cannot move the vehicle, you can hold a specialized ultraviolet light lamp right over the patch to achieve the exact same effect.
Scraping and Smoothing the Surface
When the time expires, the plastic patch should feel completely stiff and hard to the touch. The liquid underneath has transformed into a solid piece of structural plastic that matches the optical qualities of your automotive glass.
Peeling the Plastic
Reach down with your fingernail and grab a loose corner of the clear plastic curing sheet. Peel it back slowly. It should snap away easily, leaving behind a hard, cloudy bump of plastic stuck directly to your windshield. Do not worry if it looks messy or bumpy right now. We are about to clean that up.
Using the Razor Blade Correctly
Take your sharp single-edge safety razor blade. Hold the metal blade at a strict ninety-degree angle, completely perpendicular to the window surface. This means the blade stands straight up and down, not tilted flat.
Place the sharp edge right next to the hardened plastic bump. Press down firmly against the glass and slide the blade back and forth in a rapid, short sawing motion. The blade will slice through the excess plastic, shaving it down layer by layer until it sits perfectly flush with the surrounding glass.
[Correct Razor Angle]
      |  <- Razor Blade (90 Degrees)
 _____|_____
[===========] <- Windshield Glass
Safety and Cleanliness Tips
Never use the sharp corners of the blade to dig or gouge at the patch, as you could permanently scratch the surrounding glass. Keep the blade flat and let the sharp edge do the work.
As you scrape, you will see the excess resin turn into a fine, white powdery dust. Wipe this powder away periodically with a dry paper towel so you can see your progress clearly. Run your bare fingertip over the spot when you are finished. The surface should feel completely smooth, silky, and level, with no bumps or dips that you can catch with a fingernail.
Evaluating Your Final Result
Now that the job is complete, step back and take a look at your hard work. It is very important to manage your expectations correctly before you judge the final appearance.
A successful home fix will rarely make the damage disappear one hundred percent. Under most conditions, you will still see a tiny, microscopic blemish or a faint watermark spot where the original stone made contact. This spot might look like a tiny piece of clear lint or a small speck of dust trapped inside the window pane.
The real success lies in the structural safety you just created. By filling that dark void with solid resin, you have effectively glued the glass layers back together. The dangerous spider legs can no longer spread across your view, and the dark, ugly glare that used to catch your eye while driving will be completely gone. You saved a massive amount of money and kept a large piece of glass out of a local trash landfill.
Frequently Asked Questions
Can I wash my car immediately after using a home resin kit?
It is best to wait at least twenty-four hours before exposing your freshly repaired window to high-pressure car washes, automated water jets, or chemical soaps. Even though the surface resin feels completely hard after fifteen minutes in the sun, the deep interior pockets continue to bond and settle fully over the course of a full day. Exposing the car to cold water immediately can cause sudden temperature shifts that might stress the fresh patch.
Why does the chip still look slightly visible even though I followed every instruction?
The liquid material is formulated to match the optical clarity and light-bending properties of glass almost perfectly, but it is still a plastic compound. Because plastic and glass reflect light at very minutely different angles, you will often see a faint outline of the original damage. Additionally, if dirt or microscopic dust entered the crack while driving on the highway before you fixed it, that trapped grime will remain visible inside the hardened patch forever.
What should I do if the crack starts to spread while I am actively applying the pressure?
If you notice the hairline fractures growing longer while you screw down the plunger, immediately back the plunger out counterclockwise to release the physical pressure. Sometimes, the glass around the impact zone is already highly stressed, and any extra force can cause it to snap. If the crack spreads significantly during the process, stop immediately, remove your tools, and contact a professional automotive glass technician for a complete replacement.
Can I use this type of product to fix a long crack that runs across the entire window?
These retail items are designed exclusively for small round chips, bullseyes, and short star fractures that fit beneath a standard coin. They do not possess the structural capability to mend long, running cracks that split across the field of vision. Long splits require an entirely different type of commercial industrial machinery and specialized thin resins that are not available in standard retail packages.
Will the plastic resin turn yellow or brown over time as the car sits in the sun?
High-quality professional-grade kits use advanced acrylic resins that feature ultraviolet stabilizers. These special chemical ingredients prevent the clear material from breaking down, turning yellow, or becoming cloudy when exposed to years of hot summer sunshine. Cheaper, generic options might discolor slightly after a few years, but top-tier kits are designed to remain crystal clear for the remaining lifespan of the vehicle.
Can I try to apply a second coat of resin if the first attempt did not fill the hole completely?
If you finish scraping the area and discover a small, shallow dimple still exists at the impact pit, you can easily perform a secondary spot fix. Do not remount the entire bridge apparatus. Simply place one single drop of liquid resin directly into the shallow dip, cover it immediately with a fresh, clear curing sheet, and let it sit in the direct sun for fifteen minutes. Scrape it flush with your razor blade just like before to complete the surface level.
Is it safe to use these chemical liquids on a tinted window pane?
The tint film on automotive windows is almost always applied as a soft plastic sheet glued directly to the inside surface of the cabin glass. Because stone chips occur on the hard exterior surface of the glass pane, the resin will never come into contact with the sensitive tint film. It is completely safe to use these kits on tinted vehicles, provided the damage has not completely broken through all three layers of the window sandwich.
