Do you ever look at your car and feel like it is staring back at you with tired, cloudy eyes? Those yellowed, blurry headlights do more than just ruin your vehicle’s clean look. They actually block the light, making it dangerous to drive after the sun goes down.
Over time, the sun’s harsh rays bake the plastic lenses, breaking down the original factory layer. If you want to fix this problem for good, standard washing will not cut it. You need to sand away the damage and seal the plastic with a fresh, durable barrier. This complete guide will show you exactly how to restore your headlights so they stay crystal clear for years to come.
Why Do Headlights Turn Yellow and Cloudy
Modern vehicles use headlight lenses made from poly-carbonate plastic. This specific type of plastic is incredibly tough, and it can take a serious impact from a flying rock without shattering into pieces. However, this material has a major weakness. It reacts poorly to solar radiation and everyday weather elements.
The Threat of Solar Radiation
The sun produces strong ultraviolet rays. When these rays constantly hit your clear plastic lenses, they cause a chemical reaction within the material. The molecules in the plastic begin to break apart, which shows up as a nasty yellow tint. This process is called oxidation.
When your car rolls out of the factory, the manufacturer applies a thin protective film to stop this from happening. But after miles of highway driving, tiny pieces of sand, rain, road salt, and harsh car wash soaps slowly scrape that factory barrier away. Once the bare plastic is open to the air, oxygen and sunlight team up to turn the smooth clear surface into a rough, foggy mess.
Road Debris and Environmental Damage
Think about what hits the front of your car when you drive down the highway. Tiny rocks, dirt particles, bugs, and soot hit your lenses at sixty miles an hour. This endless blasting creates microscopic scratches and pits across the plastic.
Water and road chemicals trap themselves inside these tiny physical defects. When the sun heats up the lenses during the day, these trapped substances accelerate the breakdown of the plastic. The surface becomes so rough that light cannot pass through it in a straight line anymore. Instead, the light bounces around wildly inside the scratches, creating that dangerous foggy appearance that dims your nighttime view.
The Problem with Short-Term Fixes
You might have seen videos online claiming you can fix this issue using everyday household items like white toothpaste, baking soda, or spray-on bug cleaner. While these tricks might make your lenses look better for a week or two, they actually cause more harm over time.
Toothpaste has mild grit that rubs off the top layer of dirt, but it leaves behind millions of microscopic scratches without adding any protection. Bug sprays contain strong chemicals that temporarily melt the plastic to make it look smooth, but they destroy the integrity of the lens. Within a month, the headlights will look worse than they did before you started. The only true remedy is a deep mechanical sanding followed by a high-grade chemical shield.
Tools and Materials for a Permanent Fix
Before you drop your tailgate or clear off your workbench, you need to gather the correct supplies. Using the right gear makes the job much smoother and ensures your new protective layer sticks tightly to the plastic.
Choosing the Correct Wet-and-Dry Sandpaper
Sanding is the most vital step of this entire project. You cannot use ordinary sandpaper meant for wood because it will tear up the plastic and clog instantly. You need specialized waterproof sheets that can handle constant lubrication.
- 400-Grit Sandpaper: This is your heavy hitter. It feels rough to the touch and is designed to cut right through the crusty, yellow oxidized layer.
- 800-Grit Sandpaper: This medium grade smooths out the deep grooves left behind by the initial rough sanding.
- 1000-Grit Sandpaper: A transitional grade that begins to refine the surface and restore basic transparency.
- 2000-Grit Sandpaper: This ultra-fine sheet removes the final visible scratches, leaving the plastic incredibly smooth and ready for the clear shield.
Selecting Your UV Clear Coat
The magic ingredient for a long-lasting fix is a dedicated automotive clear spray that contains strong solar blockers. Standard clear sprays meant for household crafts will turn yellow and flake off within six months.
Look for a two-part polyurethane spray paint, often called a 2K clear coat. These cans feature a special button on the bottom that you push to release a hardening agent into the paint. Once mixed, this chemical formula creates a rock-hard, glass-like shell that resists rock chips, blocks solar rays, and seals the plastic completely. If you prefer not to spray, you can find premium wipe-on liquid protectants specifically formulated for restored poly-carbonate.
Essential Safety and Clean-Up Gear
Working with automotive paints and fine plastic dust means you need to protect your body and your car’s surrounding body panels.
- Automotive Masking Tape: High-quality green or blue painters tape that sticks well but leaves no sticky residue behind when you peel it off.
- Heavy Plastic Sheeting or Newspaper: Used to cover your hood, fenders, and front bumper to shield them from airborne paint mist.
- Isopropyl Rubbing Alcohol: Essential for stripping away finger oils, sanding dust, and leftover grease before painting.
- Microfiber Towels: Soft, lint-free cloths that absorb moisture and trap fine dust without scratching the freshly sanded plastic.
- Respirator Mask: A proper mask rated for chemical vapors, which protects your lungs from breathing in toxic paint mist.
- Nitrile Gloves: Keeps your skin safe from chemicals and stops your natural hand oils from contaminating the clean lenses.
Step-by-Step Masking and Preparation
Taking your time during the prep phase prevents costly mistakes later on. Paint mist can float surprisingly far on a gentle breeze, and you do not want permanent clear overspray stuck to your glossy hood or chrome grille.
Cleaning the Workspace and the Vehicle
Start by giving your car a thorough wash, focusing heavily on the front end. Use a strong dish soap around the headlights to strip away old wax and road grime. Rinse the area completely with clean water and dry it with a clean towel.
Move your vehicle into a covered area like a well-ventilated garage or a shady spot out of direct sunlight. Working in the sun causes your sanding water to dry up too quickly and makes the paint cure before it can lay down smoothly. Ensure the area is free from floating dust, lawn clippings, or bugs that could land in your wet paint.
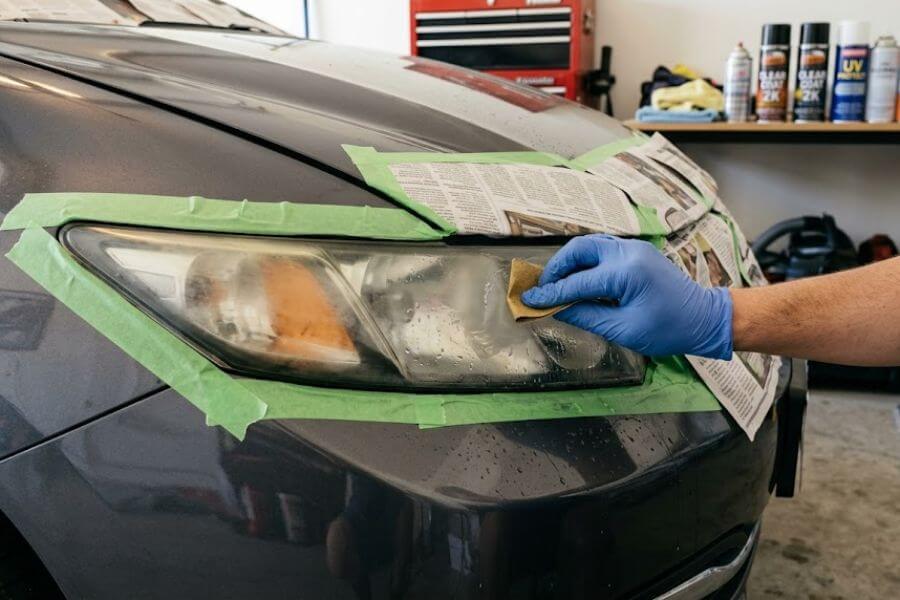
Taping Off the Light Assemblies
Open the hood of your car so you can access the top and back edges of the headlight housings. Take your automotive masking tape and carefully apply it along the seams where the plastic lens meets the metal fenders, the plastic bumper, and the grille.
Press the edges of the tape down firmly with your thumb to create a tight seal. This prevents your sandpaper from accidentally rubbing the painted metal parts of your car. Apply at least three layers of tape around the entire perimeter of each headlight. This thick border acts as a safety cushion in case your hand slips while you are sanding hard.
Covering the Rest of the Front End
Once the immediate borders are taped, take your plastic sheeting or old newspapers and spread them across the hood, front fenders, and bumper. Secure the edges of the sheets directly to your first layers of tape.
Cover the entire front half of the vehicle. Airborne paint mist is incredibly fine and acts like a magnet for automotive paint. If you leave the hood uncovered, you will notice a rough, sandpaper-like texture on your paint once the clear coat dries. Take an extra ten minutes to cover everything up, and you will save yourself hours of tedious scrubbing later.
Master the Sanding Technique
Sanding is where the real transformation happens. This stage requires patience and physical effort. You are mechanically shaving away the damaged, dead plastic to expose a fresh, perfectly clear layer underneath.
The First Step: Heavy Oxidation Removal
Dip your 400-grit sandpaper into a bucket of clean water and let it soak for a minute. Spray the headlight lens with a generous amount of water or a mix of water and a few drops of baby shampoo for extra slickness.
Begin sanding the lens using straight, horizontal motions from left to right. Do not press down with all your body weight; let the grit of the paper do the work. Never sand in circles. Circular sanding creates deep swirl marks that catch the light and are very difficult to remove. As you scrub, you will see a thick, milky, yellowish slurry running down the lens. This is the dead, oxidized plastic coming off. Keep spraying water to flush this sludge away so the paper stays clean.
Transitioning to the Next Grade
Once the slurry turns completely white and the lens has a uniform, frosty look without any bright yellow spots, it is time to move up. Wipe the lens dry with a microfiber cloth to inspect your progress.
Take your 800-grit sandpaper, wet it thoroughly, and begin sanding the lens. This time, change your direction completely. Sand using vertical, up-and-down motions. By switching from horizontal to vertical, you can easily see when the new grade has completely erased the scratches from the previous grade. Keep sanding until all the horizontal lines disappear, and you are left with only vertical lines. Flush the lens with water frequently to keep the surface cool and clean.
Achieving a Smooth Finish
Wipe the headlight dry again and grab your 1000-grit sheet. Go back to straight horizontal strokes. You will notice that the plastic is starting to feel much smoother and might even look slightly translucent when wet.
After completing the 1000-grit stage, finish up with the ultra-fine 2000-grit paper using vertical strokes. This final sanding step refines the plastic down to a microscopic level. When you wipe the lens completely dry after this step, it should look evenly frosted, cloudy, and smooth like a piece of sea glass. Do not worry if it looks hazy. The clear coat will fill in these tiny micro-scratches and make the lens instantly transparent.
| Sanding Step | Motion Direction | Primary Goal | Expected Appearance |
| 400-Grit | Horizontal Only | Strip off yellow crust and factory film | Milky yellow slurry, rough frost |
| 800-Grit | Vertical Only | Erase rough 400-grit track marks | Bright white slurry, smoother frost |
| 1000-Grit | Horizontal Only | Refine the plastic surface texture | Fine white dust, semi-translucent wet |
| 2000-Grit | Vertical Only | Polish out final lines for paint grip | Ultra-smooth feel, uniform dull haze |
Chemical Decontamination and Final Prep
Before you touch that spray can, the plastic must be completely clean and free of any contaminants. Even a tiny trace of finger oil or a speck of sanding dust can cause the paint to bead up, creating ugly craters known as fisheyes.
Eliminating sanding dust and residue
Pour fresh, clean water over the entire headlight assembly to wash away any hidden sanding particles tucked into the edges of the tape. Take a clean microfiber towel and dry the lens thoroughly. Use a blast of compressed air if you have it to blow out any water drops hiding in the seams between the plastic and the tape.
If water drips down out of a crack while you are spraying your clear coat, it will ruin the finish instantly. The entire area must be bone dry before you take the next step.
Stripping surface grease and oils
Put on a fresh pair of nitrile gloves. This step is crucial because your bare fingertips naturally carry skin oils that transfer easily to the clean plastic.
Pour a generous amount of high-purity isopropyl alcohol onto a fresh, lint-free microfiber cloth. Wipe the headlight lens firmly, starting from the top and working your way down in single, clean passes. Do not scrub back and forth, as this just moves the contamination around. You will notice the alcohol evaporates almost instantly, leaving behind a perfectly bare, chemically clean surface. Do not touch the plastic with anything else after this wipe down.
The final inspection check
Step back and look at the lenses from a few different angles using a bright flashlight or work light. Look closely for any shiny patches, left-over yellow tint, or deep stray scratches.
If you see a shiny spot, it means you missed a section of the old factory coating, and the new paint will not stick to it properly. If you spot any flaws, do not try to paint over them. Grab your sandpaper, wet the area down, and sand it out until it matches the rest of the uniform haze. Spending an extra few minutes right now ensures a beautiful final result that you will not have to redo next weekend.
Applying the UV Clear Coat Professionally
This is the most exciting part of the project. When that wet clear coat hits the hazy plastic, it fills the micro-grooves and transforms the dull surface into glass right before your eyes.
Preparing and activating the spray can
If you are using a professional grade 2K clear coat, take the red button supplied with the can and press it firmly into the valve on the very bottom of the cylinder. Place the can on a hard surface and push down until you hear a loud pop. This breaks the internal bladder and mixes the liquid activator with the paint resin.
Shake the can vigorously for a full two minutes to ensure the chemical reaction happens completely. Keep in mind that once a 2K spray is activated, it has a limited shelf life, usually about twelve to twenty-four hours, before it hardens inside the can. Plan to paint both of your lights during the same session.
The technique for a smooth spray stroke
Hold the spray can roughly six to eight inches away from the headlight surface. Never start or stop spraying directly on the plastic. Instead, start moving your hand in the air to the side of the headlight, press the spray button down, sweep across the lens in a straight line, and release the button only after your stroke clears the opposite side of the light.
Keep your wrist completely straight and move your entire arm parallel to the headlight curve. If you arc your wrist, you will apply too much paint in the center and too little on the outer edges.
Layering the clear coat for maximum protection
Apply the first coat using light, rapid strokes. This is called a tack coat, and it should look slightly dimpled or pebbled, covering about fifty percent of the surface. Let this initial layer flash dry for ten minutes. It will remain sticky and act like glue for the next layer.
[Start Sweep] --> (Press Button) --> [Across Headlight] --> (Release Button) --> [End Sweep]
For the second coat, slow down your arm speed slightly. Apply a medium wet layer, overlapping each stroke by fifty percent. Watch the paint lay down behind your stroke. It should immediately flow together into a smooth, shiny sheet. Do not go too slow, or the paint will run and form ugly sags. If your product instructions recommend a third layer, wait another ten minutes before applying it using the exact same wet technique.
Curing and Post-Restoration Care
Your headlights may look done once you finish spraying, but the chemical shell is still soft and vulnerable to airborne dirt, bugs, and fingerprints.
The critical initial drying window
Leave the vehicle exactly where it is for at least two to three hours after applying the final coat. Do not touch the plastic, do not move the vehicle, and do not pull off the masking tape yet. Even a gentle touch can leave a permanent fingerprint in the soft clear coat.
During this initial window, the solvent is evaporating rapidly out of the paint, and the top layer is forming a solid skin. Keep garage doors closed during this phase to block any sudden gusts of wind from blowing dust onto your fresh work.
Removing the tape and cleanup
After three hours have passed and the paint is no longer sticky to an indirect touch on the masking tape, you can carefully remove the protective coverings. Peel the masking tape away from the headlights at a sharp forty-five-degree angle, pulling back over itself.
Pulling the tape off this way cuts a clean line through any clear coat bridging between the lens and the body panels, preventing the fresh paint from lifting off the edges of the headlight. Gather up the plastic sheets and newspaper carefully so you do not drag dry paint flakes across your car’s clean exterior.
Long-term curing and washing restrictions
While the headlights look ready for the road, the clear coat takes several days to achieve its full chemical hardness. Avoid washing your car with any soap or taking it through a commercial car wash for at least one full week.
Do not use high-pressure spray nozzles near the edges of the headlights during this period. Try to park your car in a spot where lawn sprinklers will not hit it, as municipal tap water contains minerals that can etch themselves into curing paint. Once a week has passed, the shell is fully cured and ready to withstand normal highway use, weather elements, and regular cleaning routines.
Maintenance Strategies for Year-Round Clarity
Even with a heavy-duty UV shield applied, a little bit of ongoing attention will prolong the life of your restoration job, keeping the lenses bright for the entire lifespan of your vehicle.
Regular washing and debris removal
When you wash your car, always use a dedicated, pH-neutral automotive shampoo and a clean microfiber wash mitt. Never use harsh household detergents like dish soap for regular maintenance, as they strip away any sacrificial waxes you put on top of the clear coat.
When you notice dead bugs or road tar baked onto the lenses after a long road trip, do not scrub them with a rough sponge or a plastic brush. Instead, soak a soft towel in warm soapy water, lay it over the headlight for a few minutes to soften the debris, and gently wipe the grime away without scratching the surface.
Adding sacrificial protection layers
Every three to four months, apply a high-quality synthetic ceramic spray sealer or a premium carnauba wax directly over the dried clear coat. This creates a sacrificial barrier that absorbs the brunt of environmental abuse.
The wax layer will take the hit from bird droppings, acid rain, and tree sap, preventing these corrosive materials from eating into your clear coat. It also adds an extra layer of slickness, which helps rainwater roll off effortlessly at highway speeds, carrying away loose surface dirt before it can cause trouble.
Smart parking habits
Whenever possible, park your vehicle inside a garage, under a carport, or in the shade of a building. If you must park outside in the open sun all day at work, consider backing your car into the parking space so the rear end faces south toward the direct sunlight.
By keeping the front headlights facing away from the hottest midday sun rays, you significantly reduce the amount of heat and radiation they absorb. This simple habit preserves the chemical bonds in your clear coat, ensuring your lenses stay clear for an incredibly long time.
Frequently Asked Questions
Can I skip the rough 400-grit sandpaper if my headlights are only slightly yellowed?
If your lenses only have a very light haze and no deep flaking or heavy yellow crust, you can safely skip the 400-grit sandpaper. Start instead with the 800-grit or 1000-grit sheet. The main goal is to completely remove any remaining factory tint and smooth out minor surface defects. Beginning with a less aggressive grit saves you time and physical effort while preventing you from creating deep scratches that you would have to sand out later. Always ensure the entire surface is uniformly dull before you spray your clear coat, regardless of which grade you start with.
What should I do if the clear coat runs or sags while I am spraying it?
If you notice a drip or a heavy run forming while the paint is still wet, do not try to wipe it off with a towel or fix it with your finger. Doing so will create an absolute mess that is very difficult to fix. Let the paint dry completely for twenty-four hours until it is rock hard. Once cured, take your 1000-grit sandpaper wrapped around a flat sanding block and gently sand the high spot down until it sits perfectly flush with the surrounding paint. Finish the area with 2000-grit paper, clean it with alcohol, and apply another light coat of clear spray over the section to blend it in seamlessly.
Is it better to take the headlights completely out of the car to do this job?
Removing the headlight assemblies from the vehicle provides the absolute best access to every single edge and corner, and it eliminates any risk of getting paint overspray on your car’s body panels. However, on many modern vehicles, removing the headlights requires taking off the entire front bumper assembly, which can be a tricky and time-consuming process. If you take your time and do a thorough job masking off the surrounding area with thick plastic sheets and quality tape, you can easily achieve professional results right on the vehicle without removing a single bolt.
Why does the headlight look cloudy again right after the clear coat dries completely?
If your headlight looks frosty or cloudy once the clear coat dries, it usually means the paint was sprayed on too dry or from too far away. This is called dry spray, and it happens when the tiny paint droplets partially dry in the air before they hit the plastic surface, preventing them from flowing together into a smooth sheet. To fix this issue, let the clear coat cure for a full day. Sand the rough surface smooth using 2000-grit sandpaper until the bumps are gone, clean the lens with alcohol, and spray another layer, making sure to hold the can closer and move your arm a bit slower to get a wet finish.
Will this restoration process work on glass headlights?
This specific method is designed strictly for modern poly-carbonate plastic lenses. Older vehicles from the early 1990s and before often used real glass headlight housings. Glass does not turn yellow or oxidize from solar radiation like plastic does, though it can become pitted over time from tiny road rocks. Sanding glass with standard automotive sandpaper will cause permanent damage, and automotive clear coat will not stick to a glass surface. If you have real glass headlights that look dull, you must use a specialized glass polishing compound containing cerium oxide along with a heavy-duty mechanical buffing wheel to restore the smooth surface.
