You are cruising down the highway, enjoying your favorite playlist, and everything feels completely fine. Suddenly, you catch a glimpse of something bright on your dashboard. Your heart sinks just a bit. It is that little amber or yellow symbol shaped like an engine block. The infamous check engine light has made its grand appearance. In the modern automotive landscape of 2026, this little light remains one of the most common sources of stress for drivers of all ages. Whether you just received your driver license last week or you have been behind the wheel for a few years, seeing that warning light can make you feel helpless. You might immediately start worrying about massive repair bills, broken parts, or being stranded on the side of the road.
The good news is that you do not need to be a seasoned mechanic with decades of grease under your fingernails to figure out what your vehicle is trying to tell you. Vehicles built today are essentially rolling computers. They are filled with advanced networks, modules, and intelligent sensors that constantly monitor how the machine behaves. When something goes slightly out of specification, the computer takes notes, shines that little dashboard light, and waits for someone to ask what is wrong. Think of the check engine light not as a sign of doom, but as your car sending you a direct text message that says it needs a quick check-up.
Learning how to read, diagnose, and manage these codes is an incredibly empowering skill. It saves you time, prevents you from being taken advantage of at a repair shop, and gives you a deep understanding of the machine you rely on every single day. This comprehensive guide will walk you through the entire universe of automotive diagnostics. We will untangle the secret language of your car, explore the modern gadgets used to extract information, look at the most common reasons the light turns on, and learn how to safely clear the system once the underlying issue is completely resolved. Pull up a chair, grab your favorite drink, and let us dive into the ultimate manual for mastering your dashboard warnings.
Understanding Your Vehicle’s Brain
The Onboard Diagnostics System Explained
To understand why that light turns on, you first need to understand the computer system running beneath the hood. This network is known as the Onboard Diagnostics system, or OBD for short. Specifically, almost every car on the road today utilizes a standardized system called OBD-II. This framework was established decades ago, but it has grown increasingly sophisticated over time. Your car contains a primary central computer often called the Engine Control Module or Electronic Control Unit. This computer acts as the absolute brain of the operations.
The central computer is constantly receiving real-time data from dozens of sensors spread throughout the vehicle. These sensors measure all sorts of complex things. They track how much air is entering the intake manifold, the temperature of the liquid coolant keeping the metal parts safe, the speed of the crankshaft rotation, and the amount of oxygen left over in the exhaust gases. If every single measurement matches the optimal factory parameters, the computer stays happy and the dashboard remains dark. However, if a sensor reports a number that is too high, too low, or completely frozen for a specific duration, the computer realizes something is amiss. It saves a specific digital error code into its memory bank and illuminates the check engine light to capture your attention.
The Evolution of Car Tech by 2026
Automotive technology has advanced rapidly, and the way cars handle diagnostic data has evolved significantly. Modern vehicles are no longer isolated boxes of metal and wires. They are fully connected devices. Many modern dashboards feature advanced digital displays and heads-up projections that do more than just flash a simple engine icon. They might give you a text alert or sync directly with a manufacturer app on your phone.
Despite these neat digital upgrades, the underlying architecture still relies on the dependable OBD-II communication protocol. The physical port where you access this data is still built into your cabin, providing a direct hardware gateway to the vehicle’s computer memory. This means that even with the rise of modern electric assistance, high-tech infotainment screens, and advanced safety sensors, the fundamental process of diagnosing an engine fault follows a structured, logical sequence that anyone can learn to perform.
Deciphering the Warning Signals: Steady vs Flashing Lights
The Steady Glow: A Call for Attention
Not all check engine lights are created equal. The behavior of the light tells you a massive amount about the urgency of the problem. In most everyday situations, the light will illuminate and remain completely steady. A solid, unblinking yellow or orange light means that the computer has detected a systemic issue that impacts emissions, fuel efficiency, or general engine performance, but it is not a catastrophic emergency.
When the light is steady, you do not need to pull over immediately to the side of the highway or panic. Your car is perfectly capable of driving you home or to your final destination. It simply means you should plan to investigate the issue within the next few days. Ignoring a steady light for weeks or months can cause your fuel economy to drop, increase the amount of pollution your car creates, and eventually cause parts to wear down prematurely. Treat a steady light as a firm reminder to schedule some diagnostic time over the weekend.
The Flashing Warning: An Urgent Warning
If you are driving and the check engine light begins to flash or blink rapidly, the situation changes completely. A flashing light indicates a severe, active problem that requires your immediate action. In almost all cases, a blinking light means the engine is experiencing a severe misfire. This means that fuel is entering one or more of the engine cylinders but is failing to ignite properly.
When unburned fuel escapes the engine cylinders, it travels directly down the hot exhaust pipe and hits the catalytic converter. The catalytic converter is a very expensive component designed to clean up your exhaust gases, but it operates at extremely high temperatures. When raw fuel dumps directly onto it, the fuel burns right inside the converter, causing temperatures to skyrocket to dangerous levels. This can destroy the inner components of the converter within mere minutes, turning a simple maintenance issue into a massive, costly repair. If you ever see that light blinking, you must find a safe spot to pull over, shut down the engine, and arrange for a tow truck or immediate assistance to avoid ruining major mechanical systems.
The Essential Toolkit for Home Diagnostics
Handheld Code Readers
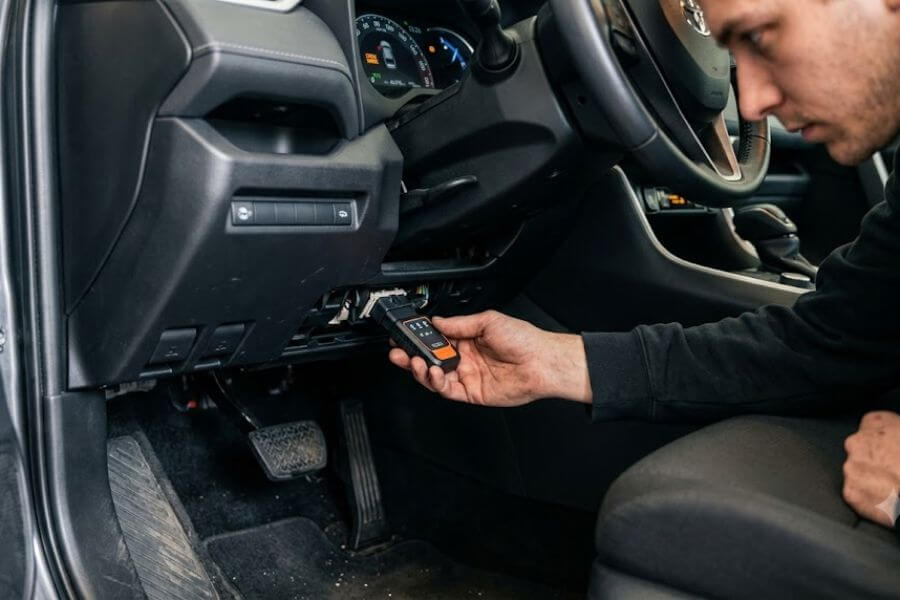
To discover what is bothering your car, you will need a device capable of talking to the onboard computer. The traditional option is a handheld standalone code reader. These devices look somewhat like small, rugged video game controllers or thick calculators with an attached cable. You plug one end of the cable directly into your car, and the device powers up using the vehicle’s electricity.
Handheld readers vary in capability. Simple models feature basic black and white screens that display the exact fault code number along with a tiny description. They are incredibly reliable because they do not require internet connections, battery charging, or software updates to do their basic job. They are durable tools that you can toss directly into your glove box or trunk, ensuring you always have a diagnostic option with you wherever you happen to travel.
Wireless Bluetooth and Wi-Fi Scanners
Wireless diagnostic adapters have become incredibly popular. These are small plastic plugs, often no larger than a small box of matches, that insert into your diagnostic port. Instead of using a built-in screen, they use Bluetooth or Wi-Fi to send information directly to your smartphone, tablet, or laptop computer.
The true beauty of wireless scanners lies in the software apps you pair them with. These mobile applications feature colorful, clean interfaces that explain mechanical issues in straightforward language. Many of these apps can look up repair costs, show you real-time graphs of your engine speed, and even pinpoint the exact part that needs to be replaced. For a younger generation that is entirely comfortable navigating mobile operating systems, a wireless Bluetooth scanner provides a highly intuitive way to interact with a car’s internal data.
Professional Grade Diagnostic Tablets
At the high end of the spectrum are professional-grade diagnostic tablets. These are massive, rugged devices used by master technicians in commercial repair facilities. They cost significantly more money and offer deep analytical features that go far beyond reading basic engine fault codes.
A professional tablet allows for bi-directional control. This means the tool can command specific parts of the car to turn on or off, such as forcing a cooling fan to spin or activating a fuel pump to test its strength. While these tools are incredible pieces of technology, they are generally far more advanced than what a typical vehicle owner needs for everyday troubleshooting. For normal maintenance and code reading, a basic handheld device or a quality Bluetooth adapter is perfectly sufficient.
Step-by-Step Guide to Reading Diagnostic Trouble Codes
Step 1: Locating Your OBD-II Port
The very first movement in your diagnostic journey is finding the physical connection point on your vehicle. This connector is called the OBD-II port. It is a trapezoid-shaped outlet that features sixteen small holes arranged in two neat rows. By automotive design laws, this port must be located within a few feet of the driver seat, and it is almost always tucked underneath the lower edge of the dashboard.
To find it, sit in the driver seat, open your door, and look down at the area near your pedals. Take a flashlight and scan the underside of the plastic plastic trim right beneath the steering column. You will usually find the port uncovered and pointing straight down toward the floorboards. In a few vehicle models, it might be hidden behind a small plastic door labeled with a word like “Diagnostics” or “OBD,” which you can pop open using your fingers.
Step 2: Connecting Your Diagnostic Tool
Once you have located the port, it is time to build the data bridge. Grab your handheld tool cable or your wireless Bluetooth adapter. Take a look at the shape of the connector. Because it is shaped like a trapezoid, it can only slide into the port in one specific direction.
Line up the wider side of your tool plug with the wider side of the car’s built-in outlet. Push the connector straight in firmly until it sits completely flush against the port. You should feel it lock into place. If you are using a handheld reader, you will often see the screen light up immediately as it draws power from the car. If you are using a wireless plug, a small LED light will usually glow to show that it is receiving electrical current.
Step 3: Turning On the Ignition
Now that the tool is physically connected, you need to wake up the car’s computer system so it can start communicating. Insert your key into the ignition cylinder, or prepare to press your engine start button. However, there is a vital distinction to remember: you do not want to crank the engine completely alive.
You want to turn the key to the “ON” or “Accessory” position, which is usually the click right before the engine cranks over. If your vehicle uses a push-button start system, press the start button twice without pressing your foot down on the brake pedal. This actions powers up all the dashboard displays, turns on the radio, and wakes up the main control modules without actually running the mechanical components of the engine. This allows the scanner to safely request data without engine vibrations interfering with the connection.
Step 4: Scanning for Stored Codes
With the vehicle’s electronics active, look at your scanner device or open the diagnostic app on your smartphone. If you are using a smartphone app, make sure your Bluetooth settings are active and pair the phone to the adapter plug.
Navigate the on-screen menu until you see an option that says “Read Codes,” “Scan,” or “Diagnostic Trouble Codes.” Select that option. The scanner will send a digital request through the wires, asking the vehicle computer to share any saved faults. Within a few seconds, the tool will gather the data and present a list of alphanumeric codes right on the screen.
Step 5: Recording the Information
When the codes appear on your screen, do not rush to delete them or assume you will remember them later. Write them down on a piece of paper, or take a quick screenshot with your smartphone camera.
Many scanners will categorize codes into distinct types. “Active” codes mean the problem is happening right now during the current driving cycle. “Pending” codes mean the computer noticed a glitch once, but it is waiting to see if it happens again before turning on the dashboard light. “Permanent” codes are locked deep into the memory and cannot be erased by a scanner until the computer confirms that the mechanical issue has been completely repaired through actual driving. Write down every single letter and number exactly as it appears.
Breaking Down the Language of DTCs (Diagnostic Trouble Codes)
The Five-Digit Code Structure
At first glance, a diagnostic trouble code looks like a random, confusing jumble of letters and numbers. It might say something strange like P0302 or U0100. However, these codes are organized using a standardized system. Every single position in that five-digit code has a very specific meaning.
The very first character is always a letter, and it tells you exactly which major system in the vehicle is experiencing an issue. The letter P stands for Powertrain, which covers your engine, transmission, and all associated fuel and emissions systems. The letter B stands for Body, which includes interior features like airbags, power seats, and climate control systems. The letter C stands for Chassis, which handles steering, suspension, and anti-lock braking components. Finally, the letter U stands for Network, which represents the digital communication wires that allow various onboard computers to talk to one another.
The second character is almost always a number, usually a 0 or a 1. A 0 indicates a generic code. This means the code has the exact same definition across every single make and model of car in the world, whether it is an American truck or a tiny imported hatchback. A 1 means the code is manufacturer-specific, meaning its meaning changes depending on whether you are working on a domestic vehicle or a foreign luxury car.
The third character tells you the specific subsystem where the trouble is occurring. For powertrain codes, a 1 or a 2 means there is an issue with fuel delivery or air metering. A 3 means something is wrong with the ignition system, like a failing spark plug. A 4 points directly to auxiliary emissions controls, such as the catalytic converter or charcoal canisters. A 5 deals with vehicle speed control and idle monitoring, while a 6 covers internal computer processor circuits.
The final two characters are numbers that pinpoint the exact nature of the fault. They act as a detailed reference tag, identifying the precise circuit, sensor, or component that is acting up.
Common Check Engine Light Codes and Their Meanings
To help you feel completely comfortable looking at these codes, let us review some of the most common error numbers that drivers encounter all over the world.
- P0171 / P0174 (System Too Lean): This means the computer has calculated that there is far too much air and not enough fuel inside the combustion chambers. This is frequently caused by unwanted air leaking into the engine through cracked rubber hoses, or a dirty sensor failing to weigh the incoming air properly.
- P0300 (Random Engine Misfire Detected): This code means that multiple engine cylinders are failing to ignite fuel properly at unpredictable intervals. If the code ends in a specific number like P0302 or P0304, it means the misfire is happening on one specific cylinder, like cylinder number two or cylinder number four, making it simple to find the bad component.
- P0420 / P0430 (Catalytic Converter Efficiency Below Threshold): This tells you that the catalytic converter is no longer doing an adequate job of cleaning the exhaust gases, or the sensors monitoring the converter have gone out of calibration.
- P0442 / P0455 (Evaporative Emission System Leak): These codes mean that fuel vapors are escaping from the gas tank or lines instead of being safely processed by the engine. A loose gas cap is the classic culprit for these specific codes.
- P0130 – P0167 (Oxygen Sensor Faults): This wide family of codes indicates that one of the chemical sensors inside your exhaust pipe has stopped responding, has a broken heater wire, or is sending completely scrambled information back to the central brain.
Diagnostic Trouble Code Category Table
| System Letter | Code Range Example | Primary Focus Area | Typical Components Monitored |
| P (Powertrain) | P0100 to P0999 | Engine, Fuel System, and Transmission | Spark plugs, fuel injectors, oxygen sensors, transmission gears |
| B (Body) | B0100 to B0999 | Interior Comfort, Safety, and Cabin Electronics | Airbag modules, power window motors, digital climate control |
| C (Chassis) | C0100 to C0999 | Mechanical Control Systems, Brakes, and Steering | ABS wheel speed sensors, power steering pumps, traction control |
| U (Network) | U0100 to U0999 | Inter-module Communication and Wiring Data | CAN bus communication wires, module-to-module data streams |
Deep Dive Into Diagnosing Root Causes
Investigating the Famous Loose Gas Cap
When your scanner displays an evaporative emissions code like P0455, you do not need to assume you have a major mechanical disaster on your hands. The evaporative emissions system is designed to trap fuel fumes inside your gas tank so they do not escape into the atmosphere. The system pumps a small amount of vacuum into the tank to check for holes. If the gas cap is not twisted tightly, air leaks inside, the vacuum drops, and the computer assumes a major pipe has ruptured.
To diagnose this, park your car on a level surface and walk to the fuel door. Open it, grasp the gas cap, and check if it feels loose. Unscrew it completely and inspect the round rubber gasket lining the inside edge of the cap. If that rubber ring looks cracked, dried out, or covered in dirt, it can no longer hold an airtight seal. You can wipe away dirt with a clean cloth, or head to a local auto parts store to purchase a brand-new cap for a very small amount of money. Twist the cap back into place until you hear it click firmly several times.
Testing and Replacing an Oxygen Sensor
If your code reader points directly to an oxygen sensor fault, you are dealing with a component that lives in an incredibly harsh environment. These sensors screw right into the blistering hot exhaust pipes to read the chemical makeup of the spent fuel gases. Over time, they get coated in thick soot, ash, and chemical deposits, which slows down their ability to read data.
To troubleshoot an oxygen sensor, you can use a scanner that displays live data streams. With the engine running safely, look at the voltage readout for the sensor in question. A healthy sensor should constantly bounce back and forth between low voltage and high voltage as the engine adjusts its fuel mixture. If the voltage reading stays frozen at one single number, the sensor has reached the end of its functional life. Replacing it involves unplugging its electrical wire clip and using a specialized socket tool to unthread it from the exhaust pipe, restoring your car’s fuel efficiency.
Tracking Down an Engine Misfire
An engine misfire code like P0303 means cylinder number three is failing to contribute power to the engine. A misfire usually happens for one of three reasons: a lack of electrical spark, a lack of fuel, or a mechanical loss of pressure inside the metal cylinder. The most frequent cause is a worn-out spark plug or a failing ignition coil pack.
A great way to diagnose this at home is a simple swapping test. If your scanner says cylinder three is misfiring, turn off the vehicle entirely. Remove the ignition coil pack from cylinder three and swap its position with the coil pack from cylinder number four. Clear the codes and start the vehicle again. If the trouble code moves and becomes a P0304, you have successfully proven that the ignition coil is broken and needs replacement. If the misfire stays on cylinder three, you know the issue lies elsewhere, like a worn spark plug tip or a clogged fuel injector nozzle.
Evaluating Catalytic Converter Issues
When a code like P0420 appears, it can cause some worry because catalytic converters contain precious metals and are expensive components to purchase. However, it is vital to remember that converters rarely die from old age. They are almost always ruined by an unresolved engine problem upstream, such as a long-term misfire or an engine that is burning oil.
Before assuming the converter is ruined, check for any other codes present in the system. If you have oxygen sensor codes or misfire codes alongside a P0420, always fix those issues first. A faulty oxygen sensor can easily misread the exhaust data and trick the vehicle computer into thinking the catalytic converter is broken when it is working perfectly fine. Address the root engine health issues first before concluding that you need a brand-new exhaust converter.
How to Clear Codes Safely and Correctly
The Clearing Process via Scanner
Once you have performed your diagnosis and completed the physical repairs, you will want to get rid of that annoying light on your dashboard. To do this, plug your scanning tool back into the OBD-II port, turn the ignition key back to the “ON” position without starting the engine, and open the main menu on your device.
Look for a choice that says “Clear Codes,” “Erase Faults,” or “Reset Module.” Select this option, and the scanner will ask if you are absolutely sure you want to proceed. Confirm your choice. You will notice that the codes disappear from the screen, and the check engine light on your dashboard will turn off. However, keep in mind that erasing the code simply clears the computer’s memory. If you did not actually fix the mechanical breakdown under the hood, the computer will quickly notice the fault again and shine the warning light right back into your eyes within a short period of driving.
The Drive Cycle: Getting Ready for Inspection
Many drivers believe they can trick an emissions inspection station by simply erasing their check engine light right before pulling into the testing bay. This strategy will fail completely due to an internal computer safety feature known as readiness monitors. When you clear codes with a scanner, you also reset all the vehicle’s internal self-test logs.
To pass an official state inspection, your car’s computer needs to run through a series of automated performance tests known as a drive cycle. A standard drive cycle requires you to drive the car under various real-world conditions. You will need to let the vehicle idle for a few minutes, accelerate smoothly up to highway speeds, cruise at a constant speed for ten to fifteen miles, and decelerate naturally to a complete stop. During this drive, the computer checks every system to confirm it is operating cleanly. If you take the car to an inspector before completing this drive cycle, their testing equipment will report that your vehicle is “Not Ready,” and you will be sent home to drive the car further.
When to Put Down the Tool and Call a Professional
High-Voltage Risks in Hybrid and Electric Vehicles
As we navigate through 2026, more cars on the road feature high-voltage hybrid or fully electric powertrains. Working on a traditional gasoline engine is a wonderful way to learn about mechanics, but hybrid and electric systems require extreme caution. These vehicles feature massive battery packs and heavy power lines that carry dangerous amounts of electrical current.
These high-voltage wires are wrapped in bright, distinct orange insulation to warn you of their danger. If your scanner retrieves codes that point to battery pack temperature faults, high-voltage isolation problems, or electric motor inverter glitches, do not attempt to look for these parts with basic household tools. Touching the wrong wire can result in a severe electrical shock. Leave all high-voltage electrical diagnostics and physical repairs to certified professionals who wear safety equipment and use insulated tools.
Internal Mechanical Sounds and Severe Symptoms
Sometimes, a check engine light is accompanied by symptoms that you can easily hear, smell, or feel while sitting in the cabin. If your light is glowing and you hear heavy metal knocking, ticking, or grinding sounds coming from deep inside the engine bay, do not try to keep driving the vehicle to see what happens.
Similarly, if you notice thick clouds of blue or white smoke pouring out of your tailpipe, or if the vehicle stalls completely every time you try to stop at a red light, you are dealing with a severe internal failure. Continuing to run the machine under these conditions can cause catastrophic metal breakage that ruins the entire engine. In these advanced scenarios, the wisest choice is to pull out your smartphone, call a professional towing service, and transport the car straight to a trusted repair facility.
Frequently Asked Questions
Can I drive my car while the check engine light is glowing steady?
Yes, it is generally safe to drive your vehicle home or to a nearby location if the check engine light is holding a steady, solid glow. A solid light indicates that the onboard computer has noted an issue that needs to be addressed soon, but it is not causing immediate destruction to the mechanical components. You can continue running your normal errands for the day, but you should avoid taking the car on an extensive cross-country road trip until you have plugged in a diagnostic scanner to discover what triggered the warning.
Why did my check engine light turn off on its own after a few days?
Your car’s onboard computer is constantly checking on things. If it notices a temporary fault, like a tiny drop in fuel system pressure or a brief sensor glitch due to extreme weather or high humidity, it will turn the light on. However, if that specific fault does not happen again for several consecutive driving trips, the computer will decide that the problem has resolved itself. It will automatically turn off the dashboard light while keeping a record of the old fault tucked away deep in its history logs for future reference.
Will clearing the codes fix the mechanical problem permanently?
Clearing the codes with a diagnostic scanning tool does not perform any physical repairs on your car. It simply wipes out the computer’s temporary memory banks and turns off the dashboard light indicator. If you have not replaced the worn-out spark plug, fixed the leaking vacuum hose, or tightened the loose fuel cap, the car’s sensors will quickly spot the exact same problem once you start driving again. The computer will immediately log the code a second time and switch the check engine light right back on.
What is the difference between a pending code and a permanent code?
A pending code means that your vehicle’s computer noticed a sensor value go out of its normal specification once, but it wants to see if the issue happens again before alarming you. A pending code will not turn on the dashboard light right away. A permanent code is a serious fault that has been confirmed across multiple driving trips. Permanent codes are locked deep inside the computer module memory. They cannot be erased by turning off your battery or pushing buttons on a scanner. They will only disappear once you fix the broken part and the computer confirms the repair during real driving.
How long do I need to drive after erasing codes to pass an inspection?
There is no single magic number of miles that works for every single car, but a general rule of thumb is to drive between fifty and one hundred miles over the course of two or three days. This driving should include a healthy mix of slow neighborhood driving with lots of stops along with some steady cruising on a fast highway. This varied driving style allows all the car’s internal readiness monitors to complete their automatic self-tests and report to the inspection computer that your system is healthy and ready for testing.
Can a weak car battery trigger a check engine light?
A weak or dying twelve-volt car battery can absolutely cause a check engine light to turn on. Your vehicle’s computers and advanced sensors rely on a steady, smooth stream of clean electrical power to function correctly. If your battery voltage drops too low while you are cranking the engine to life, the computers can experience a brief brownout. This causes them to lose communication with one another, resulting in a wave of random sensor codes that do not actually reflect any real mechanical breakdown under the hood.
Why is my code reader showing a code that starts with a U instead of a P?
If your scanner shows an error code that begins with the letter U, you are looking at a network communication code rather than an engine component failure. Modern vehicles use a high-speed digital wiring highway called a CAN bus to allow different computer modules to talk to one another. If the main engine computer loses track of the transmission computer or the anti-lock brake module due to a loose wire or a blown fuse, it will save a network code to let you know that a digital conversation was interrupted.
Can an aftermarket accessory like a throttle controller cause a check engine light?
Yes, adding aftermarket electronic accessories can sometimes trigger a check engine light. Devices like modern throttle controllers plug directly into the wiring harness near your accelerator pedal to alter how quickly the engine responds when you step on the gas. If the accessory sends an electrical signal that is slightly too strong or out of sync with what the central factory computer expects to see, the vehicle brain will assume the accelerator pedal sensor is broken, activate a fault code, and sometimes drop the car into a slow safety mode to protect you.

