Your car is a beautiful piece of machinery. It breathes in air, drinks in fuel, and creates controlled explosions to get you where you need to go. But all those mini-explosions generate a massive amount of heat. If that heat stays trapped inside the metal blocks of your engine, things will melt, warp, and break very quickly.
That is where your cooling system comes to the rescue. It is a continuous loop of liquid safety that keeps everything running at just the right temperature. At the heart of this system sits a tiny, inexpensive, yet incredibly vital part: the engine thermostat. When this little device gets stuck, your car can quickly turn into a rolling sauna—or worse, a smoking heap on the side of the highway.
If you have noticed your temperature gauge creeping into the red zone, or if your heater refuses to blow warm air on a chilly morning, you might be dealing with a sticking thermostat and old, dirty coolant. Do not panic. You do not need to be a professional mechanic with decades of experience to fix this problem. With some patience, the right tools, and this complete guide, you can tackle this project right in your own driveway.
Let us dive deep into the world of automotive cooling, learn how these parts work together, and walk through the exact steps to get your vehicle back in peak condition.
Understanding the Cooling Loop
Before you grab a wrench and start loosening bolts, it helps to understand what is actually happening under the hood of your vehicle. Think of your cooling system like a giant, liquid-filled puzzle where every piece has a specific job to perform.
The Lifeblood of the System
Coolant, which is often called antifreeze, is a special mixture of water and chemicals designed to absorb heat. Straight water would boil too quickly in the summer and freeze solid in the winter, which could crack your engine block. Coolant solves this problem by raising the boiling point and lowering the freezing point.
As your engine runs, a water pump pushes this liquid through channels built directly into the engine block. The fluid absorbs the intense heat created by the pistons and cylinders, carries it away, and moves toward the front of the car.
The Radiator and Fans
Once the hot fluid leaves the engine, it travels into the radiator. The radiator is a large, flat component filled with tiny tubes and thin metal fins. As you drive down the road, rushing air passes through these fins, cooling the liquid inside the tubes. If you are sitting still in traffic, large electric fans switch on to pull air through the radiator manually.
Once the liquid is cooled down, it travels back into the engine to start the process all over again. It is a continuous, beautiful cycle that keeps your engine happy.
The Thermostat Gateway
So, where does the thermostat fit into this picture? The thermostat acts as a gatekeeper between the engine and the radiator. When you first start your car in the morning, the engine is cold. To help it warm up quickly to its efficient operating temperature, the thermostat remains tightly closed. This forces the coolant to stay inside the engine, looping around and getting warm.
Once the liquid reaches a specific temperature—usually around 190 degrees Fahrenheit—a special wax element inside the thermostat expands. This expansion forces a spring to compress, opening the metal valve. Now, the hot fluid can finally flow out to the radiator to be cooled.
Signs of a Bad Thermostat
When a thermostat fails, it usually goes wrong in one of two ways: it gets stuck open, or it gets stuck closed. Both situations cause distinct problems for your vehicle, and you should know how to spot the warning signs.
The Stuck Closed Nightmare
This is the more dangerous of the two failures. If the thermostat gets stuck in the closed position, the hot coolant is trapped inside the engine with absolutely no way to reach the radiator. The fluid will get hotter and hotter until it boils.
- Rising Temperature Gauge: You will see the needle on your dashboard dash toward the red line within minutes of driving.
- Boiling Sounds: You might hear gurgling, bubbling, or knocking sounds coming from under the hood as the liquid turns to steam.
- Steam Clouds: If the pressure gets too high, coolant will escape through the pressure cap, creating a dramatic cloud of white steam.
- Engine Damage: If you keep driving with a closed thermostat, the extreme heat will warp your engine head, blow your head gasket, and potentially ruin the entire motor.
The Stuck Open Annoyance
If the thermostat fails while it is wide open, coolant flows constantly through the radiator, even when the engine is freezing cold. While this will not destroy your motor in a matter of minutes, it causes long-term issues.
- Slow Warm Up Times: It might take twenty minutes of driving before your temperature needle even begins to move.
- No Cabin Heat: Your dashboard vents will blow lukewarm or completely cold air because the engine never gets hot enough to warm the heater core.
- Poor Fuel Economy: Engines burn fuel most efficiently when they are hot. If your motor stays cold, the computer will inject extra fuel to try and heat things up, wasting your gas money.
- Check Engine Light: Modern cars track how fast the engine warms up. If it takes too long, the computer will trigger a warning light on your dash.
Tools and Materials Gathering
To make this job go as smoothly as possible, you need to gather all your supplies before you begin. There is nothing worse than having your car torn apart only to realize you are missing a specific tool.
Here is a detailed breakdown of everything you will need to complete the job.
Essential Tools
- Socket Wrench Set: You will need a variety of standard and metric sockets to remove the thermostat housing bolts. An extension bar will also help you reach tight spaces.
- Screwdrivers: Both flathead and Phillips screwdrivers are useful for loosening hose clamps.
- Pliers: A good pair of slip-joint or channel-lock pliers will help you pinch and slide off stubborn spring-loaded hose clamps.
- Gasket Scraper: A plastic scraper or a dull putty knife is necessary to clean old gasket material off the metal surfaces.
- Drain Pan: You need a wide, low-profile container to catch the old fluid as it drains from the vehicle.
- Funnel: A large funnel makes pouring new fluid into your radiator simple and mess-free.
Required Materials
- New Thermostat: Buy a high-quality replacement that matches your vehicle’s exact specifications. It should match the temperature rating of your original factory part.
- New Gasket or O-ring: Most new thermostats come with a matching rubber seal or paper gasket. If yours does not, make sure to purchase one separately.
- Fresh Coolant: Check your owner’s manual to find the exact type of fluid your car requires. Some vehicles use green formula, while others use orange, yellow, or blue. Never mix different colors together.
- Distilled Water: If you purchase concentrated coolant, you must mix it with water. Always use distilled water from the grocery store, never tap water. Tap water contains minerals that will clog your radiator tubes over time.
- Rags and Cleaners: Keep plenty of shop towels and a can of brake cleaner nearby to wipe down greasy surfaces and clean up spills.
Safety First
Working on an automotive cooling system can be dangerous if you do not respect the heat and pressure involved. Before you even pop the hood, commit these crucial safety rules to memory.
The Golden Rule: Let It Cool
Never, under any circumstances, open the radiator cap or loosen cooling components while the engine is hot. The system operates under intense pressure, and the fluid inside can be well over 200 degrees Fahrenheit. If you open a cap on a hot system, boiling liquid and steam will erupt like a volcano, causing severe burns to your face and hands.
Before you start working, touch the hood of the car. If it feels warm, wait. Let the vehicle sit for at least two hours until the engine block is completely cool to the touch.
Protect Your Body
Coolant is a harsh chemical that can irritate your skin and eyes. Always wear safety glasses or goggles while working under the car to protect your eyes from stray drops of falling fluid. Wear thick nitrile gloves to keep your hands clean and protected from chemical exposure.
Protect Your Pets
Coolant has a sweet smell and a sweet taste that animals find incredibly appealing. However, it is highly toxic. Even a tiny amount of swallowed antifreeze can cause fatal kidney failure in dogs, cats, and local wildlife.
Always keep your drain pan covered when you walk away from it. Clean up any spills on your driveway immediately using absorbent towels, and wash the pavement thoroughly with water and soap. Store new and used jugs of fluid high up on shelves where pets and young children cannot reach them.
Step-by-Step Thermostat Replacement
Now that you are safe, prepared, and stocked with tools, it is time to get your hands dirty. We will begin by replacing the faulty thermostat itself. Take your time, focus on each step, and do not rush.
Step 1: Locate the Thermostat Housing
Open your hood and secure it safely. To find the thermostat, follow the thick rubber hoses attached to your radiator.
On most vehicles, the upper radiator hose leads directly to a small metal or plastic dome bolted to the engine block. This dome is the thermostat housing. On some cars, the thermostat is located where the lower radiator hose meets the engine near the water pump. If you are having trouble finding it, consult a repair manual or look up a diagram online for your specific year, make, and model.
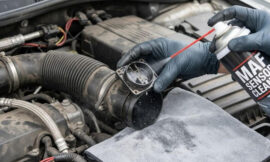
Step 2: Clear the Access Path
Sometimes, parts like the air intake duct, electrical wires, or brackets will block your path to the housing bolts. Use your screwdrivers or sockets to gently remove these obstacles.
Take pictures with your phone before you remove anything so you can remember exactly how the wires and brackets were routed when it is time to put everything back together.
Step 3: Position Your Drain Pan
Slide your wide drain pan directly under the area where the thermostat housing sits. When you open the housing, a significant amount of fluid will spill out from the engine block, and you want to catch every single drop.
Step 4: Disconnect the Hose
Use your pliers or a screwdriver to loosen the clamp holding the radiator hose to the thermostat housing. Slide the clamp back along the body of the hose away from the connection point.
Gently twist the rubber hose back and forth to break the seal against the metal tube. Once it moves freely, pull the hose away from the housing. Point the open end of the hose down into your drain pan to catch any escaping liquid.
Step 5: Remove the Housing Bolts
Most housings are held in place by two or three bolts. Use your socket wrench to loosen these bolts. Turn them counter-clockwise to back them out.
Sometimes these bolts can be stubborn due to years of heat cycles. Apply steady, even pressure so you do not snap the bolt heads off. Once the bolts are out, set them in a safe place like a small magnetic tray or a clean paper towel.
Step 6: Lift the Housing and Remove the Old Thermostat
Gently tap the side of the housing with a plastic mallet or the handle of a screwdriver to break it loose from the engine. Do not wedge a sharp metal screwdriver between the housing and the engine block, as this can scratch the soft aluminum surfaces and cause permanent leaks.
Lift the housing away to reveal the thermostat sitting inside its pocket. Note exactly which way the thermostat is facing. Is the long spring side pointing into the engine or out toward the hose?
Important Note: Thermostats only work if they are installed in the correct direction. Installing a thermostat backward will prevent it from opening, causing your engine to overheat almost instantly.
Reach in and pull the old thermostat out of its seat.
[Engine Block] <-- (Spring Side) [Thermostat] (Flat Side) --> [Housing Dome] --> [Hose]
Step 7: Clean the Mating Surfaces
This is one of the most critical steps in the entire process. Use your plastic gasket scraper to remove every trace of old paper, rubber, or silicone sealant from both the engine block surface and the underside of the housing dome.
The metal must be completely clean, smooth, and shiny. Finish the cleanup by spraying a little brake cleaner onto a shop rag and wiping down the metal surfaces to remove any grease or leftover residue.
Step 8: Install the New Thermostat
Take your new thermostat and compare it side-by-side with the old one to make sure they are the same size.
Place the new thermostat into the engine pocket, ensuring the spring side points in the exact same direction as the original. Many thermostats feature a tiny metal pin called a jiggle valve or bleed valve. This pin allows trapped air bubbles to pass through the system. If your thermostat has a jiggle valve, make sure it is positioned at the very top (the 12 o’clock position) when you install it.
Step 9: Install the New Seal and Housing
If your car uses a rubber O-ring seal, stretch it gently around the outer edge of the thermostat or place it carefully into the groove carved into the engine block. If your car uses a paper gasket, position it cleanly over the mounting surface.
Carefully lower the housing dome back down over the new thermostat. Hand-start the bolts into their holes to avoid cross-threading the delicate metal.
Using your socket wrench, tighten the bolts gradually. Alternate between the bolts, turning each one a few times so the housing pulls down evenly against the seal. Do not over-tighten them, as plastic housings can crack and aluminum threads can strip easily.
Step 10: Reattach the Hose
Slide the radiator hose back onto the housing port until it is fully seated. Move the hose clamp back into its original position, ensuring it sits securely behind the raised lip of the metal tube. Tighten the clamp firmly.
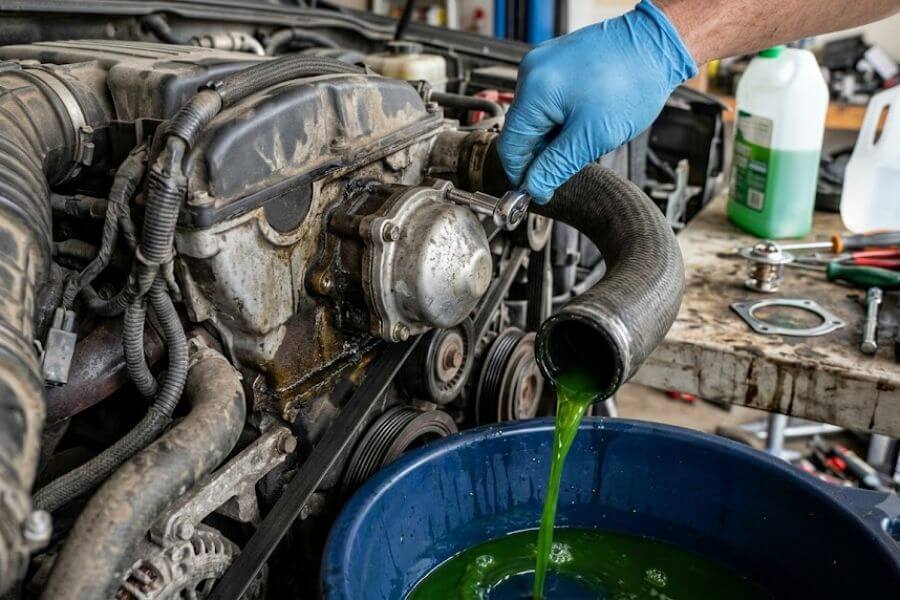
Coolant Flushing and Rinsing
Now that your brand-new thermostat is installed and sealed tight, it is time to turn your attention to the fluid itself. Over years of use, coolant breaks down, loses its protective qualities, and collects tiny bits of dirt and rust particles. A thorough flush will clean out the entire system and give your new parts a clean environment to work in.
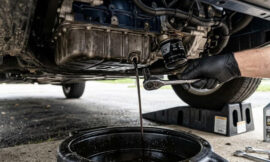
Step 1: Locate and Open the Radiator Drain Plug
Look at the bottom corners of your radiator. You should find a small plastic or metal drain plug, which is often called a petcock. Position your drain pan directly underneath this plug.
Turn the petcock counter-clockwise to open it. Some plugs can be turned by hand, while others require a wide flathead screwdriver or a socket. Let the old fluid stream out into your pan until it slows to a stop.
Step 2: Remove the Radiator Cap
To speed up the draining process, open the radiator cap at the top of the system. Removing the cap breaks the vacuum seal and allows air to enter, letting the fluid rush out much faster, much like poking a hole in the bottom of a juice box.
Step 3: Drain the Overflow Reservoir
Locate the plastic tank connected to your radiator by a small hose. This is your coolant overflow or expansion reservoir.
If the tank looks dirty or contains old liquid, remove the mounting bolts, disconnect the hose, and tip the fluid out into your drain pan. Wash the inside of the tank out with clean water until the plastic looks clear, then bolt it back into place.
Step 4: Close the Drain Plug and Fill with Distilled Water
Once all the old fluid has finished dripping out of the bottom of the radiator, turn the petcock clockwise to close it securely.
Place your large funnel into the open radiator neck. Pour clean distilled water into the radiator until the liquid reaches the top of the opening. Pop the cap back on loosely.
Step 5: Run the Engine to Flush
Get into the driver’s seat and start the car. Turn your dashboard climate control settings to full heat and set the fan speed to high. Turning on the cabin heater opens a valve that allows water to loop through your heater core, cleaning out that hidden section of the system.
Let the car idle in your driveway for about ten to fifteen minutes. Watch your dashboard temperature gauge closely. As the engine warms up, the new thermostat will open, allowing the clean distilled water to circulate through the engine block, picking up leftover bits of old coolant and debris.
Step 6: Drain the Flush Water
Turn off the engine and let it cool down until the radiator hoses feel comfortable to touch.
Carefully open the bottom drain plug once again and let all the water drain out into your pan. You will notice that the water coming out is no longer clear; it will be tinted with the color of your old fluid and might contain floating flecks of debris. Close the drain plug when it finishes dripping.
Repeating the Flush Process
If your old fluid was extremely dirty, muddy, or brown, you may want to repeat this water flush one or two more times. Keep flushing with distilled water until the liquid draining out of the bottom of the radiator looks completely clean and clear. This ensures your cooling loop is pristine and ready for fresh chemicals.
Refilling and Bleeding the System
You are in the homestretch now. Your new thermostat is in place, and your cooling channels are completely clean. Now you must fill the system with the proper mixture of fresh coolant and remove any trapped air pockets.
Step 1: Calculate Your Fluid Mix
If you bought pre-diluted coolant, you can skip this thought process and pour it straight in. If you bought concentrated coolant, you need to mix it with distilled water.
The ideal mixture for most vehicles is half coolant and half distilled water. You can mix them together in a clean, empty milk jug before pouring, or alternate pouring equal amounts directly into your funnel.
Step 2: Fill the Radiator and Reservoir
Insert your funnel into the open radiator neck. Slowly pour your fresh liquid mixture into the opening. Pouring slowly gives air a chance to escape out of the top as the liquid flows down into the tubes. Keep pouring until the liquid reaches the very base of the filler neck.
Next, open your plastic overflow reservoir and fill it up to the line marked “Cold” or “Minimum.”
Step 3: The Bleeding Process
Air is the ultimate enemy of a cooling system. When you drain the fluid, air rushes in to fill the empty spaces. If you leave these air bubbles inside the engine, they create blocks that prevent coolant from moving, which can cause localized overheating. Removing these bubbles is called bleeding or burping the system.
With the radiator cap still completely off, start your engine. Leave the car in park and set your emergency brake. Turn your dashboard heater settings back to full heat with the fan on low.
Step 4: Watch the Bubbles Escape
As the engine runs and starts to warm up, watch the open neck of your radiator. You will see the liquid level drop as the water pump pushes fluid into the engine cavities. You will also see air bubbles rising to the surface and popping.
Keep your coolant jug handy. Whenever the liquid level drops in the radiator neck, slowly pour in more fluid to keep it full.
Step 5: Squeeze the Hoses
To help dislodge stubborn air bubbles trapped in high spots, put on your thick gloves and gently squeeze the upper radiator hose a few times.
You will feel the fluid pulsing inside, and you will likely see a fresh batch of bubbles emerge from the radiator neck.
Step 6: Wait for the Cooling Fan
Keep the engine running until your car reaches its normal operating temperature. You will know this happens when you feel hot air blowing from your dashboard vents and you see the large electric cooling fans near the radiator spin to life.
The spinning fans mean the thermostat has opened completely, and the fluid is making its full journey through the loop. Once the bubbles stop appearing and the fluid level remains steady at the top of the neck, turn off the engine.
Step 7: Seal It Up
Reinstall your radiator cap, twisting it firmly until it locks completely into place. Inspect the area around your thermostat housing and your radiator drain plug to make sure there are absolutely no active leaks or damp spots. Wipe away any drips with your shop rags.
Project Component Summary
To help you review what you have learned and see how the old parts compare to the new setup, take a look at this helpful breakdown of your cooling loop project.
| System Part | Condition Before Project | Action Taken | Condition After Project |
| Engine Thermostat | Stuck open or closed, causing poor heat or dangerous engine overheating. | Replaced with a brand-new factory specified unit. | Opens and closes perfectly at the correct temperature. |
| Thermostat Gasket | Worn, compressed, and prone to developing sudden leaks. | Cleaned away entirely and replaced with a fresh seal. | Creates a tight, leak-free connection against the engine block. |
| Internal Engine Coolant | Degraded, dirty, full of debris, and lost its chemical protection. | Flushed out completely with clean distilled water. | Pure, clean, and free of floating particles or rust. |
| Fresh Coolant Mix | Empty after draining the old system. | Filled with a fresh 50/50 mix of approved fluid and distilled water. | Offers full boil-over protection and winter freeze defense. |
| Cooling Loops Channels | Filled with trapped air pockets after working on components. | Bleed and burped by running the engine with an open cap. | Solid column of liquid with zero hot-spot causing air blocks. |
Final Checks and Road Testing
Before you declare total victory and head inside to clean up, you need to conduct a safe test drive to ensure everything works flawlessly under real driving conditions.
The Clean Up Duty
Gather up all your dirty tools and wipe them down. Take your drain pan and carefully pour the old used fluid into sealable plastic jugs.
Take these jugs to a local auto parts store or a household hazardous waste recycling center. Never dump coolant down a household drain, into a storm sewer, or onto the bare ground.
The Initial Drive
Get behind the wheel and take your car for a short five-minute drive around your neighborhood. Stay close to home just in case you need to turn back.
Keep your eyes glued to your dashboard temperature gauge. The needle should climb smoothly up to the middle of the dial and stay there firmly, without bouncing up into the hot zone. Listen for any strange sounds and enjoy the nice, hot air blowing out of your cabin vents.
The Next Morning Check
Park your car back in your driveway on a level surface and let it sit overnight until the engine is completely cold again.
The next morning, open the hood and check the level inside your plastic overflow reservoir. It is perfectly normal for the level to drop slightly after a road drive as the system settles. If it is below the “Cold” line, add a splash of your leftover fluid mixture to top it off. Look under the front of the car one last time to confirm your driveway is completely dry.
Congratulations. You have successfully replaced your sticking thermostat, flushed out your old fluid, and protected your vehicle’s engine from the dangers of overheating. You saved money, learned a valuable new skill, and gained the pride that comes with fixing your own ride.
Frequently Asked Questions
Can I run my vehicle without a thermostat installed?
While your car will physically run without a thermostat, it is a very bad idea for long-term engine health. Without a thermostat to block the flow of fluid, your engine will struggle to reach its proper operating temperature, especially in cooler weather. This means your motor will run cold for extended periods, leading to terrible fuel economy, increased engine wear, thick carbon buildup inside your combustion chambers, and a complete lack of heat inside the cabin for you and your passengers.
Why must I use distilled water instead of tap water?
Tap water contains hidden minerals like calcium, magnesium, and iron. When tap water gets heated inside your engine, these minerals separate from the liquid and form a hard crust on the inside of your radiator tubes and engine channels. Over time, this mineral buildup acts like clogged arteries, restricting fluid flow and reducing the radiator’s ability to shed heat. Distilled water has been completely purified, meaning it contains zero minerals and will keep your cooling loops perfectly clean.
How often should I perform a coolant flush on my vehicle?
For most modern vehicles, it is wise to flush your system every thirty thousand to fifty thousand miles, or every three to five years, whichever comes first. Some modern long-life fluids claim to last up to one hundred thousand miles, but checking your owner’s manual is always your best bet. Regularly changing the fluid ensures that the anti-corrosion additives stay strong, protecting your aluminum engine parts from rusting from the inside out.
What should I do if my car starts overheating immediately after this project?
If your temperature gauge climbs into the red zone right after you complete this job, the most common cause is a large air bubble trapped inside the engine block. Turn off the vehicle immediately and let it cool down completely. Once it is safe, open the radiator cap and check the fluid level. You will likely need to repeat the bleeding and burping process to let that stubborn pocket of air escape out of the top of the system. Also, double-check that you did not install the thermostat backward.
Is it safe to mix different colors of coolant together?
No, you should never mix different colors of coolant together. The different colors represent distinct chemical formulas, such as Inorganic Acid Technology or Organic Acid Technology. These formulas do not mix well. If you combine them, they can chemically react with each other and turn into a thick, gel-like sludge. This sludge will clog your water pump, block your heater core, and stop your cooling system from working entirely. Always stick to the specific type recommended by your manufacturer.
