Have you ever noticed your car acting like it has a bad case of the hiccups? Maybe you are sitting at a red light, and the steering wheel starts to shake. Perhaps the engine makes a strange whistling noise when you push down on the gas pedal. Or worst of all, that glowing amber check-engine light suddenly pops up on your dashboard, staring back at you like an unwanted guest.
When your vehicle starts acting up this way, it can feel pretty frustrating. You might think you are looking at a massive, expensive repair bill at the local mechanic shop. But before you panic or start emptying your piggy bank, there is a very common culprit behind these exact symptoms that you can track down yourself. It is called an engine vacuum leak.
Think of your car engine as a giant air pump. To run smoothly, it needs to breathe in a very specific amount of air mixed with a very specific amount of fuel. If extra air sneaks into the engine through an uninvited hole, the entire balance gets thrown out of whack. It is like trying to drink a thick milkshake through a straw that has a tiny rip in the side. No matter how hard you suck, you mostly just get air, and your milkshake stays at the bottom of the cup.
In this guide, you will learn how to become a automotive detective. You will use a specialized device called a smoke machine kit to track down these hidden air leaks. This method is incredibly accurate, highly visual, and actually quite fun to do. By the time you finish reading, you will know exactly how to hook up a smoke tester, spot the rising plumes of smoke, and patch up those pesky holes so your car can run like new again.
Understanding the Mystery of Engine Vacuum
To fix a problem, you first need to understand how things work when everything is going right. Your car runs on a mixture of gasoline and air. Inside the engine, pistons move up and down at lightning speed. When a piston moves downward during its intake stroke, it creates a powerful sucking action. This action pulls air into the engine, much like your lungs draw in air when you take a deep breath.
This pulling force is what mechanics call engine vacuum. It is a state of low pressure inside the intake manifold compared to the normal atmospheric pressure outside the car. This vacuum force is incredibly strong, and your vehicle does not just use it to pull in air for combustion. It actually uses this sucking power to run many other important parts of your automobile.
The Role of the Intake Manifold
The intake manifold is a large part bolted to the top of your engine. You can think of it as a distribution hub or a series of branching tunnels. Its main job is to take the clean air coming from your air filter and divide it evenly among all the different engine cylinders.
When the throttle pedal is not pressed, a metal flap called the throttle plate stays mostly closed. This blocks the air from entering freely, which creates a very high vacuum state inside the intake manifold. When you step on the gas, that flap opens up, air rushes in, the vacuum level drops, and your car accelerates down the road.
What Does the Vacuum Power?
Your engine uses this low-pressure system to assist with several critical functions. Here are a few places where that suction goes to work:
- The Brake Booster: Have you ever wondered why the brake pedal is soft and simple to push down, even though it stops a massive piece of heavy metal? That is thanks to the brake booster, which uses engine vacuum to multiply the force of your foot.
- The PCV System: The Positive Crankcase Ventilation system uses engine suction to pull harmful gases out of the oil pan area and burn them off safely.
- The EVAP System: This system captures fuel vapors from your gas tank and uses vacuum to draw them into the engine so they do not pollute the air outside.
- Climate Control Flaps: In some older or classic vehicles, small vacuum-powered motors are used to open and close the vents inside your dashboard when you switch from defrost to floor heat.
Because this suction travels through so many different tubes, hoses, and valves, there are dozens of places where a tiny leak can develop. If a single rubber hose gets brittle, cracks, or pops off its fitting, extra air will find its way inside.
Signs Your Vehicle is Suffering from an Air Leak
When your engine has a vacuum leak, it is receiving unmetered air. This means the car computer has no idea this extra air is entering the system. Your vehicle uses a special sensor near the air filter called a Mass Airflow sensor to weigh the incoming air. Based on that weight, the computer squirts the perfect amount of fuel into the cylinders.
If extra air sneaks in after that sensor, the computer gets tricked. It thinks it is adding the right amount of fuel, but the actual mixture becomes way too thin because of the bonus air. Mechanics call this a lean condition. When your car runs lean, it will definitely let you know.
The Tell-Tale Symptoms
You do not need to be an expert to spot the warning signs of an engine vacuum leak. Keep an eye and an ear out for these specific behaviors:
- Rough Idling: When you are parked or stopped at a light, the vehicle might shake, shiver, or vibrate. The RPM needle on your dashboard might jump up and down erratically instead of staying steady.
- Stalling: Sometimes, the air imbalance becomes so severe that the engine cannot stay running at all. It might just sputter out and die when you slow down to a stop.
- Hissing or Whistling Noises: Since the engine vacuum is highly powerful, it acts like a giant whistle when air rushes through a tiny crack. If you open the hood and hear a high-pitched hiss, you are listening to a leak in action.
- Poor Acceleration: When you step on the gas pedal, the vehicle might hesitate, stumble, or feel like it has lost its muscle. This happens because the fuel-to-air ratio is completely out of balance.
- Hard Brake Pedal: If the leak is located in the large hose leading to your brake booster, you might notice that stopping the car requires a lot more leg muscle than usual.
Dashboard Warning Codes
When the computer detects that something is wrong with the air and fuel blend, it illuminates the check-engine light. If you plug a diagnostic scanner into the port under your steering wheel, you will likely see specific error codes.
| Common Diagnostic Code | What It Means to the Computer |
| P0171 | System Too Lean (Bank 1) |
| P0174 | System Too Lean (Bank 2) |
| P0300 | Random or Multiple Cylinder Misfires |
| P0507 | Idle Air Control System RPM Higher Than Expected |
Seeing these codes is a massive clue that your vehicle is drawing in rogue air from somewhere under the hood.
Why the Smoke Machine is the Ultimate Detective Tool
In the old days, fixing a vacuum leak involved a lot of guesswork and some pretty dangerous techniques. People used to spray highly flammable fluids like carburetor cleaner or propane around a running engine, listening to see if the engine speed changed when the fluid got sucked into a hidden crack. Not only is this a great way to accidentally start a fire under your hood, but it is also very inaccurate.
Other people tried spreading soapy water over the hoses, hoping to see bubbles. However, because a vacuum system sucks air inward rather than blowing it outward, soapy water rarely works well. It usually just gets sucked straight into the engine without showing you where the hole is.
Enter the Smoke Machine Kit
A smoke machine kit changes the entire game. Instead of relying on dangerous sprays or invisible air currents, this tool makes the problem completely visible to your eyes.
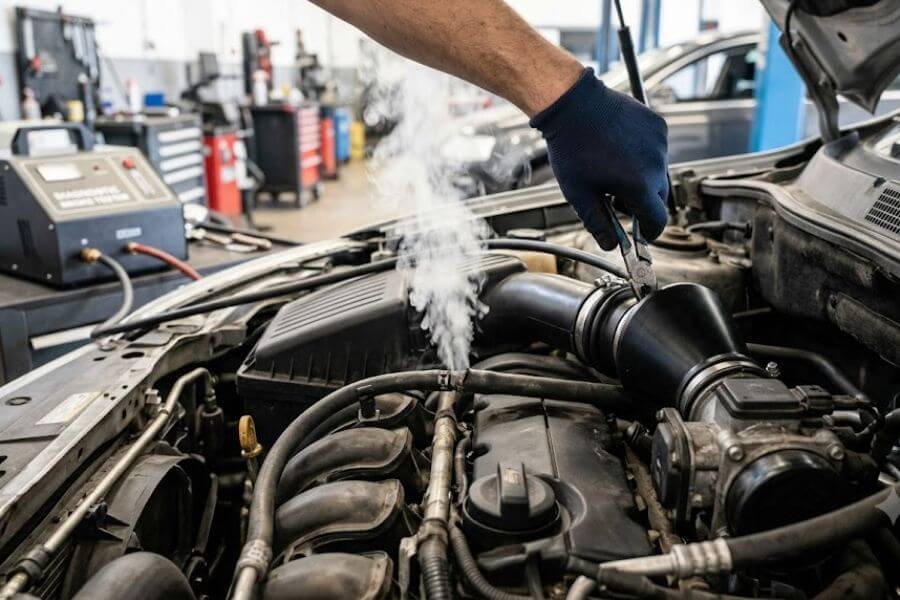
The machine works by taking a specific type of oil, like cosmetic mineral oil or specialized fluid, and heating it up inside a sealed chamber. It then uses a small built-in air compressor or an external air tank to pump that dense, white smoke into your car engine through a hose.
Because the engine is turned off during this test, the smoke creates a slight amount of positive pressure inside the intake manifold. This means the smoke will travel through every single twist, turn, hose, and gasket inside the system. When it finds a crack, a hole, or a loose fitting, it will gently drift out into the open air. All you have to do is watch for the white wisps to appear, and you have found your target.
Safety Measures Before You Begin
Working on an automobile is an awesome way to learn how things function and save money, but you must always put safety at the top of your list. Before you pop the hood and start hooked up any machinery, let us make sure your work environment is perfectly safe.
Park on Level Ground
Always make sure your vehicle is parked on a flat, even surface like a garage floor or a driveway. Pull the parking brake up as tightly as possible to ensure the car cannot roll anywhere while you are working.
Let the Engine Cool Down
This is a huge rule. Engines get incredibly hot when they run. If you start touching parts right after driving, you risk getting serious burns on your hands and arms. Furthermore, some components like the exhaust manifold can stay hot for hours. Let the vehicle sit with the hood open for at least an hour before you get started.
Protect Your Eyes and Hands
Even though the smoke produced by these machines is generally non-toxic, you still do not want it drifting into your eyes or getting all over your skin. Wear a pair of clear safety glasses to protect your eyes from stray dust, oil drops, or smoke. Put on some snug mechanic gloves to keep your hands clean and safe from sharp metal edges under the hood.
Keep a Fire Extinguisher Nearby
Whenever you work around electrical components, batteries, and automotive fluids, it is smart practice to have a working fire extinguisher within arm’s reach. It is always better to be safe and prepared.
Your Toolkit Checklist
Before you get your hands dirty, it is helpful to gather everything you need in one place. This saves you from running back and forth to your toolbox in the middle of the job.
Here is a list of the gear you will want to have ready:
- A Smoke Machine Kit: This includes the main smoke unit, the power cables, and the delivery hose.
- Smoke Fluid: High-quality mineral oil or the fluid that came inside your specific kit.
- A 12-Volt Power Source: Most smoke machines use alligator clips that connect directly to your car battery.
- An Intake Adapter Cone: A cone-shaped rubber plug that fits into your car intake tube to seal it up.
- A Bright Flashlight: A strong LED light is your best friend when trying to spot thin wisps of smoke in dark corners.
- Basic Hand Tools: A couple of flat-head screwdrivers, pliers, and a small socket set to remove plastic engine covers or loosen hose clamps.
- Shop Towels or Rags: To wipe up any stray oil drips or clean off dirty hoses.
Step-by-Step Guide to Finding the Leak
Now that you are prepared, safe, and have your tools ready, it is time to begin the actual smoke test. Follow these steps carefully to ensure a highly accurate diagnostic check.
Step 1: Remove the Plastic Engine Cover
Many modern cars have a large, fancy plastic shield covering the top of the engine. While it makes things look neat, it hides all the hoses we need to see. Use your sockets or a screwdriver to remove any clips or bolts holding this cover in place, and lift it away. Set it in a safe spot like your trunk or garage floor so you do not step on it.
Step 2: Locate the Main Air Intake Tube
Look for the large rubber or plastic tube that runs from your air filter housing over to the engine throttle body. This is the main highway for air entering your engine. You will want to disconnect this tube right at the air filter box. This gives you an open doorway to send smoke directly into the entire intake system.
Step 3: Seal the Intake Using the Adapter Cone
Grab the rubber adapter cone that came with your smoke machine kit. Shove the cone firmly into the open end of the intake tube you just disconnected. The cone is tapered, meaning it gets wider as you push it in, allowing it to create a tight seal inside different sizes of tubes. Make sure it fits snugly so no smoke escapes backward toward you.
Step 4: Add Fluid to the Smoke Machine
Open the filler cap on your smoke machine unit. Pour in the recommended amount of mineral oil or smoke fluid. Be careful not to overfill it; most machines only need a few tablespoons of fluid to create a massive amount of dense smoke. Tighten the cap back down securely.
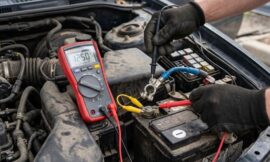
Step 5: Connect the Power Cables
Take the power cords from your smoke machine. Most kits feature two alligator clips: a red one and a black one. Connect the red clip to the positive (+) terminal of your car battery first. Then, connect the black clip to the negative (-) terminal or a clean, unpainted metal part of the car frame. You should see a power light turn on on the machine, indicating it is getting electricity.
Step 6: Hook Up the Smoke Delivery Hose
Take the long hose coming out of your smoke machine and connect it to the nozzle on the back of your rubber intake adapter cone. This creates a direct pipeline from the smoke generator straight into the heart of your engine.
Step 7: Turn On the Machine and Let It Build Pressure
Flip the power switch on your smoke unit. Many machines have a separate switch for the air pump and the heating element. Turn both on. Within a minute, the machine will start warming up the oil and pumping thick, white smoke through the tube. Watch the pressure gauge on your kit if it has one. You want the pressure to stay very low, around 1 to 5 PSI. High pressure can pop sensitive sensors or blow hoses off their brackets, which we want to avoid.
Step 8: Remove the Oil Dipstick or Oil Cap Briefly
To help the smoke fill up the entire engine crankcase and block areas rapidly, remove your oil filler cap or pull the dipstick out slightly for just a moment. Once you see white smoke starting to drift out of the oil fill hole, put the cap or dipstick back in place tightly. This proves that the smoke has successfully traveled all the way through the engine components and is now looking for a way out.
Spotting and Inspecting the Trouble Spots
With the smoke machine pumping away, grab your bright flashlight and start scanning the engine bay. Turn off your garage overhead lights if possible, as it makes spotting the smoke columns much more straightforward. Slow down and look closely at every single connection point.
Common Areas Where Smoke Will Escape
As you scan the engine compartment, pay close attention to these notorious trouble zones:
- The Intake Manifold Gasket: This is the sealing material between the metal engine block and the intake manifold. If smoke starts rising from the seam where these two giant parts meet, your gasket has failed and needs to be replaced.
- Vacuum Line T-Joints: Look for tiny rubber or plastic connectors shaped like the letters Y or T. These plastic pieces dry out from engine heat, become incredibly brittle, and snap open.
- The Throttle Body Gasket: Look right behind the metal throttle plate assembly. If smoke drifts out from this junction, the round rubber seal inside has shrunk or torn.
- The Brake Booster Hose: Follow the large, thick vacuum line that runs from the intake manifold across to the big round metal drum on the driver’s side firewall. Check the ends of this hose carefully for fine wisps of smoke.
- The PCV Valve and Hoses: This valve regulates engine fumes. If the rubber tubing connected to it has rotted from oil contact, smoke will come pouring out.
Take your time during this step. Sometimes a leak is so tiny that it only lets out a microscopic wisp of smoke every few seconds. Move your flashlight around at different angles to catch the reflection of the smoke particles in the air.
How to Correct the Most Common Vacuum Leaks
Once you have spotted the source of the escaping smoke, turn off your smoke machine and disconnect the power clips. You have successfully diagnosed the issue, and now it is time to put on your mechanic hat and fix it.
The process for correcting a leak varies depending on what part failed, but many fixes are highly manageable to do right in your own driveway.
Repairing a Split or Cracked Rubber Hose
If you found smoke coming out of a cracked rubber line, the best move is to replace the entire hose.
- Use your pliers to slide back any spring clamps holding the old hose in place.
- Gently twist and pull the bad hose off its plastic or metal port. Be careful not to snap the plastic fitting underneath if it is old.
- Take the damaged hose to your local auto parts store. They can cut a brand-new piece of vacuum hose of the exact same length and inner diameter for very little money.
- Push the fresh hose onto the fittings and slide the clamps back into position to pinch it down tight.
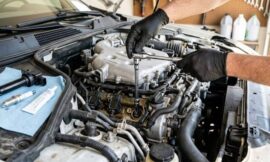
Replacing an Intake Manifold Gasket
If the smoke was leaking out from the base of the intake manifold, the repair requires a bit more teardown work.
- Label any wires and small hoses connected to the manifold so you know exactly where they go later.
- Use your socket wrench to unbolt the intake manifold from the cylinder head. Always follow a cross-pattern when loosening bolts to prevent warping the metal.
- Carefully lift the manifold off the engine.
- Use a plastic scraper or a clean shop towel to remove the old, flattened rubber gaskets from their grooves. Never use a metal razor blade on aluminum parts, or you might scratch the metal and create a permanent path for leaks!
- Clean the surfaces thoroughly with a bit of brake cleaner on a rag.
- Press the brand-new rubber gaskets into the manifold channels.
- Lower the manifold back onto the engine and torque the bolts down to the exact specifications found in your car manual.
Securing Loose Fittings and Missing Caps
Sometimes, you will discover that a hose did not actually crack; it simply slipped off its port due to engine vibrations. In other cases, a small rubber block-off cap might have dried up and fallen off completely.
For these issues, simply push the hose back onto its port and add a small zip-tie or a worm-gear hose clamp to clamp it down firmly so it can never slide off again. If a cap is missing, buy a small assortment pack of vacuum caps from the store, find the right size, and press it firmly onto the open port.
Verifying the Repair and Clearing the Codes
After you finish fixing the broken parts, you need to verify your work to ensure the engine is fully sealed up. The best way to do this is to perform a quick follow-up smoke test.
Hook up your smoke machine kit exactly like you did the first time. Turn it on and watch the specific area you just repaired. Is it perfectly sealed now? If no smoke escapes anywhere in the engine bay, give yourself a big pat on the back! You have officially solved the problem.
Wrapping Up the Job
Now, put everything back together properly:
- Disconnect the smoke machine hose and pull out the rubber adapter cone.
- Reconnect your car main air intake tube to the air filter housing and tighten up the big metal clamp using your screwdriver.
- Reinstall the plastic engine cover and tighten down its retaining hardware.
- Remove your safety gear and pack up your tools.
Clearing the Check-Engine Light
Even though the leak is fixed, your car computer might still remember the old “System Too Lean” error code, keeping the dashboard light glowing.
To clear this out, plug your digital OBD-II scanner into the port beneath your steering wheel. Turn the car key to the “On” position without starting the engine. Select the option to “Clear Codes” or “Reset DTCs” on your scanner screen. The amber light on your dash should blink out immediately.
If you do not have a scanner, you can disconnect the negative terminal of your car battery for about ten minutes to clear the computer memory. Keep in mind that this will also reset your radio presets and clock!
Once the computer is cleared, take your car out for a spin around the neighborhood. You should notice right away that the idle is silky smooth, the acceleration feels sharp and responsive, and your brakes work perfectly.
Summary Table of Vacuum Leak Fixes
To help you remember what to look for and how to handle it, look over this handy reference breakdown.
| Leaking Component | Visual Smoke Clue | Best Repair Method |
| Small Vacuum Line | Thin stream shooting out from a hairline crack | Replace with new rubber bulk line from auto parts shop |
| Main Intake Boot | Smoke escaping from the accordion folds of the big tube | Replace the entire boot assembly |
| Intake Gasket | Smoke leaking along the edge where the manifold meets the engine | Remove manifold, clean surfaces, install new rubber seals |
| Brake Booster Line | Smoke near the large round booster drum behind the brake master cylinder | Replace the thick specialized high-pressure vacuum hose |
| Missing Cap | Thick column pouring out of a bare metal nipple | Pop a new rubber vacuum cap over the open port |
Frequently Asked Questions
Can I use homemade smoke solutions like incense sticks or vaping devices to find a leak?
While it might seem tempting to try blowing vapor from a device or holding a smoking stick of incense around your engine bay to save money, it is not an effective solution. Homemade methods do not generate enough volume or dense pressure to fill up the entire inside of an engine block. A proper automotive smoke machine seals the system and creates light, continuous pressure that forces the thick smoke out of tiny cracks. Homemade smoke will just drift around in the wind under your hood, making it nearly impossible to spot a hidden, microscopic tear.
Will a vacuum leak cause long-term damage to my engine if I do not fix it?
Yes, driving with an active air leak for a long period can cause severe damage to your vehicle components. When your engine runs constantly in a lean state, it means there is too much oxygen and not enough fuel inside the firing chambers. This causes the internal combustion temperatures to skyrocket to dangerous levels. Over time, this intense heat can melt spark plug tips, burn your exhaust valves, or crack your expensive catalytic converter. It is always best to find and repair a leak as soon as you notice the first warning signs.
Is it safe to leave the smoke machine connected to my car for a long time?
Most automotive smoke testing units are designed to run for about ten to fifteen minutes at a time. Leaving a machine hooked up and running for an extended duration can cause the internal heating element to overheat, potentially damaging the machine or melting its internal plastic seals. If you cannot find the leak within ten minutes, turn the machine off, let it cool down for a few moments, check your connections, and restart the process fresh.
Why is smoke coming out of my exhaust pipe during the test?
If you see white smoke slowly drifting out of your car tailpipe at the very back of the vehicle while doing your test, do not worry! This is completely normal behavior. Inside your engine, some of the intake and exhaust valves are naturally held open depending on exactly where the pistons stopped moving when you turned the car off. The smoke travels through these open valves, moves all the way down your exhaust pipes, passes through the muffler, and exits out the back. It shows that your smoke machine is doing an amazing job filling the entire internal system of the vehicle.
Can a bad vacuum leak cause my transmission to shift poorly?
In many modern vehicles, the transmission uses electronic sensors to decide when to shift gears. However, in many older or classic automobiles, the transmission relies on a mechanical device called a vacuum modulator to know how hard the engine is working. If you have an air leak in one of these older systems, the transmission will receive an incorrect pressure signal. This can cause the car to slam roughly into gears, shift much too late, or refuse to shift into higher gears entirely. Fixing the hose line will instantly restore smooth shifting.