Picture this: You are driving down the highway, enjoying a great song, when a sudden rainstorm begins. You hit the window switch, but nothing happens. Your car window is completely stuck open. Your car interior is getting wet, and your stress levels are rising fast. Or maybe it is the middle of winter, your window is stuck down, and you are freezing. A broken power window is annoying, but you do not need to panic. You might not even need to spend a lot of money at a repair shop.
Many window problems come down to simple fixes that you can do right in your own driveway. Whether your window is completely dead, moving at a snail’s pace, or making an awful grinding noise, this guide will help you figure out what is wrong and how to fix it.
The Secret World Inside Your Car Door
Before you grab your tools, it helps to understand how your car window actually works. When you press the window button, a whole team of parts goes to work inside the door panel. If any single part of this team stops doing its job, your window stays stuck.
The Window Switch
This is the button you press every day. It acts like a gatekeeper for electrical power. When you push or pull the switch, it sends electricity from your car battery straight to the window motor. Because you use this button constantly, the internal electrical metal pieces can wear out or get covered in dirt over time.
The Window Motor
The motor is the muscle of the operation. It takes the electricity from the switch and turns it into rotational movement. Think of it like a tiny, powerful electric drill hidden inside your door. It spins forward to roll the window up and backward to roll it down.
The Window Regulator
The motor creates the spin, but the regulator turns that spin into straight up-and-down movement. The regulator holds the heavy glass panel securely. There are two main types of regulators:
- Cable-driven regulators: These use strong metal cables wrapped around a plastic wheel to pull the window up and down along metal tracks. They are light and common, but the plastic wheels can break and the cables can snap.
- Gear-driven regulators: These use a large metal arm with teeth, looking a bit like a clock gear or a metallic wing. The motor turns these teeth to lift the window. These are very strong but can jam if they lose lubrication.
The Window Tracks and Run Channels
Your window glass does not just float freely; it slides inside rubber-lined tracks called run channels. These channels keep the glass straight so it creates a tight seal against rain and wind. If these tracks get sticky, dirty, or bent, the window glass will get wedged tightly and refuse to budge.
Quick Emergency Tricks to Try Right Now
If your window is wide open and the sky looks like it is about to pour rain, you do not have time for a deep repair project. You need that glass up immediately to protect your car. Try these temporary tricks first to see if you can jump-start the system.
The Door Slam Method
This is an old mechanic trick that sounds silly but works surprisingly often if your window motor has a temporary dead spot.
- Turn your vehicle key to the “On” or “Accessory” position so the dashboard lights up, but do not start the engine.
- Press and hold the window switch in the “Up” position. Keep your finger pushing down on that button.
- While holding the button, slam the car door shut firmly. Do not slam it hard enough to break anything, but give it a solid, heavy swing.
- If the window does not move, try holding the button and firmly thumping the center of the inside door panel with the side of your fist.
This works because electric motors can get stuck on worn-out sections inside their internal mechanisms. The physical shockwave of the door slamming can shake the motor just enough to make electrical contact again, giving you one last roll-up before the motor completely dies.
The Window Hand-Sandwich Trick
If your motor is humming but the glass is slipping or barely moving, you might be able to help it along using muscle power. You will need a friend to assist you with this method.
- Sit inside the car with the door open. Have your helper stand on the outside of the door facing you.
- Both of you should place your palms flat against the window glass, sandwiching the glass tightly between your hands.
- Have your helper reach over and hold the window switch in the “Up” position.
- As the switch is held down, both of you must apply firm pressure and manually slide your hands upward, pulling the glass up into the frame.
Safety Warning: Watch your fingers! Once the window reaches the very top, immediately release your grip so your hands do not get pinched in the window frame.
Playing Detective: Diagnosing the True Problem
Before you buy any replacement parts, you need to find out exactly which component failed. Buying parts randomly can waste time and money. Use your eyes and ears to investigate.
Listen to the Sounds
Turn off your car radio, shut off the engine, but leave the key in the “On” position. Press the window switch and listen carefully to the inside of the door.
| What You Hear | What It Usually Means |
| Complete silence | No electricity is reaching the motor. This points to a blown fuse, a broken wire, or a dead switch. |
| A faint clicking sound | Electricity is reaching the motor, but the motor is jammed or lacks the power to turn. |
| A whirring or buzzing sound | The motor is working perfectly, but it has disconnected from the window regulator, or the regulator cables are broken. |
| A loud grinding or crunching noise | The regulator cables are tangled, stripped, or snapped inside the door panel. |
Watch the Dashboard Lights
Watch your car dashboard or dome light while you press the stuck window switch.
- If your dashboard lights dim slightly when you press the button, it means electricity is flowing all the way to the door motor, but the motor is stuck and pulling massive amounts of electrical power to try to move.
- If the lights do not dim at all, electricity is likely stopped early in the circuit, pointing back to a fuse or switch problem.
Gathering Your Tools
If the quick tricks failed, you will need to open up the door panel to see what is happening inside. Do not worry; you do not need an industrial workshop to do this. Most cars can be taken apart with standard tools you might already have around the house.
The Required Tool Kit
- Screwdrivers: You will definitely need a medium Philips-head screwdriver and a flat-head screwdriver.
- Plastic trim removal tools: These are cheap plastic pry bars. You can use a metal flat-head screwdriver wrapped in tape instead, but plastic trim tools prevent you from scratching your paint or tearing your interior fabric.
- Socket wrench set: A small metric socket set (especially 8mm, 10mm, and 11mm sizes) is necessary because manufacturers use small bolts to hold the window motor and regulator to the inner metal door frame.
- Safety glasses and heavy work gloves: The inside of a car door is full of sharp stamped metal edges that can easily slice your fingers. Glass can also shatter if handled incorrectly.
- Digital multimeter or test light: This tool lets you safely check if electricity is traveling through your wires.
- Painter’s tape or masking tape: You will use this to hold the glass up securely while you work underneath it.
Inspecting the Electrical Components
It is always smartest to test the simplest things first. Electrical issues are common, and you do not want to remove your entire door panel only to find out that a small two-dollar fuse was the only problem.
Checking the Fuse Box
Every car has a fuse box, which acts like a collection of electrical safety valves. If too much power surges through a wire, the fuse melts on purpose to stop a fire.
- Locate your vehicle fuse boxes. They are usually found under the dashboard on the driver side, near the kick panel, or under the hood near the battery. Check your owner manual to find the exact location.
- Look at the diagram on the fuse box cover to find the fuse labeled “Power Windows,” “P/W,” or “Window.”
- Use a small plastic pair of tweezers or fuse pullers to pull that fuse straight out.
- Hold the fuse up to a bright light. Look at the clear plastic body. If the silver metal wire inside is broken or has a dark burn mark, the fuse is blown and must be replaced.
- Replace it with a brand-new fuse of the exact same color and amperage rating number. Never use a higher number fuse, as this can cause a vehicle fire.
Testing the Window Switch
If the fuse is fine, the switch itself might be broken. Car doors get rained on when you open them, and spilled drinks can seep into the buttons, ruining the internal contacts.
- Try using the master switch panel on the driver door to move the passenger window. If the passenger window will not move using its own door switch but does move when you use the driver master switch, the passenger door switch is broken.
- If the window does not move from either switch, you need to pull the switch panel out to test it.
- Carefully wedge your plastic trim tool under the edge of the plastic switch panel on your door armrest. Gently pry upward until the clips release.
- Unplug the plastic wiring harness from the bottom of the switch.
- Take your digital multimeter, set it to measure Volts, and place the leads onto the metal pins inside the wire plug coming out of the door. Have a helper turn the car key on and press the switch. If you see around 12 volts on your screen, power is reaching the switch, which means your wiring is healthy and the problem lies deeper.
Removing the Door Panel with Care
If your electrical tests show that power is traveling all the way into the door but nothing is happening, you must remove the interior door panel to get to the motor and regulator. Take your time during this process so you do not break the plastic clips holding the panel in place.
Step 1: Locating the Hidden Screws
Car designers like to hide screws so the interior looks sleek and clean. You need to hunt for them.
- Check behind the inside door release handle. There is often a tiny plastic square cover that you can pop open with a small pocket knife to reveal a screw.
- Look inside the deep grab pocket that you use to pull the door shut. There is usually a rubber mat or plastic tab at the bottom hiding another large screw.
- Look along the very bottom edge of the plastic door panel. Some vehicles use visible screws or clips down there.
Step 2: Unclipping the Panel
Once every single screw is removed, the panel is held on only by plastic friction clips around the perimeter.
- Slide your wide plastic trim removal tool between the soft door panel and the hard metal door frame at the bottom corner.
- Gently pull the tool toward you until you hear a loud pop. This is the plastic clip releasing from the metal.
- Work your way around the bottom and sides of the door, popping out clips one by one.
- Once all the side and bottom clips are free, do not pull the panel straight off. Instead, lift the entire panel upward toward the sky. The top edge of the panel is hooked over the metal window sill.
Step 3: Disconnecting the Inner Links
Do not pull the panel away quickly yet! It is still attached by wires and cables.
- Look behind the semi-detached panel and locate the metal rods or cables that connect your interior door handle to the latch mechanism. Carefully unclip them from the handle backing.
- Unplug any remaining electrical wires for the power door locks, speakers, and courtesy lights. Now you can set the heavy door panel aside in a safe, clean place.
Step 4: Peeling Back the Vapor Barrier
Behind the door panel, you will see a plastic sheet glued to the metal. This is the vapor barrier, and its job is to keep water out of your car interior. Carefully peel this plastic sheet back from the corners to expose the big access holes in the metal door frame. Do not rip the plastic; you will need to stick it back on later.
Unjamming and Cleaning the Window Tracks
Sometimes, your motor and regulator are completely fine, but the window glass is simply stuck in place. Dirt, tree sap, sticky soda, and weathered rubber can act like glue, holding the window tightly.
Cleaning the Run Channels
Look at the vertical tracks that the edges of the glass slide through. Over the years, these rubber channels fill up with dust, road grit, and pollution.
- Take a clean rag wrapped over a flat screwdriver or an old toothbrush.
- Dip it into warm, soapy water and scrub deep inside the rubber channels from top to bottom. You will likely see a large amount of black gunk come out.
- Let the rubber dry completely.
Applying Lubrication
Rubber dries out over time and can grip the glass too tightly. You need to make it slick again.
- Spray a generous amount of dry silicone spray lubricant or graphite lubricant directly down into the rubber window tracks.
- Do not use standard multi-purpose oils or WD-40 for this task. Wet lubricants attract road dust and dirt like a magnet, which will create a thick, sticky paste that makes your window jam up worse in a few months. Dry silicone spray dries clear and leaves a slick layer that dirt cannot stick to.
Replacing a Dead Window Motor or Regulator
If you hear grinding noises or if your electrical tests show the motor is getting power but refusing to turn, you need to replace the mechanical assembly inside the door. In many modern vehicles, the motor and regulator are sold together as a single combined assembly unit, which makes replacement much simpler.
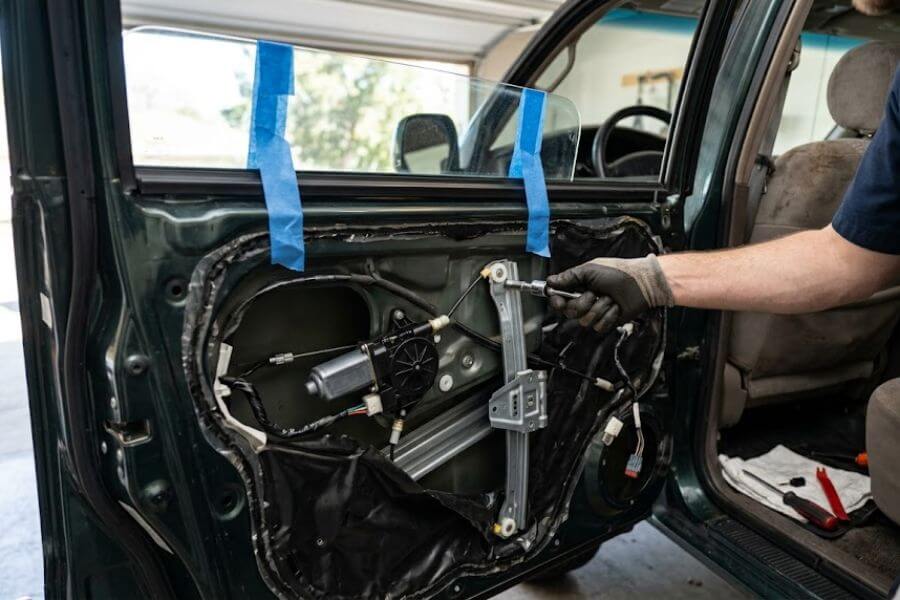
Step 1: Supporting the Glass
Before you loosen any bolts holding the regulator, you must secure the heavy glass window panel so it does not crash down to the bottom of the door and shatter into thousands of pieces.
- Manually push or slide the window glass up to its fully closed position at the top of the frame.
- Take long strips of heavy painter’s tape or masking tape. Loop the tape over the top of the door frame, sticking it firmly to the outside of the glass and the inside of the glass. Use at least three or four long strips. This creates an external suspension system that holds the glass safely at the top while you remove the mechanical skeleton underneath.
Step 2: Unbolting the Regulator and Motor
Look through the large cut-out access holes in the metal door frame. You will see the metal tracks of the regulator held to the door by several small bolts.
- Locate and disconnect the electrical wire plug going directly into the window motor.
- Use your socket wrench to loosen and remove the bolts holding the window glass clamps to the regulator track.
- Next, remove the bolts that hold the regulator frame tracks to the inner metal door skin. There are usually four to six bolts total.
- Carefully reach your hands through the access holes, collapse the old regulator mechanism like an accordion, and slide it out through the largest hole in the door frame.
Step 3: Installing the New Assembly
- Compare your old part side-by-side with your brand-new replacement part to ensure all the bolt holes, brackets, and wire plugs match up perfectly.
- Fold the new regulator assembly slightly and slide it carefully through the access hole into the inner door cavity.
- Line up the metal mounting studs with the holes in the door frame and start the bolts by hand to avoid cross-threading them.
- Tighten all the mounting bolts securely using your socket wrench, but do not over-tighten them, as you can strip the soft metal threads.
Step 4: Reconnecting and Realigning the Glass
- Carefully lower the window glass down by hand until the bottom edge of the glass lines up with the mounting clamps on your new regulator track.
- Insert and tighten the glass clamp bolts until they hold the window firmly. Ensure the rubber pads inside the clamps are positioned correctly so metal does not press directly against the glass.
- Plug the electrical wire harness back into the new motor.
- Before putting the door panel back together, temporarily plug your window switch back in, turn your car key on, and test the window. Roll it up and down a few times to make sure it glides smoothly without catching or binding.
Reassembling Your Vehicle Door
Once your window is rolling up and down smoothly with the click of a button, you can put your car back together.
- Carefully press the plastic vapor barrier sheet back onto the door frame. The sticky black sealer glue should still be tacky enough to hold it in place. Make sure the wiring harnesses stick out through their designated holes.
- Grab your interior door panel and reconnect the inner mechanical latch rods or cables to the door handle assembly.
- Plug all the electrical wiring plugs back into their sockets on the panel.
- Hang the top edge of the door panel over the metal upper window sill. Look down from above to make sure the weatherstripping sits flat against the glass.
- Line up the plastic clips around the sides and bottom of the panel with the holes in the door metal. Use the palm of your hand to tap firmly around the outer edges of the panel to snap the clips back into their slots.
- Reinstall all the hidden screws that you removed earlier (behind the door handle and inside the armrest pocket).
- Pop any plastic cosmetic covers back over the screw holes. Give the door one final clean wipe down to remove your handprints.
Frequently Asked Questions
Why does my window roll down perfectly but struggles or stops when rolling up?
Gravity is the main reason this happens. When a window rolls down, gravity helps the motor by pulling the heavy glass panel downward. When rolling the window up, the motor has to fight against gravity while overcoming friction. If your window tracks are full of sticky dirt or if your window motor is getting old and losing its electrical power, it might have enough strength to let the window drop, but it will stall out when trying to lift that heavy weight back up to the top. Cleaning your tracks and applying dry silicone spray lubricant usually solves this problem if the motor is still healthy.
Is it safe to drive my car with a broken window motor?
It is mechanically safe to drive your vehicle because a broken window motor will not affect your engine, brakes, or steering. However, it can pose safety and security risks. If your window is stuck wide open, your car becomes an easy target for thieves, and rainwater can ruin your expensive interior electronics, seats, and carpets. If the window is stuck closed, it can be a safety issue if you ever need to exit the vehicle quickly in an emergency, or if you need to roll the window down to clear fog from your mirrors. It is best to fix it as soon as possible.
Can a dead car battery cause my power windows to stop working?
Yes, a weak or dying car battery can definitely cause window problems. Power window motors require a strong, steady stream of electricity to push the glass up and down. If your battery voltage is low, the windows might move incredibly slowly or refuse to budge at all. Often, if you start your engine and let the alternator generate high voltage electricity, the windows might start moving again. If your windows act lazy only when the engine is turned off, it is a smart idea to get your car battery tested at a local auto parts store.
How can I temporarily secure my car window if it won’t roll up before a storm?
If you cannot get your window up and rain is on the way, you need to seal the opening fast. Slide the window up by hand if possible. If it stays up, lock it in place by wedging a thin plastic doorstop or a piece of folded cardboard between the glass and the inner door panel. If the glass will not move up at all, cover the open window space with a heavy-duty plastic trash bag. Secure the plastic bag to the outside of the door using blue painter’s tape. Do not use standard duct tape, because duct tape leaves a sticky, nasty residue on your car paint that can be extremely difficult to clean off later without damaging your clear coat finish.
Why does my window make a loud grinding sound when I press the switch?
A loud grinding, crunching, or rattling sound inside your door panel almost always means your window regulator mechanism is broken. Most modern cars use a cable system to pull the window. Over time, the plastic wheels that guide these cables can crack, causing the tight metal cable to jump off its track. When you press the switch, the electric motor keeps spinning, grinding the loose steel cable into a tangled mess inside the door frame. If you hear this sound, stop pressing the switch immediately to avoid burning out your motor, and plan to replace the regulator assembly.
