You are driving down the road, the sun is shining, your favorite song is playing, and suddenly you need to slow down. You press your foot against the brake pedal, but instead of a firm, reassuring stop, your foot sinks. The pedal feels like a squishy, wet sponge. Your heart drops for a second. If this sounds familiar, you have air trapped inside your brake system.
When it comes to modern vehicles, the anti-lock braking system—better known as ABS—adds a layer of safety that saves lives every single day. But when air gets inside those complex valves, fixing it can feel like a nightmare. Many mechanics will tell you that you cannot fix this without an expensive electronic scan tool. They claim that the scan tool is the only way to force the ABS pump to open up and release that stubborn air.
Well, they are wrong. You do not need a fancy computer, and you do not need to spend hundreds of dollars at a mechanic shop. You can completely clear out your brake lines right in your own driveway, entirely by yourself. Grab your tools, put on your work clothes, and let us dive into how you can get your stopping power back.
Understanding the Hidden Enemy: Air in Your Brakes
To fix a problem, you first need to understand exactly what is going wrong beneath your car. Your braking system relies on hydraulic pressure to function. In simple terms, this means it uses a special liquid to push your brake pads against your wheels to stop the vehicle.
Why Air is a Major Problem
Liquid does not compress. When you step on your brake pedal, the fluid transfers that exact physical force down to the wheels instantly. Air, on the other hand, compresses very easily. If a small bubble of air gets trapped inside your metal brake lines, your foot will simply squash that air bubble instead of pushing the fluid. This results in that terrifying, mushy pedal feeling, and it drastically increases the distance your car travels before coming to a complete stop.
How the ABS Unit Complicates Things
In an older car without ABS, the fluid flows directly from your foot pressure down a straight tube to the wheels. Modern cars have an ABS modulator block sitting between your foot and the wheels. This block is filled with tiny, intricate computer-controlled valves and internal chambers.
When your car senses that you are sliding on ice or wet roads, it automatically opens and closes these valves dozens of times per second to keep your wheels from locking up. When air gets trapped deep inside these tiny chambers, a standard fluid flush will often bypass them completely, leaving the bubble stuck inside.
Gathering Your Tools for a One-Person Job
Before you take a single bolt off your vehicle, you must make sure you have every single item ready. Since you are performing this job without a second person to pump the pedal while you open the valves, your choice of tools is incredibly important.
The Required Equipment List
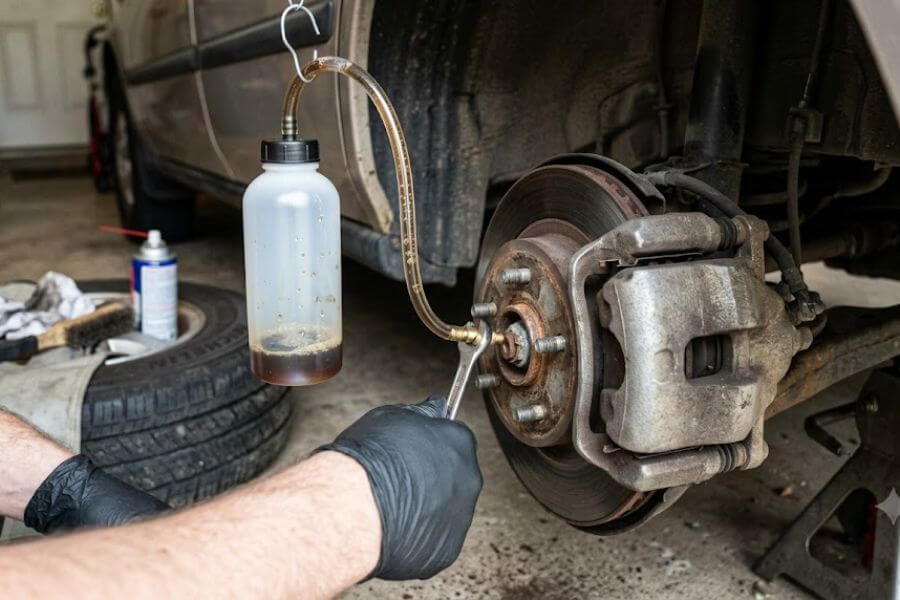
- A High-Quality One-Person Brake Bleeder Bottle: This is a special container that includes a clear hose and a built-in one-way check valve. The check valve is the secret weapon for solo mechanics. It allows old fluid and air to escape out of the line but completely blocks air from sucking back into the system when you let go of the pedal.
- Fresh Brake Fluid: Always check your vehicle owner manual to see exactly what type your car requires. It will usually say DOT 3, DOT 4, or DOT 5.1 right on top of your plastic reservoir cap under the hood. Never mix different types unless your manual explicitly says it is acceptable, and never use an old, opened bottle that has been sitting on a shelf absorbing moisture from the air.
- A Line Wrench or Flare Nut Wrench: These specific wrenches wrap around most of the metal bleeder nut, preventing you from stripping or rounding off the corners of the soft metal valve.
- A Floor Jack and Sturdy Jack Stands: Never rely solely on a hydraulic jack to hold your car up while you work beneath it. Always rest the weight securely on solid jack stands.
- Wheel Chocks: Heavy blocks placed behind the tires remaining on the ground to keep the vehicle from rolling while you work.
- Safety Glasses and Nitrile Gloves: Brake fluid is highly corrosive. It will burn your eyes, irritate your skin, and eat through the paint on your car faster than you can blink. Keep rags nearby to wipe up spills immediately.
Tool Comparison for Single-Handed Bleeding
| Tool Option | How It Works | Solo Friendly Level | Risk Factor |
| One-Way Check Valve Hose | Uses a mechanical valve to block air from returning when you release the pedal. | Extremely High | Very low risk if the hose fits tightly on the nipple. |
| Vacuum Pump Kit | Sucks fluid out from the bottom wheel valve using a hand-operated pump. | High | Can sometimes draw air past the loose threads of the valve, creating fake bubbles. |
| Pressure Bleeder | Attaches to the top fluid reservoir and pushes fluid down through the lines with air pressure. | High | Excellent tool, but expensive and requires specific vehicle adapters. |
| The Old Fashioned Jar | Submerging a plain hose under a layer of old fluid in a jar. | Medium | If the hose pops out of the liquid, air rushes straight back into your system. |
Prepping Your Vehicle the Right Way
Safety is the absolute most important part of any automotive project. You need to create a stable, organized workspace before you open any fluid lines.
Securing the Car
Park your car on a perfectly flat, level concrete surface like a garage floor or a flat driveway. Put the transmission into park, pull the emergency brake up as tight as it goes, and place your wheel chocks firmly around the tires that will stay on the ground.
Lifting and Wheel Removal
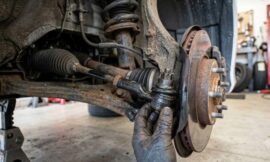
Loosen the lug nuts on your wheels just a tiny bit while the car is still on the ground. This keeps the wheels from spinning in the air while you muscle the nuts off. Next, use your floor jack to lift the car up. Slide your jack stands under the factory-approved frame lifting points, slowly lower the jack until the car rests completely on the stands, and shake the car gently to make sure it is totally solid. Remove the lug nuts fully and take the wheels off to reveal the brake calipers and lines.
Locating and Cleaning the Bleeder Valves
With the wheels out of the way, you can look closely at the backside of your wheel assemblies. On each brake caliper or wheel cylinder, you will see a small, metal nipple sticking out. This is the bleeder valve.
Removing Road Dirt
These valves live out in the open air, meaning they are constantly pelted with rain, mud, road salt, and dirt. They are often incredibly rusty and clogged. Take a stiff wire brush and clean away all the loose debris from around the base of the valve. Spray the valve generously with a high-quality penetrating oil and let it sit for at least ten minutes. This lubricates the dry threads and prevents the metal from snapping off inside your expensive caliper.
The Perfect Bleeder Order
To get every single pocket of air out of your system, you must follow a very specific order. You always want to start at the wheel that is physically furthest away from the master cylinder reservoir under your hood, slowly working your way closer. For the vast majority of cars, the master cylinder sits on the driver side firewall. Therefore, you will follow this exact path:
- Passenger Side Rear Wheel (Furthest away)
- Driver Side Rear Wheel
- Passenger Side Front Wheel
- Driver Side Front Wheel (Closest)
Step-by-Step Manual Bleeding Procedure
Now that your vehicle is prepped and you know the exact path to follow, it is time to begin the actual extraction process.
Managing the Master Cylinder
Open your car hood and locate the clear plastic brake fluid reservoir. Wipe the entire cap clean before opening it so no dirt falls inside. Look at the fluid level lines marked on the side. Fill the reservoir all the way to the maximum fill line with your brand-new, fresh fluid.
Crucial Warning: As you bleed the lines at each wheel, the fluid level in this reservoir will steadily drop. If you let this reservoir run completely dry, it will suck a massive amount of air straight into the master cylinder. If this happens, you have to start the whole job over from scratch. Check this reservoir after every single wheel.
Attaching the Solo Bleeder Kit
Move to your first wheel, which is the passenger side rear. Slide the correct size line wrench over the hex shape of the bleeder valve, but do not turn it yet. Next, push the clear rubber hose of your one-person bleeder bottle firmly over the tip of the bleeder nipple. Make sure it fits snugly. If it feels loose, use a small zip-tie to cinch the hose tight around the nipple so air cannot sneak in through the edges. Mount or hang the bottle so it sits vertically above the height of the valve. This allows air bubbles to naturally rise up and away from the car lines.
Cracking the Valve and Pumping
With the hose securely attached, carefully turn your wrench counter-clockwise to open the valve about a half turn. Now, get into the driver seat of your vehicle. Press the brake pedal down to the floorboard using slow, smooth, controlled strokes. When you push the pedal down, hold it at the bottom for one second before letting it rise back up slowly.
Because you are using a specialized one-person line with a one-way valve, fluid and air will push out into the bottle when you press down, but the valve will snap shut when you lift your foot, preventing anything from returning. Repeat this slow pumping motion about five to ten times.
Monitoring the Flow
Step out of the vehicle and look at the clear hose connected to the wheel. You will see old, dark, dirty fluid mixed with pockets of clear air bubbles moving through the line. Keep repeating the pumping sequence until you see bright, clean, honey-colored new fluid filling the line, completely free of any air bubbles.
Once the line runs perfectly clear, use your wrench to tighten the bleeder valve firmly clockwise. Do not over-tighten it or strip the threads. Disconnect the hose, wipe up any drips, and move on to the next wheel in the sequence, making sure to top off the hood reservoir before moving forward.
The Secret Trick: Triggering the ABS Without a Computer
If you completed the manual bleeding steps above but your pedal still feels slightly soft, it means you have air bubbles trapped deep inside the internal electronic valves of your ABS modulator block. Since you do not have a scan tool to command these valves to open electronically, you must trick the car into cycling the ABS pump mechanically.
Safe Field Activation
Put your wheels back on, tighten the lug nuts, and lower your car safely back down to the ground. Drive your car to a safe, wide open, empty location with zero traffic, such as a large empty dirt lot or an isolated gravel road.
Accelerate your vehicle up to a moderate, safe speed of about fifteen to twenty miles per hour. Once you reach this speed, press your foot down on the brake pedal with sudden, firm force, forcing the car into a hard stop. Because you are on a loose surface like dirt or gravel, your tires will try to slip. Your car computer will instantly notice this slip and engage the ABS system. You will feel a rapid, vibrating pulsation under your foot, and you will hear a distinct buzzing sound from the engine bay. This is the ABS pump rapidly opening and closing its internal chambers.
Dislodging the Trapped Bubbles
When those internal valves shake open during the forced stop, they release the hidden air bubbles that were locked inside the ABS block. Those bubbles are now freed and will travel out into the main brake lines.
Drive your vehicle carefully back to your workspace. Set up your jack stands, remove the wheels again, and perform the manual bleeding process one more time at all four corners. You will be amazed to see that the bubbles which were once trapped deep inside the computer module are now easily pushed right out of the wheel lines.
Verifying Your Work and Clean Up
Before you declare the job finished, you must do a final safety check. With the car back on the ground, press your foot against the brake pedal while the engine is running. It should feel rock-solid, stopping well before it gets anywhere near the floorboard. Inspect the area around every single bleeder valve to ensure there are absolutely zero fluid leaks.
Use an automotive brake cleaner spray to thoroughly wash away any fluid residue left on your metal calipers, rims, or suspension parts. This keeps your components clean and prevents the harsh fluid from damaging your rubber seals or paint over time.
Frequently Asked Questions
Can I bleed an ABS system by myself using just a regular piece of aquarium tubing and an empty plastic soda bottle?
Yes, you can do this, but you have to be extremely careful with how you arrange the equipment. A simple piece of tube does not have a built-in mechanical check valve to block fluid movement. To make this work safely by yourself, you must pour a small amount of clean brake fluid into the bottom of your plastic bottle first.
Submerge the open end of your tube completely under that pool of liquid before you open the metal bleeder valve. When you push the pedal down, air and dirty fluid will bubble out into the bottle. When you let go of the pedal, the system will suck clean fluid back up the tube instead of air. This acts as a homemade liquid barrier. However, if the tube accidentally floats up out of the liquid layer while you are inside pumping the pedal, air will instantly rush back into your brake system, ruining your progress.
What should I do if my bleeder valve is completely rusted shut and will not turn at all?
If your valve is completely frozen with rust, never try to force it open with a standard wrench using brute strength. Doing so will almost certainly snap the brittle metal nipple off flush with the body of the caliper, turning a small project into a costly replacement. Instead, apply a high-quality penetrating oil to the threads multiple times over twenty-four hours.
You can also use a small hand-held propane torch to carefully apply targeted heat to the thick metal area of the caliper immediately surrounding the valve threads. The heat causes the outer metal to expand slightly, breaking the tight grip of the rust. While the metal is still quite warm, place your line wrench over the nut and tap the wrench gently with a mallet to break the seal. If it still refuses to move, it is much safer to purchase a brand-new or remanufactured brake caliper rather than risk breaking the valve off entirely inside the old one.
Is it dangerous if I accidentally mix DOT 3 and DOT 4 fluid in my reservoir during this process?
In an emergency, mixing DOT 3 and DOT 4 fluids will not cause an immediate chemical reaction or destroy your brake components, because both fluids are glycol-based mixtures. They are chemically compatible with one another. However, they have vastly different boiling points. DOT 4 fluid is designed to withstand much higher operating temperatures than DOT 3 fluid before it begins to boil.
If your vehicle manufacturer specifically requires DOT 4 fluid due to the weight of your vehicle or the heat generated by your brakes, diluting it with DOT 3 fluid will lower the overall boiling point of your system. Under heavy braking conditions, like driving down a steep mountain road, this mixed fluid could boil much sooner, creating dangerous vapor pockets that cause sudden brake fade or a loss of stopping power. Always use the specific fluid grade listed on your reservoir cap or owner manual. Never mix anything with DOT 5 fluid, which is silicone-based and completely incompatible with all other types.
Why does my brake pedal still feel soft after I bled all four wheels and activated the ABS pump?
If you have successfully removed all the air from your outer lines and cycled your ABS pump, but your pedal remains spongy, you likely have an internal mechanical failure within your master cylinder assembly. Over years of use, the internal rubber seals mounted on the moving pistons inside the master cylinder can wear down, tear, or flip backward.
When you press down on the pedal, instead of holding tight pressure and moving the fluid forward down the steel lines, the fluid simply slips past the worn rubber seals inside the cylinder body and loops right back into the top plastic reservoir. If your pedal slowly sinks all the way to the floorboard while you hold steady pressure on it at a red light, and you see absolutely zero leaks at the wheels, your master cylinder is worn out internally and must be replaced with a new unit.