Summer is here, and your car cabin feels like a toaster. You turn the AC dial to max, but only a sad, lukewarm breeze comes out of the vents. Driving in a hot car is no fun, and it can make you feel tired and grumpy very quickly. Luckily, you do not always need to spend a lot of money at a mechanic shop to fix this problem. Many times, your car just needs a quick refrigerant top-off.
Recharging your own auto air conditioning is a classic driveway project that saves you money and gives you a great sense of accomplishment. It might look scary with all the hoses, gauges, and clicking metal parts under the hood, but it is actually a straightforward project when you break it down step-by-step. This guide will walk you through the whole process, keep you safe, and help you understand exactly what you are doing.
Why Your Car Air Conditioner Stops Blowing Cold Air
Before you grab a can of refrigerant, it helps to know how your car keeps you cool. Your automotive AC does not actually create cold air from scratch. Instead, it works like a heat sponge. It grabs the hot air from inside your cabin, carries it out to the engine bay, and dumps it into the atmosphere.
The Magical Refrigerant Loop
Inside your AC lines is a special fluid called refrigerant. This fluid changes back and forth between a liquid and a gas. When it is a liquid, it absorbs heat. When it turns into a gas, it releases that heat. A pump called the compressor keeps this fluid moving through a closed loop of aluminum tubes and rubber hoses.
The Sneaky Problem of Slow Leaks
An automotive AC system is supposed to be completely sealed. In a perfect world, the refrigerant would stay inside the tubes forever. However, cars bounce over potholes, vibrate on the highway, and deal with extreme temperature changes from winter to summer.
Over time, the tiny rubber O-rings and flexible hoses in your engine bay develop microscopic pores or get slightly loose. This allows tiny amounts of refrigerant gas to sneak out. When enough fluid leaks out, the system loses pressure. Without enough pressure, the AC cannot change the gas back into a liquid properly, and your cold air disappears.
Meeting the Two Main Modern Refrigerants
You cannot just buy any random can of gas from the auto parts store and spray it into your car. You must use the exact type of refrigerant that your car was built to handle. Mixing different types of gases will instantly ruin your compressor and cost you thousands of dollars in repairs.
The Old Reliable R134a
If your car was built between the mid-1990s and around 2015, it almost certainly uses a refrigerant called R134a. This gas became the global standard after older chemicals were banned for hurting the ozone layer. R134a works incredibly well, is relatively cheap, and can be found on the shelf at almost any retail store.
The New Eco-Friendly R1234yf
If your car was manufactured after 2015, there is a very high chance it uses a newer refrigerant called R1234yf. Environmental scientists discovered that while R134a does not hurt the ozone layer, it can trap heat in the atmosphere if it leaks out.
The newer R1234yf gas breaks down much faster if it escapes into the air, making it much better for the planet. Because it is newer and more high-tech, it is more expensive than the older gas, and the cans use a completely different type of connection valve so you cannot mix them up by mistake.
Checking the Labels Under the Hood
Never guess which fluid your vehicle uses. Manufacturers make it simple to find out. Open your hood and look for a bright yellow, white, or silver sticker. This is called the under-hood emissions and specifications label. It is usually stuck to the underside of the hood, on the radiator shroud, or near the latch.
This sticker will clearly state either R134a or R1234yf, along with the exact total weight of refrigerant your system holds when it is completely full.
Safety Gear and Precautions You Must Take
Working on a car AC system is generally safe if you respect the physics involved, but you must remember that you are dealing with chemicals under very high pressure. Taking shortcuts can lead to painful injuries.
Protect Your Eyes and Hands
The number one rule of AC work is to wear safety glasses. Refrigerant leaves the can at freezing temperatures. If a drop of liquid refrigerant squirts out and hits your bare eyeball, it can freeze the moisture on your eye instantly and cause permanent blindness.
You also need a pair of mechanics gloves. If liquid refrigerant touches your bare skin, it can cause instant frostbite, which feels like a nasty chemical burn. A good pair of work gloves protects your knuckles from sharp engine parts and shields your skin from accidental chemical sprays.
Avoid Breathing the Fumes
Always work outside in your driveway or in a garage with the garage door wide open. Refrigerant gases displace oxygen. If you work in a tiny, closed shed and a hose pops off, the gas can quickly fill the space and make it hard for you to breathe. Keeping the air moving ensures you stay safe and alert.
Stay Away from Moving Engine Parts
To recharge your AC system, your engine must be running. That means the serpentine belt will be spinning rapidly, the cooling fans will turn on without warning, and the metal exhaust pipes will get scorching hot.
Tie back long hair, do not wear baggy clothes, and keep your hands, hoses, and gauge wires far away from the front of the engine where the belts are spinning.
Gathering Your Tools and Supplies
You do not need an entire garage full of professional tools for a basic recharge, but having the right specific items makes the afternoon smooth and successful.
The All-In-One Recharge Kit
For a simple top-off, the easiest option is a retail recharge kit. These kits come with a can of the correct refrigerant for your vehicle, a built-in pressure gauge, a flexible hose, and a quick-connect coupler that snaps onto your car port.
Some kits have a trigger handle, while others use a simple twist-valve. Make sure the kit matches your car specific gas type.
A Reliable Pressure Gauge
If you do not buy an all-in-one kit, you will need a standalone AC gauge or a set of manifold gauges. The gauge tells you exactly what is happening inside the lines. Without a gauge, you are flying blind, which makes it very easy to overfill the system and break your compressor.
A Bright Flashlight
Engine bays are dark and full of shadows. A small, bright flashlight or headlamp will help you peer down into the deep corners of the motor to find the correct service ports and look for signs of oil leaks.
Locating the Low-Side and High-Side Service Ports
Your vehicle air conditioning loop has two distinct sides: a low-pressure side and a high-pressure side. The low side carries the cold gas from the cabin back to the compressor. The high side carries the hot, compressed liquid from the compressor toward the front radiator.
The Golden Rule: Only Use the Low-Side Port
You must only ever connect your recharge can to the low-side port. The low-side port handles safe, manageable pressures that the retail can can easily feed into.
The high-side port handles massive pressures that can reach over 300 pounds per square inch. If you were to somehow connect a cheap retail can to the high-pressure side, the extreme pressure from the car could force its way backward into the small can, causing it to explode like a firecracker.
How to Tell the Ports Apart
Car designers knew that people might make mistakes, so they designed the metal ports to be physically different sizes.
- The Low-Side Port: This port is located on a thicker metal pipe. The physical metal nozzle is smaller in diameter. The plastic dust cap on top is often black or blue and is usually marked with the letter L.
- The High-Side Port: This port is located on a much thinner metal pipe. The physical nozzle is visibly wider. The plastic dust cap is often black or red and is marked with the letter H.
Your recharge hose coupler will only physically snap onto the low-side port. If you try to push it onto the high-side port, it will not fit. If you find yourself hammering or forcing the coupler onto a port, stop immediately. You are trying to connect to the wrong side.
Inspecting the AC System Before Recharging
Before you open any valves or click any hoses into place, you need to perform a visual inspection. This prevents you from wasting expensive refrigerant on a system that has a massive, broken component.
Check the AC Compressor Clutch
Start your car, turn the AC to the coldest setting, and set the fan speed to high. Open the hood and look for the AC compressor. It looks like a metal cylinder bolted to the side of the engine with a belt running around its front pulley.
Look closely at the very front face of that pulley. That front face is the clutch.
- If the clutch is spinning: Your system still has some refrigerant left and the computer is allowing it to run. You are in a great position for a simple recharge.
- If the clutch is completely still: The pulley is spinning with the engine belt, but the front face is stationary. This means your system pressure is either dangerously low, or an electrical part has failed.
- If the clutch clicks on and off every few seconds: This is called short-cycling. It is a classic symptom of a system that is low on gas but trying its hardest to work.
Look for Bright Oily Residue
Refrigerant gas travels with a special synthetic oil that keeps the compressor lubricated. When gas leaks out of a hole, it leaves a sticky trail of this oil behind.
Use your flashlight to trace the metal AC lines. Look at the joints where pipes connect. If you see a spot that is covered in wet, dark grime and dirt, you likely have a significant leak at that spot. If the leak is huge, a simple recharge will just hiss right out into the air within a day or two.
Step-by-Step Guide to Recharging Your Car AC
Now that you understand the safety rules, have your gear on, and know where your ports are, it is time to do the actual work. Follow these steps calmly and carefully.
Step 1: Prep the Vehicle
Park your vehicle on a flat, level surface like a driveway or garage. Set the parking brake firmly so the car cannot move. Open the hood and prop it securely so it cannot fall on your head.
Start the engine. Reach inside the cabin and turn your AC controls to the absolute coldest temperature setting. Turn the fan blower speed all the way up to high. Make sure the air recirculation button is turned on. This forces the system to work continuously at maximum capacity, which gives you accurate pressure readings.
Step 2: Clean and Pre-Test the Low-Side Port
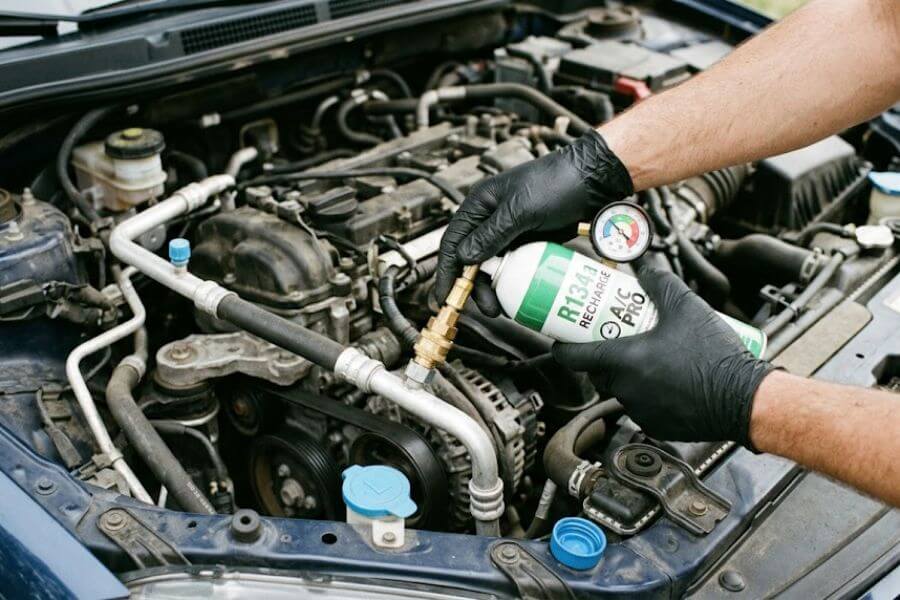
Locate your low-side service port on the thicker metal line. Unscrew the plastic dust cap counterclockwise and put it in a safe place like your pocket so it does not roll into the engine fan.
Take a clean paper towel and wipe the outside of the metal port. You do not want any road dirt, sand, or grit getting pushed inside the AC lines when you connect your hose.
Before you attach the chemical can, take your pressure gauge hose and snap the quick-connect coupler straight down onto the low-side port. You will hear a distinct clicking sound, and the sleeve of the coupler will slide forward to lock it in place. Pull up gently on the hose to make sure it is truly locked on and will not pop off under pressure.
Step 3: Read the Initial Ambient Pressure
Look at the needle on your pressure gauge. Do not squeeze any triggers yet. Right now, you are reading the current baseline pressure of your system.
Look at the temperature outside. AC pressures change dramatically depending on how hot or cold the outdoor air is. A system that reads 30 pounds per square inch on a cool spring day might read 45 pounds per square inch on a blazing summer afternoon.
Most recharge gauges have a rotating color bezel or a chart on the back. Twist the bezel to match the current outdoor temperature. This will highlight a safe target zone on the gauge face.
- If the needle is in the red zone: Your system is already full or overcharged, and your lack of cold air is caused by a broken mechanical part, not a low fluid level. Disconnect the hose and seek professional help.
- If the needle is below the green or safe zone: Your system is low, and you can proceed with adding refrigerant.
Step 4: Prepare the Refrigerant Can
Disconnect the test hose from the car port by pulling back on the locking sleeve and lifting the coupler off.
Take your can of refrigerant. If you are using a fresh kit, there might be a plastic safety shipping clip under the trigger handle or a metal foil seal on top of the can. Remove these safety devices according to the package directions.
Screw the gauge and hose assembly firmly onto the top of the refrigerant can clockwise. Make sure it is tight so no gas escapes from the threads.
Step 5: Purge Air from the Hose (Pro-Tip)
This is a step that many amateur mechanics skip, but it makes a huge difference. The rubber hose connected to your can is currently full of normal atmospheric air and moisture. You do not want to push moisture into your car AC system.
To fix this, hold the can upright and snap the quick-connect coupler back onto the car low-side port. Hold the can tightly and carefully turn the can threads back just a tiny fraction of a millimeter for one split second until you hear a tiny hiss of gas escape from the top of the can connection, then tighten it back down instantly. This clears the air out of the line, ensuring only pure refrigerant enters your car.
Step 6: Charge the System and Rock the Can
With the engine running, the AC on max, and the hose locked onto the low side, squeeze the trigger or open the valve on your kit. You will hear a rushing sound as the chemical begins moving into the car.
As the gas leaves the can, the can will start getting freezing cold to the touch. This is completely normal physics. To keep the fluid moving smoothly, you need to gently rock your wrist back and forth. Think of the can like an old clock. Shake it gently from the twelve-o-clock position to the three-o-clock position every few seconds.
Never turn the can completely upside down while charging unless the specific instructions on your kit explicitly tell you to do so. Turning it upside down can force pure liquid chemical into the compressor intake, which can bend the internal metal pistons. Keep it upright or sideways as you rock it.
Step 7: Monitor the Gauge Regularly
Every ten to fifteen seconds, release the trigger or close the valve on your can. When you are actively squeezing the trigger, the gauge will jump up high into the red zone because it is reading the pressure inside the can.
To read the actual pressure inside the car, you must stop spraying and let the needle settle down.
Watch the needle carefully during these breaks. You want to see the needle slowly climb up out of the low zone and settle comfortably in the middle of the safe green zone that matches your outdoor ambient temperature.
Step 8: Final Check Inside the Cabin
Once your gauge shows that the pressure is hovering safely in the target zone, step away from the engine bay and sit inside your car front seat.
Put your hand directly in front of the center dashboard vents. You should feel a noticeable difference. The air should feel crisp, sharp, and ice-cold. Look at your dashboard cluster to make sure no warning lights have popped up, and listen for any strange screeching noises from the engine.
Step 9: Disconnect and Clean Up
If the air is cold and your pressure is correct, your job is done. Go back to the engine bay. Pull back the outer sleeve of the quick-connect coupler and lift it off the metal service port. You might hear a tiny pop of air, which is totally normal.
Take your plastic dust cap and screw it back onto the low-side port tightly. This cap keeps dirt out and acts as a secondary seal against slow leaks.
If your chemical can still has fluid left inside, you can leave the gauge assembly screwed onto it tightly and store it in a cool, dry place in your garage for future touch-ups. Never store a pressurized chemical can in a hot car trunk where temperatures can cause it to burst.
Understanding Pressure and Temperature Relationships
To master this process, it helps to see how much outdoor heat changes the way your AC behaves. The following table shows the typical safe low-side pressure ranges for an R134a system at various outdoor temperatures. Use this as a general guideline while monitoring your gauge.
| Outdoor Air Temperature (Fahrenheit) | Safe Low-Side Pressure Range (PSI) |
| 65 degrees | 25 to 35 PSI |
| 75 degrees | 35 to 45 PSI |
| 85 degrees | 45 to 55 PSI |
| 95 degrees | 50 to 55 PSI |
| 105 degrees | 50 to 55 PSI |
As you can see, when the weather gets hotter, the natural pressure inside the system rises. This is why a charge that looks perfect in the cool morning might look slightly higher during a scorching afternoon. Always calibrate your expectations to the heat of the day.
Crucial Things to Avoid During the Process
While this project is simple when done right, a few common mistakes can ruin your hard work or damage your vehicle. Keeping these warnings in mind ensures success.
Never Overcharge the System
When it comes to automotive air conditioning, more is not better. People often think that if a little bit of gas makes the air cold, then a lot of gas will make it freezing. This is a dangerous misconception.
An overfilled AC system cannot compress the gas properly. The high pressures will trigger a safety switch that shuts the whole system down, resulting in warm air. Even worse, overfilling can create extreme pressure spikes that blow out rubber hoses or snap the internal valves inside your expensive compressor. Go slowly and stop as soon as you hit the safe target zone.
Avoid Cans with Stop-Leak Additives
When you look at the shelf at the auto parts store, you will see some cans labeled as maximum stop-leak or leak-sealer formulas. They claim to permanently fix holes in hoses and gaskets.
While these can work as a temporary fix for an old junk car, you should avoid them for your daily driver. These additives work by reacting with moisture and air to form a hard, glue-like seal.
If that chemical mixes with any tiny trace of moisture inside your AC lines, it can harden into sticky gunk that plugs up the tiny expansion valves and ruins the internal mechanisms of professional recovery machines used by mechanics. Stick to pure refrigerant with simple lubricating oil.
Frequently Asked Questions
Why is my car AC still blowing warm air after a full recharge?
If your pressure gauge shows that the system is fully charged but the air coming out of your dashboard vents is still warm, your problem lies elsewhere. The AC compressor clutch might not be engaging due to a blown fuse, a broken relay, or a failed electronic climate sensor. Another common culprit is a broken cabin blend door actuator, which is a small electric motor that flips a plastic flap inside your dashboard to let cold air through. If that flap gets stuck in the heat position, it will block the cold air from reaching your face even if the AC system under the hood is working perfectly.
Can I mix R134a and R1234yf refrigerants if I run out of one?
No, you must never mix these two types of refrigerant under any circumstances. They are completely different chemical formulas that operate at different thermodynamic properties and require different types of synthetic lubricating oils. Mixing them will cause the oils to separate and turn into a sludge that will rapidly destroy your engine compressor. To prevent this mistake, car manufacturers design the service ports with completely different geometric shapes, meaning an R134a hose coupler physically cannot snap onto an R1234yf port. Always check your under-hood label and buy the exact fluid specified for your car model year.
How do I know if my AC system has a massive leak?
If you connect your pressure gauge to the low-side port and it reads a flat zero pounds per square inch, your system is completely empty. This is a clear indicator that you do not have a normal slow leak, but rather a massive hole, a cracked line, or a completely blown gasket. When a system drops to zero pressure, normal atmospheric air and moisture rush inside. If you try to spray a retail can into a system with a giant hole, the chemical will hiss out into the air immediately, wasting your money. Empty systems require a mechanic to find the leak, replace the broken metal parts, and use a vacuum pump to suck out all air and moisture before a fresh charge can be introduced.
Is it normal for the refrigerant can to get freezing cold while I am using it?
Yes, this is completely normal and is a perfect demonstration of physics in action. Inside the retail can, the refrigerant is stored as a liquid under high pressure. When you press the trigger handle, you release that pressure, allowing the liquid to rapidly boil and turn into a gas as it rushes into your vehicle lines. This phase change requires a large amount of heat energy. The fluid sucks that heat energy out of the metal walls of the can itself, causing the can to rapidly drop in temperature, often forming actual ice frost on the outside of the label. Wearing your mechanics work gloves will protect your hands from feeling uncomfortable during this part of the process.
How long should a DIY car AC recharge typically last?
A proper top-off on a vehicle with a normal, slow, age-related leak should easily keep your cabin ice-cold for an entire summer season, and often for two or three years. If you find that your air conditioner gets warm again just a few days or weeks after performing a recharge, your vehicle has a significant mechanical leak that needs professional physical repair. Recharging a system multiple times a month is bad for your wallet and releases unnecessary chemicals into the environment, so it is best to get it diagnosed properly if the charge does not hold.

