You are driving down the road on a perfect afternoon, blasting your favorite playlist, when suddenly the music cuts out. Your radio goes completely dark. You try flipping the switches for your power windows, but they refuse to budge. Before you assume your car needs a massive, expensive repair, take a deep breath. There is a very high chance you are just dealing with a tiny piece of plastic and metal that sacrificed itself to protect your car. That little hero is called a fuse, and you can absolutely swap it out yourself without a mechanic.
Think of your car as a rolling city with its own complex electrical grid. Power flows from the battery to your headlights, phone chargers, radio, and dashboard displays. If too much electricity rushes through those wires at once, things can overheat or catch fire. To prevent that, engineers put fuses in the way. A fuse is a safety guard with a small wire inside designed to break, or blow, if the electrical current gets too high. When it breaks, it stops the electricity instantly, saving your expensive gadgets.
Locating and replacing these little guards is a skill that saves you time and money. Let us walk through exactly how to master this quick fix from start to finish.
Getting Ready for the Job
Before you touch anything under the hood or under the dashboard, you need to prepare your workspace and your mind. Working with automotive electronics requires a few basic safety steps to ensure everything goes smoothly.
Safety First
Your number one priority is making sure there is no electricity flowing through the vehicle while you work.
- Turn off the engine completely and pull the key out of the ignition.
- Set the parking brake so the vehicle cannot move.
- Put on a pair of clear safety glasses to protect your eyes from any unexpected dust or small plastic fragments.
- Leave your metal jewelry, like rings and bracelets, in a safe spot outside the car, since metal conducts electricity.
Gathering Your Materials
You do not need an expensive toolbox for this project. In fact, most of what you need might already be hiding inside your vehicle.
- A replacement pack of automotive fuses: You can find these at any auto parts shop. Make sure they match the style of your current ones, which are usually blade-style fuses.
- A fuse puller tool: This is a small pair of plastic tweezers. Car manufacturers often tuck one right inside the fuse box cover.
- A flashlight: Even during the daytime, the spaces under your dashboard and engine bay get remarkably dark. A headlamp is even better because it keeps your hands completely free.
- The owner manual: This book is your ultimate map. If you do not have a physical copy, you can easily look up a digital version on your smartphone.
Finding Your Interior Fuse Box
Most modern vehicles have at least two separate electrical hubs. The first one is the interior fuse box, which handles the items you interact with while sitting in the cabin.
Where to Look Inside the Cabin
Car designers love to play hide-and-seek with the interior panel, but they generally stick to a few predictable locations. Start by sitting in the driver seat and looking down at your knees.
Look directly underneath the steering column or just to the left of your brake pedal. You will often see a small plastic panel built into the lower dashboard. Sometimes, this panel has a little finger notch or a plastic latch that you can turn with a coin.
If it is not under the steering wheel, open your driver side door wide and inspect the side of the dashboard that faces the door frame. Many manufacturers place a removable cover right there, which is completely hidden whenever the door is shut.
If you still draw a blank, hop over to the passenger side. Check the side panel near the passenger feet, or open the glove box and look deep inside the back wall.
Removing the Interior Panel Cover
Once you spot the plastic cover, you need to remove it gently. Most interior covers utilize simple plastic tabs that snap into place. Use your fingers to press the release tab and pull the cover straight toward you.
Do not force it or yank it hard, as old plastic can become brittle over time and snap. If it feels stuck, look closely to see if there is a tiny screw or a twisting plastic clip holding it down. Set the cover face down on your car seat.
Take a close look at the backside of that plastic piece. You will notice a printed diagram filled with boxes, numbers, and labels like RADIO, WIPER, or HORN. This diagram is your map, showing you exactly which fuse protects which feature.
Exploring the Underhood Fuse Box
The interior hub takes care of your comfort items, but the big, heavy-duty electronics live right under the hood next to the engine.
Opening the Engine Bay Safely
Pull the hood release lever, which is usually located near the driver left kick panel. Walk around to the front of the vehicle, find the secondary safety latch under the lip of the hood, and flip it to raise the heavy metal frame. Secure the hood safely with the prop rod, or ensure the hydraulic struts hold it up firmly before you step underneath.
Spotting the Underhood Plastic Hub
Look around the outer edges of the engine compartment. You are searching for a prominent, black plastic box. It is usually about the size of a small hardcover book or a brick.
This box typically sits near the car battery or close to the driver side fender wall. It stands out because it looks completely sealed to shield the electronics from rain, puddles, and engine heat.
Removing the Heavy Duty Lid
Because this box lives in a harsh environment, its lid connects much more securely than the interior one. You will usually find two or more thick plastic levers on the sides.
Press these levers inward simultaneously while lifting up on the lid. You might have to wiggle it slightly as the rubber weather seal releases its grip.
Once the lid pops off, flip it over. Just like the interior cover, the underside of this lid features a detailed map explaining what each component does. Store the lid in a secure spot on top of the engine structure where it will not fall down into the deep, dark crevices of the engine bay.
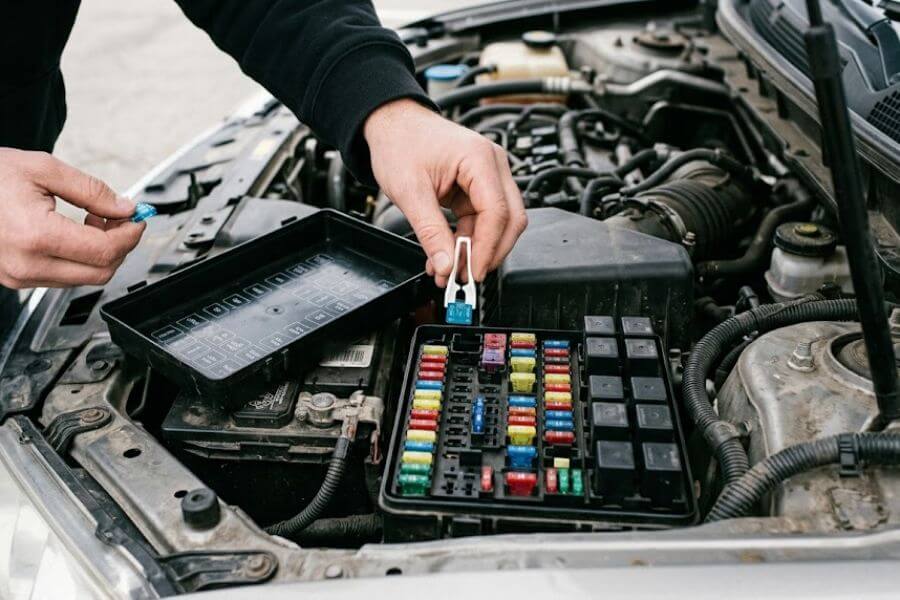
Identifying a Blown Fuse
Now that you have opened the boxes, you are looking at a colorful array of small plastic parts. They look a bit like tiny, translucent teeth lined up in neat rows.
Understanding the Visual Anatomy
Automotive fuses use a brilliant color-coding system to represent their electrical strength, which is measured in amperes, or amps. A five-amp fuse might be tan, a ten-amp fuse is almost always red, a fifteen-amp fuse is blue, and a twenty-amp fuse is yellow.
The top of each unit also has its amp rating printed directly on the plastic, such as 10, 15, or 20. When you look down at the rows, you want to find the specific one linked to your broken feature using the lid diagram.
Using the Plastic Extraction Tool
Grab your plastic fuse puller. If your car does not have one, a pair of small needle-nose pliers works perfectly.
Pinch the top of the suspect unit firmly with the tool and pull it straight out of its slot. Do not rock it side to side violently, as you could bend the metal terminals down inside the box. It should slide out with a satisfying pop.
Inspecting the Internal Wire
Hold the small plastic piece up directly against the light or your flashlight beam. Look through the clear or tinted plastic body. Inside, you will see a small, U-shaped strip of metal connecting the two outer metal prongs.
On a healthy unit, this metal strip is perfectly intact and continuous. On a blown unit, the metal strip will be visibly melted, snapped in half, or separated by a small gap. Sometimes, the clear plastic housing will even look dark, cloudy, or charred from the heat of the electrical pop.
+-----------------------------------------+
|        FUSE CONDITION COMPARISON        |
+---------------------+-------------------+
| Healthy Unit        | Blown Unit        |
+---------------------+-------------------+
| Clear plastic       | Dark or charred   |
| Continuous wire     | Broken wire gap   |
| Shiny metal legs    | Dull or burnt legs|
+---------------------+-------------------+
Installing the New Fuse
Finding the broken piece is the hardest part. Putting the new one in takes just a few moments, but you must follow one golden rule.
Matching the Amp Ratings Perfectly
You must replace the broken unit with a brand new one that features the exact same amp rating. If you pull out a blue fifteen-amp unit, you must insert a blue fifteen-amp unit.
Never, under any circumstances, put a higher-rated unit into the slot. For example, do not put a twenty-amp unit into a ten-amp slot just because you ran out of tens.
Doing that allows too much electricity to flow through the wires before the safety wire can melt. This can destroy your car computer, melt the wiring harnesses, or cause a dangerous electrical fire.
Sliding the Replacement into Position
Take your fresh, matching unit and align its two metal prongs with the open slots in the fuse block. Push it straight down firmly with your thumb or index finger until it sits completely flush with the surrounding units. It should feel snug and secure. If it feels loose or wobbles, double-check that you have lined up the prongs correctly with the metal sockets inside the hole.
Testing Your Handy Work
With the new piece firmly seated in its home, it is time to find out if your quick fix solved the underlying problem.
Checking the System
Leave the fuse box covers off for just a moment. Slide back into the driver seat and turn your car key to the accessory position, which turns on the electronics without starting the engine.
Test the feature that was broken. Flip the window switch or turn on the radio dial. If the radio lights up and music fills the cabin, congratulations. You just solved the mystery and fixed the electrical break.
What to Do if it Pops Again Immediately
If you turn the key and the radio stays dark, or if you hear a sudden click sound and the feature dies again instantly, you have a deeper puzzle to solve. This means the new fuse just blew immediately.
Fuses do not die of old age; they die because too much electricity flowed through them. If it blows right away a second time, your car has a short circuit, meaning a live electrical wire is touching the metal frame of the car somewhere, or a component like the radio motor itself is broken and drawing dangerous amounts of power.
If this happens, do not keep putting new fuses in. Leave the slot empty and schedule a visit with an automotive electrician to track down the underlying wire issue.
Reassembling the Vehicle Component Covers
Now that your testing is complete, you need to button everything back up to keep dirt, moisture, and stray fingers away from the delicate electronics.
Snapping the Cabin Panel Back Together
Pick up your interior panel cover from the seat. Line up the plastic alignment tabs on the bottom or sides with the corresponding slots on the dashboard.
Press the panel forward gently until you hear a sharp snap sound indicating the latches have locked back into place. Give it a gentle wiggle with your fingertips to make sure it will not vibrate loose and fall onto your feet while you drive down the road.
Sealing the Engine Compartment Hub
Walk back to the front of the vehicle and pick up the heavy duty black lid. Wipe away any loose dust or moisture from the outside edges. Position the lid carefully over the underhood box, ensuring it faces the correct direction according to the internal shapes.
Press down hard on the top of the lid until you hear the thick side plastic levers click loudly into place. Double-check all sides to ensure the rubber weather seal is fully compressed. This seal keeps rain, car-wash water, and engine grease out of the delicate wiring grid.
Carefully lift the car hood slightly, disengage the metal prop rod, clip the rod back into its plastic retaining holster, and lower the hood firmly until it latches shut completely.
Maintaining a Spare Fuse Kit
A smart driver is always prepared for minor roadside emergencies. You do not want to be stranded on a long road trip without a radio or windshield wipers just because a tiny piece of metal melted.
Building Your Roadside Glove Box Pack
Visit your neighborhood auto supply store and purchase a small, multi-pack assortment container of blade fuses. These kits usually include a couple of each common size, ranging from five amps up to thirty amps.
Ensure the kit contains a plastic extraction tool as well. Slip this small container directly into your glove compartment or tuck it into the storage pocket underneath your spare tire in the trunk. It takes up almost no space but provides massive peace of mind.
Checking for Universal Styles
Be aware that cars use a few different physical sizes of blade fuses. Older cars from the nineties use regular large blades, while newer vehicles use mini, low-profile mini, or micro blades.
Check your owner manual or bring your blown unit inside the store with you to match the physical shape and size exactly before spending money on a replacement assortment pack.
+-------------------------------------------------------------+
|                AUTOMOTIVE FUSE SIZES GUIDE                  |
+-------------------+-----------------------------------------+
| Style             | Characteristics                         |
+-------------------+-----------------------------------------+
| Standard Blade    | Large, wide plastic body, older cars    |
| Mini Blade        | Tall and narrow, common in 2000s cars   |
| Low-Profile Mini  | Tiny body, metal legs do not extend past|
| Micro Blade       | Ultra-thin body, very close leg spacing |
+-------------------+-----------------------------------------+
Understanding Why Fuses Blow
To prevent future electrical issues, it helps to understand the common culprits that trigger an overload in your car grid system.
Overloaded Power Accessory Outlets
The absolute number one cause of interior electrical failures is plugging too many powerful gadgets into the twelve-volt accessory outlets, which many people call the cigarette lighter sockets.
Plugging in a multi-port splitter to charge three smartphones, a tablet, and a portable camping refrigerator at the same exact time can easily draw twenty-five amps of power through a circuit that was only built to handle fifteen amps. The safety guard will break every single time to protect your dashboard from melting.
Trapped or Binding Power Windows
If a window track gets filled with thick dirt, sticky tree sap, or ice during the winter months, the glass gets stuck. When you press the window switch, the electric motor tries incredibly hard to force the window down.
Because the glass cannot move, the motor stalls and drinks massive amounts of electricity from the battery. This sudden surge blows the window fuse instantly, saving the electric motor from overheating and burning out.
Aging Component Internals
As vehicles age, the electric motors inside items like the windshield wiper fluid pump, the cooling fans, or the starter motor can begin to wear out. The internal bearings become stiff and create physical resistance.
This friction forces the electric motor to work harder and pull more current through the power lines. Eventually, the current crosses the safety threshold, and the protective link pops.
Frequently Asked Questions
Can I use a screwdriver or metal pliers to pull out a fuse if I do not have a plastic tool?
You can use metal needle-nose pliers if you are extremely careful, but you must make sure the car key is completely out of the ignition. Metal tools conduct electricity easily. If you accidentally touch the metal tool to the metal frame of the car while touching a live electrical wire inside the box, you can cause a bright spark or damage other electronics. A plastic tool is always the safest option because plastic does not conduct electricity.
What happens if I put a twenty-amp fuse into a ten-amp slot?
This is highly dangerous and should never be done. A ten-amp circuit uses thin wires designed for low electrical flow. If you install a twenty-amp unit, you are allowing twice as much power to flow through those thin wires. If an electrical issue occurs, the wires will overheat, melt their plastic insulation, and potentially start a dangerous fire behind your dashboard long before the twenty-amp safety link ever breaks.
Why are the underhood fuses so much larger physically than the ones under my dashboard?
The underhood box contains high-amperage maxi fuses and blocky plastic cubes called relays. These parts manage heavy-duty machinery like your engine cooling fans, anti-lock braking pump, and starter motor. These mechanical systems require massive amounts of power, sometimes up to forty, fifty, or sixty amps, which would instantly melt the tiny mini-fuses found inside your passenger cabin.
Can a blown fuse cause my car engine to refuse to start?
Yes, it absolutely can. The underhood box contains critical safety links for your fuel pump, fuel injectors, and main engine computer. If the fuel pump link breaks, the engine will crank over and over when you turn the key, but it will never start because no gasoline is reaching the engine pistons. Always check the underhood box if your car suddenly cranks but refuses to fire up.
How can I tell if a fuse is broken without pulling it completely out of the box?
Look closely at the very top of the plastic housing while it is still plugged into the row. You will see two tiny, shiny metal test points exposed on the left and right sides of the numbers. Mechanics use a tool called a test light or a digital multimeter to touch these two points. If the tool lights up or beeps on one side but stays silent on the other side, it means the internal wire is broken, and you need to pull it out for a replacement.
Is there a difference between the fuses used in domestic cars versus imported cars?
The physical shapes and color codes are standardized across the global automotive industry. A blue fifteen-amp mini blade unit will fit and function exactly the same way whether you plug it into a domestic truck or an imported compact car. Just ensure you match the physical style size, such as standard, mini, or micro, for a perfect physical fit.
