Imagine you are driving your truck down a quiet country road. The windows are down, the breeze is warm, and you feel completely in control of your machine. Then, you notice a faint, low-pitched humming sound coming from beneath your truck bed. It sounds like a tired swarm of bees, and it gets slightly louder every time you press down on the gas pedal. That sound is a cry for help from your truck. Deep inside the heavy metal housing between your rear wheels, a set of powerful steel gears is spinning at thousands of revolutions per minute. Those gears rely on a thick, slick cushion of oil to survive. When that oil gets old, dirty, or watery, your truck starts to hurt.
Taking care of your truck is not just about washing the dirt off the doors or keeping the gas tank full. True truck ownership means getting under the frame, getting your hands a little dirty, and learning how the mechanical heart of your machine actually beats. Changing your rear differential gear oil is one of the most satisfying and important maintenance tasks you can perform on a four-wheel-drive truck. You do not need to be a professional mechanic with a shop full of expensive computer scanners to do this right. You just need some basic tools, a bit of patience, and the willingness to learn. By taking care of this yourself, you will protect your truck from massive mechanical failures, save hundreds of dollars, and earn a serious sense of pride in your own skills.
Understanding Your Truck’s Rear Differential
Before you grab a single wrench, you need to understand what you are working on. The rear differential is that large, heavy, round metal bulwark located right in the middle of your rear axle. If you look under the back of your truck, you cannot miss it. It looks like a big metal pumpkin sitting midway between your two rear tires. This component plays a critical role in how your truck moves, especially when you are turning a corner or climbing over rough terrain.
When you drive your truck in a straight line, your rear wheels spin at exactly the same speed. However, when you turn the steering wheel to go around a sharp corner, your outer wheel has to travel a much longer path than your inner wheel. If both wheels were locked together on a solid rod, one of your tires would have to skip, hop, and slide across the pavement every time you turned a corner. This would ruin your tires in a matter of weeks and make your truck incredibly dangerous to drive. The differential solves this problem. Inside that metal housing is a complex network of interlocking gears that splits the power from your engine and sends it to each wheel, allowing them to rotate at different speeds when necessary.
Because these gears are under immense pressure from the weight of your truck and the power of your engine, they generate a massive amount of heat and friction. To keep the metal from grinding itself into dust, the entire housing is filled with a specialized, heavy duty liquid known as gear oil. This liquid is much thicker than the oil you put into your engine. It coats every tooth of every gear, creating a microscopic shield that prevents metal-to-metal contact.
In a four-wheel-drive truck, your rear differential works harder than almost any other part of the drivetrain. When you shift your truck into four-wheel drive to tackle deep mud, thick snow, or steep rocky trails, the rear differential bears the brunt of that initial push. It must endure sudden shocks, high torque loads, and harsh environments. Understanding the immense pressure this part faces helps you realize why clean oil is so critical to the life of your truck.
| Component Part | Main Purpose and Function | What Happens Without Oil |
| Ring Gear | Transfers power from the driveshaft to the differential case. | Extreme friction creates heat, warping the heavy metal teeth. |
| Pinion Gear | Connects directly to the end of your driveshaft to spin the ring gear. | High speed spinning without lubrication leads to instant tooth breakage. |
| Spider Gears | Allows the left and right wheels to spin at different speeds during turns. | Gears lock up completely, causing tires to skip and chirp on turns. |
| Differential Housing | Holds the oil and protects internal gears from rocks, dirt, and water. | Internal metal shavings pile up, accelerating the destruction of all gears. |
The Unique Abuse of Four-Wheel Drive Systems
Four-wheel-drive trucks are built to go places where normal cars fear to tread. You bought a truck so you could haul heavy loads, tow trailers, explore forest paths, or navigate through deep winter blizzards. Every single one of these activities puts extra stress on your rear differential gear oil. When you haul a heavy payload of firewood or tow a camper up a mountain pass, your rear gears are squeezed together with incredible force. This extreme pressure can actually shear the oil molecules apart, making the liquid thin and less effective over time.
Off-road driving introduces a whole new set of hazards. When you drive through deep puddles, cross shallow streams, or plow through deep mud, your differential housing gets dunked into cold water. Your differential has a small vent tube on top to relieve air pressure as the unit heats up during driving. If you submerge a hot differential in cold water, the sudden drop in temperature causes the air inside to contract rapidly. This creates a vacuum that can pull water right through the vent tube or through worn out rubber seals. Water and gear oil do not mix. When water gets inside, it turns your golden brown oil into a milky, frothy mess that offers almost zero protection to your gears.
Signs Your Gear Oil Needs Attention
Your truck will usually try to tell you when its differential oil is failing, but you have to know how to listen and look for the clues. The most common sign is the one we mentioned earlier: a distinct whining, humming, or howling noise coming from the back of the vehicle. This noise often changes pitch depending on how fast you are going or whether you are accelerating or coasting. If you ignore this sound, it will slowly grow louder over the months as your gears wear away their protective outer hardening.
Another major red flag is a puddle of dark, thick liquid on your driveway directly underneath the rear axle. Differential seals can dry out and crack as they age, allowing the precious oil to seep out. If your oil level drops too low, the remaining liquid will overheat rapidly, burning the oil and leaving your gears completely dry. You might also notice a very strong, foul odor that smells like sulfur or burnt fireworks. This smell is a clear indication that your gear oil has been pushed past its temperature limits and is no longer capable of protecting your truck.
Gathering Your Tools and Supplies
Before you slide under your truck and take off any bolts, you must make sure you have every single tool and supply ready to go right next to you. There is nothing worse than draining all the oil out of your truck only to realize you do not have the right tool to put the new oil back in. Setting up your workspace correctly will keep you moving forward without any stressful interruptions.
You do not need a massive collection of specialized tools for this project, but you do need a few specific items that are designed to handle heavy automotive work. Taking the time to gather high quality supplies will ensure that your afternoon under the truck is smooth, safe, and completely successful.
Required Mechanical Tools
- Socket Wrench Set: You will need a sturdy socket wrench, preferably a three-eighths-inch or half-inch drive, along with a collection of sockets that match the bolts on your differential cover or drain plug.
- Breaker Bar: Differential bolts and plugs can become incredibly tight over years of driving through rain and mud. A long metal breaker bar gives you extra leverage to loosen stubborn plugs without hurting your hands.
- Torque Wrench: This tool is non-negotiable. You must tighten your bolts to the exact specifications set by your truck manufacturer. Over-tightening can strip the threads out of your metal axle housing, while under-tightening can cause the oil to leak out while you are driving down the highway.
- Fluid Transfer Pump: Gear oil is incredibly thick, and it usually comes in plastic bottles that are impossible to pour directly into the tight spaces under your truck. A simple, inexpensive hand-operated fluid pump that screws onto the top of your oil bottles is an absolute lifesaver.
- Gasket Scraper or Putty Knife: If your truck uses a liquid silicone sealant instead of a pre-formed rubber gasket, you will need a dull scraper to clean the old, hardened silicone off the metal surfaces.
- Wire Brush: A small wire brush is perfect for cleaning away rust, dirt, and road grime from the bolt heads and mating surfaces before you begin assembly.
Essential Shop Supplies
- Correct Gear Oil: Check your truck owner’s manual to find the exact weight and specification of oil required for your specific rear axle. Common weights include 75W-90, 80W-90, or 75W-140. Make sure you buy enough quarts to fill your unit, which is typically between two and four quarts for most four-wheel-drive trucks.
- Friction Modifier (If Required): If your truck is equipped with a limited-slip differential, you may need to add a small bottle of special friction modifier additive to the gear oil. Some modern gear oils already have this additive mixed in, so read the labels on your oil bottles carefully.
- Replacement Gasket or RTV Silicone: You will need a way to seal the metal cover back onto the housing. You can purchase a high quality, pre-shaped replacement gasket, or you can use a tube of specialized gear oil-resistant RTV silicone sealant.
- Brake Cleaner Spray: Two or three cans of aerosol brake cleaner are essential for blasting away old oil residue, metal particles, and grease from the inside of the housing and off your tools.
- Catch Pan: You need an oil drain pan that can hold at least one gallon of liquid and is wide enough to catch oil splashing out from a wide differential opening.
- Rags and Cardboard: Gear oil has a incredibly strong, lingering smell, and it stains concrete easily. Lay down a large piece of scrap cardboard under your work area, and keep a huge stack of clean shop towels nearby to wipe up drips immediately.
Selecting the Right Gear Oil Weight
Choosing the right gear oil is not a matter of guessing or picking the prettiest bottle on the shelf at the auto parts store. You must strictly follow the recommendations provided by the engineers who designed your truck. The numbers on the bottle, such as 75W-90, represent the viscosity of the oil, which is a measurement of how thick or thin the fluid is at different temperatures.
The first number, followed by the letter W, indicates how well the oil flows in cold winter weather. A lower number means the oil stays fluid even when the temperature drops far below freezing, ensuring your gears get instant protection the moment you start driving on a freezing morning. The second number indicates how thick the oil remains when your differential heats up to maximum operating temperatures after hours of driving on the highway. If you use an oil that is too thin, it will fail to provide a strong enough cushion under heavy loads. If you use an oil that is too thick, your truck will waste energy churning through the heavy fluid, reducing your fuel economy and causing the differential to run hotter than it should.
Understanding Open versus Limited-Slip Differentials
You must find out whether your truck has an open differential or a limited-slip version before you purchase your supplies. An open differential sends power equally to both wheels until one wheel loses traction completely. If one tire gets stuck in deep, slippery mud, an open differential will send all the power to that spinning tire, leaving the tire with grip sitting completely still. These systems are simple and require standard gear oil without any special additives.
A limited-slip differential uses a series of internal clutches or gears to prevent all the power from escaping through a single spinning tire. When one wheel starts to slip, the internal clutch packs lock together, forcing both rear wheels to turn together to pull your truck out of the mud or snow. These internal clutches rely on very specific friction levels to function smoothly without chattering or binding when you make sharp turns on dry pavement. If your truck has a limited-slip axle, you must add a friction modifier liquid, or ensure that your chosen gear oil specifically states that it is formulated for limited-slip applications.
Preparing Your Workspace and Vehicle
Safety must always be your number one priority whenever you work underneath a heavy vehicle. A four-wheel-drive truck weighs several thousand pounds, and a single mistake can result in a catastrophic accident. Taking fifteen minutes to properly prepare your truck and your work environment will give you total peace of mind and allow you to focus entirely on doing a perfect job.
Never rush through the setup phase. Make sure you are working on a bright day, or ensure your garage is well-lit with bright overhead lights or portable work lamps. Clear away any tripping hazards, keep your pets and children away from the area, and dress in comfortable clothes that you do not mind ruining with smelly gear oil.
Safety First Protocols
- Park on Level Ground: Choose a perfectly flat, concrete surface for your project, such as a garage floor or a level driveway. Never work on a slope, on gravel, or on soft dirt where jacks or jack stands can sink or tilt.
- Engage the Parking Brake: Pull your truck’s emergency parking brake up as tightly as possible to lock the wheels in place.
- Chock the Front Wheels: Place heavy plastic or wooden blocks directly in front of and behind your front tires. This completely prevents the truck from rolling forward or backward while you are underneath it working on the rear axle.
- Wear Protective Eye Gear: You will be lying directly under the truck looking up at a metal housing covered in road dirt, rust flakes, and dripping oil. Wear high quality safety glasses to keep debris out of your eyes.
- Use Heavy Duty Gloves: Gear oil is notoriously difficult to wash off your skin, and its strong odor can linger on your hands for days. Wear thick nitrile gloves to protect your skin from chemicals and to keep your hands clean.
Warming Up the Existing Fluid
Cold gear oil has the consistency of thick molasses. If you try to drain your differential when the truck has been sitting idle all night, the cold oil will flow out incredibly slowly, and a large amount of old, dirty fluid will remain trapped on the surfaces of the internal gears. To get a complete, fast drain, you need to warm up the fluid.
Jump into the driver’s seat and take your truck out for a short, ten-to-fifteen-minute drive around your neighborhood. Make sure to drive at normal road speeds and take a few turns. This movement stirs up the oil, warms it up to its natural operating temperature, and thins it out. More importantly, warming up the oil suspends all the microscopic metal particles, dirt, and contaminants within the fluid. When you pull back into your driveway and pull the drain plug, all those floating contaminants will wash right out of the differential housing instead of staying stuck to the bottom of the metal case. Once you get back, park the truck, shut off the engine, set your safety gear, and let the vehicle sit for five minutes so the exhaust pipes cool down slightly before you crawl underneath.
Locating and Removing the Fill Plug First
This is the most critical insider secret of differential maintenance, and skipping this step can leave you stranded with a truck you cannot drive. You must always locate, loosen, and remove the fill plug before you touch the drain plug or remove the differential cover.
The fill plug is almost always located on the front side or the upper side of the metal differential housing, usually near where the driveshaft connects to the axle. It is typically a large, simple bolt head, or a square recess that perfectly fits the square end of a three-eighths-inch ratchet wrench drive.
Why the Fill Plug Must Come Out First
Imagine crawling under your truck, easily removing the lower drain plug, and watching all your old gear oil pour out into your catch pan. You feel great, you let it drain completely, and you put the drain plug back in. Then, you move your wrench up to the fill plug to put the fresh oil in, only to discover that the fill plug is completely rusted solid, rounded off, or seized in place. Your wrench slips, the metal strips out, and you are now completely stuck. Your truck has zero oil in its rear axle, which means you cannot drive it down the road to a mechanic shop without completely destroying your gears within a single mile.
By removing the fill plug first, you guarantee that you have a clear, open pathway to put fresh oil back into the unit. If the fill plug refuses to budge, you can simply stop the project, keep your old oil safely inside the axle, and drive your truck to a professional or tool shop to get the stuck plug sorted out. It is a simple check that eliminates any risk of stranding yourself.
Loosening a Stubborn Fill Plug
Because the fill plug sits underneath your truck, exposed to road salt, rain, mud, and heat, it can become incredibly difficult to turn. If you put your wrench on the plug and pull with all your strength, you risk slipping and skinning your knuckles against the sharp metal frame components of your truck.
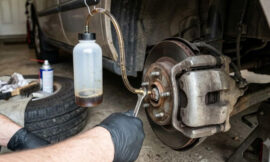
To loosen a stubborn plug safely, spraying the area generously with a high-quality penetrating oil spray can help break up rust bonds. Let the spray soak in for a few minutes. Next, use a long breaker bar instead of a standard short ratchet wrench. The extra length of a breaker bar amplifies your muscle strength, allowing you to apply smooth, controlled force to break the rusty seal. Ensure that your socket or wrench drive is pushed completely and squarely into or onto the plug so you do not accidentally round off the corners of the metal. Pull with a steady, progressive motion rather than jerking the wrench suddenly. You will hear a sharp click or pop when the threads finally break free, and you can then spin the plug out easily with your fingers.
Draining the Old Gear Oil
Once your fill plug is safely removed and sitting on your workbench, you are ready to remove the old fluid. There are two primary designs when it comes to draining a truck differential. Some trucks feature a convenient drain plug located at the very bottom of the pumpkin housing. Other trucks do not have a drain plug at all; to drain the oil on these models, you must remove the entire rear metal cover plate.
Both methods are straightforward, but they require different levels of care and cleanup. We will look closely at both scenarios so you are completely prepared no matter what design your truck manufacturer utilized.
Method A: Trucks with a Dedicated Drain Plug
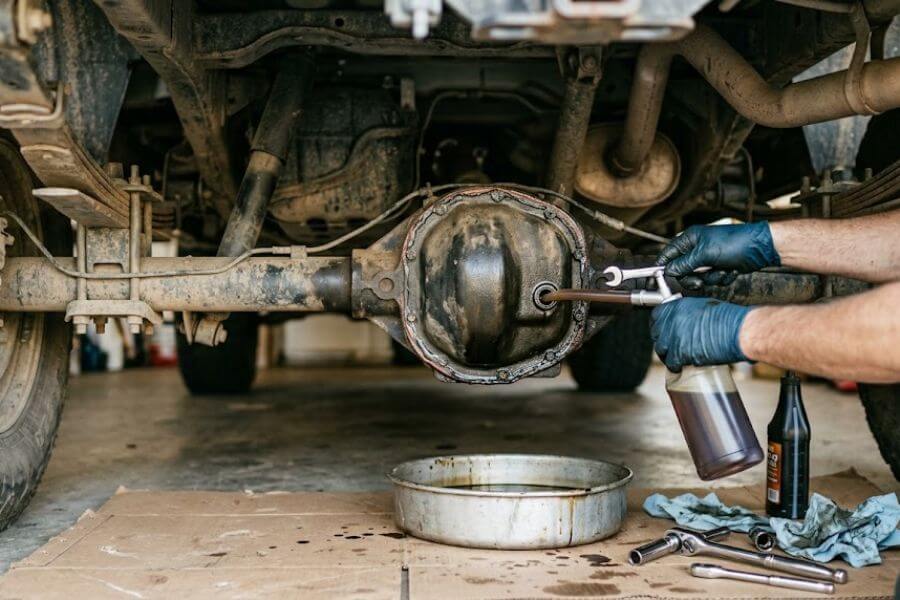
If your truck has a small bolt plug located at the lowest point of the differential housing, you have a very clean job ahead of you. Slide your wide fluid catch pan directly underneath the drain plug. Select the correct socket size, attach it to your wrench, and carefully loosen the plug.
As the plug reaches the very end of its threads, hold it firmly with your fingertips and press it slightly inward against the housing while you give it the final turns. This keeps the oil from leaking all over your fingers prematurely. Once the threads are fully uncoupled, quickly pull the plug away in one swift motion. The warm, dark gear oil will shoot out in a thick stream directly into your catch pan. Let the unit sit and drip for at least ten to fifteen minutes until the steady stream slows down to a very occasional drip.
Method B: Trucks Requiring Cover Removal
If your truck does not feature a bottom drain plug, you will need to unbolt the large, round metal cover plate on the backside of the axle to let the oil escape. This method takes a bit more time, but it offers a huge advantage: it allows you to fully inspect the condition of your internal gears and clean out every single drop of old sludge from the bottom of the housing.
Position your wide catch pan directly underneath the vertical rear cover plate. Using your socket wrench, begin loosening all the bolts that encircle the edge of the cover. Do not remove all the bolts completely right away. Instead, remove all the lower and side bolts, but leave two or three bolts at the very top of the cover threaded in by a few turns. This keeps the heavy metal cover hanging safely like a hinge so it does not suddenly drop into your pan full of smelly oil.
Take a stiff, dull putty knife or a flathead screwdriver and gently wedge it into the seam between the metal cover and the main axle housing at the very bottom. Do not shove the tool in deeply or twist it aggressively, as you can easily scratch or gouge the smooth metal mating surfaces, creating a permanent path for oil leaks. Gently pry outward until the old adhesive seal breaks. As soon as the seal pops, a wide sheet of dark gear oil will pour out of the bottom opening and splash down into your pan. Let the oil drain completely until it slows to a stop, then carefully remove the top bolts while holding the cover so it does not drop.
Inspection and Cleaning of Internal Components
With the oil drained and the cover removed, you have a rare opportunity to peak inside the mechanical vault of your truck’s rear axle. This is where you can catch potential mechanical disasters before they happen, saving yourself from a catastrophic breakdown on a lonely highway or trail.
Take your time during this phase. Use a bright flashlight to illuminate the dark interior of the metal housing and look closely at the components that keep your truck moving down the road.
Checking for Metal Shavings and Wear Patterns
It is completely normal to find a microscopic amount of very fine metal dust inside your differential oil. As steel gears mesh together over tens of thousands of miles, tiny amounts of metal wear away naturally. Many differential drain plugs and internal housings feature a small, round magnet designed to attract and capture this metal dust, keeping it out of the flowing oil.
However, you should look out for larger debris. If you see bright, shiny silver flakes floating in the oil, or if you find large, jagged metal chunks sitting at the bottom of the housing, you have a serious problem. This indicates that your gear teeth are chipping, cracking, or breaking apart. Examine the large teeth on the main ring gear. They should look smooth, polished, and uniform across their entire surface. If you see deep grooves, pitted areas, or broken edges on the teeth, your differential is failing and will need to be serviced by a professional transmission and axle rebuild shop.
Blasting the Housing Clean with Brake Cleaner
Grab a can of aerosol brake cleaner and use the long plastic straw attachment to thoroughly spray down the entire inside of the differential housing. Spray the gear teeth, the side bearings, and the deep corners at the bottom of the case. The high pressure chemical spray will instantly dissolve old, sticky oil residue and wash away any remaining metal dust or water droplets.
Watch the liquid drain out into your catch pan. Continue spraying until the fluid dripping out of the bottom of the housing is completely clear and free of dark oil stains. Once you are finished blasting the internals, use a perfectly clean, lint free microfiber cloth or paper towel to wipe out any puddles of cleaner or remaining sludge from the very bottom curve of the axle housing. The metal inside should look spotlessly clean and dry before you begin the reassembly process.
Cleaning and Preparing the Mating Surfaces
If you had to remove the rear cover plate to drain your oil, the success of your entire project now hinges on how clean you can get the metal mating surfaces. The mating surface is the flat, smooth metal rim where the edge of the cover plate presses against the main axle housing. If there is even a tiny speck of old silicone, rust, or grease left on these surfaces, your new gasket will fail to seal properly, and your fresh, expensive gear oil will slowly drip out over the coming weeks.
This step requires patience and an eye for detail. Think of it like painting a room; the final result is only as good as the preparation work you do before you open the paint can.
Scraping Away the Old Gasket Material
Take your putty knife or a specialized plastic gasket scraper and carefully scrape away every single remnant of the old pre-formed gasket or dried RTV silicone from both the axle housing rim and the inner rim of the removed cover plate. Keep your scraper at a shallow angle relative to the metal to avoid digging the sharp corners into the steel surfaces.
Work your way slowly around the entire perimeter. You want to remove every piece of dried material until you are looking at smooth, bare metal. If you find stubborn patches of hardened factory silicone that refuse to scrape off, spray them with a small amount of brake cleaner or dedicated gasket remover spray to soften the material, then try scraping again.
Degreasing the Metal for a Perfect Seal
Once all the old material is scraped away, take your small wire brush or a piece of fine scotch-brite abrasive pad and lightly scrub the mating surfaces to remove any flash rust or stuck on road grime. Be careful not to drop any of this debris inside your freshly cleaned differential housing.
Finally, saturate a clean shop rag with brake cleaner and wipe down the mating surfaces on both the truck and the cover plate one last time. This removes any oily film left behind by your fingers or the old gear fluid. A perfectly prepared surface should look bright, dry, and feel completely squeaky clean to the touch. This guarantees that your new gasket or silicone sealant can form a permanent, chemical bond with the metal.
Resealing and Reinstalling the Differential Cover
Now that everything is pristine, it is time to put the rear cover back on and seal the vault. If your truck utilizes a pre-formed rubber or paper gasket, simply align the gasket with the holes on the cover plate. If you are using RTV silicone sealant, you will need to apply a precise bead of the liquid rubber by hand.
Using RTV silicone is an incredibly effective way to seal a differential, but it requires a very specific technique to ensure it does not leak under pressure.
How to Apply RTV Silicone Sealant Properly
Cut the plastic tip of your RTV silicone tube at a slight angle, making sure the opening is wide enough to produce a continuous bead of silicone that is roughly one-eighth of an inch thick. Starting at any bolt hole, begin squeezing the tube smoothly as you trace the inner perimeter of the differential cover plate.
Do not rush. Guide the bead down the center of the flat metal flange. When you approach a bolt hole, route the bead completely around the inside of the hole, closer to the interior of the housing, before continuing down the straight paths. This ensures that oil cannot creep past the threads of the bolts later on. Once you have completed the circle, connect the loop seamlessly. Do not spread the silicone flat with your finger; leave it as a raised, wet bead.
The Two-Finger Tighten Trick for Silicone
Carefully lift the cover plate and align it with the bolt holes on the axle housing, being careful not to smear the wet silicone bead against the frame or exhaust pipes. Push the cover straight against the axle and insert all the mounting bolts by hand.
Using a small socket extension or your fingers, tighten each bolt until it is just snug. You want to tighten them just enough until you see the wet silicone start to gently squeeze out from the sides of the metal seam all the way around the cover. Stop right there. Do not crank the bolts down tight yet. If you tighten the bolts completely right now, you will squeeze all the liquid silicone out of the joint, leaving no material behind to form a thick gasket layer once it dries. Let the truck sit completely untouched for one full hour. This allows the squeezed silicone bead to skin over and cure into a tough, rubbery cushion.
Final Torqueing in a Cross Pattern
After an hour has passed, grab your torque wrench. Look up the exact torque specification for your specific truck model; it is usually a relatively low number, often between fifteen and thirty foot-pounds of torque.
Tighten the bolts using a star or cross pattern, rather than simply moving in a circle around the cover. Tighten a top bolt, then move directly to a bottom bolt, then a left bolt, then a right bolt. This ensures that the cover plate is pressed down perfectly flat and even across the entire housing, preventing any puckering or pinching of the gasket material. Once every bolt clicks your torque wrench at the proper setting, let the sealant fully cure for at least another hour before you attempt to add any liquid oil into the axle.
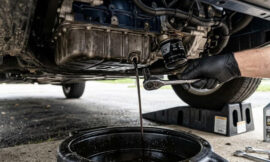
Filling the Differential with Fresh Gear Oil
This is the most rewarding part of the entire job. You are finally ready to pump clean, fresh, protective oil back into your truck’s rear differential. Since the fill hole is positioned horizontally on the side of the housing, you cannot simply hold an oil bottle upside down and pour it in. There is no room under the truck body for that. This is where your handy fluid transfer pump comes into play.
Take your time during this step to avoid making a mess on your garage floor or overfilling the unit.
Setting Up Your Fluid Transfer Pump
Unscrew the plastic cap on your first bottle of fresh gear oil. If your truck requires a separate bottle of limited-slip friction modifier additive, pour that small bottle directly into the gear oil container first, or pump it into the differential fill hole before you begin pumping the main oil.
Insert the long, rigid plastic suction tube of your hand pump down into the bottom of the gear oil bottle and screw the pump cap down tightly onto the neck of the bottle. Take the flexible output hose coming from the top of the pump and push it deep inside the open fill hole on your truck’s differential axle housing. Make sure the hose is pushed far enough inside that it will not accidentally pop out and spray oil everywhere while you are pumping.
Pumping the Fluid Comfortably
Hold the oil bottle steady with one hand and begin pumping the handle of the fluid transfer pump up and down with your other hand. Because gear oil is thick and heavy, each stroke will require a bit of physical effort. Move smoothly and steadily. You will see the golden, clean fluid travel up through the clear plastic tube and disappear into the dark differential housing.
When the first bottle runs completely dry, carefully pull the pump mechanism out, switch it over to your second bottle of oil, and repeat the process. Keep track of how many quarts you have pumped into the unit so you know when you are getting close to your truck’s specific capacity limits.
Determining the Perfect Full Level
How do you know when the differential is completely full? You do not need a dipstick or a measuring window. The design of a standard differential housing makes checking the oil level foolproof. The bottom edge of the fill hole itself represents the maximum fill line.
As you are pumping in your final quart of oil, slow down your pumping speed and watch the fill hole closely with your flashlight. The moment the oil level inside reaches the proper capacity, the excess fluid will begin to spill backward out of the fill hole and trickle down the front face of the metal housing. Stop pumping immediately. Pull your transfer pump hose out of the hole and place it safely into your catch pan. Let the excess oil continue to trickle out of the open fill hole for a minute or two until it naturally slows down to a very faint drip. When the oil is perfectly flush with the bottom lip of the hole, your truck is officially full.
Reinstalling the Fill Plug and Final Cleanup
With the fluid level perfect, you can now close up the fill hole. Take your clean fill plug, check to ensure its rubber O-ring or metal crush washer is in good condition, and thread it into the hole carefully by hand. Always start the threads by hand to make absolutely sure you do not cross-thread the bolt into the axle housing.
Spin the plug in until it is snug, then grab your torque wrench and tighten the fill plug to the manufacturer’s recommended torque setting. This plug does not need to be cranked down with immense, back-breaking force; it just needs to be tight enough to compress its sealing washer completely so it cannot back out over thousands of miles of road vibration.
Blasting the Exterior Clean
Grab your last can of brake cleaner and spray down the entire outside of the differential housing, the rear cover plate, and the area around the fill plug. Wash away all the spilled oil paths and drips that occurred during the filling process. Wipe the entire metal housing dry with a clean rag until the pumpkin looks brand new.
Cleaning the exterior is not just about making your truck look nice underneath. A clean differential makes it incredibly simple to perform visual inspections over the coming days. If your new seal has a tiny imperfection, you will instantly notice a fresh, dark wet spot on the clean, dry metal surface. If you leave the entire housing covered in old spilled oil, it will be completely impossible to tell if the unit is leaking or if you are just looking at old mess from your project day.
Responsible Fluid Disposal
Slide your catch pan out from under the truck along with your protective cardboard sheet. You are now holding a large amount of highly toxic, used industrial oil that cannot simply be thrown into your household trash can or poured down a backyard dirt patch or storm drain. Doing so is highly illegal and incredibly damaging to the local environment and water supply.
Carefully pour the old, dark gear oil from your catch pan into the empty plastic quart bottles that your new oil came in, using a small plastic funnel to prevent spills. Pop the caps back onto the bottles tightly. Take these bottles of old fluid down to your local auto parts store or your county recycling center. Almost every auto parts store will accept used automotive fluids completely free of charge and ensure they are processed and recycled safely.
The Test Drive and Post Maintenance Inspection
You are almost at the finish line. Remove the front wheel chocks, pull your tools out from under the chassis, and lower your truck if you had it raised up on jack stands. Before you head out on a long road trip or load up the truck bed with heavy cargo, you must perform a short, careful test drive to verify your work.
This final check ensures that everything is operating perfectly smoothly and that your new fluid seal is completely secure under real-world driving conditions.
Performing the Test Drive Correctly
Hop into the cabin, start the engine, and find a large, empty, paved parking lot nearby. Drive the truck slowly at first, listening carefully for any unusual noises coming from the rear end.
Drive the truck in a series of tight figure-eight patterns at low speeds. This forces the internal spider gears and limited-slip clutch packs to rotate and engage fully, pushing the fresh gear oil into every single nook, cranny, and tight clearance space inside the housing. If your truck has a limited-slip differential and you notice a slight chattering or grinding sensation during these tight turns, it means your friction modifier additive needs a bit more time to fully coat the clutch plates, or you may need to add a tiny bit more modifier fluid to the mix. Next, take the truck out onto a main road and accelerate smoothly up to standard highway speeds to ensure that no high-pitched whines or vibrations develop as the gears spin fast.
The Final Leak Check
Once you return home from your ten-minute test drive, park the truck back on your level workspace, shut off the engine, and set your parking brake. Grab your flashlight and slide right back under the rear axle to take a look at your handiwork.
Examine the entire perimeter of the rear cover plate where it meets the main housing, and look closely at the bottom edge of both the fill plug and the drain plug. Everything should look completely dry, solid, and clean. If you see a tiny droplet of fresh oil forming along the bottom seam of the cover, it means the bolts may need a tiny bit more torque, or the silicone seal had a small gap. If everything is bone-dry, your project is a complete success. You have officially extended the life of your truck by thousands of miles, protected its powerful internal gears from catastrophic wear, and mastered an essential automotive skill that will serve you well for as long as you own a truck.
Frequently Asked Questions
How often should I change the rear differential gear oil in my four-wheel-drive truck?
For most standard four-wheel-drive trucks driven under normal daily conditions, changing the rear differential oil every thirty thousand to fifty thousand miles is the ideal interval recommended by mechanics. However, if you use your truck for heavy towing, hauling constant construction payloads, or if you regularly submerge your rear axle in deep water or mud while off-roading, you should change the fluid much more frequently, typically every fifteen thousand miles or once a year to prevent premature gear wear.
Why does my new gear oil smell so terrible right out of the bottle?
Gear oil contains heavy concentrations of specialized sulfur-phosphorus additives designed to protect heavy steel gears from extreme friction and heat under massive pressure loads. This sulfur compounds give the oil its distinct, intense, pungent odor that smells like burnt fireworks or rotten eggs. The smell is completely normal and indicates that the oil contains the high strength chemical packages required to survive inside your truck’s heavy axle housing.
Can I drive my truck immediately after applying RTV silicone to the cover plate?
It is highly recommended that you wait at least two to three hours before adding oil and driving after completing the final torque process. RTV silicone creates a custom rubber seal by curing through exposure to moisture in the air. If you fill the differential with heavy oil and drive down the highway immediately, the high pressure and shifting fluid inside the housing can easily blow through the soft, wet silicone, creating an instant oil leak that will force you to redo the entire project from scratch.
What will happen if I accidentally overfill my rear differential housing?
Overfilling your rear differential can cause the spinning internal gears to whip the excess oil into a frothy, bubbly foam. Air bubbles trapped inside foamed oil cannot lubricate metal surfaces properly, which can lead to increased operating temperatures and accelerated gear wear. Furthermore, the increased fluid pressure can force the excess oil past your outer axle seals, causing oil to leak onto your rear brakes or spray all over your rear suspension components.
Is it safe to use synthetic gear oil if my truck came from the factory with conventional oil?
Yes, switching to a high quality synthetic gear oil of the exact same viscosity weight is completely safe and highly beneficial for almost all four-wheel-drive trucks. Synthetic gear oils provide superior protection against extreme heat breakdown, flow much better in freezing winter temperatures, and offer stronger resistance to shearing forces under heavy towing loads compared to traditional conventional mineral oils.
Why is there a milky white color to the old gear oil I just drained out?
A milky, frothy, or light brown appearance in your drained gear oil indicates that water has entered your differential housing and mixed with the fluid. This usually happens when a hot differential is submerged in deep puddles or boat ramps, drawing water in through the vent tube or worn out rubber seals. If you find milky oil, you must flush the system thoroughly with clean fluid and locate the source of the water entry to protect your gears from rusting out completely.