Imagine you turn the key in your car ignition, or you push the start button, and absolutely nothing happens. You might hear a single, sharp click, or maybe you hear a slow, tired groaning sound that fades into total silence. Your dashboard lights up, your radio plays your favorite song, but the engine refuses to wake up and run. This is a moment that can make your stomach drop, but you do not need to panic or call an expensive tow truck. Most of the time, this frustrating problem points directly to a failing or completely broken starter motor. You can fix this issue right in your own driveway or garage using nothing more than basic hand tools and some patience. This detailed guide will show you exactly how to test your starter, figure out if it is truly the broken part, and replace it with a fresh one so you can get back on the road.
Understanding the Heart of Your Starting System
What is a Starter Motor?
Before you pick up a wrench, you should know exactly what a starter motor is and what it does for your vehicle. Think of your car engine as a giant machine that requires a heavy push to get moving. The engine cannot start running on its own power because it needs to pull in air and fuel, compress that mixture, and light it with a spark plug first. The starter motor is the small, incredibly powerful electric motor that provides that initial push. It is usually about the size of a large loaf of bread or a thick thermos, and it bolts directly onto the side of the engine where the engine meets the transmission. Inside this metal cylinder, there are coils of wire, magnets, and a spinning shaft. When you give the command to start the car, this little motor uses a massive amount of electricity to turn the giant, heavy components inside your engine.
How the Starting System Works
Your vehicle uses a beautifully synchronized system to bring the engine to life. Everything begins when you turn your key or press the start button. This action sends a small electrical current from your ignition switch through a protective fuse and into a device called a starter relay. The relay acts like a smart gatekeeper, switching a much larger current directly from your heavy battery cables. This large current rushes straight into the starter solenoid, which is the smaller cylinder attached to the top of the main starter motor. The solenoid has two jobs. First, it acts as a massive electrical switch to let battery power flow into the main motor. Second, it uses a mechanical lever to push a tiny gear, known as the pinion gear, outward from the tip of the starter. This tiny gear rams straight into the teeth of a giant, circular gear called the flywheel or flexplate, which is bolted to the back of the engine crankshaft. As the starter motor spins, the tiny gear spins the giant flywheel, which moves the pistons up and down, allowing the engine to start firing its own fuel and running independently. As soon as you let go of the key, a spring inside the solenoid pulls the tiny gear backward, saving it from being spun too fast by the newly started engine.
Why Starters Wear Out Over Time
Like any mechanical item that works hard every single day, a starter motor has a limited lifespan. Every single time you start your car, the internal parts experience friction, heat, and high electrical current. Inside the motor, there are small blocks of carbon called brushes that rub against a spinning part called the commutator to deliver electricity. Over thousands of miles, these carbon brushes slowly wear down into fine dust until they can no longer make a clean electrical connection. At the same time, the powerful electrical contacts inside the solenoid can become burnt, pitted, and covered in carbon deposits from the sparks that jump across them when you start the vehicle. Outside forces also attack your starter. If your engine has a small oil leak, oil can drip down directly into the starter casing, soaking the internal electrical parts and causing them to short out. Salt from winter roads, mud from puddles, and constant vibrations from driving over bumps can also loosen the internal wiring or rust the mounting bolts. Understanding these causes helps you realize why a starter is considered a wear-item, much like your brakes or your tires.
Gathering Your Hand Tools and Safety Gear
Essential Safety Equipment
Working on mechanical systems requires a serious commitment to safety. You will be working beneath a heavy vehicle and dealing with high-current electrical systems that can cause sparks, burns, or electrical shocks if handled incorrectly. Your very first line of defense is a high-quality pair of safety glasses. These will protect your eyes from falling dirt, rust flakes, droplets of oil, and any stray sparks while you are underneath the chassis. You also need a pair of tight-fitting, durable work gloves. These gloves protect your knuckles from painful scrapes when a stubborn bolt suddenly breaks loose, and they shield your skin from harmful chemicals and hot metal surfaces. Because you will need to raise the car off the ground to reach the starter on most front-wheel-drive and rear-wheel-drive vehicles, you absolutely must use heavy-duty jack stands. Never, under any circumstances, crawl under a vehicle that is supported only by a hydraulic floor jack. Jacks can fail instantly without warning, while solid steel jack stands will keep you safe. Finally, place solid wheel chocks behind and in front of the tires that remain on the ground to stop the car from rolling while you work.
The Basic Mechanics Hand Tools
You do not need a fancy, expensive rolling tool chest filled with air tools to finish this job successfully. A standard socket set containing both metric and standard sizes is the primary tool group you will use. You will want a three-eighths-inch drive ratchet along with a collection of short and deep sockets. Starter bolts are often tucked away in tight, shadows-filled spaces, so having a few different socket extensions of varying lengths will help you reach those hidden fasteners without scraping your hands. A swivel joint or universal joint attachment for your ratchet is also incredibly helpful for turning bolts at odd angles. In addition to your socket wrench set, a combination wrench set is very useful. These wrenches have an open end and a closed box end, allowing you to hold a nut on one side while you turn the bolt on the other. You will also need a couple of screwdrivers, including a flat-head and a Phillips-head, which help pry off plastic clips or clean away debris. A wire brush is another tool you should keep nearby to scrub away corrosion from the electrical terminals. Lastly, a basic digital multimeter is a fantastic tool to have for checking battery voltage and electrical continuity, ensuring you do not waste money replacing a part that is actually working perfectly.
Preparing Your Workspace Safely
The environment where you choose to work can make a huge difference in how smoothly your repair goes. Look for a flat, level, and solid surface to park your vehicle, such as a concrete driveway or a garage floor. Working on dirt, grass, or loose gravel is highly dangerous because jack stands can sink into the soft earth, causing the vehicle to tilt and fall. Once your car is parked on flat concrete, turn off the engine, engage the parking brake as tightly as possible, and pull the keys completely out of the ignition. If you have been driving the car recently, let the vehicle sit for at least one full hour. The starter motor is often mounted very close to the exhaust pipes, which can reach scorching temperatures capable of causing severe skin burns on contact. While the engine cools down, clear away any tripping hazards around the car, lay down a clean piece of thick cardboard or a mechanic creeper to lie on, and set up a bright work light or flashlight so you can clearly see deep into the dark corners of the engine compartment.
Recognizing the Warning Signs of a Dying Starter
The Classic Click Sound
One of the absolute most common warning signs of a broken starter is a distinct, sharp clicking noise when you try to start the engine. You sit in the driver seat, turn the key, and hear a single “clack” or a rapid-fire “click-click-click” coming from underneath the hood, but the engine does not turn over at all. This sound is actually the starter solenoid trying to do its job. The clicking is the sound of the internal plunger slamming forward to engage the small pinion gear with the flywheel. However, because the main motor section of the starter is broken or is not receiving enough electrical current, the motor cannot spin. When you hear a single loud click, it often means the electrical switch inside the solenoid is worn out or the motor brushes are no longer making contact. Rapid clicking, on the other hand, usually points toward a battery that is too weak to keep the solenoid fully engaged, causing the mechanism to bounce back and forth rapidly.
The Dreaded Slow Crank
Another clear indicator that your starter motor is on its final legs is a slow, sluggish cranking speed. When you attempt to start the car, instead of the crisp, fast turning sound you are used to, the engine sounds like it is struggling heavily. It makes a slow, labored sound that sounds like the vehicle is working through thick mud. This symptom happens when the internal electric motor inside the starter begins to short out, or when the internal bearings dry out and seize up. When bearings fail, they create immense internal friction, making it incredibly difficult for the motor shaft to spin. This internal resistance forces the starter to draw way more electrical current from the battery than it normally would, which drains your battery power quickly and leaves the engine turning too slowly to catch fire and run. It feels like a dead battery, but even with a fully charged battery, the crank remains painfully slow.
Whining or Grinding Noises
If you turn your key and hear a high-pitched, metallic screaming or whining noise, your starter is experiencing a mechanical failure. This specific sound happens when the starter motor spins rapidly, but it fails to engage with the engine flywheel. The internal mechanism that pushes the small pinion gear forward along the shaft has become stuck or broken. As a result, the motor spins freely at high speed in empty space, creating a loud whining noise without actually turning the engine over. Conversely, if you hear a horrific, harsh grinding noise that sounds like metal gears chewing each other to pieces, the teeth on the small starter pinion gear or the giant engine flywheel are badly worn down, chipped, or broken. This prevents the teeth from meshing together smoothly, causing them to slam into each other edge-to-edge. This requires immediate attention because a grinding starter can quickly destroy the expensive teeth on your engine flywheel.
Smoke and Burning Smells
Because the starter motor is a high-power electrical device, a major failure can lead to overheating and smoke. If you continuously turn the key and crank a stubborn engine for more than fifteen seconds at a time without letting it rest, the starter will get incredibly hot. The electrical wires inside will begin to melt their protective insulation, leading to a strong, acrid smell of burning plastic or electrical fire. In severe cases, wisps of white or grey smoke will drift up from underneath the engine block. If you smell or see smoke while trying to start your vehicle, stop immediately, take your hands off the key, and let the system cool down completely. This smoke means the starter has suffered permanent internal damage and must be replaced before you can safely drive the car again.
How to Test Your Starter Before Removing It
Performing a Battery Visual Inspection
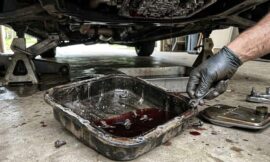
Before you start unbolting your starter motor, you must make absolutely certain that your battery is not the actual root cause of your starting troubles. A starter requires a massive amount of electrical energy, and a weak battery will mimic a bad starter perfectly. Pop open your hood and locate the vehicle battery. Look closely at the top of the battery casing for any cracks, bulges, or leaks. A battery case that looks swollen or bloated is a clear sign of internal damage and must be replaced. Next, look at the metal battery terminals where the thick wires connect. If you see a crusty, flaky white, green, or blue powder piled up around the metal posts, you are looking at heavy corrosion. This corrosion acts like an electrical wall, blocking the flow of power from the battery to the starter motor.
The Headlight Test for Power Drop
A fast and simple way to check your electrical system without any tools is the classic headlight test. Turn your vehicle headlights on so they shine against a garage wall or a fence where you can see them clearly from the driver seat. Take note of how bright the headlights are. Now, try to start the engine while watching the brightness of the headlight beams. If the headlights stay very bright but the engine does not crank at all, the electricity is likely not even reaching the starter motor, pointing to a bad ignition switch, a blown fuse, or a failed relay. If the headlights dim down drastically or turn completely black while you try to crank the engine, it means something is drawing a huge amount of power. This tells you that either your battery is completely dead, or your starter motor is internally jammed up and shorting out, sucking up all available power without spinning.
Checking the Battery Terminals and Cables
Even if your battery is brand new, loose or dirty cable connections will prevent your starter from working. Put on your safety gloves and gently try to twist the thick battery cables around the metal battery posts by hand. If the cables wiggle, slide, or rotate even a tiny bit, they are too loose to deliver the heavy current required by the starter. You will need to use a small wrench, usually a ten-millimeter size, to tighten the nuts on the cable clamps until they are completely snug and immovable. If you noticed corrosion during your visual check, use your wrench to disconnect the negative cable first, then the positive cable. Scrub the metal posts and the insides of the cable clamps thoroughly with a wire brush until the metal shines brightly. Reconnect the cables tightly, positive first and then negative, and try starting the car again.
The Old-School Screwdriver Tap Trick
If your car will not start and you are stranded, there is an old mechanical trick that can often help you get home or prove your starter is bad. This is known as the starter tap test. Locate your starter motor underneath the hood or under the car. While an assistant sits in the driver seat holding the key in the start position, take the heavy wooden or plastic handle of a large screwdriver or a small mallet and gently tap the solid metal side of the starter motor casing a few times. Do not strike it with extreme force, as you can smash the internal permanent magnets. Often, this physical vibration will jar the worn-out internal carbon brushes just enough to make contact with the spinning commutator one last time. If the engine suddenly roars to life while you tap it, you have found your problem. This confirms that the starter motor has internal dead spots and needs to be replaced immediately.
Testing with a Basic Digital Multimeter
For a scientific and accurate test, you can use a digital multimeter to measure the exact voltage in your starting system. Set your multimeter dial to the “DC Voltage” mode, specifically on the twenty-volt scale. Touch the red positive test lead of the meter to the positive terminal of your car battery, and touch the black negative lead to the negative battery terminal. A fully charged, healthy battery should read at least twelve-point-six volts when the car is completely off. If your meter shows less than twelve volts, your battery is discharged and needs to be recharged or replaced before you can test anything else. Next, have a friend crank the engine while you watch the meter screen. A healthy system should not drop below nine-point-six volts during cranking. If the voltage drops down into the five or six-volt range, your battery cannot handle the load, or the starter is pulling too much power due to internal mechanical seizure.
Checking the Starter Relay and Fuse
Your starter motor relies on a clean signal from the vehicle fuse box to know when to spin. Open the plastic cover of your engine bay fuse box, which is usually located near the battery or under the driver side dashboard. Look at the diagram printed on the inside of the cover to locate the starter fuse and the starter relay. Pull the starter fuse out and hold it up to a bright light. Look for the small metal wire loop inside the clear plastic body. If that metal wire is broken, melted, or has a dark burn mark around it, the fuse is blown, which cuts off all power to the starter circuit. Replace it with a new fuse of the exact same amperage rating. If the fuse is good, locate the starter relay, which looks like a small plastic cube. You can often swap this relay with an identical, non-essential relay from the same fuse box, such as the horn relay or the air conditioning relay. If swapping the relays causes your engine to start up perfectly, your original relay was broken and needs to be replaced.
| Starting System Symptom | Potential Root Cause | Recommended Action |
| Loud single click, no engine crank | Worn starter solenoid or bad internal brushes | Test starter voltage, tap starter, or replace starter |
| Rapid clicking, lights dim drastically | Weak, discharged, or dying battery | Charge or replace battery, clean terminals |
| High-pitched whining, engine does not turn | Stuck or broken starter pinion gear mechanism | Replace starter motor assembly |
| Harsh metallic grinding noise | Damaged teeth on pinion gear or flywheel | Inspect teeth through inspection window, replace starter |
| No sound at all, bright headlights | Blown starter fuse, bad relay, or open wire | Replace fuse, swap relay, check ignition switch |
Step-by-Step Guide to Removing the Bad Starter
Disconnecting the Negative Battery Cable
Before you touch a single bolt on the starter motor itself, you must complete the most critical safety step of the entire process: disconnecting the battery. The main power cable attached to your starter motor connects directly to the positive post of your battery without any fuse in between. It carries enough electrical energy to melt a metal wrench instantly or cause a severe fire if it touches the car frame. Use your ten-millimeter hand wrench to loosen the nut on the negative battery cable clamp, which is marked with a minus sign or a black cover. Slide the cable clamp completely off the metal post and tuck it deep down into the side of the engine bay where it cannot spring back and accidentally touch the battery post. By disconnecting the negative side, you break the electrical loop, making the entire metal body of the car safe from accidental electrical short circuits while you work underneath.
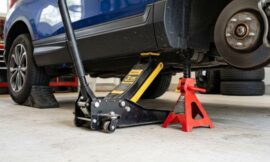
Lifting and Securing the Vehicle Safely
On many modern vehicles, the starter motor is mounted on the lower portion of the engine block, meaning you must access it from underneath the car. Park your vehicle on your flat concrete workspace. Place your solid wheel chocks around the rear tires if you are raising the front of the car. Position your hydraulic floor jack under the factory-approved lift points on your car frame, which are clearly listed in your owner manual. Slowly pump the jack handle to raise the car until the front tires are completely off the ground and you have enough space to slide underneath comfortably. Locate a solid, structural part of the vehicle frame to position your heavy-duty jack stands. Lower the hydraulic jack slowly until the entire weight of the car is resting securely on the jack stands. Before you step a foot under the car, give the bumper a firm, solid shake. If the car wiggles or shifts at all, raise it again and adjust the jack stands until the vehicle is completely rock-solid and immobile.
Locating the Starter Motor Under the Vehicle
Slide underneath the vehicle on your cardboard sheet or creeper with your flashlight or work light. You need to look for a cylindrical metal component bolted to the junction where the engine block meets the transmission housing. If you are working on a rear-wheel-drive truck or car, the starter is typically very visible on the lower side of the engine near the oil pan. If you are working on a compact front-wheel-drive car, the starter might be tucked away tightly behind the radiator or underneath the intake manifold, requiring you to reach into tight spaces. Look for the thick, bright red electrical wire that leads directly from the battery compartment down to the engine block; following this heavy cable will lead your eyes straight to the starter solenoid.
Disconnecting the Starter Electrical Wiring
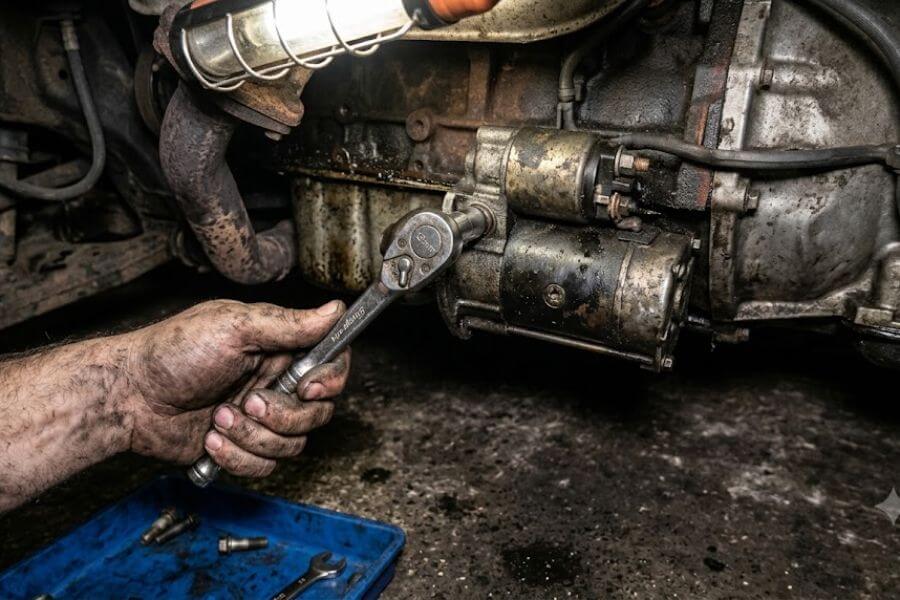
Once you have a clear view of the starter, you will see two distinct electrical connections attached to the back of the starter solenoid. The first connection is the heavy battery positive cable, which is secured by a medium-sized nut, usually a twelve or thirteen-millimeter size. This nut is often protected from moisture by a flexible rubber boot; slide this boot back along the wire to expose the metal nut. Use your hand wrench or a socket to carefully loosen and remove this nut, then slide the thick eyelet terminal off the threaded metal stud. The second connection is a much smaller wire, which carries the start signal from your ignition switch. This wire might be held in place by a small nut, or it might use a plastic click-connect tab. Carefully unclip or unbolt this small wire. Place the loose wires off to the side where they will not get caught or pinched when you remove the heavy starter motor.
Unbolting the Starter from the Engine Block
With the wires safely disconnected, you can now remove the main mounting bolts that hold the heavy starter motor to the vehicle. Starters are typically held in place by two or three long, high-strength steel bolts that thread directly into the transmission bellhousing or engine block. These bolts can be very tight due to years of engine heat cycles and rust. Select the correct size socket from your hand tool set, attach it to your three-eighths-inch ratchet, and use a long extension if necessary to get a straight angle on the bolt heads. Place one hand firmly on the head of the ratchet to keep the socket from slipping off and rounding the metal corners, and use your other hand to apply steady, firm pressure to break the bolt loose. Remove the top bolt or the hardest-to-reach bolt completely first, leaving the bottom or most accessible bolt for last so the heavy starter does not unexpectedly fall down onto your face.
Wiggling the Starter Free from the Housing
Hold the heavy body of the starter firmly with one hand while you use your other hand to loosen and remove the final mounting bolt. Starter motors can be surprisingly heavy, often weighing anywhere from five to fifteen pounds, so be prepared to support its weight. Once all the bolts are completely removed, the starter may still feel stuck in place. This is because a round guide nose on the front of the starter fits very tightly into a hole in the transmission housing to keep the gears perfectly aligned. Gently wiggle the starter body up and down and pull it straight back toward the rear of the vehicle to slide the guide nose out of its mounting hole. Be very careful not to drop the starter, as it can damage nearby parts like plastic oil sensors, cooler lines, or your fingers. Carefully maneuver the starter out of the tight engine spaces and slide out from under the car.
Inspecting and Bench Testing Your Starter
Examining the Starter Gear for Wear
Now that you have the old starter motor sitting on your workbench or driveway, take a few minutes to inspect its physical condition closely. Look at the small pinion gear tucked inside the nose cone of the unit. This small gear has a series of metal teeth that smash into your engine flywheel every time you start the car. Examine these teeth under a bright light. If the edges of the teeth are completely clean, smooth, and square, the gear is in good health. However, if you notice that the edges of the metal teeth are heavily rounded off, chipped, flattened, or completely broken away, this indicates that the starter was slipping and grinding against the flywheel. Also, try to spin the tiny gear by hand. It should spin smoothly in one direction and lock up completely in the opposite direction. If it spins freely and loosely in both directions, the internal one-way clutch mechanism is broken, which explains why the motor was spinning without turning your engine over.
How to Perform a Bench Test Using Jumper Cables
If you want absolute confirmation that your starter is dead before spending money on a replacement part, you can perform a quick bench test using a standard twelve-volt car battery and a set of emergency jumper cables. Place the starter motor flat on the ground or clamp it firmly into a heavy workbench vise so it cannot jump around when it starts spinning. Attach the red positive jumper cable clamp to the positive terminal of your helper battery, and connect the other end of the red cable directly to the large, threaded top post on the starter solenoid where the main battery wire normally connects. Next, clamp one end of the black negative jumper cable to the negative terminal of the battery, and attach the other black clamp to a clean, unpainted metal spot on the solid body of the starter casing to complete the ground circuit. Finally, take a short piece of wire or a small screwdriver and carefully bridge the gap between the large positive stud on the solenoid and the small terminal where the ignition wire connects. If the starter is working perfectly, the tiny gear will instantly pop outward with a sharp click and spin at high speed with a powerful roar. If the gear pops out but does not spin, or if absolutely nothing happens at all except for a few weak sparks, the starter is internally broken and completely dead.
Deciding Between Rebuilding or Buying a New Unit
When it comes to getting a working starter back into your car, you generally have two choices: you can take your broken starter to a local specialty auto electric shop to have them rebuild it, or you can purchase a replacement unit from your local auto parts store. Rebuilding involves opening the metal casing, cleaning out the carbon dust, installing fresh brushes, replacing worn bearings, and putting in a new solenoid switch. This can sometimes save money, but it takes time. The faster option is to buy a ready-to-install replacement unit. When you go to the auto parts store, you will often have a choice between a brand-new aftermarket starter and a remanufactured unit. A remanufactured starter is an original factory core that has been completely taken apart, rebuilt to factory standards in a large facility, and tested to work like new. Remanufactured units are usually cheaper than brand-new ones, but they require a “core charge,” which means you must hand over your old broken starter to the store so they can send it back to be rebuilt for the next customer.
Installing Your Brand New Starter Motor
Comparing the Old Starter with the New One
Before you unwrap your fresh replacement starter and crawl back under your vehicle, place the old starter and the new starter side-by-side on your workbench or flat ground. You must do a thorough visual comparison to ensure the auto parts store gave you the exact correct part for your specific engine size and model year. Check the main metal body and ensure the mounting ears have the exact same shape and spacing for the bolts. Look closely at the small pinion gear in the nose cone and physically count the number of individual teeth on the gear; a starter designed for an identical-looking engine might have nine teeth, while your specific car needs eleven teeth. Next, look at the back of the solenoid and make sure the electrical terminal posts are positioned in the same spots and use the same thread sizes. If anything looks different, stop and exchange it at the store, because installing an incorrect starter can permanently damage your engine flywheel.
Cleaning the Mounting Surface Properly
A very common mistake that leads to starter problems later on is bolting a new starter onto a dirty, rusty engine block. The starter motor relies on its physical metal-to-metal contact with the engine block to complete its ground circuit. If there is a thick layer of grease, dirt, rust, or old corrosion sandwiched between the starter mounting face and the engine, electricity will struggle to flow, leading to a weak crank. Take a clean rag and wipe away any heavy grease from the mounting area on the transmission bellhousing. Then, take a firm wire brush or a piece of medium-grit sandpaper and gently scrub the flat metal surface until it is smooth and clean. Wipe away any remaining metal dust with a dry cloth, ensuring a pristine metal surface for your new starter to mount against.
Positioning the New Starter and Hand Threading Bolts
Carefully slide back underneath your securely supported vehicle, holding your new starter motor firmly. Lift the heavy starter into position and gently slide the round nose cone guide into the matching alignment hole in the transmission housing. While holding the heavy weight of the starter steady with one hand to prevent it from dropping, use your other hand to insert the first mounting bolt through the starter ear and into the engine block. Twist the bolt clockwise with your fingers for at least four or five full turns. Never use a wrench or a ratchet to start tightening the bolts right away. Starter bolts thread into soft aluminum engine parts very easily, and using a wrench too early can cause cross-threading, which strips out the delicate metal threads and ruins your engine block. Hand-thread the remaining bolts until they are all engaged and the starter can hang safely on its own.
Torquing the Starter Bolts with Hand Tools
With all the mounting bolts safely started by hand, you can now use your hand socket wrench to snug them down evenly. Tighten the bolts in an alternating pattern, turning the top bolt a few times, then the bottom bolt, to ensure the starter pulls evenly and flat against the mounting surface without tilting. You want these bolts to be securely tightened so they cannot vibrate loose while you drive down the road. If you have a hand torque wrench, look up the exact torque specification for your vehicle in a repair manual and tighten the bolts to that precise limit. If you do not have a torque wrench, tighten the bolts firmly with a standard ratchet handle until they are completely snug, and then give the wrench handle one final, solid push with your arm to lock them in place securely. Do not use your entire body weight or put a long pipe over your wrench handle, as too much force can snap the steel bolt heads off completely.
Reconnecting the Solenoid and Power Wires
Now that the starter is solidly bolted to the engine, you can reconnect the electrical wiring system. Slide the eyelet terminal of the thick red positive battery cable back onto the large threaded copper stud on the starter solenoid. Take the mounting nut and thread it on by hand first to prevent cross-threading. Use a small hand wrench or socket to tighten this nut down until it is snug. Be very careful not to over-tighten this small nut; the threaded studs on the solenoid are made of soft copper and are embedded in brittle plastic, so applying too much twisting force can crack the plastic solenoid housing instantly. Once the nut is snug, slide the protective rubber moisture boot back completely over the connection to keep out water and road salt. Finally, reconnect the small ignition signal wire by clicking the plastic plug back into place or tightening its small nut until it is secure.
Lowering the Vehicle and Reconnecting the Battery
Double-check your work area under the car to ensure you have not left any hand tools, flashlights, or loose rags lying around near the hot exhaust pipes or spinning engine belts. Gather your tools and slide out from under the car. Position your hydraulic floor jack back under the main lift point, pump the handle to raise the car slightly off the solid jack stands, and carefully slide the jack stands out from underneath the frame. Slowly turn the valve on your jack to lower the vehicle back down until all four tires are resting firmly on the ground. Open your engine hood and retrieve your negative battery cable clamp. Slide the clean metal clamp back onto the negative post of the battery. Use your ten-millimeter hand wrench to tighten the clamp nut until it is completely snug and you cannot twist or wiggle the cable with your hand.
Testing Your New Starter and First Start-Up
What to Listen for During the First Turn
Now comes the exciting moment of truth. Sit comfortably in the driver seat, make sure the vehicle transmission is firmly in Park or Neutral, and plant your foot firmly on the brake pedal. Turn your ignition key or press the start button. The engine should instantly react with a crisp, fast, and energetic spinning sound, followed immediately by the smooth roar of the engine catching fire and running on its own power. Listen closely to the sound of the crank. It should sound smooth and even, without any high-pitched squealing, hesitant clicking, or metallic grinding. As soon as the engine starts running, release the key immediately to let the starter mechanism disengage.
Verifying Clean Connections and Good Voltage
After letting the engine run for a couple of minutes, turn the vehicle off and open the hood one more time to perform a quick safety inspection. Walk around to the battery and gently touch the negative and positive cable clamps to ensure they are cool to the touch and have not vibrated loose. If you have your digital multimeter handy, turn it on and touch the leads to the battery terminals while the engine is running. Your meter should now display a reading between thirteen-point-five and fourteen-point-five volts. This high number shows you that your alternator is working perfectly, sending fresh power back into the battery to replace the energy that your new starter motor just used to bring the engine to life.
Troubleshooting Common Installation Mistakes
If you turn your key after the installation and the car still refuses to start, do not panic. Most of the time, the issue is caused by a very simple oversight during the assembly process. First, check your battery cables again to ensure they are completely tight; a slightly loose negative cable will prevent the starter from pulling enough power. Second, ensure you did not accidentally forget to plug in the tiny ignition signal wire on the back of the starter solenoid, as this wire tells the starter when to wake up. Third, ensure your vehicle is completely in Park or Neutral; many modern cars have a safety switch that blocks power to the starter if the gear shifter is accidentally left in Drive or Reverse. Slide the shifter through the gears and push it firmly back into Park before trying again.
Maintenance Tips to Make Your Starter Last Longer
Keeping Your Battery at Peak Charge
The best way to protect your brand-new starter motor from wearing out early is to maintain a healthy, fully charged car battery. When a battery becomes weak, its voltage drops down. To make up for this low voltage, the starter motor is forced to pull a massive amount of electrical current to find the power it needs to turn the heavy engine. This high current creates extreme heat inside the starter casing, which quickly toasts the internal wiring insulation and burns up the carbon brushes. Check your battery health once a year, clean away any signs of white powdery corrosion immediately with a wire brush, and if you plan to leave your car sitting without driving for more than two weeks, connect a smart battery maintenance charger to keep the system topped off.
Protecting the Starter from Oil Leaks
Keep a close eye out for any fluid or oil leaks developing in your engine bay. The starter motor is often located directly below parts like the valve covers, the oil filter housing, or the oil pressure sensors. If these gaskets fail, engine oil will slowly drip down, landing directly on top of the starter motor casing. Over time, this thick oil will seep inside through the small gaps in the starter metal housing. Once oil gets inside, it mixes with the natural carbon dust from the brushes, creating a thick, sticky sludge that coats the electrical contacts and shorts out the motor coils. If you notice an oil leak anywhere near your starter, fix that leak immediately to prevent it from ruining your new starter motor.
Avoiding Extended Crank Times
Always be gentle with how long you run your starter motor when trying to start a stubborn car. If your vehicle runs out of gas, or if it has a broken fuel pump that prevents it from firing up right away, do not just hold the key down continuously. A starter motor is designed to run for only a few brief seconds at a time. Holding the key down for thirty seconds or a full minute straight will generate intense friction heat that can permanently melt the internal parts of the motor. If your engine does not start up within ten seconds of cranking, release the key completely. Let the starter motor sit and cool down for at least two full minutes before you attempt to crank it again, saving the internal components from heat death.
Frequently Asked Questions
Can I replace a starter motor without jacking up my car?
Whether you can replace a starter without raising the vehicle depends entirely on the design of your specific car or truck. If you drive a large four-wheel-drive pickup truck or a large sport-utility vehicle with high ground clearance, you might be able to slide underneath the frame comfortably with your hand tools while all four wheels remain flat on the ground. Additionally, on a small number of vehicles, the starter motor is mounted on the top side of the engine block underneath the intake manifold, allowing you to complete the entire job while standing over the engine bay. However, for most standard passenger cars and low-riding vehicles, you will absolutely need to raise the car safely using a jack and solid jack stands to give your arms and tools enough room to work safely and effectively.
How long does it usually take to replace a bad starter motor?
For a person using basic hand tools for the first time, a starter motor replacement typically takes between one and three hours to complete from start to finish. The exact time depends heavily on how easy it is to reach the starter in your engine bay. On an older rear-wheel-drive vehicle with plenty of open space around the engine block, you can often remove the two bolts and disconnect the wires in less than forty-five minutes. On a modern, tightly packed front-wheel-drive car, you might need extra time to carefully maneuver your socket wrench extensions around tight hoses, plastic brackets, and frame components to access the hidden mounting bolts.
What happens if I forget to disconnect the battery before working?
Failing to disconnect the negative battery cable before you touch the starter motor is highly dangerous. The thick main wire connected to the starter solenoid is always live with direct, heavy electrical current from the battery. If your metal socket wrench accidentally touches this live terminal while the other end of your wrench brushes against the metal car frame or engine block, you will create an instantaneous, massive electrical short circuit. This will create intense, blinding sparks, can weld your hand tool directly to the car frame, can cause the car battery to rupture or explode, and can result in severe electrical burns to your skin or start a serious engine fire.
Why does my new starter motor make a loud clicking sound?
If your brand-new starter motor makes a clicking sound but refuses to turn the engine, the problem is almost always a weak or discharged car battery rather than a defect in your new starter. The clicking sound proves that the starter solenoid is working and trying to engage, but your battery does not have enough stored electrical energy to actually turn the heavy motor shaft. Use a digital multimeter to check your battery voltage, or use a set of jumper cables to jump-start the vehicle from a helper car. If the engine starts immediately with a jump, your battery needs to be fully charged or replaced.
Can a bad starter motor drain my car battery overnight?
Yes, a faulty starter motor can occasionally drain your vehicle battery while the car is parked overnight. This happens if the heavy electrical contacts inside the starter solenoid become physically stuck or melted together in the closed position, or if an internal short circuit develops within the motor coils. This creates a continuous, hidden electrical drain that pulls power out of the battery twenty-four hours a day, even when your keys are completely removed from the ignition. If you notice your battery keeps going completely dead every single morning despite being a brand-new battery, a shorted starter solenoid could be the hidden culprit.
Is it necessary to replace the starter relay when replacing the starter?
It is generally not mandatory to replace your starter relay when you install a new starter motor, provided that your original relay passes its electrical tests. The starter relay is an independent switch located inside the fuse box, and it does not experience the same harsh physical wear, engine heat, and road debris as the starter motor itself. However, because starter relays are very inexpensive and easy to swap out by hand, many car owners choose to install a fresh relay at the same time as a form of cheap insurance, ensuring the entire starting electrical circuit is completely refreshed.
How can I tell if my starting problem is the alternator instead of the starter?
An easy way to tell the difference between a bad starter and a failed alternator is to look at how the car behaves right before it refuses to start. If your alternator breaks while you are driving, it stops charging the battery, causing your dashboard lights to dim, your radio to turn off, and your engine to slowly die and sputter out while you are actively on the road. Once you stop, the battery is completely dead. If your starter motor is the broken part, the car will drive perfectly without any electrical issues at all, but the next time you park, shut the engine off, and try to restart it, the car will suddenly refuse to crank despite having bright dashboard lights and a healthy battery.
Can I start my car by tapping on the starter permanently?
No, the starter tap trick is strictly a temporary emergency measure designed to get you out of a dangerous situation or help you drive home to fix the problem. Tapping on the starter jar the worn carbon brushes so they touch the commutator one last time, but those brushes are still physically worn out and will continue to degrade. Eventually, within a few days or a few more starts, the brushes will wear down so far that no amount of tapping or hitting with a screwdriver will ever make an electrical connection again, leaving you completely stranded.
Should I apply grease to the teeth of my new starter gear?
No, you should never apply grease, oil, or any heavy lubricants to the metal teeth of the starter pinion gear or the engine flywheel. While it might seem like a good idea to lubricate moving gears, the starter housing is a dry environment. If you put grease on the gear teeth, that sticky grease will quickly act like a magnet for road dirt, fine sand, clutch dust, and metallic debris. This debris will mix with the grease to form an abrasive, gritty paste that will rapidly grind down and destroy the teeth on both your new starter and your highly expensive engine flywheel.
What is a starter shim and do I need to use one?
A starter shim is a very thin, flat metal plate that is placed between the starter mounting surface and the engine block on certain older vehicles, particularly older domestic models. Shims are used to slightly adjust the physical distance between the small starter pinion gear and the giant engine flywheel so the teeth mesh together perfectly. Most modern vehicles do not use starter shims because modern manufacturing allows for incredibly precise fits. When you remove your old starter, look closely to see if a thin metal spacer drops out with it. If your car had a shim installed from the factory, you must clean it off and reinstall it in the exact same position with your new starter to prevent gear grinding.