Imagine you are driving down a quiet road on a beautiful afternoon. The sun is shining, your favorite music is playing, and everything feels perfect. Suddenly, you feel a strange vibration in your hands. The steering wheel starts to wiggle back and forth like it has a mind of its own. When you try to steer around a slight curve, the vehicle feels loose, almost as if it is floating on ice. You turn the wheel, but there is a slight delay before the front wheels actually respond. When you hit a small bump, a loud clunking noise echoes from underneath the front end.
If this sounds familiar, your vehicle might be trying to tell you something important. Beneath the metal body and beautiful paint of your car lies a complex network of parts working together to keep you safe and in control. Among the most critical parts of this system are the inner and outer tie rod ends. These small but mighty components connect your steering gear to your front wheels. When they wear out, your safety is compromised.
Replacing worn steering components might seem like a job reserved only for master mechanics with years of training, but anyone can learn how the system works. By understanding how to check these parts and how to swap them out when they fail, you can save money, keep your vehicle running smoothly, and ensure your time on the road is completely secure. Let us dive deep into the world of automotive steering and discover how to tackle this project from start to finish.
Understanding Your Vehicle Steering System
Before you grab your toolbox and crawl under your vehicle, it helps to understand exactly what you are looking at. Your vehicle does not turn its wheels by magic. It relies on a mechanical system that translates the twisting motion of your steering wheel into a side-to-side movement at the tires.
The Rack and Pinion Setup
Most modern vehicles use a setup called a rack-and-pinion steering system. Think of the steering rack as a long metal housing mounted horizontally between the two front wheels. Inside this housing is a metal bar with teeth cut into it, known as the rack. At the end of your steering column, which extends down from your steering wheel, is a small gear called the pinion.
When you turn your steering wheel, the pinion gear spins. Its teeth mesh with the teeth on the steering rack, pushing the rack either to the left or to the right. This side-to-side motion is what ultimately forces your front wheels to turn, allowing you to navigate corners, change lanes, and park your vehicle.
The Role of Tie Rods
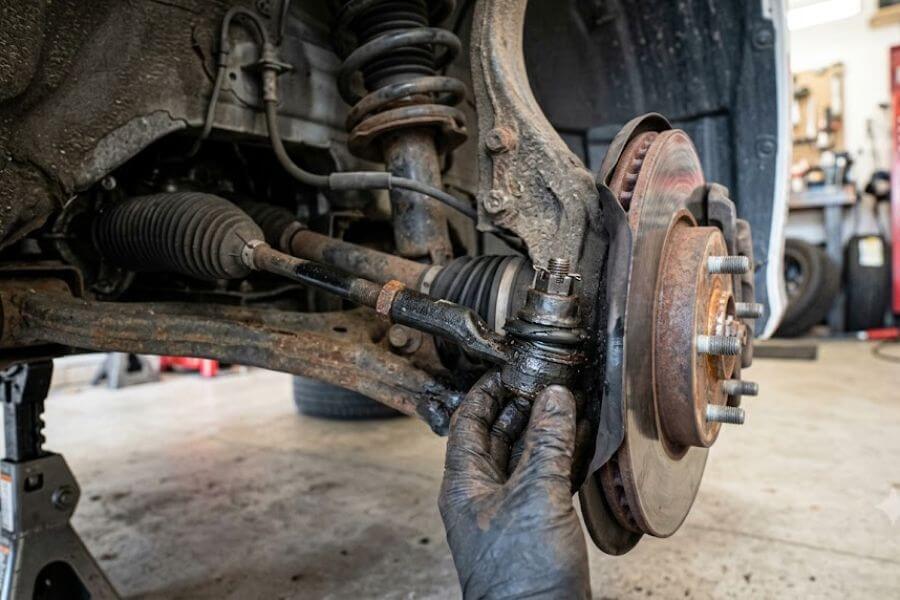
The steering rack itself does not reach all the way to the wheels. It needs a bridge to connect the moving rack to the steering knuckles, which hold your wheels and tires. This bridge is where tie rods come into play. Every vehicle has two tie rod assemblies, one for the driver side and one for the passenger side.
Each assembly is split into two distinct parts: the inner tie rod and the outer tie rod. Together, they act like a human arm. The inner tie rod is like your shoulder, connecting directly to the main body of the steering rack. The outer tie rod is like your wrist, connecting to the steering knuckle near the wheel. They work together to transfer the horizontal push or pull from the steering rack directly to the wheel assemblies, allowing for precise steering control.
Inner vs Outer Tie Rod Ends
While they work toward the same goal, inner and outer tie rod ends look and function quite differently.
The inner tie rod end is hidden away from view. It connects directly to the end of the steering rack and is protected by a flexible rubber boot called a steering rack bellows boot. This boot keeps dirt, water, and debris away from the polished metal surfaces. The inner tie rod end features a ball-and-socket joint that allows the rod to pivot up and down and side to side as your vehicle drives over bumps and the suspension moves.
The outer tie rod end is highly visible when you take a front wheel off. It screws onto the outer end of the inner tie rod and connects directly to the steering knuckle. It also features a heavy-duty ball-and-socket joint, which is protected by a small rubber grease boot. Because it sits right next to the wheel, the outer tie rod end is exposed to harsh weather, road salt, rain, and debris. It takes a lot of abuse, which is why it usually wears out much faster than the inner tie rod end.
| Component | Location | Protection | Main Job | Wear Rate |
| Inner Tie Rod End | Attached to the steering rack | Large rubber bellows boot | Pivots with suspension movement | Slower wear rate |
| Outer Tie Rod End | Attached to the steering knuckle | Small rubber grease boot | Connects steering to the wheel | Faster wear rate |
Why Tie Rod Ends Wear Out Over Time
Like any mechanical part that moves constantly, tie rod ends have a limited lifespan. Every single time you turn your steering wheel, drive over a speed bump, pothole, or gravel road, these joints are absorbing massive amounts of force. Understanding why they fail can help you spot the warning signs before a total failure occurs.
Loss of Lubrication
The secret to a long-lasting ball-and-socket joint is lubrication. Inside the metal housing of a tie rod end, the metal ball is surrounded by specialized grease that allows it to pivot smoothly without creating friction. Over time, the rubber boots that protect these joints can crack, tear, or degrade.
Once a boot develops even a tiny rip, two bad things happen. First, the essential grease escapes, leaving the metal-on-metal components to grind directly against each other. Second, water, dirt, and road grit enter the joint. This mixture acts like liquid sandpaper, quickly scratching the smooth metal ball and wearing away the socket. Once the socket stretches out, the joint becomes loose, creating play in your steering.
Constant Road Impacts
Your suspension and steering systems are on the front lines of defense against bad roads. Every pothole you hit, every curb you accidentally scrape, and every railroad track you cross sends a massive shockwave through your front wheels.
These shockwaves travel directly through the outer tie rod end and into the inner tie rod end. Over thousands of miles, these repetitive impacts cause the metal components to fatigue and wear down. If you regularly drive on rough dirt roads or live in an area with poorly maintained city streets, your tie rod ends will experience significantly more stress and wear out much sooner than a vehicle driven mostly on smooth highways.
Age and General Fatigue
Even if you are the most careful driver in the world and avoid every single pothole, time always wins. The rubber boots will naturally dry out and crack due to age and temperature swings. The internal components will gradually wear down simply from the millions of small steering corrections you make during normal driving. Most factory tie rod ends are designed to last anywhere from eighty thousand to one hundred thousand miles, but this can vary wildly based on your driving habits and environmental conditions.
Top Symptoms of Worn Tie Rod Ends
When your tie rod ends start to fail, your vehicle will give you several clear warning signs. Recognizing these symptoms early is crucial. Ignoring them can lead to a complete loss of steering control, which is an incredibly dangerous situation at any speed. Here are the most common signs that your tie rod ends need to be replaced.
A Loose or Wandering Steering Wheel
One of the very first things you will notice when a tie rod end goes bad is a change in how your steering wheel feels. When the ball-and-socket joints are tight and healthy, your steering wheel feels responsive. The moment you move the wheel a fraction of an inch, your vehicle begins to turn.
When a tie rod end is worn out, a gap develops inside the ball-and-socket joint. This gap creates what mechanics call play. When you turn your steering wheel, you might be able to move it an inch or two in either direction before the wheels actually start to turn. This makes the vehicle feel loose or disconnected from the road. You might also notice your vehicle wandering or drifting to the left or right on a straight highway, requiring you to constantly make small steering corrections to stay in your lane.
Unusual Noises From the Front End
Cars speak to us through the noises they make. If your tie rod ends are failing, you will likely hear them complaining, especially when driving at low speeds or turning into a parking spot.
The most common noise is a metallic clunking, popping, or knocking sound. This happens because the loose ball inside the tie rod end socket is bouncing around and hitting the walls of the housing whenever the weight of the vehicle shifts. You will notice this sound most when driving over small bumps, going up a driveway ramp, or turning the steering wheel while parked. If the joint is completely dry of grease but not yet totally loose, it may produce a loud squeaking or groaning sound whenever you turn.
Uneven or Rapid Tire Wear
Your vehicle steering and suspension systems rely on perfect alignment to keep your tires flat against the road. The angle at which your front tires point toward or away from each other is known as the toe alignment. Tie rod ends are the specific parts used to set and lock this toe alignment.
When a tie rod end wears out and becomes loose, it allows the front wheel to wobble slightly outward or inward while you drive. This ruins your alignment. As a result, your tires will scrape sideways along the pavement instead of rolling smoothly. This leads to a specific type of tire wear known as feathering, where one side of the tire tread blocks feels smooth when rubbed one way but sharp when rubbed the other way. You might also notice the inner or outer edges of your front tires wearing down to bald metal threads much faster than the rest of the tire.
Shaking or Vibrating Steering Wheel
As the wear inside the tie rod joint becomes more severe, the loose wheel will begin to vibrate at certain speeds. This vibration is often felt directly through your hands on the steering wheel.
Typically, this shaking gets worse as you accelerate. It often becomes highly noticeable at highway speeds, around fifty-five to sixty-five miles per hour. Unlike a tire that is out of balance, which usually creates a steady, rhythmic shake, a tie rod vibration can feel erratic and may worsen when you gently sweep through a long curve on the highway or hit a small bump in the road.
How to Inspect Your Tie Rod Ends
You do not have to guess whether your tie rod ends are bad. You can perform a couple of simple physical tests right in your driveway to determine their condition with absolute certainty. Here is how to inspect them like a pro.
The Steering Wheel Shake Test
This is a quick diagnostic check that you can perform with the help of a friend. It allows you to watch the steering components in action while they are under load.
- Park your vehicle on a flat, level surface and engage the parking brake.
- Leave the tires on the ground and turn the ignition key to the run position so the steering wheel is unlocked, but do not start the engine.
- Have your friend sit in the driver seat and rapidly rock the steering wheel back and forth from the nine o’clock position to the three o’clock position. They should only move the wheel a few inches in each direction.
- Crouch down in front of the vehicle and look underneath at the steering components. You can also shine a flashlight on the outer tie rod ends behind the front wheels.
- Watch closely for any delayed movement. If the steering column and rack are moving, but the outer tie rod end is wiggling up and down or clicking before it moves the wheel knuckle, the joint is worn out.
The Jacked-Up Wheel Wiggle Test
This is the most definitive test for checking tie rod health. By lifting the front wheels off the ground, you remove the weight of the vehicle from the joints, allowing you to easily feel any internal slack or play.
- Loosen the lug nuts on your front wheels just a quarter-turn while the vehicle is on the ground, but do not remove them.
- Use a heavy-duty floor jack to lift the front end of your vehicle safely into the air.
- Place sturdy jack stands under the designated frame lift points to support the weight of the vehicle. Never rely solely on a hydraulic jack to hold a vehicle up while you work underneath it.
- Chock the rear wheels to prevent the vehicle from rolling backward or forward.
- Go to one of the front wheels and place your hands at the nine o’clock and three o’clock positions on the tire.
- Gently but firmly push and pull the wheel back and forth in an alternating motion. You are simulating a turning motion here.
- If you feel a distinct clicking, skipping, or mechanical play before the steering wheel inside the car moves, you have a loose component.
- To pinpoint whether it is the inner or outer joint, look behind the wheel while wiggling the tire with your hands. If the outer tie rod end bounces or shifts on its stud, it is bad. If the whole tie rod shaft moves in and out of the rubber bellows boot with a clunking sensation, the inner tie rod end is the culprit.
- For comparison, place your hands at the twelve o’clock and six o’clock positions on the tire and wiggle it. Play in this direction usually points to a bad wheel bearing or control arm bushing rather than a tie rod end.
Visual Inspection of the Boots
While you have the vehicle lifted, take a close look at the protective rubber boots on both the inner and outer tie rod ends.
If you see that the rubber boot on an outer tie rod is torn wide open, leaking dark grease all over the braking components, it is a ticking time bomb. Even if it does not feel incredibly loose yet during the wiggle test, it will fail very soon because dirt and moisture are actively destroying it. Check the large inner bellows boot as well. If it is ripped, cracked, or filled with power steering fluid, it needs immediate attention.
Essential Tools and Safety Equipment
If your inspection reveals that your tie rod ends are indeed worn out, it is time to gather your gear. Having the proper tools on hand before you start will prevent frustration and ensure the job goes smoothly.
Required Tools
- Floor jack and jack stands: Essential for lifting and supporting your vehicle safely.
- Lug wrench or impact wrench: To remove the front wheels.
- Socket set and ratchet: You will need standard and metric sizes to remove various bolts.
- Open-end wrench set: Crucial for holding the inner tie rod shaft and loosening the jam nuts.
- Needle-nose pliers: To remove the cotter pins from the outer tie rod castle nuts.
- Torque wrench: To ensure all nuts are tightened to the exact manufacturer specifications.
- Tie rod end separator or pickle fork: This tool helps pop the tightly wedged outer tie rod stud out of the steering knuckle.
- Inner tie rod tool kit: A specialized set of long tubes and crowfoot adapters that slide over the inner tie rod shaft to unscrew it from the steering rack. Many auto parts stores will rent this tool to you for free.
- Tape measure or digital calipers: Used to measure the length of your old tie rod setup so you can install the new one with a reasonably close alignment.
- Paint pen or masking tape: For marking the exact thread positions.
Safety Gear
- Safety glasses: Vital for protecting your eyes from falling dirt, rust flakes, and grease while looking up from under the vehicle.
- Mechanic gloves: Protects your hands from painful scrapes, sharp metal edges, and chemical exposure from grease and fluids.
- Wheel chocks: Placed behind the rear tires to guarantee the vehicle cannot roll off the jack stands.
Step-by-Step Guide: Replacing the Outer Tie Rod End
Replacing the outer tie rod end is generally straightforward because the part is highly accessible. Follow these steps carefully to ensure a successful installation.
Step 1: Raise the Vehicle and Remove the Wheel
Safety is always the number one priority. Park on flat ground, apply the parking brake, and place chocks behind the rear tires. Loosen the front lug nuts slightly, jack up the front of the vehicle, and place it securely on jack stands. Once the vehicle is stable, remove the lug nuts completely and take the front wheel off. Place the wheel flat on the ground under the frame rail next to your jack stand as an extra safety barrier.
Step 2: Clean the Threads and Apply Penetrating Oil
Steering components are exposed to rain, salt, and mud, meaning they are often coated in rust. Take a wire brush and vigorously scrub the threads of the outer tie rod jam nut and the mounting stud on the steering knuckle. Once the loose rust is gone, spray a generous amount of high-quality penetrating oil onto all the threaded connections. Let it soak for ten to fifteen minutes to dissolve the rust and make removal much easier.
Step 3: Measure and Mark the Threads
Before you loosen anything, you must take careful measurements. If you install the new outer tie rod without checking the position of the old one, your wheel alignment will be completely ruined, making the vehicle undrivable.
Use a tape measure to measure the exact distance from a fixed point on the inner tie rod shaft, like a flat spot or a notch, to the center of the grease grease zerk or stud on the outer tie rod end. Write this number down carefully. Next, count the number of exposed threads on the inner tie rod shaft behind the jam nut. Alternatively, wrap a piece of masking tape tightly around the inner tie rod shaft right against the jam nut, or mark it with a bright paint pen. This gives you a clear visual guide for where the new part needs to stop.
Step 4: Loosen the Jam Nut
The jam nut is a large nut that screws onto the inner tie rod shaft and presses tightly against the back of the outer tie rod end, locking it in place so it cannot spin.
To loosen it, place an open-end wrench on the flat spot of the inner tie rod shaft to hold it steady. Place a second wrench on the jam nut. Turn the jam nut clockwise (when looking from the wheel toward the center of the car) to back it away from the outer tie rod end. You only need to crack it loose and back it away by a quarter-turn or half-turn. Do not spin it far down the shaft, as it serves as your position marker.
Step 5: Remove the Castle Nut Cotter Pin
Look at the top or bottom of the outer tie rod stud where it passes through the steering knuckle. It is held in place by a castle nut, which has slots cut into its top rim like the towers of a castle. A metal cotter pin passes through these slots and a hole in the stud to prevent the nut from backing off.
Use your needle-nose pliers to straighten out the bent legs of the cotter pin. Once straight, grasp the head of the pin and pull it completely out of the stud. Always discard old cotter pins, as they are single-use items that degrade when bent. New tie rod ends will always include a fresh cotter pin in the box.
Step 6: Remove the Castle Nut
Select the correct size socket and place it over the castle nut. Turn it counterclockwise to loosen and remove it. If the entire stud starts spinning inside the tie rod joint while you try to loosen the nut, use a floor jack to gently lift up on the bottom of the tie rod joint. This forces the tapered stud tightly into the steering knuckle, locking it in place so you can unscrew the nut completely.
Step 7: Separate the Tie Rod from the Knuckle
Even with the nut removed, the outer tie rod stud will remain stuck in the steering knuckle. This is because the stud and the hole in the knuckle are tapered, creating an incredibly tight mechanical press-fit. Never strike the threaded end of the stud directly with a metal hammer if you plan to reuse any parts, as this will mushroom the metal.
The best method is to use a dedicated tie rod separator tool. Slide the jaw of the separator between the steering knuckle and the tie rod boot, then tighten the tool bolt with a socket. This applies steady downward pressure on the stud until it pops free with a loud bang.
If you do not have a separator, you can use a heavy hammer. Strike the solid metal side of the steering knuckle boss right where the stud passes through. The intense vibration from a few sharp hammer blows will momentarily distort the tapered hole, causing the tie rod stud to pop out easily.
Step 8: Unscrew the Old Outer Tie Rod End
With the stud free from the knuckle, lift the outer tie rod end up. Carefully spin the entire outer tie rod unit counterclockwise to unscrew it from the inner tie rod shaft.
As you turn it, count every single full rotation until it comes off completely. Write this number down next to your measurements. For example, if it takes exactly nineteen and a half full turns to remove it, you know your new part will need to be screwed on by that exact same amount.
Step 9: Install the New Outer Tie Rod End
Take your new outer tie rod end and compare it side-by-side with the old one. Make sure they are the exact same total length and have the same thread pattern.
Screw the new outer tie rod end onto the inner shaft clockwise, counting the exact number of full rotations you recorded during removal. Stop when you hit that magic number or when the back of the outer tie rod touches your tape marker or jam nut.
Step 10: Connect to the Knuckle and Torque the Nut
Insert the tapered stud of the new outer tie rod end through the hole in the steering knuckle. Thread the new castle nut onto the stud by hand to ensure it does not cross-thread.
Grab your torque wrench and look up the specific torque specification for your vehicle year, make, and model. Tighten the castle nut to that exact specification. Tightening it correctly is vital. If it is too loose, it can vibrate off, and if it is too tight, it can snap the metal stud.
Step 11: Install the New Cotter Pin
Once the nut is torqued, look through the slots in the castle nut to locate the hole drilled through the stud. If the hole does not line up with a slot, tighten the nut just a tiny bit further until the next slot aligns perfectly with the hole. Never loosen or back off a castle nut to align the cotter pin hole.
Slide the new cotter pin through the hole. Use your pliers to bend the legs of the pin firmly around the outside of the nut in opposite directions. This mechanically locks the nut so it can never spin off while driving.
Step 12: Tighten the Jam Nut
Hold the flat spot on the inner tie rod shaft steady with one wrench, and use a second wrench to tighten the jam nut counterclockwise firmly against the back of the new outer tie rod end. Lock it down tight to ensure your steering alignment settings stay completely secure.
Step-by-Step Guide: Replacing the Inner Tie Rod End
If your inspection showed that the inner tie rod end is also loose, you will need to dig a little deeper. Since you already know how to remove the outer tie rod end, you are halfway there. Here is how to complete the inner tie rod replacement.
Step 1: Remove the Outer Tie Rod and Jam Nut
Follow the steps from the previous section to remove the outer tie rod end completely. Once it is off, remove the jam nut from the inner tie rod shaft entirely by spinning it counterclockwise off the threads. Keep it safe, or prepare your new one if your replacement kit included a fresh nut.
Step 2: Remove the Steering Bellows Boot Clamps
The inner tie rod end is completely protected by the flexible rubber bellows boot. To remove this boot, you must release the two clamps holding it in place.
The outer clamp, located on the small end of the boot around the inner tie rod shaft, is usually a simple spring clamp that you can pinch with pliers and slide off. The inner clamp, located on the large end of the boot where it attaches to the thick metal steering rack housing, is often a heavy-duty single-use metal crimp clamp or a plastic zip tie. Use a flathead screwdriver to pry open the metal crimp clamp, or use side-cutters to carefully snip the plastic zip tie. Be very careful not to cut or puncture the rubber boot itself.
Step 3: Slide Off the Bellows Boot
With both clamps removed, grasp the rubber boot and pull it outward along the inner tie rod shaft. It might be stuck to the metal due to dirt and heat, so give it a gentle twist to break the seal. Slide it completely off the shaft and set it aside.
Take a moment to inspect the inside of the boot. If it is full of oily, liquid power steering fluid, your steering rack internal seals are blown, and the entire steering rack assembly will eventually need to be replaced. If it is dry and just dirty on the outside, wipe it clean and prepare to reuse it.
Step 4: Remove the Inner Tie Rod Lock Washer
Look closely at the joint where the inner tie rod connects to the steering rack. Many manufacturers install a thin metal lock washer over the flat spots of the inner tie rod housing. The outer edges of this washer are bent or hammered over the flats to act as a mechanical lock, preventing the inner tie rod from unscrewing itself.
Use a hammer and a long flathead screwdriver or a small chisel to carefully bend these metal tabs back flat so they no longer grip the flat sides of the tie rod housing.
Step 5: Use the Inner Tie Rod Tool to Unscrew the Joint
Because the inner tie rod joint sits deep inside the wheel well chassis area, there is usually no room to get a standard wrench or socket onto it. This is where the specialized inner tie rod tool kit is required.
Find the correct size crowfoot adapter ring from the tool kit that fits perfectly over the flat spots of your inner tie rod housing. Slide the adapter ring onto the joint. Next, take the long metal tube from the kit and slide it completely over the long inner tie rod shaft until the slots on the end of the tube lock onto the adapter ring. Attach a long breaker bar or a half-inch ratchet to the outer end of the tube. Turn the tool counterclockwise to break the inner tie rod loose, then unscrew it completely from the steering rack.
Step 6: Install the New Inner Tie Rod End
Clean out any old grease or debris from the threaded hole on the steering rack using a clean lint-free cloth. Take your new inner tie rod end and slide the new lock washer onto it, if one was provided in the kit.
Apply a small drop of medium-strength blue thread-locking compound to the male threads of the new inner tie rod end for extra security. Thread the new inner tie rod into the steering rack by hand to ensure the threads catch smoothly without cross-threading.
Step 7: Torque the New Inner Tie Rod
Slide your inner tie rod tool back over the shaft and lock it onto the flats of the new joint. Use your torque wrench to tighten the inner tie rod end to the exact factory torque specification.
Once it is torqued down, remove the tool. Use a hammer and a punch to bend the tabs of the new lock washer firmly over the flat spots of the new tie rod housing, locking it in place permanently.
Step 8: Reinstall the Bellows Boot and Clamps
Apply a thin layer of clean lithium or silicone grease to the smooth section of the inner tie rod shaft where the small end of the rubber boot will sit. This allows the boot to slide easily and prevents it from twisting when you get an alignment done later.
Slide the rubber bellows boot back over the shaft and push it firmly onto the steering rack housing until it snaps back into its original groove. Install a new heavy-duty zip tie or a new metal clamp onto the large inner end of the boot, pulling it completely tight to seal out water and dirt. Slide the small outer spring clamp back into place on the outer end of the boot.
Step 9: Reinstall the Jam Nut and Outer Tie Rod
Thread your jam nut back onto the new inner tie rod shaft, running it down close to where your original marks were.
Now, screw your outer tie rod end back onto the shaft, counting the exact number of turns you recorded originally. Connect the outer tie rod to the steering knuckle, torque the castle nut, install a fresh cotter pin, and lock down the jam nut firmly.
| Action Item | Crucial Checking Point | Expected Outcome |
| Measurement Check | Tape measure distance & thread count | Matches original factory geometry as close as possible |
| Torque Check | Castle nut & inner joint housing | Tightened to exact foot-pounds via torque wrench |
| Safety Lock Check | New cotter pin & bent lock washer tabs | Mechanical security against loosening |
| Boot Seal Check | Bellows boot & outer grease boot | Completely sealed with clamps, zero tears |
Post-Installation Steps and Alignment
Congratulations, you have successfully swapped out your worn-out tie rod ends. However, your job is not quite done yet. There are a few critical steps you must take before you can safely take your vehicle out for a normal drive.
Put the Wheel Back On and Lower the Vehicle
Lift your wheel back onto the wheel hub and thread the lug nuts on by hand. Use your lug wrench to snug the nuts down in a star pattern so the wheel sits perfectly flat against the brake rotor face.
Bring your floor jack under the lift points, lift the vehicle off the jack stands, and carefully remove the stands. Lower the vehicle slowly until the tires touch the ground. Take your torque wrench and torque the lug nuts in a star pattern to your vehicle specific wheel torque rating, which is typically between eighty and one hundred foot-pounds for most cars and small SUVs.
Perform a Final Visual and Physical Clearance Test
With the vehicle back on its own weight, turn the steering wheel all the way to the left and all the way to the right.
Listen carefully for any binding, rubbing, or unusual noises. Look underneath the wheel wells to ensure the rubber bellows boots are not twisting or stretching excessively and that the outer tie rod ends have plenty of clearance from braking lines and suspension links.
Go for an Immediate Professional Wheel Alignment
This is the most critical post-installation requirement. Even if you were incredibly meticulous with your tape measurements, paint marks, and thread counts, your alignment will still be slightly off. Even a tiny fraction of a millimeter difference in tie rod length can drastically alter your vehicle toe alignment.
If you drive around without getting a professional alignment, you will quickly ruin your front tires, causing them to wear out completely in just a few hundred miles. The vehicle steering might also feel twitchy, or your steering wheel might sit crooked when you are driving straight down the road. Drive your vehicle slowly and directly to a reputable local alignment shop immediately after completing this repair. They will use laser alignment machines to adjust the tie rods to factory perfection.
Frequently Asked Questions
Can I replace just one tie rod end, or should I replace them all at the same time?
You can technically replace just a single worn out tie rod end if the others are completely tight and healthy. However, it is highly recommended to replace them in pairs. If the driver side outer tie rod end has worn out from miles of driving, the passenger side outer tie rod end has experienced the exact same road conditions and is likely very close to failing too. Replacing them together saves you time and money because you only have to pay for a single wheel alignment afterward.
Is it safe to drive with a loose or worn tie rod end?
No, it is absolutely not safe to drive with a worn tie rod end. A loose tie rod end creates unpredictable steering behavior, compromises your ability to handle emergencies, and accelerates tire wear. If the joint wears out completely while you are driving, the ball will pop out of its socket. When this happens, the wheel will completely detach from the steering system, flopping outward. You will lose all steering control of that wheel, which can lead to a catastrophic accident.
How can I tell the difference between a bad tie rod end and a bad ball joint?
While both parts use a ball-and-socket design and can cause front-end clunking, they fail in different directions. A tie rod end controls horizontal steering motion, so it shows play when you wiggle the tire side-to-side at the nine o’clock and three o’clock positions. A lower or upper ball joint connects the wheel knuckle to the control arms vertically, absorbing vertical suspension loads. You check for a bad ball joint by wiggling the tire up-and-down at the twelve o’clock and six o’clock positions or by prying up on the tire with a pry bar while watching for vertical movement.
Why is my steering wheel crooked after installing new tie rod ends?
If your steering wheel is off-center when you are driving straight, it means your toe alignment is uneven between the left and right sides. During installation, one tie rod may have been screwed on slightly further than the other, pushing one wheel outward and pulling the other inward. To fix this, a professional alignment technician will lock your steering wheel perfectly straight in the shop and then turn the inner tie rod shafts on both sides until the tires are perfectly straight and parallel.
Do I need to grease my new tie rod ends after installing them?
It depends on the specific type of tie rod end you purchased. Many factory replacement parts are sealed from the factory, meaning they are pre-lubricated with grease and do not have any openings. You simply install them and drive. However, many heavy-duty aftermarket tie rod ends come with a grease zerk fitting that screws into the top or bottom of the housing. If your new part has a grease zerk, you must use a grease gun to pump high-quality automotive chassis grease into the joint until the rubber boot expands slightly.