Your car is your ticket to freedom. It gets you to school, takes you to your job, and brings you to your friends’ houses on the weekend. But underneath that shiny hood, thousands of parts are working together to make that happen. One of the most important pieces of your car is the transmission. It is the powerhouse that takes the energy from your engine and sends it to your wheels. Inside that transmission is a special liquid called automatic transmission fluid. Over time, this fluid gets dirty, filled with tiny bits of metal, and loses its power to protect your car.
Many people think you need a massive, expensive machine at a repair shop to fix this. That is a myth. You can change your automatic transmission fluid and your filter right in your own driveway with basic tools. Taking care of this yourself saves you money, teaches you how your car works, and keeps your ride running smooth for years. Let us dive into how you can give your car a fresh start.
The Secret Life of Automatic Transmission Fluid
Before you grab a wrench, you need to understand what this liquid actually does. Automatic transmission fluid is not like regular engine oil. It has a massive checklist of jobs it must perform every single second your engine is running.
First, it acts as a hydraulic fluid. This means it uses pressure to shift the gears for you. When you put your car in drive, the fluid pushes against internal components to change gears automatically. Second, it acts as a coolant. Your transmission creates a massive amount of heat through friction. The fluid absorbs that heat and carries it away so your parts do not melt. Third, it lubricates everything. There are hundreds of moving metal teeth, clutches, and bearings inside that box. Without fluid, they would grind themselves into dust within a few minutes.
When transmission fluid is brand new, it is usually a bright, clear red color. It smells slightly sweet or like clean oil. As you drive thousands of miles, the fluid faces extreme heat. It starts to cook. It also picks up microscopic debris from the clutches wearing down inside the transmission. Slowly, that beautiful red liquid turns into a dark brown or jet-black sludge. It loses its ability to transfer pressure, it fails to cool the system, and it stops protecting the metal. If you leave that dirty fluid in there too long, your transmission will start to slip, hesitate when you step on the gas, or completely break down.
Gathering Your Tools and Supplies for the Big Day
You cannot build a house without a hammer, and you cannot fix a car without the right gear. Preparing your workspace ahead of time prevents you from getting stuck halfway through the job with an empty transmission and no way to get to the auto parts store.
Here is a breakdown of the specific items you must gather before you turn a single bolt.
Safety Gear First
Never work on a vehicle without protecting your body. You need high-quality safety glasses to shield your eyes from dripping fluid. Transmission fluid tastes terrible and stings badly if it gets in your eyes. You also want a good set of nitrile gloves. These keep your hands clean and protect your skin from chemicals. Keep an old stack of rags or a roll of heavy-duty paper towels nearby because things will get messy.
The Right Tools for the Fasteners
You will need a socket set with a ratchet. Most transmission pan bolts are relatively small, usually ranging from eight millimeters to thirteen millimeters. A socket with an extension bar will help you reach the bolts hidden behind exhaust pipes or frame rails. You might also need a flathead screwdriver or a small pry tool to help gently nudge the old filter out of its socket.
Raising the Vehicle Safely
You need enough space to crawl completely under your car. A heavy-duty hydraulic floor jack is necessary to lift the vehicle up. However, you must never, ever rely on a hydraulic jack to hold the car while you are underneath it. Jacks can fail instantly. You must use a pair of sturdy jack stands to support the weight of the vehicle. To keep the car from rolling while you lift it, place plastic or wooden wheel chocks behind the tires that remain on the ground.
Catching and Pouring the Liquid
You will need a large, wide drain pan to catch the old fluid. A pan that holds at least two gallons of liquid is perfect. Because you will be dropping a wide metal pan full of oil, a wider drain pan prevents splashes on your driveway. You also need a long, skinny funnel. The dipstick tube where you refill the fluid is narrow and buried deep in the engine bay, so a standard kitchen funnel will not reach.
The Replacement Parts
You must buy the exact automatic transmission fluid specified by your vehicle manufacturer. Look in your owner’s manual. It might say something like Dexron, Mercon, or ATF-Plus-Four. Do not guess. Using the wrong fluid can destroy your transmission within a few miles. You also need a new transmission filter kit. This kit almost always comes with the replacement filter and a brand-new rubber or cork gasket for the pan.
Here is a quick summary table of the items you need to check off your list before beginning.
| Item Type | Specific Tool or Part | Purpose of the Item |
| Safety | Glasses and Nitrile Gloves | Protects eyes and skin from chemical burns |
| Lifting | Floor Jack and Jack Stands | Lifts and safely holds the car off the ground |
| Hand Tools | Socket Set and Ratchet | Removes the small bolts holding the oil pan |
| Clean Up | Wide Drain Pan and Rags | Catches the old oil and cleans up accidental spills |
| Refilling | Long Skinny Funnel | Reaches the deep fluid fill tube under the hood |
| Replacements | OEM Fluid and Filter Kit | Replaces the dirty components with fresh ones |
Preparing Your Workspace and the Vehicle
Now that your tools are sitting on the driveway, it is time to get the car ready. Safety is the absolute most important part of any automotive project. If you do not set up correctly, you risk damaging your vehicle or getting seriously hurt.
Start by parking your vehicle on a completely flat, solid concrete surface. Do not try to do this job on a slope, on gravel, or on dirt. Dirt allows jack stands to sink into the ground, which makes the vehicle unstable. Put the car in park and set the emergency parking brake as tightly as it will go. Go to the back of the car and place your wheel chocks tightly behind the rear tires. This ensures the car cannot roll backward while you raise the front end.
Before you lift the vehicle, think about the temperature of the fluid. If you just drove the car for three hours on the highway, the transmission fluid will be burning hot, reaching temperatures over two hundred degrees. It will blister your skin instantly if it splashes on you. On the flip side, if the car has been sitting in freezing weather for days, the fluid will be thick like molasses and will take hours to drain out. The sweet spot is a lukewarm temperature. If the car is cold, start it up and let it idle for about five minutes, then turn it off. This warms the fluid slightly so it flows freely but remains safe to touch.
Pop the hood of your car and locate the transmission dipstick. It is usually bright red or yellow and sits closer to the windshield than the engine oil dipstick. Pull it out slightly to break the vacuum seal. This helps the fluid drain out much smoother when you open things up from underneath, similar to how putting a hole in the top of a juice can helps it pour better.
Now, take your hydraulic floor jack and slide it under the approved lifting point at the front of your car. Check your manual to find this spot so you do not accidentally crush your oil pan or a plastic bumper. Slowly pump the jack until the front wheels leave the ground. Slide your jack stands under the solid metal frame rails of the vehicle. Slowly lower the hydraulic jack until the full weight of the car is resting securely on the stands. Shake the bumper of the car firmly. If the car rocks or feels loose, lift it back up and adjust your stands. It must be solid as a rock before you crawl underneath.
The Art of the Controlled Mess: Dropping the Pan
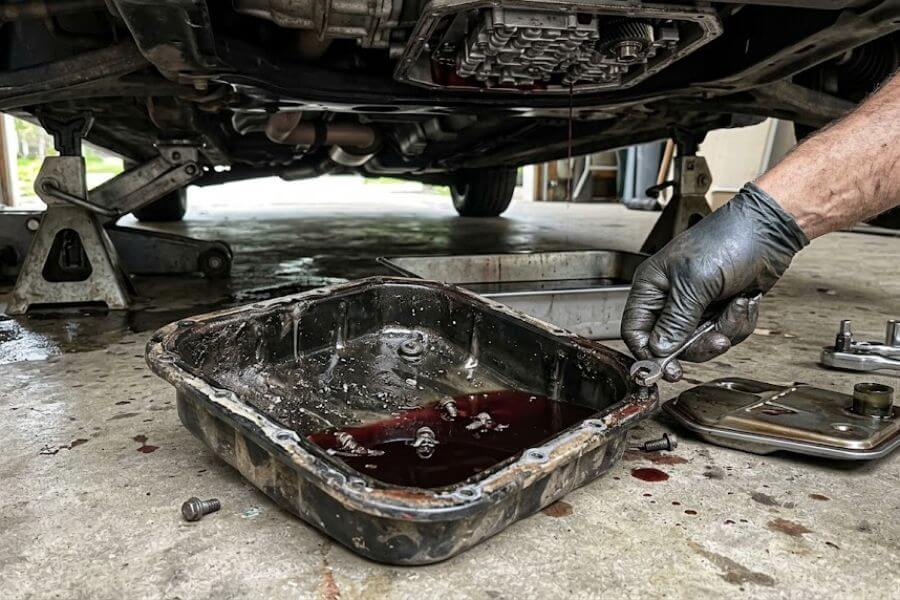
Crawl under the vehicle with your safety glasses on, your gloves tight, your socket wrench, and your wide drain pan. Look upward and locate the transmission pan. It looks like a flat, rectangular metal dish held to the bottom of the transmission by a dozen or more small bolts.
Many modern vehicles do not have a drain plug on the transmission pan. If your car has a drain plug, count yourself incredibly lucky. You can simply unbolt the plug, let the fluid drain into your pan, and then remove the metal dish. However, most manufacturers omit this plug. This means you have to perform what mechanics call the controlled tilt method to remove the fluid without creating a tidal wave of oil on your floor.
Position your wide drain pan directly underneath the transmission pan. Pick a side of the pan that you want to be the low point where the fluid will pour out first. Let us say you choose the back edge of the pan. Take your socket wrench and begin loosening the bolts. Do not remove them completely yet. Back them out about halfway.
Now, move to the front edge and the sides of the pan. Remove these bolts completely and place them safely in a small cup or magnetic tray so they do not roll away into the grass. As you remove the side bolts, move toward the back. Leave the last two or three bolts on the rear edge in place, but loosened by a few threads.
At this point, the weight of the liquid inside should start to force the front of the pan downward. If the pan stays stuck to the transmission, it is because the old gasket acts like glue. Do not use a sharp screwdriver to pry it open, or you will scratch the soft aluminum mating surfaces, causing a permanent leak. Instead, use a dull putty knife or gently tap the side of the pan with a plastic mallet.
As the seal breaks, the front of the pan will drop down, and a waterfall of old transmission fluid will pour out into your drain pan. Let it stream out until it slows to a tiny drip. Now, support the bottom of the metal pan with one gloved hand while you use your other hand to remove the final remaining rear bolts. Carefully lower the entire pan down to the ground. It will still contain a shallow pool of fluid, so keep it completely level as you slide it out from under the car.
Removing and Inspecting the Old Filter
With the pan out of the way, look straight up into the exposed belly of the transmission. You are looking at the valve body, which looks like a complex metal maze. Attached to the bottom of this maze is the transmission filter. It is usually a flat plastic or metal cartridge with a wide opening on one side.
The filter is responsible for catching all the tiny particles floating through your transmission fluid before they can clog up that complex metal maze. Over time, this filter fills up with junk, restricting the flow of oil.
Most filters are held in place by one or two small bolts, while others are held by simple metal clips. Use your socket wrench to remove any fasteners holding the filter. As you pull the filter straight down, be prepared for a surprise splash of oil. The filter holds a significant amount of fluid inside its body, and pulling it loose will release another small wave of liquid. Keep your drain pan positioned directly underneath.
Look closely at the neck of the old filter when you pull it out. There should be a small rubber ring, known as an O-ring or a seal, on the neck. If that rubber ring is missing from the old filter, it means it is still stuck up inside the transmission bore hole. You must get it out. Take a small plastic pick or a dull tool and gently pull the old rubber seal out of the hole. If you leave it up there and push your new filter into place, you will double-gasket the system. The filter will not seal correctly, it will suck air instead of fluid, and your transmission will starve for oil and destroy itself.
Take a moment to look closely at the old filter and the fluid inside your drain pan. This is your chance to play detective and figure out the health of your vehicle.
- Healthy Fluid: Dark red or light brown oil with no chunky debris means your car is in good shape.
- Burnt Fluid: A heavy, smoky smell like burnt toast paired with black color indicates your clutches are slipping and creating intense heat.
- Metal Flakes: A small amount of microscopic metal dust that looks like glitter in the sun is normal wear and tear. However, if you see large metal chunks, teeth, or silver flakes at the bottom of the pan, your transmission is failing mechanically and will need major professional repairs soon.
Cleaning the Pan and the Magic Magnet
Slide the metal transmission pan over to your clean workspace on the driveway. Look inside the bottom of the pan. You will notice a small, flat, circular magnet sitting there. Car manufacturers intentionally place this magnet inside the pan to catch microscopic steel filings before they can clog your filter.
Your job now is to make this pan clean enough to eat off of. First, peel the old gasket off the rim of the pan. If it is a cork gasket, it might break into tiny pieces and stick to the metal. Use a plastic scraper to carefully clean the flat edge of the rim until it is smooth. Never use a wire wheel or a metal scraper on an aluminum pan, because a single deep scratch creates a channel where oil can escape, leading to a frustrating leak.
Next, take the magnet out of the pan. It will likely be covered in a thick layer of grey, fuzzy metallic paste. Spray the magnet thoroughly with automotive brake cleaner and wipe it down with a clean rag until it looks like shiny black metal again. Set it aside in a safe spot.
Now, spray the entire inside of the transmission pan with brake cleaner. This spray dissolves the stubborn oil sludge instantly. Wipe the pan dry with a lint-free cloth or a heavy-duty paper towel. Do not use cheap paper towels that shed white fuzz, because those tiny fibers will travel straight into your transmission valves and cause issues.
Once the pan is spotless and dry, spray the flat mating surface on the underside of the transmission body with brake cleaner to remove any remaining oil drops. Place your clean, shiny magnet back into its designated spot in the bottom of the pan. It usually sits on a small raised bump or a specific square section stamped into the metal.
Installing the New Filter and Setting the Gasket
Open up your brand-new transmission filter kit. Match the new filter against the old one to ensure they are the exact same shape and size. Take a small drop of fresh transmission fluid on your fingertip and smear it around the new rubber O-ring seal on the neck of the new filter. This lubricates the rubber so it slides into the transmission bore hole easily without tearing or binding.
Push the neck of the new filter straight up into the transmission bore hole. You should feel a firm pop as the rubber seal seats itself correctly. Reinstall the small bolts or clips that you removed earlier to hold the filter in place. Tighten these bolts by hand until they are snug, then give them a very gentle turn with your ratchet. Do not overtighten them, because the housing is made of plastic or soft aluminum and cracks easily.
Now, prepare your new gasket. Transmission gaskets generally come in three styles: rubber, cork, or high-quality reusable plastic with embedded rubber seals.
- Rubber and Cork Gaskets: These require a completely clean, dry surface. Do not use liquid gasket sealants or silicone RTV unless your specific manufacturer guidelines demand it. Applying silicone often causes the gasket to squish out of place when you tighten the bolts, creating a massive gap.
- Keeping It Aligned: To hold a floppy rubber gasket in place while you lift the pan back under the car, insert four of your pan bolts through the corners of the metal pan and press them through the corresponding holes in the gasket. The tight rubber holes will hold the bolts and the gasket perfectly aligned.
Reinstalling the Pan with Precision Torque
Crawl back under your vehicle with your clean pan, the new gasket aligned on top, and your small bolts. Carefully lift the pan up to the bottom of the transmission. Line up your corner bolts with the holes in the transmission body and start spinning them in with your fingers.
Always start every single bolt by hand. The casing of your transmission is made of aluminum, which is a soft metal. If you shove a bolt into a socket wrench and immediately force it in, you run a massive risk of cross-threading the bolt, which ruins the threads inside your expensive transmission. Spin each bolt in by hand until it touches the surface of the pan.
Once all the bolts are started, it is time to tighten them down. You cannot simply start at one corner and go around in a circle. If you do that, you will pinch the gasket on one side, bowing the metal pan upward on the opposite side, which guarantees a massive leak. You must use a star pattern or a crisscross pattern.
Tighten a bolt on the front left corner, then jump to the back right corner. Next, tighten a bolt on the middle right side, then jump to the middle left side. Keep jumping back and forth across the pan like you are drawing a star. This applies equal, level pressure across the entire surface of the gasket, compressing it evenly.
Ideally, you should use an inch-pound torque wrench to tighten these bolts to the exact specification listed in your workshop manual. Transmission pan bolts require a surprisingly small amount of force, usually around eighty to one hundred and twenty inch-pounds, which translates to just eight to ten foot-pounds. If you do not have a torque wrench, use a small quarter-inch drive ratchet. Hold the ratchet close to the head and snug the bolts down until they feel firm. Do not muscle them with a giant wrench, or you will snap the small bolts off clean inside the transmission frame.
Measuring and Pouring the Fresh Fluid
Slide your tools and your old fluid pan out from under the car. You are officially done with the dirty work underneath. Now, you get to focus on refilling the heart of the system.
Before you pour a single drop of new oil down your long funnel, you need to estimate how much fluid you actually removed. When you drop the pan, you do not drain all the fluid in the vehicle. A huge chunk of fluid remains trapped inside the torque converter and the cooling lines. Generally, a pan drop removes about four to six quarts of fluid.
Take an empty, clean container with measurement markings on the side, like an old oil jug, and pour your dirty fluid from your drain pan into it. Measure exactly how much fluid came out. If four and a half quarts of old oil are sitting in your jug, you know that you need to put exactly four and a half quarts of fresh oil back into the machine to return it to the correct starting level.
Insert your long, skinny funnel directly into the transmission dipstick tube in your engine bay. Open your fresh bottles of manufacturer-approved automatic transmission fluid. Pour the fluid down the funnel slowly. Do not rush this step. Transmission fluid is thick, and the dipstick tube is narrow. If you pour too fast, air cannot escape, and a volcano of bright red oil will bubble up out of the tube and spill all over your hot engine components.
Pour in the exact amount you measured from your old fluid. Once you hit that mark, stop. Remove the funnel and slide your transmission dipstick all the way back into the tube until it clicks into place.
The Critical Warm-Up and Fluid Level Adjustment
You cannot simply jump in your car and drive away immediately after filling it. The new fluid is currently sitting in a cold puddle at the bottom of the pan. It needs to be pulled up into the hydraulic pumps, run through the new filter, and pushed into all the tiny passages of the valve body.
Ensure your car is still sitting level on your jack stands, or lower it safely back to the ground using your hydraulic jack if you prefer. Check one last time under the car to ensure no oil is dripping from your freshly installed pan.
Get into the driver’s seat and turn the key. Start the engine and let it idle normally. Do not touch the gas pedal. Let the engine run for about two to three minutes to get the oil pump moving the fresh fluid through the internal pathways.
With your foot pressed firmly down on the brake pedal, move the shift lever out of park and slide it down into reverse. Hold it there for five seconds. You might feel a slight hesitation as the system fills empty air pockets with fluid. Next, shift into neutral for five seconds, then into drive for five seconds. Manually move the shifter through all available gear selections if your car allows it, holding each position for a brief moment. Finally, shift the car all the way back up into park and engage the emergency brake. Leave the engine running.
Transmission fluid expands significantly when it gets hot. Because of this, manufacturers design transmission dipsticks to be read while the engine is running and the oil is fully warmed up to operating temperature.
Leave the engine idling, pop the hood, and pull out the transmission dipstick. Wipe it completely clean with a fresh rag. Slide it all the way back down into the tube for two seconds, then pull it straight back out. Look closely at the tip of the metal blade in the bright sunlight.
You will see two sets of markings stamped into the metal: one labeled “COLD” and one labeled “HOT.” Because you only ran the car for a few minutes, the fluid is likely still cool, so the wet line should sit somewhere within the cold crosshatch marks. If the fluid level is low, insert your funnel and add just a quarter-of-a-quart of fluid at a time. Check the dipstick again. It is incredibly easy to put too much fluid in, but it is highly annoying to get it back out if you overfill the system.
Take your car for a gentle, ten-minute test drive around your neighborhood. Listen carefully for any strange noises and feel how the transmission shifts. It should transition from gear to gear smoothly without lagging or revving up between shifts. When you return to your driveway, leave the engine idling, check the dipstick one final time to ensure it now reads right in the middle of the “HOT” zone, and peek underneath to verify that your new pan gasket is completely bone-dry.
Frequently Asked Questions
Why shouldn’t I use a machine to flush my transmission fluid instead of doing this by hand?
Using a high-pressure flush machine can actually harm an older or high-mileage vehicle. These machines force fluid backward through the transmission system under intense pressure. This violent force can dislodge large chunks of sludge, metal shavings, and debris that were safely stuck in corners. Once freed, these particles travel directly into the ultra-fine passages of your valve body, clogging the tiny fluid channels and ruining your transmission. The manual method described here relies on natural gravity, which gently drains the old oil out without disturbing embedded debris, making it a much safer choice for the long-term health of your car.
Can I change my transmission fluid without replacing the filter at the same time?
While you technically can just change the fluid, it is highly discouraged. Your transmission filter acts like a protective shield for the entire system. Over miles of driving, it traps metal dust, friction material from clutches, and carbon sludge. If you leave a clogged, dirty filter inside and pour fresh fluid over it, the transmission pump will have to work twice as hard to pull fluid through the blocked material. This starves the system of vital pressure and lubrication, which can cause slipping and premature failure. Always change the filter every time you drop the pan.
What should I do if I accidentally put too much transmission fluid into the vehicle?
Overfilling your transmission is dangerous because it causes the rotating internal gears to whip the excess fluid into a thick foam filled with air bubbles. Aerated fluid cannot hold hydraulic pressure, which leads to severe gear slipping, overheating, and damaged seals. If you overfill it by more than half a quart, you must remove the excess oil. You do not have to drop the whole pan again. Instead, buy a cheap hand siphon pump from an auto parts store, slide the thin plastic tube straight down your transmission dipstick hole, and pump out the extra liquid into a measuring cup until your dipstick reads perfectly.
Is it safe to use universal transmission fluid that claims to work in every single car model?
No, you should avoid generic universal fluids. Modern automatic transmissions are built with incredibly precise tolerances and unique clutch materials that require distinct friction characteristics. A fluid designed for a heavy-duty pickup truck will not have the same viscosity or chemical additives needed for a compact economy car. Using an incorrect fluid type can cause your clutches to chatter, slide, or overheat. Always look at your owner’s manual and buy fluid that specifically states it meets the manufacturer’s exact specification code on the back label.
How often do I need to perform this manual fluid and filter change on my vehicle?
For most standard vehicles driven under normal conditions, changing your automatic transmission fluid and filter every thirty thousand to sixty thousand miles is ideal. If you use your vehicle for demanding tasks like towing heavy trailers, hauling heavy cargo, or driving constantly in stop-and-go city traffic, the fluid breaks down much faster due to the increased heat. In those severe conditions, performing this maintenance task every twenty thousand to twenty-five thousand miles will keep your transmission protected and running beautifully for the lifespan of your vehicle.
