You step inside your driveway, staring at the sleek lines of your modern utility vehicle. The dashboard display just popped up with a message that cannot be ignored. It is time for fresh lubrication. Taking care of this automotive task on your own terms connects you directly to your machine. It builds immense confidence and saves money that you can spend on your next great road trip. Let us open up the hood and get to work.
Why Your Modern 2026 SUV Demands Specific Care
Vehicles have transformed dramatically over the last few years. The utility vehicle sitting in your garage is no longer the simple, heavy iron machine that your parents used to work on. It is a highly optimized, high-tech computer on wheels with mechanical parts engineered to microscopic tolerances. Understanding why your vehicle requires specific maintenance procedures is the first step toward becoming a truly competent home mechanic.
The Shift to Low-Viscosity Oils
When you walk into an automotive parts store today, the shelves look completely different than they did a decade ago. Heavy, thick formulations like 10W-40 or 20W-50 have largely vanished from mainstream applications. Modern sport utility vehicles are designed to run on ultra-low-viscosity fluids. Viscosity grades like 0W-16, 0W-12, and even 0W-8 are now standard factory requirements for many new powertrains.
These ultra-thin fluids are engineered to achieve maximum fuel efficiency. When an engine rotates, a thick fluid creates internal drag. This force requires the pistons and crankshaft to work harder, consuming more fuel just to overcome the internal resistance of the liquid. A low-viscosity synthetic fluid flows like water, reducing this internal friction to an absolute minimum. This engineering choice allows your large family transport vehicle to achieve fuel economy figures that were once reserved only for tiny compact hatchbacks.
However, these low-viscosity formulations place immense pressure on the chemical additive packages within the fluid. Because the liquid barrier is incredibly thin, the anti-wear additives must perform flawlessly to prevent metal-to-metal contact. This means you cannot simply grab whatever bottle happens to be on sale. You must match the exact specification required by your manufacturer to ensure your internal components remain pristine.
Turbocharging and Hybrid Systems
Take a look at the emblem on your tailgate or check under your plastic engine cover. There is a massive probability that your vehicle features either a small-displacement turbocharged engine, a hybrid assistance system, or both. The era of the naturally aspirated, massive V6 or V8 engine as the default choice for family transport has yielded to smaller, high-output powerplants.
Turbochargers operate at mind-boggling rotational speeds, frequently exceeding one hundred thousand revolutions per minute. They are propelled by scorching hot exhaust gases right as they exit the combustion chambers. The bearings inside that glowing turbocharger rely entirely on the engine oil for both lubrication and thermal management. When you turn off your ignition after a long highway sprint, the fluid resting inside those turbocharger bearings must resist extreme heat without breaking down into hardened carbon deposits. Conventional mineral oil would cook and turn to sludge instantly in these conditions. This is why full synthetic fluids are absolute necessities for modern driving.
Hybrid powertrains introduce a completely separate set of challenges. In a hybrid setup, the internal combustion engine cycles on and off repeatedly during a single commute. It might fire up suddenly while you are accelerating onto a fast highway ramp, demanding instant performance before the metal components have even reached proper operating temperature. The fluid must flow instantly to the top of the cylinder head within milliseconds of a cold start. If the fluid is too thick or has degraded over time, those frequent start-stop cycles will cause premature wear on the valve train and cylinder walls.
Advanced Internal Engineering and Tighter Clearances
The internal architecture of a modern engine features component clearances that are measured in microns. The space between the journals of the crankshaft and the bearing shells is thinner than a human hair. The fluid must be capable of squeezing into these microscopic gaps under immense pressure without shearing or losing its protective film.
Additionally, many modern powertrains utilize variable displacement oil pumps. These smart pumps alter their output pressure based on current engine speeds, load factors, and oil temperatures calculated by the vehicle computer. If you introduce an incorrect fluid thickness into this system, the variable pump might struggle to maintain the correct hydraulic pressure. This can trigger error codes, illuminate your check-engine light, and prevent advanced systems like variable valve timing from functioning correctly. By taking your time to understand these engineering realities, you ensure that your home maintenance work preserves the factory-designed performance of your vehicle.
Essential Tools and Materials for the Job
Before you turn a single bolt or lift your vehicle off the ground, you need to assemble your arsenal of tools. Having everything neatly organized within arm’s reach prevents frustration, avoids mid-project trips to the auto parts store, and ensures a clean execution of the task.
Gathering Your Diagnostic and Safety Gear
You should never skimp on the basic equipment that protects your body and keeps your workspace organized. Your physical safety is the single most important factor of this entire project.
First, secure a high-quality set of ramps or a robust hydraulic floor jack accompanied by heavy-duty jack stands. Never trust a factory emergency jack to support a heavy vehicle during maintenance. You will also need a pair of oil-resistant gloves, protective safety glasses to shield your eyes from falling debris under the chassis, and plenty of clean shop towels. A large sheet of cardboard or a dedicated garage floor mat placed underneath your work area will catch any accidental drops or splashes, keeping your driveway or garage floor pristine.
Choosing the Perfect Oil Grade and Specification
Consulting your owner’s manual is a non-negotiable step in this process. Do not rely on internet forums or advice from friends who drive older vehicles. Open up your digital manual or flip through the booklet in your glove compartment to locate the exact viscosity requirement and industry certification standard.
Look closely for labels such as API SP or ILSAC GF-6B. These alphanumeric codes indicate that the fluid has passed the latest, most stringent testing protocols against low-speed pre-ignition and timing chain wear. The table below highlights the common modern fluid grades you will encounter and their primary attributes.
Selecting the Correct Filter Type
The oil filter is the unsung hero of your engine longevity. It traps microscopic bits of metal, carbon deposits, and dirt that naturally accumulate during the combustion process. For modern vehicles, filters generally fall into two categories: traditional spin-on metal canisters and modern cartridge-style elements.
If your vehicle uses a cartridge filter, you will be replacing a pleated paper element that drops into a permanent plastic housing located on the engine block or near the oil pan. These setups require careful handling because the plastic housings can crack if handled roughly. Spin-on filters feature their own metal housing and screw directly onto a threaded bung. Always check your vehicle specification sheet to buy the exact part number. Selecting a premium filter with a silicone anti-drainback valve ensures that fluid remains in the upper sections of the engine during long parking sessions, preventing dry starts.
Summary Table of Required Tools
| Tool Name | Primary Purpose | Key Detail to Remember |
| Hydraulic Jack & Stands | Safely lifting and supporting the vehicle weight | Never use a jack without secondary support stands |
| Socket Wrench Set | Removing the drain plug and underbody shields | Metric sizes are standard on modern vehicles |
| Dedicated Filter Wrench | Loosening the stubborn filter housing | Cap-style wrenches prevent damage to plastic caps |
| Wide Catch Pan | Collecting the draining fluid cleanly | Must hold at least two gallons of liquid volume |
| Clean Funnel | Directing new fluid into the engine fill neck | Clean thoroughly before use to avoid contamination |
| Digital Torque Wrench | Tightening components to exact factory specs | Prevents stripping aluminum threads in the oil pan |
Preparing Your Workspace and Ensuring Ultimate Safety
A chaotic workspace leads to accidents and spilled fluids. By spending fifteen minutes prepping your environment and setting up your vehicle correctly, you guarantee a smooth operation from start to finish.
Finding the Ideal Ground and Setting Up Ramps
Your vehicle must be parked on a perfectly flat, solid concrete surface. Asphalt can soften on warm summer days, which can allow heavy jack stands or ramps to sink and tilt dangerously. Dirt or gravel surfaces should never be used for lifting operations.
If you are using drive-up ramps, align them perfectly straight with your front tires. Slowly creep the vehicle forward up the incline until you feel the front wheels drop securely into the recessed pockets at the top of the ramps. Apply the electronic parking brake immediately and shut off the engine. Step out of the vehicle and visually verify that both front tires are perfectly centered on the platforms.
Stabilizing the Vehicle with Wheel Chocks
Even with the parking brake fully engaged, an elevated vehicle can still try to roll backward. Take a pair of heavy rubber or plastic wheel chocks and wedge them firmly behind both rear tires. This physical barrier ensures that the vehicle cannot move a single inch while you are underneath the frame.
Give the front bumper a gentle push from the outside. If the vehicle feels rock-solid and exhibits no wobbling or shifting, your setup is secure. If you notice any movement or hear creaking, back down the ramps and readjust your positioning until everything is entirely stable.
Donning Your Personal Protective Equipment
Engine oil contains chemical compounds and contaminants gathered from thousands of miles of combustion. Prolonged skin contact is not ideal. Slip on a fresh pair of nitrile gloves before touching any mechanical components.
Slide your safety glasses over your eyes before crawling under the chassis. As you move around under the engine bay, your clothing or tools will inevitably knock loose small bits of road road grime, dried mud, or salt from the underbody panels. Safety glasses keep this debris out of your eyes so you can maintain full focus on the mechanical tasks at hand.
Step-by-Step Breakdown of the Draining Process
Now that your workspace is secure and your tools are ready, it is time to perform the primary mechanical operations. This phase requires patience and a gentle touch with your tools to avoid damaging the specialized fasteners found on modern vehicles.
Locating the Underbody Shield and Removal
Modern utility vehicles are designed with extensive aerodynamic shields underneath the engine compartment. These plastic or composite panels serve multiple purposes. They minimize wind resistance to boost fuel economy, protect delicate electrical components from road spray, and reduce cabin noise.
Get under the vehicle with your socket wrench and look for the access panel labeled for oil service. Some vehicles feature a small, removable door held in place by a few clips, while others require you to remove the entire front belly pan. Keep a small tray or cup nearby to hold all the bolts and plastic push-pins you remove. Labeling them or keeping them organized ensures you will not have any mysterious leftover hardware when you button everything back up.
Identifying the Drain Plug and Oil Pan
With the aerodynamic shield removed, look upward to locate the engine oil pan. It will be positioned directly beneath the engine block. Be careful not to confuse it with the transmission fluid pan, which is typically located further back toward the center of the vehicle.
The oil pan is usually made of stamped steel, cast aluminum, or high-strength composite plastic. Look for the single hex-head bolt protruding from the lowest point of the pan. This is your drain plug. Aluminum and plastic pans require extra care because their threads are much more delicate than older steel designs.
Positioning the Catch Pan Safely
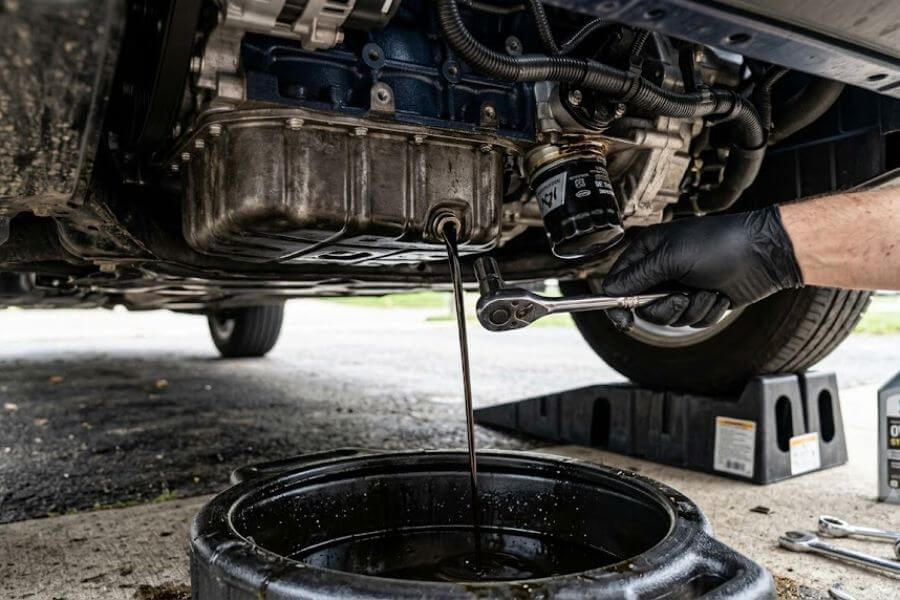
Grab your wide catch pan and place it on the ground directly beneath the drain plug. Keep in mind that when you remove the plug, the fluid will not simply drop straight down in a neat vertical line. The internal pressure of the fluid volume will cause it to shoot out horizontally in a stream toward the rear of the vehicle.
Position your catch pan slightly offset toward the path of the expected stream. As the fluid drains out completely, the stream will gradually weaken and turn into a vertical drip. You will need to slide your catch pan accordingly during this process to avoid a mess on your floor.
Loosening the Plug and Managing the Flow
Select the correct metric socket that fits snugly onto the drain plug. Avoid using adjustable wrenches or open-ended wrenches, as they can easily slip and round off the edges of the soft bolt head. Position your wrench and apply steady, counterclockwise pressure until the plug breaks loose.
Spin the bolt out the rest of the way using your gloved fingers. Apply slight inward pressure toward the oil pan as you turn the bolt. This keeps the fluid from leaking out early all over your fingers. Once you reach the end of the threads, pull the plug away cleanly in one quick motion. Let the fluid rush out into your collection container. Take this opportunity to uncap the oil filler neck up top in the engine bay. Removing that top cap breaks the internal vacuum, allowing the fluid to drain out much faster and more completely.
Replacing the Crush Washer and Torquing the Plug
While the fluid slows down to a very faint drip, inspect the drain plug you just removed. Modern vehicles utilize a single-use crush washer made of soft copper or aluminum. This washer deforms intentionally when tightened to create a perfect, leak-free seal against the pan face.
[Oil Pan Face] <--- [New Crush Washer] <--- [Drain Plug Threads]
Peel the old, flattened washer off the bolt and discard it. Slide a brand-new factory crush washer onto the threads. Wipe down the mating surface of the oil pan with a clean shop towel to remove any residual grit or old fluid. Thread the plug back into the pan by hand for at least four or five full rotations. Never start this bolt with a wrench, as you risk cross-threading the soft pan. Once hand-tight, grab your digital torque wrench and tighten the bolt to the exact factory specification, which is usually between fifteen and twenty-five foot-pounds. You will feel a distinct mechanical click or hear a digital beep when the proper tension is achieved.
Removing and Installing the Modern Oil Filter
Replacing the filter element is just as critical as changing the fluid itself. A clogged filter will trigger an internal bypass valve, allowing unfiltered, dirty fluid to circulate directly through your pristine engine components.
Cartridge Style versus Spin-on Canister Style
Take a moment to look at your replacement filter kit to confirm which style your vehicle uses. If you have a traditional spin-on canister, you are looking at a self-contained metal cylinder. If your vehicle features a modern cartridge housing, your kit will consist of a pleated paper filter insert and one or two black rubber O-ring seals.
Cartridge systems are increasingly popular because they minimize environmental waste. You only throw away the paper media, while the heavy plastic housing remains on the engine permanently. However, these plastic housings require precise alignment and gentle handling to prevent structural damage.
Extracting the Old Filter Element
If you are dealing with a spin-on filter, slip your filter wrench over the body of the canister and turn it counterclockwise. These filters can become quite stubborn due to heat cycling, so a firm grip is necessary. Once loose, spin it off by hand, keeping the opening tilted upward to minimize fluid spillage.
For a cartridge style, use a specialized socket that fits perfectly over the multi-sided top of the plastic housing cap. Carefully unscrew the cap and lift it away. The old paper filter will usually come out attached to the central cap spindle. Gently pop the old element off the spindle and place it directly into a plastic bag to prevent messy dripping on your garage floor.
Preparing and Lubricating the New Seal
Before you install any new parts, look closely at the mounting face on the engine block. If you removed a spin-on canister, verify that the old square rubber gasket came off along with the filter. If that old gasket remains stuck to the metal block, a catastrophic double-gasket leak will occur when you install the new unit, spraying fluid everywhere within seconds of engine startup.
Clean the mounting area thoroughly. For spin-on filters, dip your gloved finger into a bottle of fresh synthetic fluid and spread a thin film of liquid around the rubber ring of the new filter. This lubrication allows the rubber to slide smoothly against the metal engine block, creating a tight seal without binding or bunching up. For cartridge systems, pry off the old rubber O-ring from the plastic cap channels using a non-marring tool. Slide the new lubricated O-ring into the exact same groove, making sure it is not twisted or stretched out of shape.
Correct Torque Specifications for Filter Housings
Pop your new filter element into place. Spin-on canisters should be threaded on by hand until the rubber gasket makes firm contact with the engine mounting face. From that specific point of contact, turn the filter an additional three-quarters to one full turn using your hands. Do not use a mechanical wrench to tighten a spin-on filter, as over-tightening will distort the gasket and cause a persistent leak.
For plastic cartridge housings, thread the cap back into place by hand to avoid cross-threading the delicate plastic threads. Grab your torque wrench and tighten the cap to the exact specification stamped right onto the plastic housing surface, which is usually around twenty-five Newton-meters. This guarantees that the cap is tight enough to prevent leaks without putting structural stress on the composite material.
Refilling the Engine with Fresh Premium Synthetic Fluid
With the bottom end of your engine completely sealed and your new filter securely mounted, you can finally move to the top of the engine bay to introduce the clean, high-performance synthetic fluid.
Locating the Oil Fill Cap Under the Hood
Step out from under the vehicle and pop the hood fully open, securing it with the prop rod if necessary. Look at the top plastic beauty cover of your engine. Look for a prominent plastic screw cap adorned with an image of an oil can or explicitly stamped with the required viscosity grade, such as 0W-20.
Clean the area around the cap thoroughly before removing it. Any stray leaves, dust particles, or road salt resting on the engine cover could easily drop down into the open valve train when you lift the cap away. Keeping the environment immaculate protects the pristine internal systems of your powertrain.
Using a Funnel to Avoid Messy Spills
Never attempt to pour fluid directly from a large five-quart container into the engine without a proper funnel. The modern engine bay is tightly packed with intricate electrical connectors, alternator belts, and hot exhaust heat shields. A simple spill can create an annoying burning odor or even damage delicate wiring harnesses.
Insert a long, clean funnel deep into the oil filler neck. Ensure that the funnel is perfectly stable and does not tilt or wobble. Double-check that there is no dust or cardboard debris inside the funnel before you begin pouring your fresh fluid.
Pouring the Initial Volume Carefully
Lift your five-quart fluid container and turn it sideways so the pour spout is positioned at the top of the bottle as you tilt it. This specific orientation allows air to enter the container smoothly as the fluid flows out, preventing the annoying glugging motion that causes sudden splashes.
Pour the liquid in a slow, controlled stream. Do not dump the entire recommended capacity into the engine all at once. If your manual states that your vehicle requires 5.5 quarts of fluid, start by adding exactly five quarts. It is far easier to add a little bit of extra fluid later than it is to drain out excess fluid if you accidentally overfill the system.
Checking the Mechanical Dipstick Correctly
Allow the newly poured fluid a couple of minutes to cascade down through the cylinder head channels and collect completely in the bottom of the oil pan. Locate your mechanical dipstick, which usually features a bright yellow or orange plastic loop handle. Pull the dipstick completely out of its tube.
Wipe the entire metal blade completely clean with a fresh shop towel. Reinsert the dipstick all the way back into the tube until it clicks down completely into its seating position. Pull it back out once more and hold it horizontally to read the fluid level.
[ MIN ] =======############======= [ MAX ]
               (Fluid Level)
The fluid mark should rest comfortably between the two indicators, notches, or cross-hatched lines on the tip of the metal blade. If the line is sitting just above the minimum mark, add small increments of your remaining half-quart of fluid, checking the dipstick after each addition until the level rests near the upper line or middle zone.
Navigating and Resetting the Digital Oil Life Monitor
Modern utility vehicles no longer rely on simple mileage numbers printed on a windshield sticker. Your vehicle utilizes a sophisticated onboard computer network to calculate fluid degradation in real-time based on your actual driving habits.
Understanding the Intelligent Dashboard Algorithm
The intelligent fluid life monitor inside your instrument cluster does not actually analyze the chemical purity of the liquid via an optical sensor. Instead, it utilizes a highly accurate software algorithm. This program monitors a wide variety of operational data parameters every single time you drive.
The computer tracks the exact number of cold starts you perform, ambient outdoor temperatures, average trip distances, engine rotational speeds, and total load factors. If you spend your weeks towing a heavy trailer through stop-and-go city traffic during freezing weather conditions, the algorithm will accelerate the countdown, requiring a service interval much sooner. If you spend your time cruising down open highways at steady speeds, the system rewards you with an extended service interval. This guarantees that your fluid is always replaced before its critical additive packages become completely exhausted.
Step-by-Step Reset Procedures for Popular Brands
Once you finish your physical maintenance work, you must manually inform the vehicle computer that fresh fluid has been introduced. This procedure varies slightly between different automotive brands, but the basic logic remains uniform across modern model years.
For most modern push-button start systems, you will need to enter the accessory mode without actually starting the engine. You achieve this by pressing the Start/Stop engine button twice with your foot completely off the brake pedal. This illuminates your dashboard displays while keeping the internal combustion engine dormant. Use the directional arrow pads on your steering wheel spokes to scroll through the central driver information menu until you reach the screen displaying the vehicle health status or oil life percentage. Press and hold the central OK or Reset button for several seconds. You will see the display animation flash or update, showing a fresh, reassuring status of one hundred percent fluid life.
Why Neglecting the Computer Reset Causes Trouble
Failing to reset this digital monitoring system can lead to significant headaches down the road. If you skip this digital step, the computer will continue its countdown based on your previous maintenance cycle. Eventually, the dashboard will begin flashing urgent warning messages or audible chimes, falsely indicating that your engine is operating with dangerous, worn-out lubrication.
Furthermore, keeping this system accurate is critical for maintaining your factory warranty coverage. Modern vehicle computers store historical data regarding when maintenance reminders were triggered and when they were cleared. If an engine component experiences a failure and the internal log files indicate that the vehicle was driven for thousands of miles with a zero percent fluid life message active, the manufacturer may attempt to deny your warranty claim based on vehicle neglect. Taking sixty seconds to complete the digital reset protects both your machine and your financial investment.
Post-Service Inspections and Cleaning Up Your Workspace
The mechanical tasks are complete, but you are not quite ready to hit the open highway yet. A true master mechanic always performs a final quality control check to verify that every single seal is holding perfectly under real-world operating pressure.
Running the Engine to Check for Active Leaks
Step back inside the driver seat, apply your foot firmly to the brake pedal, and press the start button to fire up the engine. Keep your eyes locked onto your instrument cluster for the first few seconds. The oil pressure warning light should extinguish almost immediately.
Let the vehicle idle smoothly in park for approximately two to three minutes. Do not rev the engine during this phase. While the engine hums along, step outside with a flashlight and peer underneath the front bumper. Look closely at the drain plug and the base of the oil filter housing. Everything should look entirely bone-dry. If you spot a faint drip or a slow sheen of liquid forming around a component, shut down the ignition immediately and check your torque values.
Reinstalling the Aerodynamic Underbody Shield
Once you are entirely satisfied that your vehicle is completely leak-free, shut off the ignition and crawl back underneath the chassis for the final assembly phase. Grab your aerodynamic underbody shield or access door along with the collection of fasteners you stored earlier.
Align the panel with the factory mounting holes on the frame rails. Thread all the metal bolts and plastic push-pins in by hand first to make sure the panel is square. Use your socket wrench to snug down the fasteners until the plastic panel is held tight against the chassis without vibrating. This guarantees that your vehicle will slice through the air quietly and efficiently when you reach cruising speeds on the highway.
Proper Disposal and Recycling of Used Engine Fluid
Pour the dark, used fluid from your wide collection pan into an empty plastic jug or your old fluid containers using your clean funnel. Ensure that the caps are screwed on tight. Never dispose of used automotive fluids in regular household trash cans, pour them down driveway storm drains, or dump them onto the ground. Doing so is highly illegal and causes catastrophic damage to localized ecosystems and groundwater supplies.
Take your sealed containers of used fluid along with your old paper or metal filter to a local automotive parts retailer or a municipal recycling facility. Most auto parts stores will accept your used fluids completely free of charge. They pour the liquid into massive collection vats to be sent away for re-refining into industrial lubricants or fresh base stocks, completing a sustainable cycle of automotive care.
Common Pitfalls to Avoid During This Procedure
Even experienced DIY enthusiasts can occasionally run into trouble if they rush through the process or lose focus. Staying aware of these classic mistakes allows you to navigate around them smoothly without damaging your vehicle.
Cross-Threading the Aluminum Drain Pan Threads
This is perhaps the single most common error made during home maintenance, and it can turn a routine afternoon project into an expensive repair. Modern oil pans are frequently made of cast aluminum to save weight. Aluminum is a relatively soft metal compared to the hardened steel used to manufacture the drain plug bolt.
If you place the bolt into the pan and immediately begin cranking on it with a long socket wrench, you might drive the bolt in at a slight angle. This will strip the soft aluminum threads out of the pan completely, preventing the bolt from ever tightening again. Always use your bare fingers to spin the plug into the pan. If you feel any physical resistance or binding within the first two turns, back the bolt out entirely, realign your angle, and try again. The bolt should spin effortlessly until the crush washer touches the metal face.
Leaving the Old O-Ring Stuck to the Engine Block
This mistake is often referred to as double-gasketing. It occurs most frequently with traditional spin-on canisters, but it can also happen on cartridge systems if the old O-ring tears apart during removal. When the old rubber ring sticks to the engine block and you mount a new filter directly over it, the two pieces of rubber will squeeze against each other unevenly.
As soon as your oil pump builds up pressure, the fluid will find the gap between those two loose rings. It can empty your entire oil pan onto your garage floor in a matter of seconds, potentially starving the engine of oil and causing total internal failure before you can even turn off the key. A quick, simple visual check of the old filter ensures that the old gasket came off cleanly with it, saving you from a massive mess and structural damage.
Overfilling and the Dangers of Aeration
Some people think that if a little bit of fluid is good for an engine, a little bit extra must be even better. This is a dangerous misconception. If you pour too much fluid into the engine, the fluid level in the pan will rise high enough to interact with the rapidly spinning lobes of your crankshaft.
The counterweights of the crankshaft will beat the liquid fluid into a thick, frothy foam filled with air bubbles. This process is called aeration. Your oil pump cannot pump foam effectively. Air bubbles compress easily, meaning the pump will lose its ability to maintain hydraulic pressure. This can lead to metal-to-metal contact, overheating, and severe wear on your bearings. Always stick strictly to the exact fill volume specified by your vehicle manufacturer, verifying your work using the physical dipstick.
Frequently Asked Questions
Can I use a different oil viscosity if my specific grade is currently out of stock?
You should always make every possible effort to utilize the exact viscosity grade stamped on your engine oil cap or listed within your factory owner’s manual. Modern engines feature tight internal tolerances and advanced variable valve timing components that are calibrated to operate within a specific fluid thickness range. However, major automotive manufacturers have issued official service bulletins acknowledging occasional supply disruptions for ultra-thin synthetic fluids like 0W-8 or 0W-16. In these specific, verified supply shortage situations, manufacturers typically allow you to temporarily substitute the next closest weight, such as 0W-20, for a single service interval. If you must use a substitute fluid due to an emergency or a total lack of local parts availability, make sure to change your fluid back to the factory-recommended viscosity grade at your very next maintenance cycle to preserve optimal efficiency and protect your long-term warranty status.
How often should I change my oil if my SUV sits parked for weeks at a time?
Even if your utility vehicle is rarely driven and spends most of its life resting inside a clean garage, the engine oil still needs to be replaced on a regular time-based schedule. Engine oil naturally degrades over time through atmospheric exposure, oxidation, and moisture accumulation. Every time your engine runs for a brief period, it creates moisture through internal condensation. If the vehicle is not driven long enough for the engine to reach its full operating temperature, that moisture will remain trapped inside the oil pan, mixing with the fluid to form harmful acids that can slowly corrode internal yellow metals and bearing surfaces. Because of this chemical reality, most major vehicle manufacturers recommend changing your synthetic oil at least once every twelve months, regardless of how few miles you have driven during that year.
Why is full synthetic oil mandatory for modern engines compared to old conventional choices?
Conventional mineral oils are refined directly from crude oil pumped out of the ground, meaning they contain natural impurities, varying molecular sizes, and wax compounds that can break down quickly under intense stress. Full synthetic lubricants are engineered from the ground up in a laboratory setting. Scientists build these fluids using uniform molecular structures that offer vastly superior thermal stability, excellent resistance to oxidation, and phenomenal cold-flow performance. Modern engines utilize turbochargers that operate at extreme temperatures and hybrid systems that demand instant lubrication upon a cold startup. Synthetic fluids are formulated to resist cooking into hardened carbon sludge inside hot turbo bearings while remaining thin enough to flow instantly to the top of the cylinder head during a sub-zero morning start. Using conventional oil in a modern powertrain will lead to rapid fluid breakdown and severe internal component damage.
What should I do if my oil pressure warning light stays illuminated after a fresh service?
If you start your engine after completing your maintenance work and the red oil pressure warning light remains illuminated on your dashboard for more than five seconds, you must turn off the ignition key or press the engine stop button immediately. Do not allow the engine to idle or try to rev the motor to clear the light. An illuminated oil pressure light indicates that your internal components are moving without the vital protective fluid barrier they need to prevent total failure. Step out of the vehicle and perform an immediate check for massive fluid leaks underneath the chassis or around the filter housing. Verify that your mechanical dipstick shows the fluid level is filled into the correct operational zone. If there are no visible leaks and the fluid level is correct, your oil pump may have temporarily lost its prime, or a piece of debris could be blocking the oil pressure sensor tip. Keep the engine turned off completely and consult a certified professional technician to diagnose the root cause safely.
Is it truly necessary to change the oil filter during every single oil change cycle?
Yes, it is highly recommended to replace your engine oil filter every single time you change the fluid. The filter element works tirelessly to trap microscopic bits of carbon, metal shaving debris, and road dust that naturally bypass your air intake system. Over thousands of miles of driving, the filter media gradually fills up with these trapped particles, which slowly restricts the free flow of liquid through the engine. If a filter becomes completely clogged with debris, an internal safety bypass valve will open up to prevent the engine from starving for oil. When this bypass valve activates, it allows raw, completely unfiltered dirty oil to circulate directly through your delicate bearings and valve train components. Spending a few extra dollars on a fresh, premium filter element during every service cycle is a small price to pay to ensure your clean synthetic fluid stays completely pure.
How do severe driving conditions alter the life expectancy of my synthetic engine oil?
The standard service intervals advertised by automotive manufacturers are calculated based on ideal driving conditions, such as cruising down an open, dust-free highway at steady speeds in moderate ambient temperatures. However, real-world commutes often fall into the severe category. Severe driving conditions include frequent short trips under five miles, prolonged idling in heavy city traffic, driving in extreme ambient heat or sub-zero winter temperatures, towing heavy trailers, or navigating through dusty, unpaved terrain. These demanding scenarios accelerate fluid contamination and cause the additive packages to deplete much faster than normal. If your daily driving routine matches any of these severe descriptions, your intelligent oil life monitor will automatically adjust its internal algorithm to shorten the countdown, meaning you should prepare to change your fluid more frequently, often around every five thousand to seventy-five hundred miles.
Can I safely mix two different brands of synthetic oil together if I am running a little short?
In an emergency situation where your fluid level is low on the dipstick and you need to top off the engine to travel safely, it is completely acceptable to mix different reputable brands of synthetic fluid together, provided they are of the exact same viscosity grade and meet the mandatory API or ILSAC industry specifications. The primary base stocks used by major high-quality lubricant manufacturers are chemically compatible with one another. However, each unique brand utilizes its own proprietary blend of anti-wear, detergent, and friction-reducing chemical additives. When you mix different brands together, you alter the balance of those specific chemical packages, which can slightly reduce the overall effectiveness and longevity of the fluid blend. For a complete fluid replacement service, you should always purchase enough identical fluid from a single brand to fill the entire crankcase capacity from scratch.
What is the difference between a traditional dipstick reading and an electronic oil level sensor?
Many modern sport utility vehicles are phasing out the traditional metal dipstick under the hood in favor of an entirely digital, electronic oil level sensor integrated directly into the oil pan. An electronic oil level sensor utilizes acoustic or thermal technology to measure the exact volume of fluid in the pan while you drive, displaying a convenient digital graphic indicator on your center console screen. While this system keeps your hands completely clean, it relies entirely on the proper functionality of an electronic sensor and its associated wiring harnesses. A traditional mechanical dipstick provides a direct, foolproof physical reading of the fluid resting in the pan, allowing you to visually inspect the actual color and tactile texture of the fluid to check for grit or fuel dilution. If your vehicle features both systems, always treat the physical dipstick as the ultimate source of accuracy.
