
Imagine you are driving down the road on a beautiful afternoon. You turn the steering wheel to go around a smooth corner, but instead of a silent and smooth turn, you hear a loud, high-pitched whine from under the hood. It sounds like an angry mechanical bee. When you pull into your driveway and look down, you spot a puddle of dark red or brown fluid dripping onto the concrete. Your steering wheel suddenly feels stiff and heavy, making you work twice as hard just to turn into your parking spot.
These are the classic signs of a failing power steering pump. The power steering system is what allows you to turn a heavy piece of machinery with just your hands. Without it, driving would feel like a massive workout. When the pump starts leaking or wearing out, you need to fix it before it damages other parts of your vehicle.
Replacing a power steering pump and flushing out the old fluid might seem like a job only a professional mechanic can handle, but with the right guidance, the proper tools, and some patience, you can do this job right in your own garage or driveway. This guide will walk you through every single step of the process, from finding the leak to pouring in the fresh fluid. By doing this yourself, you will gain a deeper understanding of how your vehicle works while keeping your hard-earned money in your pocket.
How Power Steering Works
Before you pick up a wrench, it helps to understand what this part actually does. Your vehicle is incredibly heavy, and the front tires carry most of that weight along with the engine. When you turn the steering wheel, you are fighting against the friction of the tires on the asphalt.
The power steering pump is the muscle of the operation. It is bolted to the engine and driven by a rubber accessory belt. As the engine runs, it spins the pump. Inside the pump, small blades push hydraulic fluid under high pressure through rubber and metal hoses down to your steering gear or steering rack. This pressurized fluid pushes against a piston inside the steering rack, which assists you in turning the wheels.
When the pump develops a leak, two bad things happen. First, you lose the fluid that creates the hydraulic pressure, making the steering wheel stiff. Second, as fluid leaks out, air gets sucked into the system. Air bubbles in a hydraulic system act like tiny cushions, preventing the fluid from doing its job and causing that awful whining or groaning noise whenever you turn the steering wheel.
Why Flushing the System Is Crucial
You might wonder why you cannot just swap out the broken pump and call it a day. Why do you need to flush the whole system? Think of it like changing the oil in your engine or pouring fresh milk into a glass. If you leave a little bit of old, sour milk at the bottom of the glass and pour fresh milk on top, the whole glass gets ruined.
As a power steering pump wears out, it sheds tiny bits of metal, rubber, and plastic into the fluid. This debris travels through the hoses and collects inside your steering rack. If you install a brand-new pump without cleaning out the old fluid, that leftover metal debris will immediately flow right into your new pump. The gritty metal particles will scratch the smooth internal chambers of your new part, destroying the seals and ruining it within a few weeks. A complete system flush ensures that your new pump operates in a clean environment, protecting your investment and keeping your steering smooth for years to come.
Signs Your Power Steering Pump Is Failing
Your vehicle will almost always warn you before a part fails completely. Recognizing these signs early can save you from getting stranded on the side of the road with a steering wheel that refuses to turn.
The Tell-Tale Whining Noise
The most common sign of a bad pump is a loud whining or groaning noise that changes in pitch as you rev the engine or turn the steering wheel. When the fluid level drops too low due to a leak, air enters the pump. The pump spins at thousands of revolutions per minute, and when it tries to compress air instead of fluid, it creates a loud, screeching protest. If the noise gets significantly louder when you turn the wheel all the way to the left or right, your pump is begging for attention.
Heavy or Stiff Steering
If you notice that turning the steering wheel requires a lot of physical effort, your pump is no longer generating enough hydraulic pressure. This stiffness might come and go at first. You might notice it mostly when you are trying to park or drive at low speeds, as this is when the steering system has to work the hardest. If the wheel feels jerky or stiff, the pump is failing to provide a steady flow of pressurized fluid.
Fluid Puddles Under the Vehicle
Power steering fluid is typically red, pink, or clear when it is brand-new. As it gets old and dirty, it turns dark brown or black. If you notice a puddle of oily fluid underneath the front of your car, right around where the engine sits, you likely have a leak. Take a clean piece of cardboard and slide it under your engine overnight. In the morning, look at the color and location of the drips to help identify exactly where the fluid is escaping.
Discolored or Foamy Fluid
Open your vehicle hood and locate the power steering fluid reservoir. It is usually a clear plastic or black metal container with a cap that says “Power Steering” on it. Pop the cap off and look inside. If the fluid looks like a frothy strawberry milkshake or is filled with tiny bubbles, air is getting into the system. If the fluid looks pitch-black and smells like it was burned, the pump is overheating and destroying the fluid.
Tools and Supplies You Will Need
To complete this job smoothly, you need to gather your tools before you begin. Having everything laid out neatly will keep you organized and prevent you from having to run to the auto parts store in the middle of the project.
Safety and Clean-Up Gear
Working on vehicles involves oils, chemicals, and heavy metal components. Protecting yourself and your workspace is your top priority.
- Safety Glasses: Power steering fluid is under high pressure and can spray when hoses are disconnected. Protect your eyes from chemical splashes.
- Mechanic Gloves: Nitrile or latex gloves keep your hands clean and protect your skin from absorbing harmful chemicals.
- Shop Towels and Rags: You will spill fluid during this process. Having a large stack of absorbent towels is essential.
- Oil Catch Pan: A wide, low-profile pan to catch the old fluid as it drains from the hoses.
- Kitty Litter or Oil Absorbent: In case any fluid misses the pan and hits your driveway, this will soak it up quickly.
Hand Tools
You do not need specialized factory machinery, but a standard set of automotive hand tools is necessary.
- Socket Set and Ratchet: A set of metric and standard sockets to remove the bolts holding the pump to the engine bracket.
- Open-End Wrenches: These are useful for holding nuts in place or reaching into tight spots where a socket will not fit.
- Line Wrenches: Also known as flare-nut wrenches, these are specially designed to grip metal fluid lines without stripping the soft metal nuts.
- Pliers: Standard slip-joint pliers or needle-nose pliers to remove the spring-loaded hose clamps on the low-pressure lines.
- Screwdrivers: Both flathead and Phillips head screwdrivers for adjusting worm-gear hose clamps.
- Serpentine Belt Tool or Breaker Bar: A long bar used to compress the automatic belt tensioner so you can remove the drive belt.
Specialty Equipment and Parts
These items are specific to the power steering system replacement.
- Replacement Power Steering Pump: Make sure you purchase the exact model for your vehicle year, make, engine size, and model.
- Power Steering Pump Pulley Puller and Installer Tool: Many new pumps do not come with the metal pulley attached. You cannot use a standard jaw puller, or you will bend the pulley. Most auto parts stores will rent this specialty tool to you for free.
- New Power Steering Fluid: Check your owner manual for the exact specification. Some vehicles use specific power steering fluid, while others actually use automatic transmission fluid (ATF). Using the wrong fluid can destroy your new seals.
- Clear Vinyl Tubing: A few feet of clear tubing that fits over your low-pressure return hose. This allows you to watch the fluid change color during the flush.
- Plastic Bucket or Empty Jug: To collect the old fluid during the system flush.
- New Hose Clamps: It is smart to replace old, weak spring clamps with fresh screw-tightened worm-gear clamps.
Understanding Your Power Steering System
To visualize what you will be doing, let us look at the anatomy of a standard power steering system. It consists of a loop where fluid constantly circulates.
The Component Layout
| Component | Main Function | Material |
| Reservoir | Holds the reserve supply of fluid for the system. | Plastic or Aluminum |
| Power Steering Pump | Creates hydraulic pressure by spinning internal vanes. | Cast Iron or Aluminum |
| High-Pressure Hose | Carries highly pressurized fluid from pump to steering rack. | Reinforced Rubber and Metal Lines |
| Steering Rack / Gear | Uses fluid pressure to mechanically move the vehicle wheels. | Heavy Steel or Aluminum |
| Low-Pressure Return Hose | Carries used, unpressurized fluid back to the reservoir. | Standard Rubber Hose |
The fluid starts its journey in the reservoir. The pump draws fluid from the reservoir and forces it under extreme pressure through the high-pressure hose down into the steering rack. When you turn your steering wheel, internal valves direct this high-pressure fluid to one side of a piston, helping you turn. Once the turn is complete, the fluid drops in pressure and flows out of the steering rack, through the low-pressure return hose, and back into the reservoir to start the cycle over again.
Your leak is likely occurring at the pump shaft seal, where the pulley spins, or at the connection points where the hoses attach to the pump body. By replacing the pump, you fix the source of the pressure loss and the leak.
Safety First: Preparing Your Workspace
Never rush into an automotive repair project. Setting up a safe workspace protects your body, your vehicle, and the environment.
Securing the Vehicle
Park your vehicle on a flat, level concrete surface like a garage floor or a solid driveway. Do not work on dirt, grass, or an incline. Set the parking brake as firmly as possible. If your vehicle is rear-wheel drive, place wheel chocks behind the rear tires to prevent the vehicle from rolling backward or forward.
For many vehicles, you can access the power steering pump entirely from the top of the engine bay. However, some vehicles require you to get underneath or remove the front passenger-side wheel to reach the pump bolts. If you must lift your vehicle, use a high-quality hydraulic floor jack to lift the front end. Never rely on the jack alone to hold the vehicle up. Always lower the vehicle onto heavy-duty jack stands placed under solid frame rails. Give the vehicle a firm shake before climbing underneath to guarantee it is completely stable.
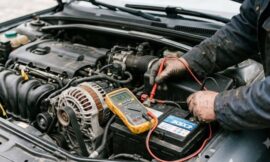
Disconnecting the Battery
Whenever you work around the engine accessory belt, you will be close to electrical components like the alternator. To prevent any accidental electrical sparks or the engine accidentally cranking, use a wrench to loosen the nut on the negative battery terminal. Slide the cable off the battery post and tuck it out of the way so it cannot spring back and make contact.
Protecting the Environment
Power steering fluid is toxic to animals and plants. It can stain concrete permanently and ruin the soil. Lay down a large plastic tarp or a thick layer of cardboard underneath your entire work area. Keep your catch pan directly under the area where you will be disconnecting hoses. If you spill any fluid on the ground, cover it immediately with kitty litter, let it sit for twenty minutes to absorb the oil, and sweep it into a trash bag.
Step-by-Step Guide: Removing the Old Power Steering Pump
Now that your workspace is ready and safe, it is time to dig in and remove the faulty pump. Take your time, take photos with your phone at each step to remember how things look, and keep your parts organized.
Step 1: Remove the Engine Cover and Fluid
Open the hood and remove any plastic cosmetic engine covers that block your view of the power steering pump. Look for the fluid reservoir. Clean the outside of the reservoir cap with a clean rag so no dirt falls inside when you open it.
Before you pull any hoses off, you want to get as much fluid out of the reservoir as possible to prevent a massive mess. You can use a clean turkey baster, a large medical syringe, or a fluid suction pump to suck the old fluid out of the reservoir. Empty the old fluid into your waste bucket. Keep sucking fluid until the reservoir is completely empty.
Step 2: Remove the Serpentine Belt
The power steering pump is driven by the engine serpentine belt. Before you can remove the pump, you must remove this belt. Locate the automatic belt tensioner, which is a spring-loaded pulley designed to keep constant tension on the belt.
Insert your breaker bar or serpentine belt tool into the square hole or onto the bolt head in the center of the tensioner pulley. Rotate the tool to compress the internal spring. This will slacken the belt. While holding the tensioner back with one hand, carefully slide the belt off the power steering pump pulley with your other hand. Slowly release the tensioner tool. You do not need to take the belt completely out of the engine bay; just drape it out of the way of the pump.
Step 3: Remove the Pulley (If Required)
Look closely at your replacement pump. If it came with a new pulley pre-installed, you can skip this step. If it did not, you must transfer your old pulley to the new pump. In many engine compartments, the bolts holding the pump to the engine block are hidden directly behind the pulley face. This means you must remove the pulley while the pump is still bolted firmly to the engine.
Attach your specialty power steering pulley puller tool to the ridges on the center hub of the pulley. Never use a standard three-jaw claw puller on a power steering pulley, because the pulley is made of thin stamped steel or plastic and will warp or break immediately. Hold the body of the puller tool steady with a large wrench while turning the center pressure screw with a socket. The tool will smoothly draw the pulley off the pump shaft. Store the pulley safely.
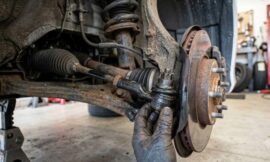
Step 4: Disconnect the Hoses
Place your oil catch pan directly underneath the pump, because fluid will spill during this step. There are two hoses connected to the pump: the low-pressure return line and the high-pressure line.
Start with the low-pressure return line, which is usually held in place by a simple spring clamp or a screw clamp. Use your pliers to squeeze the spring clamp tabs together and slide the clamp back down the hose, away from the metal fitting. Carefully twist the rubber hose back and forth to break the seal, then pull it off the pump nozzle. Quickly point the open end of the hose down into your catch pan to let any remaining fluid drain.
Next, remove the high-pressure line. This line is held on by a threaded metal flare nut or a bolt that goes through a metal loop fitting (called a banjo bolt). Use your line wrench to loosen the flare nut. Line wrenches grip all sides of the nut to prevent stripping its soft corners. Once the nut is loose, unthread it by hand and pull the line away from the pump. If your vehicle uses a banjo bolt, look out for two small copper washers on either side of the metal loop fitting. Do not lose these, though you should replace them with the new washers that come with your new pump.
Step 5: Unbolt and Remove the Pump
The pump is held onto its mounting bracket by two, three, or four bolts. Some of these bolts might pass through holes in the pulley if you did not have to remove it first. Use your socket set to loosen and remove these mounting bolts.
Support the weight of the pump with your hand as you remove the final bolt so it does not drop and damage other components. Carefully lift the old pump out of the engine bay. Hold it upright so fluid does not leak out of the open ports, and place it directly into your catch pan. Compare the old pump side-by-side with your new pump to guarantee that the mounting holes, hose connection points, and dimensions match perfectly.
Step-by-Step Guide: Installing the New Power Steering Pump
With the old pump out of the way, your engine bay is ready for the fresh replacement component. Installation is a precise process that requires careful attention to torque and alignment.
Step 1: Install the Pulley onto the New Pump
If your new pump did not come with a pulley, you must install your old pulley now. You cannot hammer the pulley onto the new shaft, because hammering will destroy the delicate internal bearings and seals of your brand-new pump.
You must use the pulley installer tool. This tool consists of a long, hardened bolt that threads into the internal threads on the tip of the pump shaft. It features a bearing assembly and a large nut that pushes against the pulley hub. Thread the tool into the shaft until it bottoms out. Hold the center bolt steady with a wrench, and turn the large installer nut clockwise. This mechanical action smoothly presses the pulley onto the shaft without placing any damaging impact forces on the internal pump components. Press the pulley on until the front face of the pulley hub sits completely flush with the tip of the pump shaft. Remove the installer tool.
Step 2: Mount the New Pump
Carefully lower your new pump into the engine compartment, aligning its mounting tabs with the holes on the engine bracket. Start all the mounting bolts by hand for a few turns to ensure you do not cross-thread them.
Once all bolts are started by hand, use your socket wrench to tighten them in a crisscross pattern. If you have a torque wrench, look up the factory specifications in a repair manual and tighten the bolts to the exact setting. This prevents over-tightening, which can crack the aluminum engine block or the pump housing.
Step 3: Connect the High-Pressure and Low-Pressure Lines
Inspect the threads on your high-pressure line to ensure they are clean and free of debris. If your pump uses a flare nut fitting, thread it into the new pump port by hand first. This is critical because cross-threading this high-pressure port will ruin your new pump instantly. Once threaded smoothly by hand, tighten it firmly with your line wrench.
If your system uses a banjo bolt connection, place one new copper washer onto the bolt, slide the bolt through the round hose fitting, place the second copper washer onto the bolt, and then thread it into the pump. The copper washers act as crush seals to prevent leaks under extreme pressure. Tighten the bolt to factory specifications.
Next, slide your low-pressure rubber return hose onto the plastic or metal suction nozzle of the new pump. Slide your new worm-gear hose clamp into place and tighten it securely with a screwdriver. Do not over-tighten plastic nozzles, or they can crack.
Step 4: Reinstall the Serpentine Belt
Use your breaker bar or serpentine belt tool to pull the automatic tensioner back once again. Carefully route the serpentine belt back around all the engine pulleys, ensuring it follows the exact diagram printed on your engine bay sticker.
Slide the belt over your new power steering pump pulley last. Make sure the grooves on the inside of the rubber belt seat perfectly into the matching grooves on every single pulley. Slowly release the tensioner tool so the spring applies full tension back onto the belt system. Reconnect your negative battery cable at this time.
Step-by-Step Guide: Flushing the Whole System
Now that your new pump is mechanically installed, you must perform the crucial system flush before you start the engine. This step clears out all the hidden dirt, metal shavings, and ancient fluid trapped inside your steering rack.
Step 1: Prepare the Flush Setup
Do not connect the low-pressure return hose to the fluid reservoir just yet. If you already connected it during the pump assembly step, remove it specifically from the reservoir side, not the pump side.
Look at the reservoir. It has two ports: a large feed port that goes down to the pump, and a smaller return port where fluid enters after circulating through the steering rack. Because the return line is disconnected, you must plug up that small return nozzle on the reservoir so fluid does not leak out when you fill it. You can use a rubber vacuum cap, a small piece of spare hose with a bolt shoved into the end, or a piece of plastic wrap secured tightly with a rubber band to seal this open port.
Take your long piece of clear vinyl tubing and slide it over the open end of the low-pressure return hose that you just disconnected from the reservoir. Run this clear tubing out of your engine bay and drop the other end deep into your empty plastic bucket or waste jug. This setup creates a path where old fluid will escape into your bucket, allowing you to watch the fluid change color through the clear tube.
Step 2: Fill the Reservoir
Pour fresh, brand-new power steering fluid into the reservoir until it reaches the “Max” or “Full” line. Keep your bottles of fresh fluid open and within arm’s reach, because you will need to add more fluid quickly during the next step.
Step 3: Run the Manual Flush Process
To perform this flush safely without stressing your brand-new pump, you should do this with the engine turned completely off. Running the engine spins the pump incredibly fast, which can suck the reservoir dry in two seconds, running your new pump dry and damaging it. By doing this manually, you have complete control over the speed of the fluid.
Jack up the front end of the vehicle so both front tires are completely off the ground and can spin freely. Have a helper sit in the driver’s seat. Instruct your helper to turn the steering wheel slowly and smoothly all the way to the left until it stops, and then all the way to the right until it stops. This action is called turning the wheel “lock-to-lock.”
As your helper turns the steering wheel back and forth, the mechanical internal piston inside your steering rack acts like a manual pump. It will push the old, dirty fluid out of the rack, through the return hose, through your clear vinyl tubing, and into your waste bucket. At the same time, it will draw fresh fluid down from the reservoir into the steering rack.
Step 4: Monitor and Refill
Watch the fluid level in the reservoir closely as your helper turns the wheel. As the fluid level drops close to the bottom of the reservoir, shout for your helper to stop turning. Pour more fresh fluid into the reservoir to top it off.
Look at the clear vinyl tubing leading to your bucket. At first, the fluid coming out will look dark brown, black, or cloudy gray. Have your helper resume turning the steering wheel lock-to-lock. Continue this loop of turning the wheel, watching the fluid drain, and topping off the reservoir with fresh fluid.
After a few cycles of turning and refilling, you will see bright, clean, translucent fluid flowing through the clear vinyl tubing into your bucket. This indicates that all the ancient, contaminated fluid has been completely pushed out of your steering rack and replaced with pure, clean fluid.
Step 5: Finalize the Hose Connections
Once the fluid runs completely clean, your flush is a success. Have your helper stop turning the wheel. Carefully remove the clear vinyl tubing from the return hose, keeping a shop towel handy to catch any drips. Remove the temporary plug or cap you placed on the reservoir return nozzle.
Slide the low-pressure return hose back onto the reservoir return nozzle. Secure it firmly with your hose clamp. Use a can of automotive brake cleaner to spray down any areas where fluid spilled onto the frame, hoses, or engine block, and wipe the area completely clean with a fresh rag. Cleaning the area now ensures that if a leak develops later, you will know immediately instead of mistaking it for old spilled fluid.
Bleeding the Air Out of the System
Your system is now filled with clean fluid, but it contains a massive amount of trapped air pockets from disconnecting the lines. Air bubbles must be removed, or your new pump will scream loudly and fail to provide smooth steering assistance.
Step 1: Initial Dry Bleed
With the vehicle still raised safely on jack stands and the front wheels suspended off the ground, check the fluid reservoir and ensure it is filled to the top fill mark. Leave the reservoir cap off during this process so trapped air can escape easily out of the top of the container.
With the engine still turned completely off, have your helper turn the steering wheel slowly from lock-to-lock again. Do this at least twenty to thirty times. Watch the fluid inside the reservoir. You will see a stream of large air bubbles rising to the surface and popping. As these air pockets escape, the fluid level in the reservoir will drop. Add more fresh fluid as necessary to keep it at the proper level. Do not rush this step. Manual bleeding removes the majority of the air without forcing the pump to grind against air pockets under power.
Step 2: Engine-On Bleeding
Once the big bubbles stop rising during the manual turns, it is time to start the engine. Ensure all your tools are well clear of the spinning engine belt. Ensure your helper’s hands and clothing are clear of any moving parts.
Start the engine. You might hear a brief whine or growl from the new pump for a couple of seconds as it catches the fluid, which is normal. Let the engine idle smoothly. Do not touch the steering wheel yet. Let it run for one minute while you watch the reservoir. If the fluid starts to foam up or look milky, turn the engine off immediately. This means air is still trapped inside. Let the vehicle sit for fifteen minutes until the foam turns back into liquid fluid, and then repeat the manual engine-off bleeding process.
If the fluid stays clear and calm while idling, have your helper turn the steering wheel slowly from left to right while the engine is running. Only turn the wheel about three-quarters of the way at first. After a few smooth turns, have them turn the wheel all the way until it gently hits the stops on either side. Do not hold the steering wheel hard against the steering stops for more than two seconds, because this subjects the system to maximum pressure and stresses the new seals. Repeat this turning sequence ten to fifteen times.
Step 3: Lowering and Final Check
Turn the engine off. Look into the reservoir one final time. The fluid should look perfectly clear, smooth, and bubble-free. Use your floor jack to lift the vehicle slightly, remove your jack stands, and smoothly lower the vehicle back down so its tires rest firmly on the ground.
With the full weight of the vehicle resting on the pavement, start the engine again. Have your helper turn the wheel back and forth. The steering wheel should turn smoothly with minimal physical effort, and the pump should operate in near-total silence. Turn the engine off, check the reservoir level one last time, and screw the reservoir cap back on tightly.
Testing Your Work and Cleanup
Before you take your vehicle out on a major road trip, you need to verify your repair with a short test drive and perform proper cleanup of your workspace.
The Neighborhood Test Drive
Buckle your seatbelt and take your vehicle for a slow drive around your immediate neighborhood block. Keep your windows rolled down and your radio turned completely off so you can listen closely to the engine bay. Try making a series of safe left and right turns, and practice a few tight turns at low speed, such as parking maneuvers.
The steering should feel consistent, solid, and light. If you hear a slight whine when turning that slowly fades away, there may still be a few microscopic air bubbles trapped in the system. These will usually work themselves out naturally after a day or two of normal driving. However, if the steering feels incredibly stiff or the pump screams loudly, pull back into your driveway immediately and check for a dropped fluid level or a hidden leak.
Post-Drive Leak Inspection
Park the vehicle back on your level work area and let the engine idle. Grab a bright flashlight and peer down into the engine bay. Look directly at the high-pressure fitting and the low-pressure hose clamp on your new pump. Check the front shaft behind the pulley. Everything must be completely dry. Look underneath the vehicle at your drip pan and your protective cardboard to ensure no fresh puddles have formed.
Responsible Waste Disposal
Automotive fluids cannot be thrown away in your household trash can or poured down a backyard drain. Power steering fluid is highly regulated and must be recycled safely.
Pour the old fluid from your catch pan and your flush bucket into sealable plastic containers, like empty fluid bottles or clean milk jugs. Secure the caps tightly. Take these containers to a local automotive parts store or a city chemical recycling facility. Most auto parts retailers will accept your used automotive fluids completely free of charge and recycle them responsibly, protecting the environment and keeping our waterways clean. Clean your hand tools with a dry rag, store them away neatly, and enjoy the satisfaction of a job well done.
Frequently Asked Questions
Can I use standard brake fluid or engine oil if I run out of power steering fluid?
No, you must never use brake fluid, motor oil, or any unauthorized fluids in your power steering system. Every fluid in your vehicle is engineered with a completely unique chemical composition, thickness, and heat resistance. Brake fluid is designed to withstand extreme heat without compressing, but it uses a chemical formula that will instantly eat through, swell, and destroy the rubber seals inside a power steering pump and steering rack. Motor oil is too thick and will clog the small internal valve passages of your steering components. Always consult your vehicle owner manual and use only the exact type of power steering fluid or automatic transmission fluid specified by your vehicle manufacturer. Using the wrong fluid can cause total system failure within a few miles of driving.
Why did my new power steering pump start whining immediately after installation?
If your brand-new pump whines as soon as you turn the engine on, the most common cause is trapped air bubbles inside the hydraulic system. When air gets mixed into the fluid under pressure, it undergoes a process called cavitation, which creates a loud mechanical groan. You can fix this by performing the bleeding procedure again, turning the steering wheel lock-to-lock with the wheels off the ground to force the air out. Another possibility is a restriction or a tiny leak in your low-pressure suction line. If the hose clamp is loose, the pump can suck air into the system through the microscopic gap around the fitting without showing an external fluid leak. Double-check that your return line hose is perfectly sealed and has no cracks.
How often should I perform a power steering system flush on my vehicle?
While many car manufacturers do not list a specific timeline for flushing power steering fluid in their basic maintenance schedules, most automotive professionals recommend flushing the system every two to three years or every thirty thousand to fifty thousand miles. Over time, the fluid breaks down due to high operating temperatures and loses its ability to lubricate the moving parts inside the pump. You should check the condition of the fluid during every routine engine oil change. If the fluid looks dark brown, black, or cloudy, or if you spot tiny metallic flakes shimmering in the light inside the reservoir, it is time to perform a complete system flush to protect your steering components.
Is it safe to drive my car with a leaking power steering pump?
It is highly unsafe to continue driving a vehicle with a severely leaking power steering pump. If the fluid drops below a critical level while you are driving, you will suddenly lose your steering assistance. This can make the steering wheel incredibly heavy and difficult to turn, which is highly dangerous if you need to perform an emergency swerve to avoid an obstacle on the highway. Furthermore, running the pump completely dry will cause extreme friction heat, which can seize the pump internals, snap your accessory belt, and cause your engine to overheat or lose power to other critical parts like the alternator and water pump.
Can I skip using the specialty pulley removal tool and use a hammer instead?
You must never use a hammer, a crowbar, or a standard jawed gear puller to remove or install a power steering pump pulley. The pulleys are made from relatively thin materials like stamped sheet metal or composite plastics. Applying uneven force with a hammer or a standard claw tool will warp, bend, or crack the pulley immediately, making it unusable. Additionally, striking the pump shaft with a hammer sends massive shockwaves through the center of the pump, which will instantly crush the internal roller bearings and tear the delicate internal rubber seals of your brand-new part. The specialty puller and installer tool is designed to apply smooth, perfectly linear pressure directly to the hub hub, which preserves the integrity of both the pulley and the pump.
