Imagine you are driving down your favorite road. Usually, your car glides smoothly over the asphalt, making you feel like you are floating on a cloud. But lately, things feel different. Every single bump in the road feels like a miniature earthquake. When you hit a pothole, your car bounces up and down like a trampoline. When you step on the brakes, the front of your car dives toward the ground like a pelican diving for a fish. If this sounds familiar, your vehicle is trying to tell you something important. Your front struts and coil springs are worn out, and they need your help.
Taking care of your car might seem like a job only meant for professionals in greasy mechanics shops. However, learning how your vehicle works and how to fix it yourself is incredibly rewarding. It saves you money, teaches you valuable skills, and gives you a massive sense of achievement.
This guide will walk you through the entire process of diagnosing and replacing your worn front struts and coil springs assembly. We will break down the science of your suspension, look at the warning signs, and go step-by-step through the replacement process. Grab your tools, put on your safety glasses, and let us get started.
Understanding Your Car Suspension System
Before you start twisting bolts, it helps to understand what these parts actually do. Your car suspension system has two main jobs. First, it keeps your tires firmly planted on the ground so you can steer and brake safely. Second, it absorbs all the bumps and dips in the road so you and your passengers stay comfortable.
What Is a Strut Assembly
A strut is a major structural part of a modern car suspension system. Think of it as a multi-tasking superhero. It combines several different components into one single unit. The main body of the strut is a shock absorber, which is a metal cylinder filled with special oil or gas. When your car hits a bump, a piston moves up and down inside this cylinder, slowing down the bouncing movement.
Unlike a standard shock absorber, a strut also acts as a structural pivot point for your steering. It holds the wheel in the correct position and supports the weight of the vehicle. Without struts, your car would not just bounce uncontrollably; the wheels would actually fold inward under the weight of the vehicle.
The Power of the Coil Spring
Wrapped tightly around the middle of the strut is a large, heavy-duty metal spring called the coil spring. This spring supports the entire weight of your vehicle. When you drive over a bump, the coil spring compresses to absorb the energy of the impact. Once you pass the bump, the spring wants to release that energy by expanding back to its original size.
If you had a coil spring without a strut, your car would keep bouncing up and down for a very long time after hitting a single bump. The strut controls the spring, while the spring supports the weight. They are the ultimate automotive duo.
The Magic of the Complete Assembly
In the past, mechanics had to use dangerous tools to compress the coil spring, take the old strut apart, and build a new one piece by piece. Today, you can buy a complete strut assembly. This is often called a loaded strut or a quick-strut.
A complete assembly includes a brand new strut, a new coil spring, a new upper mount, and all the rubber boots and cushions already put together by a factory machine. Buying the complete assembly makes the job much safer, faster, and highly manageable for someone working in their home driveway.
Signs of Worn Struts and Coil Springs
Car parts do not last forever. Over time, the constant bumping and weight-bearing takes a toll on your suspension. On average, struts and springs last between fifty thousand and eighty thousand miles, depending on how rough your local roads are. Here are the major warning signs that tell you it is time for a replacement.
The Bouncy Castle Ride
The most obvious sign of bad struts is excessive bouncing. When you drive over a speed bump, your car should bounce up once, come back down, and immediately settle. If your car continues to bob up and down two, three, or four times after a bump, your struts are no longer controlling the coil springs.
Front End Nose Diving
When you step firmly on the brake pedal, the weight of your vehicle shifts forward. Good front struts resist this weight shift. If your struts are worn out, the front nose of your car will dip down dramatically toward the pavement. This is called nose diving. It is dangerous because it increases the distance your car needs to come to a complete stop.
Vehicle Sagging or Leaning
Coil springs can weaken and sag over time due to metal fatigue. If you notice that one corner of your car sits lower than the other corners when parked on level ground, you likely have a broken or sagging coil spring. A sagging spring throws off the balance of your car and puts extra stress on your tires and brakes.
Fluid Leaking from the Strut Body
Take a look inside your wheel well behind the front tires. Look at the metal cylinder of the strut. Do you see wet, oily fluid coating the outside of the strut? If so, the internal hydraulic seals have broken. Once the oil leaks out, the strut loses its ability to control the spring, meaning the part is officially dead.
Cupped or Uneven Tire Wear
When your suspension is loose and bouncy, your tires do not stay firmly pressed against the road. Instead, they bounce rapidly up and down as you drive. This creates an unusual wear pattern on your tire tread called cupping or scalloping. You will see smooth, wavy dips carved into the rubber of your tire. If you see this, your tires and your struts will both need to be replaced.
Knocking or Clunking Noises
Every time you turn the steering wheel or drive over a bump, you might hear a loud metallic clunk, pop, or rattle coming from the front wheels. This noise usually comes from the upper strut mount. The mount contains a bearing that allows the strut to spin when you turn the wheel. When that bearing wears out or the rubber inside rips apart, metal hits metal, creating a harsh noise.
Gathering Your Tools and Supplies
Before you lift your car off the ground, you need to collect all the right tools. Having everything ready beforehand prevents you from getting stuck halfway through the job. Here is a comprehensive list of what you will need to get the work done smoothly.
Essential Hand Tools
- Socket Set and Ratchet: You will need both metric and standard sockets, ranging from ten millimeters up to twenty-four millimeters. A long-handled ratchet or a breaker bar will help you loosen tight bolts.
- Wrench Set: Open-ended and combination wrenches are necessary for holding nuts in place while you spin the bolt from the other side.
- Torque Wrench: This is a vital tool. A torque wrench allows you to tighten every bolt to the exact measurement required by your vehicle manufacturer, ensuring everything stays safe.
- Screwdrivers and Pliers: Useful for removing small plastic clips, cotter pins, and brake line brackets.
- Hammer or Mallet: A heavy rubber mallet or a brass hammer helps gently tap stubborn bolts out of their holes without damaging the metal threads.
Safety and Lifting Equipment
- Hydraulic Floor Jack: Never rely on the small jack that came with your spare tire. You need a sturdy floor jack capable of lifting the weight of your front end.
- Jack Stands: Never work under a car supported only by a hydraulic jack. You must rest the vehicle securely on heavy-duty jack stands.
- Wheel Chocks: Heavy blocks placed behind the rear tires to prevent the car from rolling backward or forward while you work on the front end.
- Safety Glasses and Gloves: Thick gloves protect your knuckles from scrapes, and safety glasses keep rust, dirt, and chemical fluids out of your eyes.
Chemical Solutions
- Penetrating Oil: Under-car bolts are exposed to rain, snow, salt, and dirt. They are often rusted solid. Spraying them with a high-quality penetrating oil a few hours before you start makes them much easier to loosen.
- Brake Cleaner: Great for cleaning dirt and grease off your new parts and brake components once you finish the job.
Choosing Your Replacement Parts
When buying your new parts, always purchase them in pairs. You should never replace just the left front strut or just the right front strut. If one side is worn out, the other side is close behind it. Replacing both sides ensures your car handles evenly and stays balanced. Opt for high-quality, pre-assembled complete strut units to make your job straightforward and stress-free.
Step by Step Pre-Repair Preparation
Preparation is the secret key to a successful automotive repair project. Taking your time during this phase keeps you safe and prevents costly mistakes.
Finding a Flat Work Area
Park your vehicle on a solid, completely level surface, like a concrete garage floor or a flat concrete driveway. Working on a slope or on soft ground like grass or dirt is extremely dangerous because the jack stands can sink or tip over. Turn off the engine, put the transmission in Park, and pull the emergency parking brake as tightly as you can.
Securing the Vehicle
Walk to the back of the vehicle. Place your wheel chocks tightly behind and in front of both rear tires. This ensures that even if the front of the car moves slightly as you loosen heavy bolts, the rear wheels cannot roll anywhere.
Loosening the Lug Nuts
Before you lift the wheels off the ground, take your tire iron or a large socket and loosen the lug nuts on both front wheels. Only turn them about half a turn counter-clockwise. You want them loose, but still holding the wheel against the car. If you try to loosen them with the wheel up in the air, the tire will just spin around and around in circles.
Lifting and Supporting the Car
Locate the proper factory jack points underneath your car. These are usually reinforced metal ridges located under the side skirts behind the front wheels. Position your hydraulic floor jack under the front frame or a solid crossmember.
Slowly pump the jack until both front tires clear the ground by a few inches. Slide your jack stands underneath the solid frame rails of the vehicle. Slowly lower the floor jack until the full weight of the car is resting completely on the jack stands. Give the car a firm push from the side. If it shakes or wobbles, adjust your jack stands until the car is rock solid. Safety must always come first.
Removing the Wheels
Now that the car is safe up on the stands, spin the loosened lug nuts the rest of the way off by hand. Remove the front wheels and set them aside out of your workspace. You now have a clear, open view of your front suspension, the brake rotor, and the strut assembly.
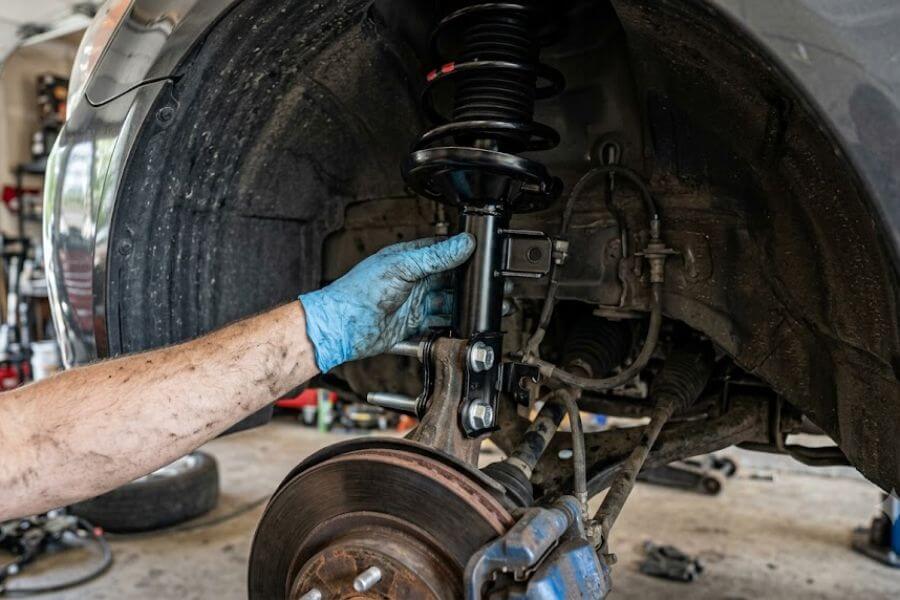
How to Remove the Old Strut Assembly
With the wheels out of the way, you can clearly see the strut assembly. It is bolted to the body of the car at the top, and it is bolted to the steering knuckle at the bottom. Let us break down how to remove it safely.
Clearing Connected Components
Before unbolting the major suspension parts, you must remove the smaller items attached to the strut body. If you forget this step, you can tear wires or bend metal lines.
| Component Attached to Strut | Tool Needed for Removal | Purpose of Component |
| Brake Line Bracket | Small socket or wrench | Holds hydraulic fluid lines away from moving parts |
| Anti-lock Brake (ABS) Wire | Pliers or trim tool | Sends wheel speed data to the car computer |
| Sway Bar End Link | Wrench and Allen key | Connects the strut to the anti-roll stabilization bar |
First, look for the flexible rubber brake hose. It is usually secured to a small metal tab welded onto the side of the strut body. Use a small wrench to remove the retaining bolt, and move the brake hose gently out of the way. Do not let the heavy brake caliper hang by its rubber hose; if necessary, tie the brake assembly to the frame with a piece of wire to protect the hose.
Next, look for any small wires running along the strut. These are your ABS sensor wires. They are often held in place by small plastic clips. Use your pliers or a flat screwdriver to gently pop these clips free from the strut body without tearing the rubber coating around the wires.
Disconnecting the Sway Bar Link
The sway bar link is a thin metal rod that connects your strut to the vehicle sway bar. It helps keep the car level during sharp turns. The nut holding the sway bar link to the strut can be notoriously stubborn.
Spray the threads with penetrating oil. Hold the back of the joint with a wrench while you use your socket to loosen the nut on the front. Sometimes, the inner stud will spin along with the nut. If this happens, insert an Allen wrench into the very tip of the stud to hold it still while you turn the nut with an open-ended wrench. Once the nut is off, pull the sway bar link out of the hole in the strut bracket.
Unbolting the Lower Strut Mount
The bottom of the strut is held inside a large slot on the steering knuckle by two very large, heavy-duty bolts. The steering knuckle is the heavy cast-iron piece that holds your wheel hub and brake rotor.
Place a large wrench on the nut and a large socket on the bolt head. Turn the socket counter-clockwise with a long breaker bar to break the rust loose. These bolts are put on very tightly from the factory, so you will need to apply some muscle power.
Once you spin both nuts completely off, the bolts might still stay stuck inside the holes due to the tension in the suspension. Leave the nuts on the very tips of the threads to protect the metal, then tap them gently with your mallet or hammer until the bolts slide through the holes. Pull the bolts completely out. The steering knuckle will now want to tilt outward, so be careful not to stretch the brake lines.
Unbolting the Upper Strut Mount
Now it is time to move to the engine bay. Pop open your car hood and look at the metal towers on the left and right sides of the engine compartment. You will see the top of the strut sticking up through a large circular hole, held in place by three or four small nuts.
Important Warning: Never touch the large center nut in the middle of the strut mount. That center nut holds the high-tension coil spring in place. Touching it can cause the spring to fly off with explosive force. Only remove the small outer nuts that circle the outside of the tower.
Hold the lower body of the strut with one hand from inside the wheel well so it does not drop unexpectedly. With your other hand, use a socket to remove the outer nuts from the top engine bay tower. Once the last nut is removed, carefully lower the old strut assembly out from under the wheel well. Congratulations, the old, worn-out part is officially out of your car.
Installing the New Strut Assembly
Now that the old part is gone, you can bring in your shiny new complete strut assembly. Installing it is essentially the reverse of the removal process, but you must pay close attention to alignment and tightness.
Positioning the New Unit
Lift the new complete strut assembly into the wheel well. Line up the threaded metal studs at the top of the mount with the holes in your engine bay tower. Push the assembly upward so the studs poke through into the engine bay.
While holding the strut up with one hand, use your other hand to thread the small top nuts onto the studs. Spin them down by hand until they are snug. This will support the weight of the strut so it does not fall on you while you work down below.
Aligning the Lower Knuckle
Move back down to the wheel well. Slide the bottom portion of the strut over the steering knuckle. You may need to push down on the steering suspension parts or lift the heavy brake rotor up to get the bolt holes to align perfectly.
Once the holes line up, slide your two large lower bolts back through the assembly. Push them all the way in until the heads are flush with the bracket. Thread the large nuts onto the ends of the bolts by hand.
Torqueing the Fasteners to Specification
Tightening your bolts correctly is the most critical safety step of this entire repair project. You cannot just guess how tight they should be; you must look up the exact torque specifications for your specific vehicle make and model in a repair manual.
Take your torque wrench and set it to the specified number, which is usually measured in foot-pounds. Tighten the large lower knuckle bolts first. When the wrench makes a loud click sound, you have reached the correct tightness.
Next, move to the top of the engine bay and torque the small upper mount nuts to their proper specification. These top nuts require much less force than the bottom bolts, so be gentle so you do not snap the metal studs.
Reattaching Accessories
Now you can put all the auxiliary components back where they belong.
- Slide the sway bar end link back into its tab on the new strut body and tighten the nut securely.
- Reattach the brake line bracket to the side of the strut and tighten its small holding bolt.
- Push the plastic ABS wire clips back into their mounting holes on the new assembly, making sure the wire hangs loose enough that it will not pinch or stretch when you turn the steering wheel completely to the left or right.
Final Assembly and Safety Checks
With the new components securely bolted into place, you are ready to wrap up the project and get your car back on its wheels.
Inspecting Your Work
Before you put the tire back on, take a clean rag and some brake cleaner to wipe off any grease or oily fingerprints from your brake rotors. Do a visual scan of the entire wheel well area. Double-check that every single bolt has a nut on it and that no loose wires are hanging down near moving parts.
Reinstalling the Wheels
Lift your wheel and tire assembly back onto the wheel hub. Thread the lug nuts back onto the studs by hand. Tighten them with your tire iron or socket until they are snug against the wheel. Do not try to fully tighten them yet; wait until the car is down on the ground.
Lowering the Vehicle Safely
Position your hydraulic floor jack back under the main lifting point. Pump the jack to lift the car slightly off the jack stands. Carefully slide the jack stands out from under the frame rails and set them aside.
Slowly twist the release valve on your floor jack counter-clockwise to let the car descend gently to the ground. Once the jack is free, slide it away from the vehicle.
Final Wheel Torqueing
With the vehicle weight fully resting on its tires, take your torque wrench and tighten the wheel lug nuts to your car specific factory specification, which is usually between eighty and one hundred foot-pounds.
Always tighten lug nuts in a star pattern. Do not just go around in a circle. Tighten one nut, skip the one next to it, tighten the next one, and continue this criss-cross pattern. This ensures the wheel presses perfectly flat and even against the brake hub, preventing alignment issues and vibrations.
The Post Repair Test Drive
You are almost done, but you should never skip the safety test drive. This ensures everything is operating correctly before you head out onto major highways.
The Neighborhood Shake Down
Hop into the driver seat, buckle your seat belt, and start the engine. Before moving, turn the steering wheel all the way to the left and then all the way to the right. Listen carefully for any binding, rubbing, or popping sounds. If it is silent, shift into gear and drive slowly down your local neighborhood street.
Drive over a few minor road wrinkles or small bumps. Pay close attention to how the car feels. The front end should feel firm, quiet, and controlled. It should absorb the bump quickly without any extra bouncing.
Scheduling an Alignment
There is one final task you must do after replacing any major suspension part. You must take your car to a professional auto shop for a wheel alignment.
When you unbolt the steering knuckle from the struts, the precise angle of your front tires changes by tiny fractions of an inch. Even a tiny misalignment can cause your car to pull hard to one side and can destroy a brand new set of expensive tires in just a few thousand miles. A professional alignment technician uses laser machines to reset your wheels to absolute perfection, completing your successful suspension restoration.
Suspension Component Comparison
To help you understand your choices when buying replacement parts, let us look at the differences between standard individual parts and the complete factory assemblies we used today.
| Feature | Individual Components (DIY Built) | Complete Assembly (Quick Strut) |
| Installation Speed | Slow (requires taking apart old units) | Fast (drops directly into the vehicle) |
| Safety Risk Level | High (must compress a high tension spring) | Minor (spring is safe inside factory unit) |
| Part Condition | Only replaces the failed shock absorber | Replaces spring, shock, mount, and bushings |
| Long Term Value | Moderate (old springs can sag later) | High (everything is brand new together) |
Frequently Asked Questions
What happens if I choose to ignore my worn out struts?
Ignoring bad struts is a significant safety hazard. Over time, your braking distances will increase dramatically, making it harder to stop in an emergency. Your car will lean excessively during sharp turns, increasing the risk of skidding off the road. Additionally, the constant bouncing will quickly ruin your front tires and destroy other expensive steering parts like ball joints and tie rods, turning an affordable fix into a massively expensive repair bill.
Do I need to replace my rear struts at the exact same time as the front ones?
No, you do not have to replace all four struts at the exact same moment. The front suspension handles the weight of the engine and does most of the heavy steering work, so front struts almost always wear out much faster than rear ones. However, you must always replace struts in pairs on the same axle. If you replace the front left strut, you must replace the front right strut at the same time to ensure stable, balanced driving.
How can I tell if my coil spring is broken or if just the strut is bad?
A bad strut will typically cause fluid leaks, bouncy riding conditions, and front end nose diving when braking. A broken or sagging coil spring will usually cause the vehicle to sit noticeably lower on one specific corner, even when parked on a flat surface. You might also hear a very loud, metallic snapping or grinding noise when you turn your steering wheel, which indicates the broken coils are shifting out of place.
Why is it dangerous to disassemble an old strut assembly by myself?
An automotive coil spring is held inside the assembly under hundreds of pounds of mechanical pressure. If you remove the center nut on top of the strut without a professional industrial spring compressor machine, that massive stored energy releases instantly. The metal spring can fly across the room with enough speed and power to break bones or cause catastrophic structural damage to your workspace. Complete pre-assembled units completely eliminate this danger.
How long should a front strut replacement project take for a beginner?
For someone doing this project for the first time in their home garage, it usually takes about two to three hours per side. Budgeting a full afternoon for the entire job allows you to take your time, clean your tools, follow every step carefully, and double-check your torque specifications without feeling rushed or stressed. As you gain experience, the process naturally becomes much quicker.
