Your Ford F-150 is the backbone of your daily adventures, whether you use it to haul heavy payloads, tow a weekend camper, or navigate your morning commute. The power under the hood of a 2026 model is undeniable, but that massive strength requires an equally powerful stopping system to keep you and everyone else on the road out of harm’s way. Over time, the heavy-duty components that slow your truck down will wear out.
When your brake pedal starts feeling soft, or you notice an annoying high-pitched squeal every time you slow down at an intersection, your truck is telling you it needs some attention. Rolling up your sleeves to swap out your own front brake pads, rotors, and calipers is an excellent project. Taking care of this yourself gives you a deeper connection to your vehicle while ensuring that your truck stops precisely when you need it to. This guide walks you through every detail of the process, from loosening the first lug nut to final testing.
Understanding the Parts of Your Front Braking System
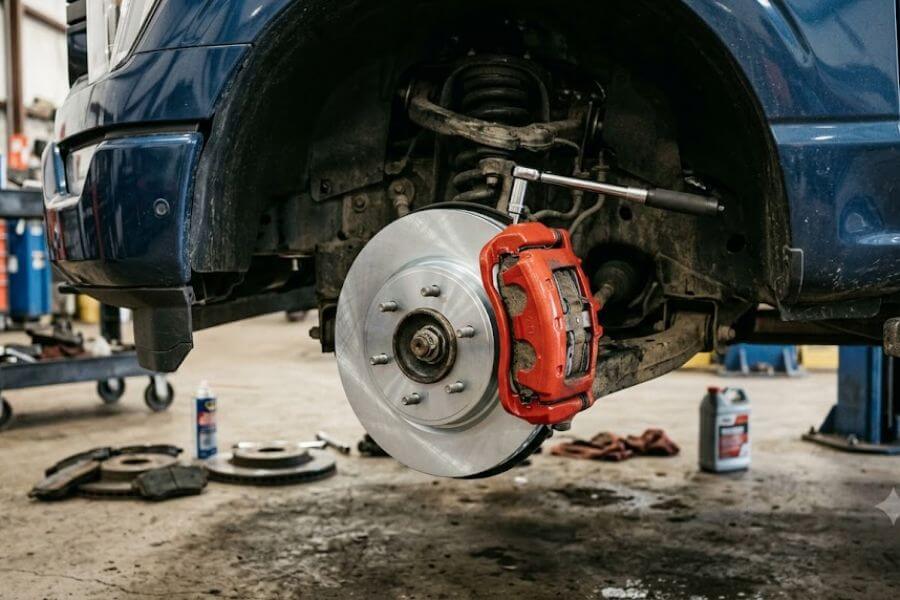
Before you jump into the mechanical work, you need a clear picture of what is happening behind your front wheels. Your 2026 Ford F-150 relies on a hydraulic disc braking system. When you press the brake pedal, fluid moves through metal lines and flexible hoses to apply pressure to the moving components, converting forward motion into heat through friction.
The Role of Brake Pads
Brake pads are the sacrificial friction material in the system. They sit inside the caliper and press directly against the spinning metal disc. Modern trucks utilize advanced ceramic or semi-metallic formulations that can withstand extreme heat without breaking down. Every time you slow down, a tiny layer of this material wears away. If you let them wear down too far, the metal backing plates will grind against your discs, causing severe damage.
The Importance of Rotors
Rotors, which are also frequently called brake discs, are the heavy metal plates that bolt directly to your wheel hub. They spin at the exact same speed as your tires. When the brake pads clamp down on both sides of the disc, the resulting friction stops your truck. Because they handle extreme heat, they can eventually warp, develop deep grooves, or wear below safe thickness limits.
The Mechanics of the Caliper
The caliper acts like a heavy-duty clamp. It houses hydraulic pistons that push the pads against the rotor surfaces. Calipers live in a harsh environment filled with road grit, rain, snow, and intense heat. Over thousands of miles, internal rubber seals can dry out, internal pistons can seize up, or slide pins can lose their lubrication. Replacing them restores balanced clamping force and prevents the brakes from dragging or pulling to one side.
Safety Guidelines and Setup Procedures
Working on a heavy-duty full-size pickup truck demands strict attention to safety. Your Ford F-150 weighs several thousand pounds, and a failure to secure the vehicle properly can result in catastrophic damage or severe personal injuries.
Securing Your Workspace
Always perform this work on a flat, solid, level surface like a concrete garage floor or a level driveway. Never attempt to lift a vehicle on dirt, gravel, or sloped surfaces. Before you lift a single tire off the ground, engage the electronic parking brake completely. Take plastic or heavy rubber wheel chocks and wedge them tightly behind both rear tires. This step ensures that the truck cannot roll backward or forward while you work on the front axle.
Proper Lifting Techniques
Never rely on a portable hydraulic bottle jack or a factory emergency jack to hold your truck up while you work on it. You must use a heavy-duty hydraulic floor jack rated for at least three tons to lift the front end. Position the jack under the designated frame lifting points or the reinforced front crossmember.
Once the truck is high enough for the front wheels to clear the ground, slide heavy-duty jack stands under the frame rails. Slowly lower the hydraulic jack until the full weight of the truck rests securely on the stands. Shake the truck gently from the side to verify that it is completely stable before sliding underneath or removing any components.
The Essential Toolkit for the Job
Having the right equipment organized and ready to go saves you time and reduces frustration. Gather these items before you start loosening parts on your truck.
Required Hand Tools and Shop Supplies
- Heavy-duty hydraulic floor jack (three-ton capacity minimum)
- High-weight-capacity jack stands
- Wheel chocks for the rear tires
- Lug wrench or a 21mm deep socket with a long breaker bar
- Socket wrench set including 13mm, 15mm, 18mm, and 21mm sockets
- Open-end wrench set for holding slider pins
- Heavy-duty torque wrench capable of reaching high foot-pound specifications
- Brake caliper piston compression tool or a large metal C-clamp
- Brake fluid catch pan or clean container
- Brake line clamp or banjo shutter pliers
- Stiff wire brush or detail brush for rust removal
- Bungie cords or mechanical wire hangers
Specialized Lubricants and Cleaners
- High-temperature silicone brake grease (never use petroleum-based grease)
- Multiple cans of premium aerosol brake cleaner
- Fresh, unopened container of DOT 4 brake fluid
- Thread-locking compound (medium strength blue formula)
- Clean, lint-free shop towels or microfiber rags
Step-by-Step Disassembly Process
Now that your workspace is safe and your tools are ready, you can begin removing the old, worn-out components from your front wheel assembly. Work on one side of the truck at a time so you can use the opposite side as a visual reference if you forget how a spring or clip fits together.
Wheel Removal
While the truck is still touching the ground slightly, use your breaker bar and a 21mm socket to loosen the lug nuts on your front wheels by about one full turn. Do not remove them yet. Lift the truck fully onto the jack stands as described in the safety section.
Unscrew the lug nuts completely and pull the heavy wheel off the hub assembly. Set the tire flat on the ground away from your workspace, or slide it underneath the frame rail next to your jack stand as an extra backup safety shield. Turn the steering wheel all the way toward the side you are working on to give yourself clear, open access to the bolts on the back of the wheel hub.
Detaching the Brake Caliper
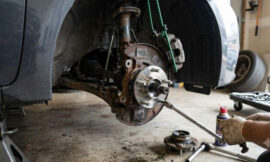
Look at the back of the caliper assembly to locate the two smaller slider pin bolts. Use an appropriate socket to loosen and remove these bolts. If the internal slide pin spins while you try to turn the bolt, hold the flat section of the pin in place with an open-end wrench.
Once the bolts are out, gently wiggle the caliper assembly off the rotor. Because you are replacing the caliper completely, you will eventually disconnect the fluid line, but do not do that just yet. To avoid straining the flexible rubber brake hose, use a bungee cord or a wire hanger to suspend the caliper from a sturdy section of the front suspension frame. Never let a caliper hang freely by its rubber fluid line.
Extracting the Worn Brake Pads
With the main caliper housing pulled aside, you can easily slide the old brake pads out of the mounting bracket. Pay close attention to how they sit within the small metal anti-rattle clips. Note which pad faces the inside toward the engine and which one faces the outside toward the street, as the inner pads often feature unique circular wear marks where the hydraulic pistons push against them. Pull the old metal clips off the bracket and put them aside.
Removing the Caliper Mounting Bracket
The larger metal frame holding the pads is the caliper mounting bracket. It is bolted directly to the steering knuckle with two large, heavy-duty bolts. These bolts are installed with strong thread-locking compounds from the factory and will require significant effort to loosen.
Use a large socket and a long breaker bar to break the tension on these bolts. Spin them out completely and lift the mounting bracket away from the hub assembly. Inspect the bracket for any deep cracks or structural damage.
Taking Off the Old Rotor
In many cases, the brake rotor will slide right off the wheel hub once the bracket is out of the way. However, road salt, moisture, and heat often create a layer of rust that fuses the rotor to the hub surface. If your rotor is stuck, do not strike the smooth stopping surface with a standard steel hammer if you plan to reuse it, though since you are replacing it, a few firm taps on the back of the rotor with a heavy rubber mallet or a dead-blow hammer will break the rust bond. Pull the heavy rotor off the lug studs and set it aside.
+--------------------------------------------------------------+
|                DISASSEMBLY SEQUENCE SUMMARY                  |
+--------------------------------------------------------------+
|  1. Loosen Lug Nuts -> 2. Raise Truck & Secure Jack Stands   |
|  3. Remove Wheel -> 4. Turn Steering Wheel for Access        |
|  5. Remove Caliper Slider Bolts -> 6. Support Caliper W/ Wire|
|  7. Slide Out Brake Pads -> 8. Remove Caliper Bracket Bolts  |
|  9. Remove Bracket -> 10. Free & Slide Off Old Rotor         |
+--------------------------------------------------------------+
Disconnecting the Hydraulic Line
Because this project includes replacing the caliper housing itself, you must open the sealed hydraulic system to swap the fluid line from the old unit to the new one. This part of the project requires speed and cleanliness to keep air entry to a absolute minimum and prevent fluid from ruining your driveway.
Preparing for Fluid Spillage
Brake fluid destroys painted surfaces almost instantly. Place a wide plastic catch pan directly beneath the brake line connections to catch any stray drops. Keep a handful of clean shop towels within arm’s reach.
Locate the banjo bolt on the back of the hanging caliper, which connects the flexible rubber fluid line to the metal caliper body. This bolt passes through a special brass block at the end of the line.
Swapping the Lines
Before loosening the bolt, look at your new caliper assembly. Make sure it matches the side of the truck you are working on, as front calipers are side-specific. You can identify the correct side by looking at the bleeder valve screw. The bleeder screw must always point upward toward the sky when installed on the truck. If the bleeder valve points down, air bubbles will get trapped inside the housing, and you will never get a firm brake pedal.
Use a line clamp or specialized non-marring hose pliers to gently pinch the flexible rubber line a few inches above the connection. This prevents all the fluid in your master cylinder reservoir from draining out while you complete the swap.
Unscrew the banjo bolt from the old caliper. Remove the old line and discard the two thin copper crush washers that sat on either side of the brass fitting. Always use the brand-new copper washers included with your new caliper kit.
Place one new copper washer onto the banjo bolt, slide the bolt through the brass line fitting, and then place the second new copper washer onto the bolt threads. Thread the bolt into the new caliper body by hand to prevent cross-threading, then tighten it firmly to factory specifications with your wrench. Remove the line clamp from the rubber hose.
Preparing and Cleaning Your New Components
Brand-new auto parts come from the factory with protective layers that you must remove before installation to ensure your brakes operate safely and quietly.
Degreasing the New Rotors
New metal rotors are sprayed with a clear, greasy petroleum-based rust preventative at the factory to keep them from rusting while sitting in a warehouse box. If you install a rotor with this grease still on it, the material will contaminate your new brake pads, ruining their stopping ability.
Hang the new rotor up or hold it over your catch pan. Spray both sides of the stopping surface generously with aerosol brake cleaner. Watch the grease dissolve and run off the metal. Wipe the surfaces completely dry with a clean, lint-free microfiber cloth. Repeat this process until the metal looks pristine and bone dry.
Cleaning the Hub Mounting Surface
Look closely at the flat, circular face of the wheel hub where the new rotor sits. You will likely see a buildup of rust scale, dirt, and corrosion. If you slide your new, perfectly flat rotor over this rough debris, the rotor will sit at a tiny angle. This uneven positioning causes an issue called lateral runout, which feels like a violent steering wheel vibration when you brake at highway speeds.
Take a stiff wire brush or a specialized hub cleaning tool and scrub the flat face of the hub until you expose clean, shiny metal. Wipe away the loose dust with a dry towel.
Servicing the Caliper Mounting Bracket
If you are reusing your original caliper mounting brackets with the new calipers, you must prepare them properly. Pull the rubber boots off the slide pins and slide the pins out of the bracket channels. Clean the old, dried-out grease off the pins using brake cleaner and a rag. Spray out the inside of the pin channels to remove old debris.
Apply a generous layer of high-temperature silicone brake grease to the smooth shafts of the slide pins, then slide them back into the bracket channels. Push them in and out a few times to verify they move smoothly without binding. Inspect the rubber boots for tears and snap them securely into place to keep moisture out.
Step-by-Step Reassembly Process
With all your components clean, lubricated, and prepped, you can begin putting your front suspension back together. This stage requires precision and the correct application of torque to prevent parts from coming loose under stress.
Installing the New Rotor
Lift your clean, degreased rotor and carefully slide it over the six wheel lug studs. Push it back until it sits perfectly flat against the freshly scrubbed hub face.
Because the rotor can tilt forward while you try to bolt the other components into place, take one of your truck’s lug nuts and thread it onto a top stud by hand. Spin it down until it pinches the rotor gently against the hub. This temporary step keeps the rotor perfectly steady and upright while you complete the installation.
Mounting the Caliper Bracket
Take your prepared caliper mounting bracket and position it over the new rotor. Align the bolt holes on the bracket with the mounting tabs on the steering knuckle.
Apply a couple of drops of medium-strength blue thread-locking compound to the clean threads of the large bracket bolts. Thread the bolts into place by hand to make sure they are seating properly.
Take your heavy-duty torque wrench and tighten these bolts to the factory specified torque. For a modern full-size F-150, these bolts require substantial tightening force to handle massive stopping loads.
Placing the New Hardware and Brake Pads
Snap your brand-new metal anti-rattle clips into the slots on the caliper mounting bracket. These clips provide a smooth track for the brake pads to slide on and prevent annoying clicks and rattles.
Apply a very thin layer of high-temperature silicone brake grease to the contact tabs of the brake pads where they touch the metal clips. Be exceptionally careful not to get any grease on the main friction material face of the pads.
Slide the inner brake pad into the bracket clips, then slide the outer brake pad into place. Both pads should sit tightly against the faces of the new rotor.
Installing the New Caliper Body
Because you are using a new caliper, its hydraulic pistons are already fully retracted into the housing. Lift the caliper assembly and slide it carefully over the new brake pads. Align the mounting holes with the lubricated slide pins in the bracket.
Insert the clean slider pin bolts by hand. Take your torque wrench and tighten these bolts down to their proper specification, which is much lower than the main bracket bolts. Verify that the flexible rubber brake line curves naturally without any sharp twists, kinks, or stress points.
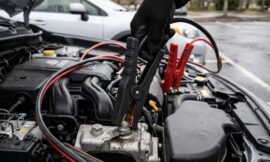
Bleeding the Brake Hydraulic System
Whenever you open a hydraulic brake line, air enters the system. Air bubbles compress under pressure, whereas brake fluid does not. If you leave air inside the lines, your brake pedal will plunge completely to the floorboard when you press it, and your truck will not slow down. Bleeding the lines removes this air, ensuring a solid pedal connection.
Setting Up the Bleed Bottle
Locate the small metal bleeder valve screw on the top section of your new caliper body. Remove the protective rubber cap.
Slip a length of clear, flexible vinyl tubing tightly over the tip of the bleeder valve. Place the opposite end of the tube into a clean plastic bottle partially filled with fresh DOT 4 brake fluid. Ensure the end of the tube stays submerged under the fluid level inside the bottle to prevent air from getting sucked back up into the caliper.
The Two-Person Bleeding Method
This step goes smoothest with the help of an assistant sitting inside the cab of the truck. Clean all dirt away from the cap of the master cylinder brake fluid reservoir under your hood, open the lid, and fill the reservoir to the maximum fill line with fresh fluid. Keep this reservoir topped off throughout the process; if it runs completely dry, it will pump air into the anti-lock braking system, requiring a professional tow to a repair shop.
Have your assistant pump the brake pedal inside the cabin slowly three or four times, then hold the pedal down firmly toward the floorboard with continuous leg pressure. With your assistant holding the pedal down, use an open-end wrench to turn the caliper bleeder valve counterclockwise about one-quarter of a turn.
You will see brake fluid mixed with pockets of air bubbles rush through the clear vinyl tube into your collection bottle. As soon as the fluid stream slows down, close the bleeder valve tightly by turning it clockwise.
Once the valve is shut, yell to your assistant to release the brake pedal. Repeat this exact sequence over and over until you see nothing but pure, solid, bubble-free fluid passing through the clear line. Tighten the bleeder valve securely and press the rubber dust cap back on.
Wheel Installation and Torque Specifications
With the mechanical components fully installed and the hydraulic lines free of air, you can finalize the hardware setup by reinstalling the wheel assembly.
Mounting the Wheel
Remove the temporary lug nut you used to hold the rotor steady. Lift your heavy tire and wheel assembly back onto the hub, taking care not to scrape or damage the new brake components.
Thread all six lug nuts back onto the studs by hand. Use your lug wrench to tighten the nuts down until they are snug against the wheel face, following a cross-pattern sequence to ensure the wheel seats evenly against the rotor.
Lowering the Truck and Final Torque
Slide your hydraulic floor jack back under the main lifting point on the frame rail. Raise the truck up slightly until the weight shifts off your jack stands. Carefully pull the jack stands out from under the chassis and set them aside.
Slowly turn the handle on your hydraulic jack to lower your F-150 until the front tires are resting firmly on the ground. Remove the jack completely.
Take your torque wrench and set it to 150 foot-pounds, which is the standard specification for a modern Ford F-150 wheel hub. Tighten the lug nuts in a star pattern, jumping across the wheel rather than moving in a circle. This alternating pattern distributes clamping pressure perfectly across the face of the new rotor, preventing it from warping over time.
      LUG NUT STAR PATTERN
            (1)
       (6)       (3)
       (4)       (5)
            (2)
Component Torque Specification Table
Using precise tightening measurements keeps your suspension intact under heavy vibration and temperature swings. Use this quick comparison reference table for your final assembly checks.
| Component Connection | Fastener Size | Torque Specification | Lubrication Requirement |
| Caliper Mounting Bracket Bolts | 18mm or 21mm | 184 ft-lbs (250 Nm) | Medium Thread-Locker |
| Caliper Slider Pin Bolts | 13mm or 15mm | 27 ft-lbs (37 Nm) | Clean Dry Threads |
| Brake Line Banjo Bolt | 11mm or 13mm | 26 ft-lbs (35 Nm) | New Copper Washers Only |
| Bleeder Screw Valve | 10mm or 11mm | 115 in-lbs (13 Nm) | Keep Clean and Dry |
| Wheel Hub Lug Nuts | 21mm Deep | 150 ft-lbs (204 Nm) | Clean Dry Threads |
The Critical Brake Pad Burnishing Procedure
Do not simply jump into your truck and speed down the highway as soon as you finish bolting the wheels back on. Your fresh brake pads and pristine metal rotors need to be properly broken in through a process called burnishing or bedding. This procedure deposits a thin, even layer of friction material from the pads onto the bare surface of the metal rotor, which optimizes stopping performance and prevents uneven wear.
Initial Pedal Pump
Before you turn the engine key, sit in the driver’s seat and pump the brake pedal down slowly several times. The first couple of pumps will feel completely soft, and the pedal might sink all the way to the floor. This happens because the new caliper pistons are adjusting outward to meet the new pads. Pump the pedal until it feels firm and resilient high up in its travel. Check your brake fluid reservoir under the hood one last time to make sure it is exactly at the max fill line.
Safe Driving Bed-In Steps
Drive your truck to a wide, quiet, empty stretch of road or a large, deserted parking lot where you can safely perform sudden slowdowns without interfering with other motorists.
- Accelerate your F-150 up to 40 miles per hour.
- Press the brake pedal firmly with steady pressure to slow the truck down rapidly to about 10 miles per hour. Do not come to a complete dead stop, as holding the hot pads against a stationary rotor can leave an uneven patch of material on the metal.
- Drive normally for about 30 seconds to let the wind cool down the brake assemblies.
- Repeat this exact 40-to-10 mile-per-hour slowdown process five or six times in a row.
- Next, increase your speed to 50 miles per hour and brake firmly down to 15 miles per hour. Repeat this higher-speed cycle three times.
- Drive your truck smoothly for several minutes without using the brakes to let the intense heat dissipate naturally from the wheels. Once your brakes have cooled down, the burnishing process is complete, and your truck is officially ready for regular service.
Frequently Asked Questions
Why is my new brake pedal feeling soft or spongy after doing all this work?
A soft or spongy brake pedal is almost always a sign that air bubbles are still trapped inside your hydraulic lines. Because air can compress when you push the pedal, you lose the firm hydraulic force needed to move the caliper pistons. To resolve this problem, you must perform the brake bleeding sequence again on both front wheels. Make sure that your helper keeps steady pressure on the pedal while you open and close the bleeder valve, and always ensure your fluid reservoir under the hood stays filled with fresh fluid.
What happens if I forget to clean the new rotors with brake cleaner?
If you forget to spray down your new rotors with cleaner before installing them, the factory protective anti-rust oil will burn directly into your new brake pads as soon as they get hot. This oil contamination glazes the surface of the pads, causing a severe drop in friction and stopping power. It often leads to loud squealing noises, smoky wheels, and permanent damage to both the new pads and the rotors, forcing you to buy replacement components all over again.
Why do front brake pads wear down faster than the rear ones on my truck?
Your truck’s front braking components carry a much larger workload than the rear parts due to weight transfer. Whenever you step on the brakes, the forward momentum shifts the massive weight of your F-150 onto the front suspension. Because of this dynamic shift, the front brakes handle up to seventy percent of the total stopping force required to bring your vehicle to a halt. This high load means they naturally experience greater heat and friction wear over time.
Do I really need to replace my calipers every time I install new pads and rotors?
No, you do not need to replace the calipers every single time you change your pads and rotors. Calipers are designed to last through multiple sets of pads. However, you should replace them if you notice fluid leaking past the internal rubber piston seals, if the caliper body has become severely corroded, or if the internal pistons have seized up, causing the brakes to drag constantly. Replacing them alongside your pads and rotors ensures your entire front stopping system is completely refreshed.
Why is it important to use new copper crush washers on the brake line banjo bolt?
Copper is a relatively soft metal that is specifically chosen because it deforms slightly when you tighten the banjo bolt. This flattening action creates a perfect, airtight seal between the hard steel brake line and the caliper housing. Once a copper washer has been compressed by a bolt, it hardens and cannot reshape itself a second time. Reusing old washers will almost always lead to a persistent, slow brake fluid leak, which compromises your hydraulic system safety.