Whether you want to change your own oil, swap out a flat tire, or just look underneath your car to see how things work, learning how to lift your vehicle is the absolute first step. It can feel a bit intimidating at first. After all, you are raising a machine that weighs thousands of pounds into the air, and you need to make sure it stays exactly where you put it.
Getting your car off the ground does not have to be scary. When you use the right tools and follow the correct steps, it is a straightforward process that anyone can master. This guide will walk you through everything you need to know to lift and support your vehicle like a seasoned professional, keeping you and your car completely safe from start to finish.
Gathering Your Essential Safety Gear and Tools
Before you even think about touching your car, you need to assemble your team of tools. Working on a vehicle is not a situation where you want to improvise or use the wrong equipment. Having the correct gear ensures that the job goes smoothly and that you remain completely out of harm’s way.
The Floor Jack
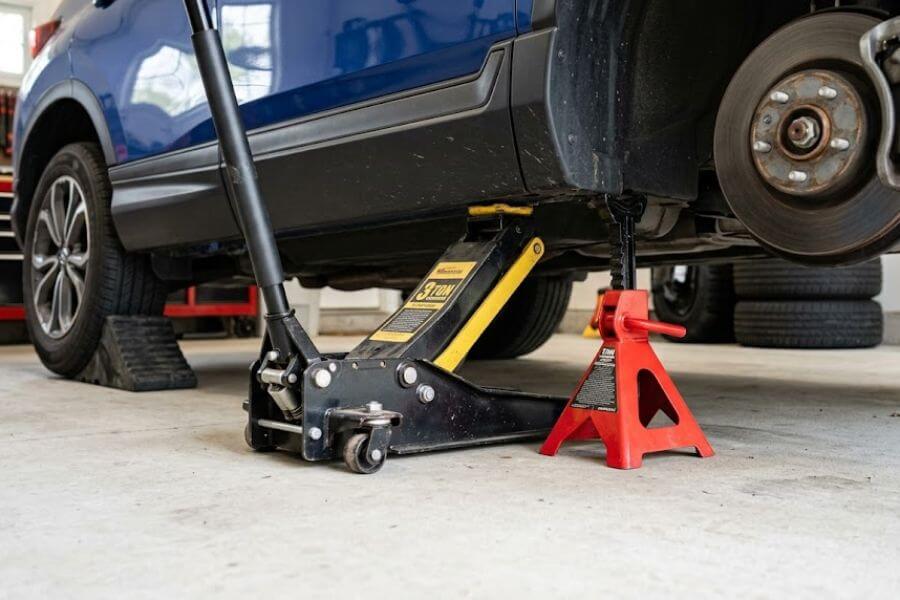
The floor jack is the muscle of the operation. This is a heavy, wheeled device that uses hydraulic fluid power to do the heavy lifting for you. When you pump the handle, it pushes a metal saddle upward, raising the vehicle off the ground.
When choosing a floor jack, you must check its weight rating. Most passenger cars can be lifted with a two-ton jack, while larger trucks and SUVs might require a three-ton or four-ton jack. A single ton equals two thousand pounds, so a three-ton jack can handle six thousand pounds. Always choose a jack that is rated for more than the weight of your vehicle to give yourself a massive safety cushion.
Jack Stands
If the floor jack is the muscle, the jack stands are the bones. This is the most crucial lesson in automotive maintenance: never put any part of your body under a vehicle that is only supported by a hydraulic floor jack. Jacks can fail, seals can leak, and valves can release pressure suddenly.
Jack stands are mechanical, stationary towers made of heavy-duty steel or aluminum. Once you raise the vehicle with the jack, you place these stands underneath the solid parts of the car frame and lower the car onto them. They mechanical-lock into place and will not budget, providing a rock-solid foundation while you work underneath. Like jacks, they come with weight ratings, and you should always use them in pairs that match or exceed your vehicle’s weight requirements.
Wheel Chocks
Vehicles like to roll. Even when a car is in park with the emergency brake engaged, lifting one end of it changes the balance and can cause the tires still touching the ground to shift. Wheel chocks are heavy wedges made of rubber, plastic, or metal that you wedge tightly against the tires that remain on the ground.
If you are lifting the front of the car, you place chocks behind and in front of the rear tires. If you are lifting the back of the car, the front tires get chocked. This simple step completely prevents the vehicle from rolling forward or backward while you are lifting it.
Personal Protective Equipment
Working around machinery means protecting yourself from rogue debris, fluids, and heavy drops. You should always wear a pair of sturdy safety glasses to keep dust, rust particles, and dripping fluids out of your eyes. A good pair of mechanic gloves will protect your hands from sharp metal edges, hot exhaust pipes, and nasty chemical grime while giving you a much better grip on your tools.
Preparing Your Workspace for Success
Safety starts long before the jack touches the car frame. Setting up your environment correctly creates a controlled space where variables are minimized and surprises are eliminated.
Finding Perfect Ground
You must always work on a level, solid surface made of concrete. Asphalt might seem hard, but on a hot summer day, it can soften significantly. The heavy, narrow legs of a jack stand can actually sink into warm asphalt, causing the vehicle to tilt and potentially fall.
Never attempt to jack up a vehicle on dirt, gravel, grass, or any sloped surface. If a jack or stand shifts even a tiny bit on an unstable surface, the momentum of the moving vehicle will pull everything down with it. A flat concrete garage floor or a clean, level concrete driveway is the gold standard.
Securing the Vehicle Position
Once your car is parked on the perfect concrete spot, you need to lock it down completely. Put the transmission into Park if you drive an automatic, or shift into first gear or reverse if you drive a manual transmission stick-shift.
Next, pull the emergency brake or parking brake handle up as hard as you can. This locks the rear wheels in place. Finally, turn off the engine and take the keys out of the ignition so nobody can accidentally start the car while you are working near the moving parts.
Placing the Chocks
Go to the opposite end of the car that you plan to lift. Grab your wheel chocks and wedge them snugly against the tires. You want to place one chock firmly against the front of the tire and another firmly against the back of the tire.
| Vehicle Area Being Lifted | Wheel Chock Placement Location | Transmission and Brake Settings |
| Front End Lifted | Around Both Rear Tires | Park / First Gear + Parking Brake On |
| Rear End Lifted | Around Both Front Tires | Park / First Gear + Parking Brake On |
| Left Side Lifted | Around Both Right Tires | Park / First Gear + Parking Brake On |
| Right Side Lifted | Around Both Left Tires | Park / First Gear + Parking Brake On |
Locating Your Vehicle’s Factory Pinch Welds and Jack Points
You cannot just place a jack anywhere under a car. If you pump up a jack against the thin sheet metal floorboards of your vehicle, the jack will punch right through the floor, ruining your interior and damaging the structure. You must only lift from designated, reinforced factory locations.
Understanding the Pinch Welds
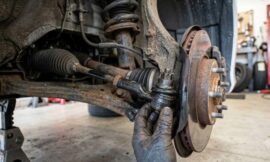
On most modern cars with a unibody design, where the body and frame are one single piece, the most common jack points are the pinch welds. These are the sturdy metal ridges running along the bottom sides of your car, right between the wheels and directly beneath the doors.
The manufacturer reinforces these specific sections with multiple layers of thick steel welded together to withstand the intense pressure of lifting the vehicle. Look closely at the plastic trim under your doors; you will often see small notches, arrows, or cutouts that point directly to the reinforced section of the pinch weld.
Frame Rails for Trucks and SUVs
If you are working on a larger truck or older SUV that features a body-on-frame design, you will see two massive, solid steel beams running down the entire length of the underside of the vehicle. These frame rails are incredibly strong. You can generally place your jack and jack stands directly under these straight sections of the frame rail, as long as you stay clear of brake lines, fuel lines, or wiring harnesses that might be running alongside them.
Consulting the Owner’s Manual
Every single vehicle is different, and guessing is never an option when it comes to automotive safety. Open your glovebox, pull out the owner’s manual, and flip to the index to look up lifting or changing tires.
The manual will feature clear diagrams showing you exactly where the factory-approved lifting points are located. Some vehicles also feature central jack points on the front subframe crossmember or the rear differential housing, allowing you to lift the entire front or rear end at once. Always verify these locations in your manual before proceeding.
The Step-by-Step Guide to Lifting the Vehicle
Now that your workspace is set up, your tools are ready, and you know exactly where to aim, it is time to perform the actual lift. Take your time during this process; there is absolutely no reward for speed.
Positioning the Jack
Roll your floor jack underneath the vehicle, aligning the circular metal saddle directly beneath the chosen factory jack point. Before you start pumping, look closely to ensure that the jack saddle is perfectly centered on the solid metal lift point.
Most floor jacks have a release valve built into the handle that you must turn clockwise to tighten and close before the jack will raise. Twist the handle fully clockwise until it stops, but do not crank it down with excessive force.
Raising the Car Slowly
Begin pumping the jack handle downward using smooth, steady strokes. Watch the saddle rise and make contact with the vehicle. Stop pumping the moment the saddle touches the car.
Get down on your knees and inspect the contact area. Is the jack perfectly centered? Is it slipping to one side? If anything looks slightly crooked, turn the jack handle counter-clockwise slowly to lower the car back down, adjust the position, and start again. If everything looks perfectly straight, continue pumping until the tire lifts completely off the ground and you have enough space to clear your jack stands.
Setting Up the Jack Stand
Slide your jack stand underneath the vehicle and position it right next to the floor jack, directly under another approved factory jack point or an adjacent reinforced section of the frame rail. Raise the adjustable center post of the jack stand until the cradling saddle is as close to the frame as possible.
Ensure that the mechanical locking pawl or safety pin is fully engaged in the tooth notches of the stand. The stand must sit completely flat on the concrete floor, with all four legs making solid, even contact with the ground.
Lowering the Vehicle Onto the Stand
This is the step that requires the most finesse and control. You want to lower the vehicle onto the jack stand so gently that you can barely hear it touch.
Slowly, and very carefully, turn the floor jack handle counter-clockwise. You only need to twist it a tiny fraction of an inch to open the hydraulic valve. If you turn it too fast, the car will drop like a stone, which can damage the car or tip the jack stands over. Twist it gently until you see the car creep downward, and let it rest its full weight completely onto the jack stand. Once the car is firmly settled on the stand, do not remove the floor jack just yet; leave it raised with just a tiny bit of light pressure against its lift point to act as a secondary safety backup.
Verifying Solid Stability Before Going Underneath
Before you slide your body under the car to start your repair work, you must pass the ultimate stability check. This is the moment where you prove without a shadow of a doubt that the car is completely secure.
The Rock Test
Stand outside the vehicle, place your hands on the bumper or the side frame of the car, and give it a firm, vigorous shake. Push it back and forth and side to side with a reasonable amount of muscle power.
It might feel scary to shake a lifted car, but it is infinitely better for the car to shift or fall off the stands now, while your body is safely on the outside, than later when you are lying underneath it. If the car creaks, wobbles, or if any leg of the jack stands lifts off the concrete, the setup is unsafe. You must immediately raise the car back up with the floor jack, readjust your jack stands, lower it back down, and perform the rock test again until the vehicle feels as solid as a concrete wall.
Secondary Backups
A great mechanic always relies on redundant safety systems. In addition to leaving your floor jack in place as a backup, you can slide your removed car tires and wheels right under the side frame rails of the car if you happen to be doing tire work.
If the jack stands were to somehow fail completely, the heavy steel or aluminum wheels lying flat on the ground would catch the car frame before it could crush down to the floor, leaving a survival gap of space underneath.
Lowering the Vehicle Back Safely to the Floor
When your repair job is finished, it is time to return the car back to the earth. Lowering the car requires just as much focus and care as lifting it did.
Clearing the Area Underneath
Before you touch any tool, take a moment to look completely under the car. Crawl around and look for stray tools, loose nuts and bolts, shop rags, oil pans, and oil slick puddles.
Most importantly, make sure that your own legs and body parts, as well as any friends or pets helping you out, are completely clear of the vehicle perimeter. You want a completely empty zone beneath the car before you start moving it down.
Lifting Off the Stands
Close the hydraulic release valve on your floor jack by twisting the handle fully clockwise. Begin pumping the jack handle smoothly to raise the vehicle just an inch or two off the jack stands. You only need to lift it high enough so that the jack stands can slide out from underneath without scraping or snagging on the car frame.
Removing the Jack Stands
Reach under the vehicle carefully and pull the jack stands out from the side of the car. Place them far away from the work area so they do not become a tripping hazard or block the downward path of the car body. Double-check that nothing else remains underneath the tires or frame.
The Final Gentle Descent
Grab the floor jack handle and twist it counter-clockwise with extreme control, turning it just a millimeter at a time. Let the vehicle glide downward smoothly and slowly until the tires touch the concrete and the jack saddle completely separates from the lifting point.
Once the jack is loose, roll it out from under the car, open the valve fully to let the jack saddle lower all the way down, and put your tools away. Now you can remove your wheel chocks from the tires, release your parking brake, and celebrate a job safely and successfully completed.
Frequently Asked Questions
Can I use a block of wood on top of my jack stand to protect my car frame?
You should avoid placing loose blocks of wood directly between the top metal saddle of a jack stand and your car frame. Wood can split, crack, or crush under the immense, concentrated weight of a vehicle, which can cause the car to suddenly shift and slip off the stand. If you want to protect your vehicle’s factory paint or pinch welds from scratches, you can purchase specially designed, heavy-duty molded rubber jack stand pads that slip directly over the metal cradle of your stands. These rubber pads are engineered to distribute the weight evenly without any risk of splitting or sliding out of place.
What should I do if my floor jack starts slowly dropping on its own while lifting?
If your floor jack begins to sink or lose height while you are actively pumping it, stop working immediately. This behavior means that either the hydraulic release valve is not fully closed, or the internal hydraulic seals are worn out and leaking fluid past the internal pistons. Never try to quickly slide a jack stand under a sinking jack. Instead, if the car is high enough, safely guide it back down by turning the valve counter-clockwise fully, reset everything, and swap out the faulty jack for a brand-new, properly functioning unit. A jack that cannot hold pressure is a serious hazard and should never be used.
Is it acceptable to use the emergency scissor jack that came with my car for maintenance?
The emergency roadside scissor jack that is tucked away in your car trunk near the spare tire is only built for temporary emergency situations, such as changing a flat tire on the side of the road. These jacks have a very narrow base, are highly unstable, and are mechanical devices that can easily tip over if the car is bumped or shifted. They are never intended to hold a car up for standard garage maintenance work. You should always invest in a high-quality hydraulic floor jack and heavy-duty mechanical jack stands for any routine garage work, as they provide a vastly wider, safer, and more stable platform.
How do I store my floor jack and jack stands when I am not using them?
To keep your lifting equipment performing perfectly for years, you should store them in a clean, dry, indoor environment like a garage or tool shed. For your floor jack, open the hydraulic release valve completely so that the lift arm and saddle sit in the lowest possible position, which keeps the polished hydraulic ram piston retracted inside the cylinder and protected from moisture, dust, and rust. Wipe away any spilled oil or grease from the body, and periodically check the fluid levels to ensure the jack remains ready for your next automotive project.
