We have all been there. You walk out to your car, the sun hits the paint just right, and your heart sinks. There it is—a nasty, deep scratch staring right back at you. It is the kind of mark that catches your fingernail and makes your stomach churn. Your beautiful ride suddenly feels ruined.
But do not panic and do not reach for your wallet to pay an expensive body shop just yet. You can fix this yourself. With some patience, the right tools, and a little elbow grease, you can erase that scratch and bring back that mirror-like shine. This guide will walk you through the exact process of wet-sanding, compounding, and buffing your car paint to perfection.
Understanding Your Car Paint
Before you grab any tools, you need to understand what you are actually working on. Modern car paint is not just one thick layer of color. It is a carefully layered system designed to protect the metal underneath and look great at the same time. If you do not know how these layers work, you could accidentally cause more harm than good.
The Anatomy of Automotive Paint
Think of your car paint like a delicious three-layer cake. Each layer has a specific job to do, and they all work together to create the final look.
- The Primer: This is the bottom layer. It sticks directly to the bare metal or plastic panel of your car. Its main job is to prevent rust and create a smooth, sticky surface for the next layer of paint to bond with.
- The Base Coat: This is the middle layer. It contains the actual color and any metallic flakes or pearls that give your car its unique look. Interestingly, the base coat actually looks completely dull and matte when it is first sprayed on. It has no shine on its own.
- The Clear Coat: This is the top layer, and it is the star of our show today. It is a thick, completely see-through layer of resin sprayed over the base coat. It does two massive jobs. First, it acts as a shield, protecting the color layer from the harsh sun, rain, bird droppings, and road grit. Second, it provides that deep, glossy, wet-looking shine that makes a car look brand new.
How Deep is Your Scratch
When you look at a scratch, you need to play detective. You must figure out exactly which layer of the paint cake the scratch has penetrated. This determines whether you can fix it at home or if it needs professional help.
| Scratch Depth Level | Visual Appearance | Can You Fix It at Home? |
| Clear Coat Scratch | White or hazy line, disappears when wet, does not catch a fingernail deeply | Yes, this is the perfect candidate for this guide |
| Base Coat Scratch | You can see a different color shade underneath, does not disappear when wet | Partially, needs touch-up paint before sanding |
| Primer or Metal Scratch | You can see gray, black, or shiny silver metal at the bottom of the groove | No, needs immediate primer and paint to prevent rust |
Here is the golden rule of paint correction: the fingernail test. Gently run your fingernail across the scratch. If your nail glides over it with just a tiny bump, or if the scratch completely vanishes when you splash a little water on it, you are dealing with a clear-coat scratch. You can fix this. But if your fingernail drops into a deep canyon and snaps to a hard stop, the scratch has cut all the way through the clear coat.
In this guide, we are focusing on deep clear-coat scratches. These are marks that are deep enough to see clearly but have not damaged the color coat underneath. We have just enough clear-coat room to level the surface out.
The Science of Paint Correction
How do we actually get rid of a scratch? It sounds like magic, but it is just basic physics. You cannot actually fill a scratch in or pull it out. Instead, you have to shave down the surrounding clear coat until it is perfectly level with the very bottom of the scratch.
Imagine a scratch as a tiny V-shaped valley in a smooth plateau. To make the valley disappear, you must sand down the entire plateau until it matches the height of the valley floor. Once the surface is completely flat again, light will reflect off it evenly, and the scratch will be completely invisible to the human eye.
Gathering Your Tools and Workspace Setup
You would not build a house without a hammer, and you should not touch your car paint without the proper gear. Using the wrong items can ruin your clear coat in seconds. Taking the time to gather high-quality supplies ensures you get a professional outcome.
The Essential Supplies Checklist
Do not skimp on your materials. Go to a dedicated automotive parts store or a detailing supply shop to get these specific items.
- Automotive Sandpaper: You need ultra-fine, waterproof sandpaper. Do not use regular wood sandpaper from the hardware store. Look for grits of 1500, 2000, 2500, and 3000.
- Sanding Block: Never use your bare fingers to press sandpaper against your car. Your fingertips create uneven pressure points that will gouge deep grooves into the paint. A soft foam or rubber sanding block distributes the pressure perfectly.
- Rubbing Compound: This is a liquid paste filled with microscopic abrasives. Think of it like liquid sandpaper. It is designed to remove the heavy scratches left behind by your sandpaper.
- Finishing Polish: This is a much milder liquid abrasive. It cleans up the tiny haze left by the rubbing compound and brings out the deep shine.
- Polishing Machine: While you can do this by hand, a dual-action polisher makes the job much faster and yields far better results. Dual-action machines spin and oscillate at the same time, making them safe for beginners because they do not build up heat quickly.
- Buffing Pads: You need a heavy-cutting foam or microfiber pad for the compounding step, and a soft finishing foam pad for the polishing step.
- Lubricant: A spray bottle filled with clean water and a few drops of mild automotive car soap. This keeps the sandpaper sliding smoothly.
- Microfiber Towels: Grab a pack of plush, tag-less microfiber cloths. You will use these to wipe away residue. Regular towels or old t-shirts will scratch your freshly polished paint.
- Painter Tape: High-quality automotive masking tape is crucial for protecting body lines, plastic trim, and rubber seals.
Preparing a Safe Environment
Where you work is just as important as how you work. You cannot do this job outside on a sunny, windy day.
First, find a shaded, indoor area like a clean garage. Direct sunlight heats up the car panels, which makes your soapy water dry up too fast and causes compounds to bake onto the paint. A cool panel is a happy panel.
Second, ensure the area is free of dust and wind. If a gust of wind blows a single grain of sand onto your polishing pad or sandpaper, you will drag that rock across your paint, creating massive, deep swirls that are incredibly difficult to fix.
Third, set up excellent lighting. A handheld LED detailing light or a bright work light on a stand is necessary. You need to see the paint from different angles to track your progress and see exactly when the scratch disappears.
Washing and Decontaminating the Area
You must never sand or buff a dirty car. Any tiny speck of dirt trapped under your tools will act like a rock, wrecking your paint.
Start by washing the entire vehicle thoroughly using a wax-free car soap. Pay extra attention to the area around the scratch. Rinse the car completely and dry it using a clean microfiber drying towel.
Next, use a detailing clay bar on the area around the scratch. A clay bar picks up bonded contaminants like tree sap, industrial fallout, and brake dust that regular washing leaves behind. Spray your soapy water lubricant on the paint, then gently glide the clay bar back and forth over the area. You will feel the rough bumps disappear until the paint feels as smooth as glass. Wipe the area clean one last time.
[Wash Car Thoroughly] → [Apply Clay Bar Treatment] → [Dry and Inspect Surface]
Mastering the Art of Wet Sanding
This is the scariest part of the entire process for most people. Taking sandpaper to a glossy car finish feels wrong, and the paint will look terrifyingly dull at first. But if you follow the steps carefully, you will control the process perfectly.
Why We Use Water
Wet-sanding gets its name because we keep the surface completely drenched while we sand. The water serves two vital purposes.
First, it acts as a slick cushion between the paper and the paint. This allows the sandpaper to glide smoothly, preventing the gritty particles from digging too deeply into the clear coat.
Second, the water constantly flushes away the tiny particles of clear coat that you are shaving off. Without water, that sanded paint dust would build up on the paper, clumping together into hard little balls that would create deep, nasty scratches called pig-tails.
Soaking Your Sandpaper
Preparation is everything. Before you even think about touching the car, take your sheets of ultra-fine sandpaper and submerge them in a bucket of clean water. Drop a few drops of car soap into the water to increase the slickness.
Let the paper soak for at least fifteen to thirty minutes. This softens the paper backing, making it highly flexible so it can conform to the curves of your car body panels without digging in its sharp edges.
Taping Off the Danger Zones
Before you start sanding, take your painter tape and mask off nearby areas. Cover any plastic trim, rubber moldings, door handles, and emblems.
Most importantly, place tape over any sharp body lines or panel edges near the scratch. The paint on raised ridges and sharp corners is incredibly thin. A single swipe of sandpaper over a sharp body line can strip the clear coat right off, exposing the bare metal. Protect those edges like a shield.
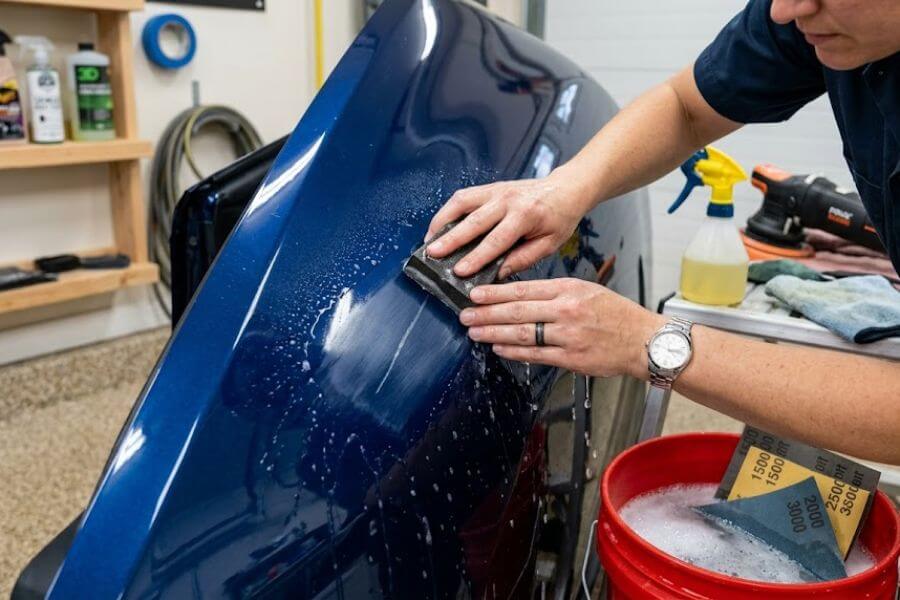
The Correct Sanding Technique
Wrap your soaked 2000-grit sandpaper tightly around your foam sanding block. Spray a generous amount of your soapy water mixture directly onto the scratched area and onto the sandpaper face.
Hold the sanding block lightly. You do not need to push down hard. The weight of your hand provides plenty of pressure; let the grit of the paper do the heavy lifting.
Right Way:   [Block Flat] -------> Straight Lines Only (Cross-Hatch)
Wrong Way:   [Block Tilted] ------> Circular Motion (Gouges Paint)
Move the block in a straight, back-and-forth motion. Never sand in circles. Circular sanding creates uneven swirl marks that are brutal to polish out. Sand at a forty-five-degree angle across the scratch. This ensures you level down the high edges of the scratch valley instead of riding along inside the groove.
Keep the area dripping wet. Every four or five strokes, spray more water. Stop after about ten to fifteen strokes to check your work. Wipe the slurry of white soapy water away with a clean microfiber towel and let the paint dry completely.
When dry, the sanded spot will look completely dull, flat, and hazy. Look closely at the hazy patch under your LED light. If you can still see a shiny, dark line running through the middle of the dull area, that shiny line is the bottom of the scratch. It means you have not leveled the surrounding paint enough yet. Spray more water and sand a few more times until that shiny line completely disappears into the flat, uniform matte haze.
Stepping Up the Grits
Once the scratch is completely leveled and gone, you are left with a dull patch of paint covered in 2000-grit sanding marks. Now you need to make those marks smaller and shallower so they can be polished out. This is called refining your scratch pattern.
Switch your sandpaper to 2500-grit or 3000-grit. Re-wet the area thoroughly. This time, change your sanding direction. If you sanded from left-to-right with the first grit, sand from top-to-bottom with the finer grit. This cross-hatch pattern allows the finer paper to quickly shave down the ridges created by the previous, rougher paper.
Sand gently for another ten to fifteen strokes, keeping the surface soaking wet. Wipe it clean and dry it. The area will still look dull, but the haze will look much smoother, finer, and satin-like. You are now ready to bring back the shine.
Compounding the Sanding Marks Away
Compounding is where the transformation truly begins. This step removes the uniform dull haze you just created with your sandpaper and begins to restore clarity to the clear coat.
How Rubbing Compound Works
Think of rubbing compound like a liquid modern technological marvel. It contains microscopic, engineered particles suspended in a thick lotion. When your spinning polishing pad presses these particles against the hazy clear coat, they act like millions of tiny knives, leveling down the fine scratches left by your 3000-grit sandpaper.
As you work the compound into the paint, these tiny particles actually break apart and become smaller and smaller. This means the compound starts out aggressive to cut away the heavy haze, and slowly finishes fine to leave a semi-glossy surface behind.
Setting Up Your Dual-Action Polisher
Attach your heavy-cutting foam or microfiber pad firmly to the backing plate of your dual-action polisher. Make sure it is perfectly centered; an off-center pad will cause the machine to vibrate violently and shake your arms to pieces.
Take your bottle of rubbing compound and shake it well to distribute the abrasives evenly. Apply four or five pea-sized drops of compound directly onto the face of the pad. Do not overdo it. Using too much product creates a sloppy mess and acts like a lubricant cushion, stopping the pad from cutting the paint effectively.
Before you turn the machine on, press the face of the pad firmly against the dull spot on your car. Dab it around the area a few times to spread the paste out. This prevents the compound from slinging all over your garage walls the second you flip the power switch.
The Section Pass Technique
Set the speed dial on your dual-action polisher to a medium-high setting, usually around speed four or five on most machines. Place the pad flat against the paint, hold the machine with two hands, and pull the trigger.
Move the machine across the dull area in a slow, deliberate grid pattern. Your hand should move very slowly, about one inch per second.
Pass 1: Left to Right (Horizontal Lines)
Pass 2: Up and Down (Vertical Lines)
Combined, these two steps equal one full section pass.
Keep the pad completely flat against the panel. If you tilt the machine on its edge, you will concentrate all the energy into a small line, which can burn through the clear coat in an instant. Apply light downward pressure, just enough to let the machine know you are boss, but do not push so hard that the spinning pad stops rotating. Watch the markings on your backing plate to ensure it keeps spinning smoothly.
Work the compound through three to four complete section passes. You will notice the white lotion start to thin out and turn into a clear, film-like haze on the paint. This tells you the abrasives have broken down completely and done their job. Turn the machine off while the pad is still pressed against the paint, then lift it away.
Inspecting Your Progress
Grab a fresh, clean microfiber towel. Fold it into quarters so you have a thick, cushioned pad. Wipe away the oily compound residue from the paint using light, straight strokes.
Turn on your bright LED light and look at the paint from several different angles. The dull matte finish should be completely gone. In its place, you should see high gloss and deep color.
However, look closely. You might see a faint, cloudy haze or tiny, fine spider-web lines under the bright light. Do not worry. Those are normal compounding trails. The important thing is that the flat sanding marks and the deep scratch are entirely gone. If you can still see a hint of the flat sanding haze, repeat the compounding process one more time with a few fresh drops of product.
Buffing and Polishing to a Mirror Finish
You are on the home stretch now. The deep scratch is history, and the sanding marks are gone. Your paint looks good, but we want it to look absolutely perfect. The polishing step removes that last bit of compound haze and clarifies the clear coat to produce a jaw-dropping reflection.
The Role of Finishing Polish
Finishing polish is the ultra-fine cousin of rubbing compound. It contains much smaller, rounder abrasives that do not cut deep into the paint. Instead, they gently shave away the micro-marring and tiny haze left behind by the aggressive compounding step.
Think of polishing like jewelers burnishing precious metals. It refines the surface texture down to an absolute microscopic level of flatness. The flatter the surface, the more perfectly light reflects off it, resulting in that dripping-wet look.
Switching Pads and Products
Remove your dirty cutting pad from the polishing machine. Grab your soft finishing foam pad and center it onto the backing plate. This pad has no cutting power on its own; it is soft and spongy, designed purely to hold the fine polish evenly against the car.
Apply three to four small drops of finishing polish onto the pad. Just like before, dab the pad across your work zone to distribute the product before turning the machine on.
The Polishing Method
Set the speed dial on your dual-action machine slightly lower this time, around speed three or four. You do not need aggressive speed or heavy pressure for this stage. The weight of the machine itself is plenty of force.
Guide the polisher over the area in the same cross-hatch pattern, moving left-to-right then top-to-bottom. Since the abrasives are so fine, you only need to do two or three quick passes. The polish will quickly break down into a light, transparent oil film.
Flip the power switch off, lift the machine away, and get ready for the grand reveal.
The Final Wipe-Down
Take a brand-new, ultra-plush microfiber towel. Spray a light mist of a dedicated paint prep spray or a mixture of isopropyl alcohol and water onto the area. This dissolves and removes the polishing oils left behind on the paint, revealing the true state of the clear coat.
Wipe the surface gently. Step back, turn on your LED light, and admire your hard work. The clear coat should look completely flawless, crystal clear, and as reflective as a calm mountain lake. The deep scratch that used to ruin your day is completely gone, and nobody will ever know it was there.
Paint Correction Journey:
[Deep Scratch] → [Sanded Flat Haze] → [Compounded High Gloss] → [Polished Mirror Finish]
Protecting Your Freshly Corrected Paint
Congratulations, you have successfully leveled and polished your clear coat. But your job is not quite done yet. By sanding and polishing, you have completely stripped away any old wax or sealants that were on the car. Your fresh, beautiful clear coat is now completely naked and vulnerable to the world. You must seal it immediately to lock in that gloss and keep it safe.
Choosing Your Shield
You have a few great options when it comes to paint protection. Each one offers a different level of durability and shine, so choose the one that fits your lifestyle and budget.
- Carnauba Wax: This is the classic option. It is made from natural palm tree leaves and gives the paint a deep, warm, natural glow that car enthusiasts love. However, it is soft and wears off quickly, usually lasting only one to two months before you need to reapply it.
- Paint Sealant: This is a synthetic liquid wax made from man-made polymers. It creates a tough, interlocking chemical shield over your paint. It gives off a very bright, glassy shine and lasts much longer than natural wax, protecting your car for four to six months.
- Ceramic Coating: This is the ultimate modern protection. It is a liquid monomer that contains silicon dioxide. When you apply it, it chemically bonds with your clear coat, essentially hardening into a second, ultra-tough, microscopic layer of glass. It repels water like crazy, makes the car incredibly easy to wash, and can last anywhere from one to several years.
Applying the Protection
Whichever protection option you choose, apply it using a clean foam applicator pad. Work in small circles or straight lines, putting down a paper-thin, even layer over the freshly polished spot.
Let the product dry according to the instructions on the bottle. This usually takes five to ten minutes, during which the product will turn into a white, chalky haze.
Take a clean microfiber towel and buff away the dried residue using light, circular motions. Turn the towel over frequently to ensure you are picking up all the excess product. Once buffed clean, your paint is officially shielded against the elements.
Common Mistakes to Avoid
Paint correction is an incredibly rewarding process, but it leaves very little room for error. A single careless mistake can instantly turn a simple repair into an expensive trip to a professional repaint shop. Keep these common pitfalls in mind so you can steer completely clear of them.
Sanding without a Block
It bears repeating: never, ever sand your paint using just your bare hand holding the sandpaper. The bones in your fingers naturally create thin, high-pressure ridges.
If you press your fingers against the paper, you will sand deep, uneven trenches into your clear coat that follow your finger shapes. Always use a proper, flat foam or rubber sanding block to ensure the cutting force is perfectly distributed across the entire surface.
Rushing the Inspection Steps
When you are wet-sanding, it is easy to get impatient and keep sanding without stopping to check your work. This is a recipe for disaster.
You must stop every ten to fifteen strokes, wipe the water away completely, and let the paint dry. You can only see the true depth of the remaining scratch when the paint is totally bone-dry. If you sand continuously while the panel is wet, you will have no idea how much clear coat you have removed, and you will likely blast right through into the color coat below.
Ignoring Panel Edges and Body Lines
The sheet metal of a car is stamped into beautiful shapes, creating sharp lines, folds, and corners. When paint is sprayed onto a car at the factory, it naturally flows away from sharp ridges, leaving the clear coat incredibly thin on those spots.
If your sandpaper or compounding pad rubs heavily against a sharp body line, it will cut through that thin paint in a heartbeat. Always keep your tools away from edges, or place high-quality painter tape over them to protect them from accidental contact.
Using Too Much Product
When it comes to compound and polish, more is definitely not better. If you overload your buffing pad with product, the excess liquid acts like a thick cushion that prevents the tiny abrasive particles from contacting the paint properly. It slows down your progress and creates a sticky, messy film that slings everywhere. Stick to four or five small, pea-sized drops at a time.
Frequently Asked Questions
What happens if I accidentally sand all the way through the clear coat?
If you sand too deep and cut completely through the clear coat, you will hit the base coat below. This is called burning through the paint. You will know it happened immediately because your sandpaper or towel will suddenly start turning the color of your car paint, and you will see a dull, flat patch that looks completely different from the surrounding area.
Unfortunately, this cannot be polished or buffed out. The clear coat is gone, and the exposed base coat has no gloss or protection. The only way to fix a burn-through is to have that section of the panel professionally resprayed with new color and clear coat at a body shop. This is why it is vital to sand cautiously, check your progress constantly, and stop the moment the scratch disappears.
Can I do this entire process by hand if I do not own a polishing machine?
Yes, you can absolutely do this entire process by hand, but it requires a tremendous amount of time, physical effort, and patience. Humans cannot spin or vibrate their hands anywhere near as fast as a dual-action machine, which runs at thousands of revolutions per minute.
If you choose to work by hand, wrap your microfiber towel tightly around a foam applicator pad or a soft block to keep your pressure even. Use firm, straight, back-and-forth motions to work the compound into the sanded haze. You will need to work the product into the paint for a much longer time to break down the abrasives and remove the sanding scratches. It is an excellent workout, but your arms will be incredibly tired by the end.
How many times can a car be wet-sanded before the paint gets dangerously thin?
Factory clear coat is incredibly thin, usually about the thickness of a sticky note or a clear plastic food wrap. Wet-sanding removes a small but measurable amount of that thickness. Because of this, you should only wet-sand a specific area of factory paint once or twice in its entire lifetime.
If you constantly wet-sand the same panel every time you get a light scratch, you will eventually thin out the clear coat so much that it will fail. Over-thinned clear coat will begin to peel, crack, and turn white under the sun, a condition known as clear-coat failure. For everyday maintenance and light marks, stick to mild polishes and avoid sandpaper entirely unless the scratch is truly deep.
Is wet-sanding safe to use on a car with a matte or satin paint finish?
No, you must never wet-sand, compound, or polish a vehicle that has a factory matte or satin paint finish. Matte paint looks the way it does because its clear coat is intentionally rough on a microscopic level, scattering light instead of reflecting it.
If you sand or polish matte paint, you will shave those microscopic rough ridges flat, which will create a permanent, awkward, shiny gloss spot on your beautiful matte finish. There is no way to undo this mistake. Matte and satin finishes cannot be mechanically corrected; if they get deep scratches, the entire panel must be completely repainted with special matte clear-coating agents.
How long should I wait to wet-sand and buff a car that was recently repainted?
If your car was recently repainted at a professional body shop, you must wait for the fresh paint to fully cure before you attempt to sand or polish it. Even though the paint feels dry to the touch within a few hours, it takes weeks for the solvents inside the deep layers of paint to completely evaporate and escape, a process called out-gassing.
Sanding or sealing fresh paint too early can trap those solvents, leading to a dull, wrinkled finish or tiny blisters in the clear coat. Most professional paint manufacturers recommend waiting at least thirty to ninety days before doing any heavy wet-sanding or applying any protective waxes and sealants. Always ask your specific auto body painter for their recommended waiting window.
