Picture this. You are driving down the highway, and a sudden summer downpour hits. You reach for the wiper switch, expecting your trusty blades to clear the view. Instead, you hear a sad, grinding groan. The wipers nudge forward an inch, shudder, and freeze right in your line of sight. You are stranded in a blurry world of water.
Most people think windshield wipers are just simple rubber strips. In reality, those blades are the final step in a clever mechanical dance. Beneath the plastic trim at the base of your windshield lives a powerhouse duo: the wiper motor and the transmission linkage assembly. When this system fails, driving becomes incredibly dangerous.
Taking your vehicle to a repair shop for this fix can drain your wallet quickly. Mechanics often charge steep fees for labor on steering column and cowl repairs. The good news? You can tackle this project right in your own driveway. With a few basic tools, a little patience, and this guide, you will restore your clear view of the road and keep your hard-earned cash where it belongs. Let us dive in and transform you into a backyard mechanic.
Understanding the Hidden Wiper Kingdom
Before you grab a single wrench, it helps to understand what you are actually working on. Your vehicle uses a complex network of electrical and mechanical components to clear rain, snow, and dirt. Knowing how these parts talk to each other makes the entire replacement process much smoother.
The Electric Heart: The Wiper Motor
The wiper motor is a compact, high-torque electric motor. It connects directly to your car’s electrical system. When you turn the wiper dial on your steering column, you send an electrical signal through a fuse and a relay to this motor. The motor converts that electrical energy into rotational force.
Most modern wiper motors have multiple speed settings and an intermittent function. They also feature a special internal parking switch. This switch ensures that when you turn the wipers off, the blades automatically travel back down to the very bottom of the glass rather than stopping randomly in the middle of your windshield.
The Mechanical Skeletal System: The Linkage Assembly
A motor can only spin in circles, but your wiper blades need to move back and forth in a sweeping motion. This is where the wiper transmission linkage, often called the cowl linkage, comes into play.
The linkage is a series of metal rods connected by pivot joints. It attaches directly to the drive shaft of the wiper motor. As the motor spins, the linkage converts that circular motion into a side-to-side sweeping motion. It pushes and pulls the wiper arms simultaneously so they move in perfect harmony without striking one another.
Common Failure Points
Why do these systems break down in the first place? Here are the usual suspects:
- Stripped Gears: The internal gears inside the motor are often made of heavy-duty plastic to reduce noise. Over time, or when forced to push heavy snow, these plastic teeth can strip away entirely.
- Worn Bushings: The linkage rods connect using plastic bushings. Exposure to temperature swings, moisture, and age causes these bushings to crack, crumble, and pop out of their sockets.
- Bent Rods: Trying to clear thick ice or heavy snow packs can bend the metal rods, throwing off the geometry of the entire system.
- Corroded Pivots: Water naturally drains through the area where the linkage lives. If the pivot points rust, they seize up, causing the motor to overheat and burn out.
Gathering Your Mechanical Toolbox
A successful repair depends heavily on preparation. You do not want to be stuck halfway through the job with your car torn apart, searching for a tool you do not own. Lay everything out on a clean workbench or a towel next to your vehicle before you begin.
Necessary Hand Tools
- Socket Set and Ratchet: You will need both metric and standard sockets, usually ranging from 8mm to 15mm, to remove the wiper arms and the assembly mounting bolts.
- Open-End Wrenches: Useful for holding nuts in place while you loosen tight bolts in cramped quarters.
- Screwdrivers: Gather a variety of flat-head and Phillips-head screwdrivers. These help pry off plastic covers and release wiring harness clips.
- Trim Clip Removal Tool: A specialized plastic or metal fork tool that allows you to pop off delicate plastic clips without snapping them.
- Wiper Arm Puller: A small, inexpensive tool that clamps onto the wiper arm base and presses down on the mounting stud, popping the stuck arm free without damaging your glass.
Safety Equipment and Cleaners
- Safety Glasses: Protecting your eyes from falling debris, rust flakes, and plastic shards under the cowl is crucial.
- Mechanic Gloves: A good pair of nitrile or thin work gloves protects your knuckles from sharp metal edges and keeps grease off your hands.
- Penetrating Oil: A spray can of rust-dissolving oil will save you from snapping rusted bolts.
- Dielectric Grease: Keeps moisture out of your new electrical connections, preventing future corrosion.
- Painter’s Tape: Used to mark the exact position of your wiper blades on the windshield before disassembly.
Preparing Your Vehicle and Workspace
Safety always comes first when you work on an automobile. Before you touch a single mechanical part, you must set up a secure work environment.
Securing the Work Area
Park your vehicle on a flat, level surface like a concrete driveway or a garage floor. Engage the parking brake firmly to ensure the vehicle cannot roll. If you are working outside, check the weather forecast to make sure you have a clear afternoon without unexpected rain. Pop the hood and secure it safely with the hood prop rod or ensure your hydraulic hood struts are holding firm.
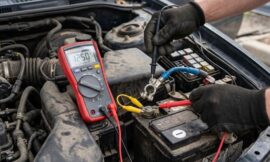
Disconnecting the Battery
Whenever you work on a component that has an electrical connection, you must disconnect the power source. This prevents accidental short circuits that could destroy your car’s main computer or spark a fire. Locate your vehicle’s battery. Use a wrench to loosen the nut on the negative battery terminal, which is always marked with a minus sign or a black cover. Slide the cable completely off the terminal and tuck it down to the side so it cannot accidentally spring back up and touch the metal post.
Step-by-Step Removal of the Old Assembly
Now that your workspace is safe and your tools are ready, it is time to dismantle the broken system. Take your time during these steps and avoid rushing, as windshield glass is very fragile and can crack under sudden pressure.
Marking the Wiper Blade Positions
Before you remove the wiper arms, take a roll of brightly colored painter’s tape. Apply a strip of tape along the bottom edge of both wiper blades directly on the windshield glass. This gives you a perfect visual reference point for when you install the new assembly later. If you skip this step, alignment becomes a massive guessing game, and your wipers might end up smacking the side of your car frame or parking halfway up your windshield.
Removing the Wiper Protective Caps and Nuts
Look at the base of your wiper arms where they attach to the vehicle body. You will usually see a small plastic cap covering the main mounting nut. Use a small flat-head screwdriver to gently pry these caps open or pop them off entirely. Set them aside in a secure tray.
Next, select the correct socket size and attach it to your ratchet. Place the socket over the wiper arm nut. Hold the wiper arm firmly with your non-dominant hand to prevent it from twisting and straining the linkage while you loosen the nut. Turn the ratchet counter-clockwise to remove the nuts completely.
Extracting the Wiper Arms
Wiper arms sit on splined, cone-shaped shafts. Over time, road salt, moisture, and vibration cause these metal parts to fuse together tightly. Do not grab the arm and yank upward with all your strength, as you can easily crack your windshield.
Instead, slide your wiper arm puller tool over the base of the wiper arm. Align the center bolt of the tool with the center of the threaded metal stud. Tighten the tool bolt clockwise using a wrench or your fingers. As you tighten it, the tool will gently and evenly press the arm upward off the splined shaft until it pops free with a distinct click. Lift the arms away and place them safely in your garage or back seat.
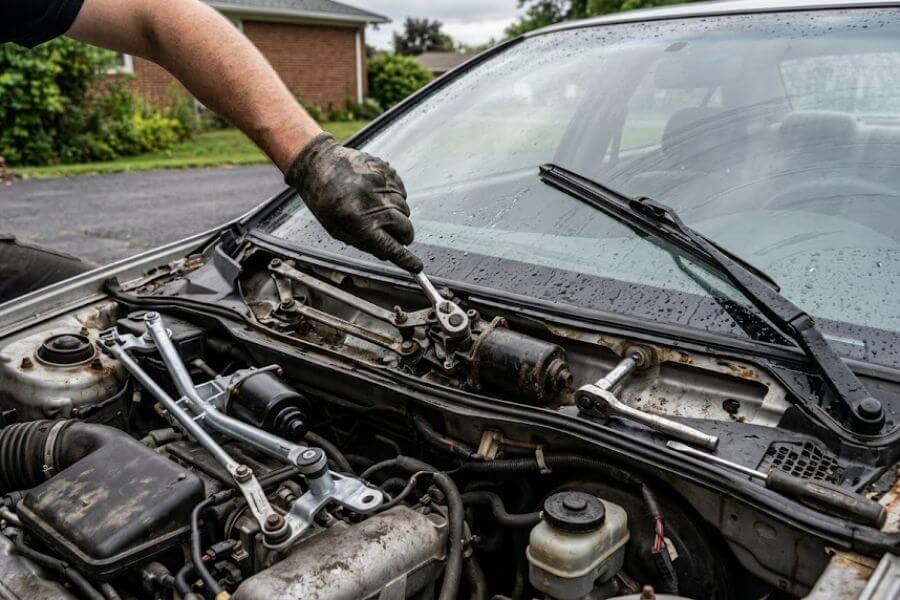
Removing the Cowl Panel Trim
The cowl panel is the large plastic or metal grille running along the bottom of your windshield, right below where the wipers sit. It protects the wiper linkage and cabin air intake from leaves and water.
Inspect the cowl panel for fasteners. You will likely find a row of plastic push-clips, screws, or small bolts along the front edge under the hood. Use your trim clip removal tool to pop out the plastic fasteners by sliding the fork underneath the head and lifting upward. Once all fasteners are removed, look at the weatherstripping seal that runs across the cowl. Gently peel this rubber seal back.
Carefully lift the cowl panel up and out. Some vehicles have a two-piece cowl, so you may need to slide one side out before the other. Be mindful of any washer fluid hoses attached to the underside of the cowl; disconnect them gently from their plastic elbow joints if they restrict your movement.
Unplugging the Main Electrical Connector
With the cowl panel gone, you can now see into the hidden wiper cavity. Locate the wiper motor, which is usually a cylindrical metal canister attached to a triangular bracket. Look for the thick bundle of wires leading into it.
This wiring harness is held in place by a plastic locking tab. Press down firmly on the locking tab with your thumb or a small screwdriver, then pull the plastic plugs apart. Never pull directly on the wires themselves, as you can pull the copper strands right out of the plastic terminal housing. Inspect the inside of the connector plug for green corrosion or melted plastic, which indicates electrical issues.
Unbolting the Linkage Framework
The entire linkage assembly and motor are typically held onto the vehicle body by three to five mounting bolts. These bolts pass through rubber vibration-dampening grommets into the metal firewall of the vehicle.
Locate each of these bolts. Spray them with a light coating of penetrating oil if they look rusty. Use your ratchet and a mid-sized extension to loosen and remove each mounting bolt. Keep one hand on the assembly as you remove the final bolt so the heavy metal framework does not drop down into the deep cowl cavity.
Maneuvering the Assembly Out of the Cowl Cavity
Carefully lift the entire linkage and motor assembly as a single unit out of the cowl area. This requires a bit of puzzle-solving skill. You will need to tilt, rotate, and slide the long metal rods around structural braces, hood hinges, and engine components. Move slowly so you do not scratch the paint on your hood edges or scratch the bottom of your windshield glass. Set the old unit down on your clean workspace.
Inspecting and Prepping the Components
With the assembly sitting on your workbench, you need to decide whether you are replacing the entire system as a complete unit or swapping out individual components.
Comparing Old and New Parts
If you bought a pre-assembled unit containing both a new motor and a new linkage, lay it side by side with the old unit. Verify that the mounting holes align perfectly, the wiring harness connector has the correct number of metal pins, and the metal arms are the exact same length. Installing an incorrect part will cause binding issues and could short out your vehicle’s electrical system.
+------------------------+---------------------------------------+---------------------------------------+
| Component Feature      | Old Broken Assembly                   | New Replacement Assembly              |
+------------------------+---------------------------------------+---------------------------------------+
| Wiring Pins            | Often corroded, potentially bent      | Clean, bright copper, perfectly straight|
| Linkage Joints         | Loose, dry, cracked plastic bushings   | Tight, pre-greased, sealed bushings    |
| Metal Structural Rods  | May be bent, rusted, or fatigued       | Straight, painted or coated steel     |
| Output Shaft Splines   | Stripped, filled with debris or rust  | Sharp, clean ridges for maximum grip  |
+------------------------+---------------------------------------+---------------------------------------+
Separating the Motor from the Linkage (If replacing individually)
If you are only replacing a burned-out motor while keeping your old linkage, or vice versa, you must separate them now. Look at the center hub where the motor drive shaft connects to the linkage mechanism.
Remove the large central nut holding the short linkage drive crank arm to the motor shaft. You may need to hold the crank arm with a pair of locking pliers to stop it from turning while you loosen this nut. Once that nut is off, remove the small bolts holding the motor body to the metal linkage frame structure. Separate the components carefully.
Bench-Setting the New Motor Park Position
This is a critical step that many beginner mechanics overlook. A new wiper motor does not always ship from the factory in its official park position. If you bolt everything together while the motor is in the middle of a cycle, your wipers will swipe downward into your hood when you turn them on.
To set the park position without installing the whole unit:
- Carry the loose new motor over to your car cowl.
- Plug the electrical wiring harness into the new motor.
- Temporarily reconnect your negative battery cable.
- Reach inside the car, turn the ignition key to the accessory position, and switch the wiper dial to high speed for five seconds.
- Turn the wiper switch off and wait ten seconds for the motor to complete its cycle and return to its built-in park position.
- Turn off the ignition, remove the key, and disconnect the negative battery cable once again.
- Unplug the motor from the wiring harness and bring it back to your workbench. The motor is now perfectly calibrated to start from the baseline bottom position.
Assembling the Motor to the New Linkage
Mount the calibrated motor onto the linkage frame bracket. Tighten the motor housing bolts to the frame firmly using a hand wrench. Next, press the main linkage crank arm onto the motor splined shaft.
It is vital that this short arm is pointing in the exact direction specified in your replacement part instruction sheet, usually parallel to the main linkage bar. Tighten the central shaft nut down firmly. If your new linkage came with loose plastic bushings, apply a liberal amount of water-resistant grease inside the bushing cups before snapping the metal linkage ball studs into place using a pair of slip-joint pliers.
Installing the New Assembly with Precision
Now you are ready to reverse the process and fit the fresh, functional assembly back into your vehicle cowl.
Clearing the Cowl Basin
Before dropping the new part in, look inside the empty cowl basin. Over the years, this area collects rotting leaves, pine needles, dirt, and twigs. This debris clogs up the cowl drain holes, causing water to pool up and drown your wiper motor. Use a shop vacuum to suck out all the loose debris. Wipe the area down with a damp rag to ensure clean drainage passages.
Reinserting the Unit
Carefully maneuver the new motor and linkage assembly back into the cowl cavity. Just like during removal, move slowly to avoid hitting the glass or scraping your engine bay paint. Align the assembly mounting tabs with the corresponding bolt holes on the firewall chassis.
Securing the Mounting Bolts
Start all the mounting bolts by hand into their threads. Starting them by hand prevents cross-threading, which can ruin the metal threads inside your car frame. Once all bolts are started, use your socket wrench to tighten them down evenly. Do not over-tighten them; the rubber grommets around the bolts should compress slightly to absorb vibration, but they should not be squished completely flat or cracked by excessive force.
Connecting the Electrical Supply
Grab your vehicle wiring harness plug and apply a small dab of electrical dielectric grease to the terminals. This grease blocks moisture and prevents corrosion in this damp environment. Push the male and female wiring harness plugs together firmly until you hear or feel the plastic locking tab click into place. Tug gently on the wires to verify that the connection is locked tight and cannot vibrate loose while driving.
Performing a Dry Run Functional Test
Before putting all the plastic trim pieces back on, you must test the system to ensure everything operates smoothly and parks correctly.
Reconnecting Power Temporarily
Ensure that no tools, towels, or stray wires are resting on the moving parts of the linkage assembly. Carefully reconnect the negative cable to your battery terminal and tighten the nut down with your wrench.
Running the System Without Arms
Sit in the driver’s seat and turn your ignition key to the accessory power position. Turn on your windshield wipers on the low speed setting. Step out of the car and watch the bare splined shafts protruding up from the cowl area. They should rotate smoothly back and forth without stuttering, binding, or making any loud scraping noises.
Switch through the different speeds: intermittent, low, and high. Everything should respond instantly. Finally, turn the wiper switch off. Watch the shafts carefully as they complete their last swing and come to a full stop. This confirms your system is parking properly. Turn off your car ignition and remove the key for safety.
Reassembling the Vehicle Body Panels
With a successful mechanical test completed, you can now rebuild the exterior trim of your vehicle.
Reinstalling the Cowl Panel
Slide the plastic cowl panel back over the wiper shafts and align it with the base of the windshield. Make sure the rear edge of the plastic sits correctly against the glass seal. Reinsert all the plastic push-clips or screws along the front edge that you removed earlier. If any of the old plastic clips broke during removal, replace them with fresh ones from an auto parts store to prevent the cowl from rattling at highway speeds. Push your rubber weatherstripping seal back onto the cowl ridge, pressing it down firmly from end to end.
Positioning and Installing the Wiper Arms
Look at the pieces of painter’s tape you left on your windshield earlier. Grab your driver-side wiper arm and place it onto the splined drive shaft. Align the rubber blade edge perfectly with the top edge of your tape marker. Press down firmly on the base hinge of the arm to seat it onto the tapered spline ridges. Repeat this exact process for the passenger-side wiper arm.
Torquing the Wiper Arm Nuts
Thread the mounting nuts onto the wiper shafts by hand. Take your socket wrench and tighten the nuts down until they are snug. Hold the metal wiper arm securely with your free hand while tightening to ensure it does not slip out of alignment or put stress on your new internal linkage gears. Once snug, give the ratchet an extra quarter-turn to lock it down. Push the protective plastic caps back over the nuts until they click closed.
The Final Wet Field Test
You are almost at the finish line. The last step is checking your work under realistic conditions.
Removing the Alignment Markers
Peel the strips of painter’s tape off your windshield glass and discard them. Clean away any adhesive residue left behind using a paper towel and a dab of glass cleaner.
Testing with Water
Never test new wipers on dry glass. Dry rubber dragging across dry glass creates immense friction, which can scratch your windshield and overload your brand-new wiper motor right out of the box.
Hop into the driver’s seat, turn on the ignition, and pull the wiper stalk to spray washer fluid onto the glass, or have a friend spray the windshield with a garden hose. Turn the wipers on. Watch the blades sweep smoothly across the glass. They should wipe cleanly without hitting the plastic cowl at the bottom or hitting the painted roof pillars on the side.
Check for any juddering, skipping, or unusual noises. If the blades stroke too far or stop too high, you will need to loosen the arm nuts, lift the arms off the splines, adjust their resting angle slightly, and retighten them. If everything looks smooth and clear, you have completed the job successfully.
Maintaining Your New Wiper System
To ensure your newly installed motor and linkage assembly last for years to come, incorporate a few simple habits into your car maintenance routine.
Clearing Heavy Winter Snow by Hand
Your new wiper system is powerful, but it is not built to lift forty pounds of heavy, wet snow off your windshield. In the winter time, always use a dedicated handheld snow brush and ice scraper to clear your windshield completely before turning your wipers on. Forcing the wipers to plow through deep snow drifts will strip the internal plastic gears of your new motor or pop the linkage bushings loose.
Regular Cleaning and Inspection
Every time you wash your vehicle, lift your wiper arms up and wipe down the rubber blades with a rag soaked in warm, soapy water or rubbing alcohol. This removes built-up road grime, oil, and sap that cause friction and blade chatter. At the same time, look down through your cowl grille to check for accumulating leaves and clear them out before they block the drainage holes.
Frequently Asked Questions
Why do my windshield wipers only work on high speed but not on low or intermittent settings?
When your wipers only function on the highest speed setting, the culprit is usually not the mechanical linkage or the motor itself. Instead, this issue points to a failed wiper motor resistor or a faulty control relay. The lower speed settings rely on a resistor to reduce the electrical current flowing to the motor. When that resistor burns out, electricity can only reach the motor when the switch is set to high speed, which bypasses the resistor entirely. Replacing the wiper relay or the motor assembly electrical resistor block will usually restore all speeds.
Can I just buy the plastic linkage bushings instead of replacing the entire metal assembly?
Yes, you can often find replacement wiper linkage bushing kits at local auto parts stores. This option is highly cost-effective if your metal rods are perfectly straight and your motor functions well. However, pressing new plastic bushings into old, worn metal rods can be physically challenging and requires a vise or heavy-duty pliers. Additionally, if the metal ball joints have rusted and worn down, new bushings may pop out again quickly. Replacing the entire linkage assembly provides a more reliable, longer-lasting repair.
What causes my new wiper blades to slap against the side frame pillar of my car?
If your wiper blades are smacking against the side pillars of your windshield or hitting the lower cowl plastic, your wiper arms are misaligned on their splined drive shafts. This happens if the arms were not reinstalled at the correct baseline angle or if the motor was not fully set in its park position during installation. To fix this, remove the wiper arm nut, pull the arm off the splines, realign the blade with your baseline resting position, and secure the nut tightly.
Is it safe to drive my car if I hear a clicking noise coming from the cowl when wipers are on?
A clicking or snapping noise from your cowl area is a warning sign that your linkage bushings are heavily worn and are about to fail completely. The sound is caused by the metal rods shifting loosely and striking other components inside the cowl cavity. While the vehicle remains safe to drive mechanically, your wipers could stop functioning instantly during the next rainstorm. It is best to inspect and replace the worn components as soon as possible before you get caught in dangerous driving conditions.
Why did my brand-new wiper motor start smoking right after I turned it on for the first time?
If you see smoke or smell burning plastic from your new motor immediately after installation, turn off your ignition switch right away. This problem occurs for two main reasons. Either the mechanical linkage is severely jammed or bound up, causing the motor to stall and overheat while trying to turn, or there is a major electrical short circuit in the wiring harness plug. Double-check that your linkage moves freely by hand and ensure no wire strands are touching each other inside the electrical connection plug.