Your car is running hot, the temperature gauge is creeping into the dangerous red zone, and a strange sweet smell is drifting from under the hood. A heavily clogged radiator is choking your engine, trapping heat that could cause massive internal damage if left unaddressed. You do not need to spend hundreds of dollars at a professional repair shop to fix this problem. With a few basic tools, some patience, and the right approach, you can restore your cooling system back to peak performance right in your own driveway.
Understanding Your Vehicle Cooling System
To properly clean a clogged radiator, you must understand exactly how the cooling system operates inside your machine. The engine creates an immense amount of heat through thousands of controlled explosions every single minute. Without a functional cooling system, the metal components of your engine would warp, melt, and fuse together within a short period of running time.
The radiator sits at the very front of your vehicle, acting as the primary heat exchanger. Liquid coolant, which is a specific mixture of antifreeze and water, circulates through the water jackets surrounding the engine cylinders. As it moves through these passages, the fluid absorbs the extreme heat generated by combustion. The water pump, driven by a belt connected to the crankshaft, keeps this fluid in constant motion.
Once the coolant reaches a specific temperature, a mechanical valve called the thermostat opens up. This allows the hot liquid to exit the engine block and travel through a large rubber hose into the top or side of the radiator. The radiator itself is a network of thin aluminum or copper tubes surrounded by a dense maze of tiny metal fins. As your vehicle moves forward, rushing air passes through these fins, drawing heat away from the hot liquid inside the tubes. Cooling fans mounted behind the radiator turn on automatically to pull air through the fins when the vehicle is stationary or moving at slow speeds.
After the liquid passes through the cooling fins, its temperature drops significantly. The cooled fluid then leaves the bottom of the radiator through a lower rubber hose, returning to the water pump to begin the cycle all over again. A separate circuit routes a portion of this hot fluid through a smaller radiator hidden inside your dashboard, known as the heater core, which provides warmth to the passenger cabin when you turn on the heater.
When rust, scale, mineral deposits, or degraded coolant sludge build up inside the tiny radiator tubes, the flow of fluid slows down or stops entirely. The radiator can no longer exchange heat with the outside air, causing the engine temperature to spike dramatically.
Key Components of the Cooling System
- The Radiator: The main heat exchanger consisting of tanks, tubes, and cooling fins designed to dissipate thermal energy into the atmosphere.
- The Water Pump: A mechanical or electrical pump that circulates the coolant throughout the engine block, cylinder head, and radiator.
- The Thermostat: A temperature-sensitive valve that regulates the flow of coolant based on how hot the engine is operating.
- The Radiator Cap: A pressurized cap that raises the boiling point of the coolant fluid and allows excess pressure to escape into an overflow reservoir.
- The Heater Core: A small, radiator-like component located inside the dashboard that provides heat to the vehicle interior.
- Cooling Hoses: Heavy-duty rubber lines that transport the fluid between the engine, radiator, and interior heating system.
Signs of a Heavily Clogged Radiator
Recognizing the early warning signs of a clogged radiator can save you from a catastrophic engine failure. When blockages begin to form, your vehicle will communicate the problem through several distinct symptoms.
The most obvious sign is a rising temperature gauge on your instrument cluster. If you notice the needle climbing higher than its usual midway point during normal driving conditions, the cooling system is struggling. In severe cases, the gauge will enter the solid red zone, accompanied by a warning light or a message on your digital display telling you to pull over safely.
Another common symptom is poor cabin heating performance. Because the heater core relies on the continuous flow of hot coolant from the engine, a restriction in the cooling system often starves the heater core of fluid. If your dashboard vents blow cold or lukewarm air when you have the heater turned up to the maximum setting, a blockage is a highly probable cause.
Visual inspections can reveal a wealth of information about the health of your radiator. When you look inside the radiator filler neck after the engine has cooled down completely, the fluid should look bright, clear, and vibrant. Green, orange, yellow, pink, or blue are common colors for fresh coolant. If the fluid looks muddy, brown, thick, or resembles a chocolate milkshake, your cooling system is heavily contaminated with rust, oil, or ancient decomposed fluid. You might also spot physical flakes of metal or crusty white mineral scale clinging to the visible internal tubes.
Puddles of coolant under your vehicle or visible crusty residue around the radiator seams, hose connections, or the radiator cap indicate that excessive pressure is building up due to a clog. When fluid cannot flow freely, the pressure rises until it finds the weakest point to escape, creating pinhole leaks or forcing liquid past old rubber seals.
The Essential Tool Kit and Supplies
Before you begin working on your vehicle, you need to gather all the necessary tools and materials. Having everything ready by your side prevents unnecessary interruptions and keeps the workspace clean and organized.
Required Tools
- Socket Set and Ratchet: Needed to remove plastic underbody shields, splash guards, or fan shrouds that block access to the lower radiator area.
- Pliers or Hose Clamp Tools: Essential for compressing and moving the spring clamps or screw clamps that secure the radiator hoses to their metal necks.
- Screwdrivers: Both flat-head and Phillips screwdrivers are helpful for releasing plastic retaining clips or loosening specific types of hose clamps.
- Large Drain Pan: A wide, low-profile basin capable of holding at least two to three gallons of liquid without spilling or overflowing.
- Spill-Free Funnel Kit: A specialized funnel that attaches directly to the radiator filler neck, creating an airtight seal that makes bleeding air out of the system a clean process.
- Safety Glasses and Heavy Rubber Gloves: Crucial for protecting your eyes and skin from caustic chemical flushes and toxic antifreeze compounds.
Required Supplies
- Distilled Water: You will need anywhere from ten to twenty gallons of distilled water depending on the size of your cooling system. Never use tap water, as it contains minerals that will quickly create new scale deposits inside your clean radiator.
- Premium Radiator Flush Chemical: A heavy-duty, acid-free chemical cleaner designed to break down rust, scale, grease, and stubborn sludge accumulations.
- Fresh Concentrated or Pre-Diluted Coolant: Purchase the specific type of coolant recommended by your vehicle manufacturer. Check your owner manual to ensure you have the correct formulation.
- New Radiator Cap: A cheap but vital component. Replacing an old cap ensures the system can maintain correct operating pressure after the cleaning process is finished.
- Catch Buckets with Lids: Sturdy containers to store the old, contaminated flush water so you can transport it safely to a local recycling center or hazardous waste facility.
Safety First: Crucial Precautions Before You Begin
Working on a vehicle cooling system involves high temperatures, intense pressure, and toxic chemicals. Safety must be your absolute top priority throughout every single step of this maintenance procedure.
The golden rule of radiator work is simple: never, under any circumstances, open the radiator cap while the engine is hot or warm. When an engine runs, the cooling system builds up immense pressure to raise the boiling point of the fluid. Opening the cap on a hot system will cause the superheated liquid to explode out of the filler neck instantly, creating a violent geyser of boiling steam and chemical fluid that will cause severe, life-altering burns to your face, hands, and body. Always let the car sit turned off for at least two to three hours before touching the cooling system. Feel the upper radiator hose with your bare hand; if it feels warm or hard to the touch, the system is still hot and pressurized. Wait until it feels completely cold and soft before proceeding.
Antifreeze is highly toxic to humans, pets, and the surrounding environment. It contains ethylene glycol, a chemical that tastes sweet but causes rapid kidney failure and death if swallowed. Because of its sweet smell and taste, dogs, cats, and wild animals are strongly attracted to puddles of spilled coolant. Always work over a clean concrete surface or a large drop cloth. Immediately wipe up any drips, splashes, or spills with absorbent rags or kitty litter, and wash the area thoroughly with soapy water. Keep all drain pans and storage buckets securely covered with tight lids at all times, and keep children and pets locked safely indoors while you work.
Always wear proper protective gear. Safety glasses shield your eyes from unexpected splashes or high-pressure sprays when disconnecting stubborn hoses. Thick nitrile or heavy-duty rubber gloves protect your skin from absorbing the toxic chemical compounds present in old coolant and commercial flushing agents.
Ensure your vehicle is parked on a perfectly flat, level concrete surface. Engage the parking brake firmly, and place wheel chocks behind the rear tires to prevent the car from rolling while you work underneath the front end. If you must lift the vehicle with a jack to gain access to the bottom drain plug, always support the weight of the car with heavy-duty jack stands placed under approved frame lift points. Never rely solely on a hydraulic jack to hold a vehicle up while you are positioned underneath it.
| Safety Item | Main Hazard Addressed | Required Action |
| Cool-Down Period | Thermal burns from boiling fluid and steam | Wait 2-3 hours until hoses are cold to the touch. |
| Safety Glasses | Chemical splashes into eyes during hose removal | Wear continuously from start to finish. |
| Rubber Gloves | Dermal absorption of toxic ethylene glycol | Use heavy-duty, chemical-resistant gloves. |
| Closed Containment | Accidental poisoning of pets and children | Store all waste fluids in sealed buckets immediately. |
| Jack Stands | Mechanical crushing from vehicle collapse | Never work under a car supported only by a jack. |
Step 1: Draining the Old Toxic Fluid
With the vehicle safely positioned and completely cold, you can begin the physical process of removing the old, contaminated coolant from the system.
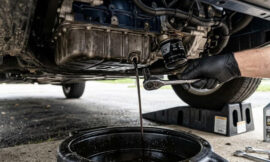
Locate the radiator drain valve, commonly referred to as the petcock. This valve is typically situated at the bottom corner of the radiator on either the driver or passenger side. It may look like a small plastic thumbscrew, a wing nut, or a bolt head hidden behind a small cutout access panel in the plastic underbody splash shield. If your vehicle does not have a petcock, or if the plastic valve is old, brittle, and refuses to turn, do not force it. Plastic petcocks snap easily, which would require you to buy a brand-new radiator. Instead, you can drain the system by removing the lower radiator hose, which is often a more effective method because the large opening allows heavy debris and thick sludge to rush out quickly.
Slide your large drain pan directly underneath the petcock or the lower radiator hose connection. If you are using the petcock, slowly turn it counterclockwise. Fluid will begin to trickle or stream out into the pan below. To allow the fluid to drain rapidly and smoothly, remove the radiator cap from the top of the engine. This lets air enter the system, preventing a vacuum from forming and stopping the glugging, splattering flow of liquid.
If you are removing the lower radiator hose instead of using the petcock, use your pliers to compress the tabs of the spring clamp. Slide the clamp back away from the radiator neck by a few inches along the body of the hose. Carefully twist the rubber hose back and forth to break the baked-on seal with the plastic radiator neck. Do not yank or pry hard with metal screwdrivers, as you can easily crack the fragile plastic neck of the radiator. Once the hose is loose, slowly pull it away from the neck, pointing the open end down into your drain pan. A large torrent of fluid will escape quickly, so ensure your pan is positioned correctly to catch the sudden rush.
Let the fluid drain completely until it reduces to a occasional drip. Take a close look at the liquid inside your pan. Note the color, the presence of floating debris, and any metallic flakes. Slide the drain pan to the side and pour the old fluid carefully into your sealed storage buckets for disposal later. Reattach the lower radiator hose or close the petcock by turning it firmly clockwise. Do not overtighten the plastic petcock, as it can strip or crack with very little force.
Step 2: The Initial Distilled Water Rinse
Even after draining, a significant percentage of old coolant remains trapped deep inside the engine block, heater core, and overflow reservoir. The initial rinse helps remove this residual liquid before you apply the chemical cleaning agents.
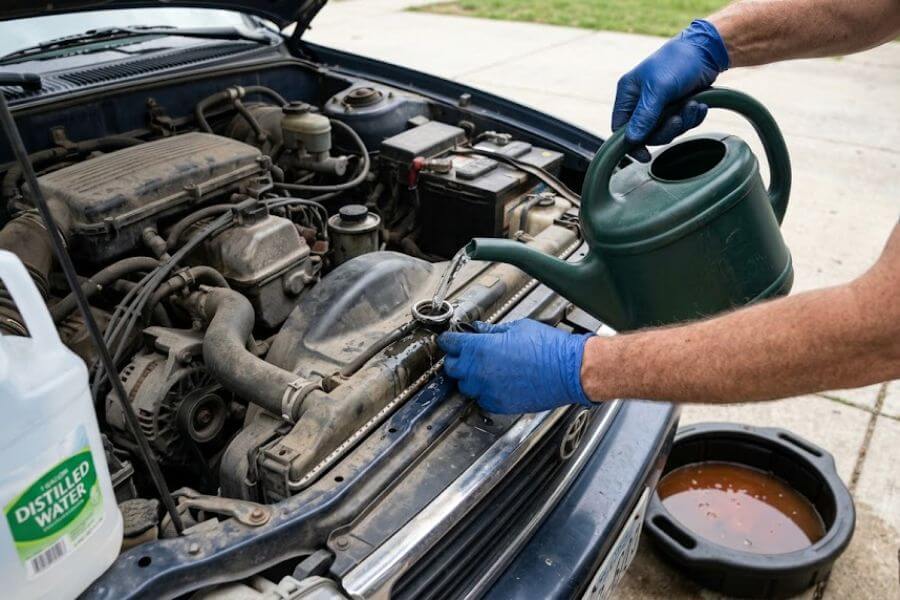
Place your spill-free funnel kit onto the open radiator filler neck. Select the correct adapter that matches your radiator or expansion tank opening, ensuring a snug, leak-proof connection. Pour pure distilled water directly into the funnel. Fill the system slowly to give air bubbles an opportunity to escape up through the liquid. Continue pouring until the fluid level reaches the top of the radiator neck or the full mark on the expansion tank.
Take a look around the bottom of the car to ensure the petcock or lower hose is not leaking. Once you confirm the system is holding water, climb into the driver seat. Start the engine and look closely at the dashboard. Ensure the oil pressure light turns off and no unusual warning indicators appear.
Turn your climate control system to the maximum heat setting and set the fan speed to low or medium. This step is critical because it opens the internal blend doors or control valves, allowing the distilled water to circulate freely through the heater core inside the cabin. This flushes out the stagnant, sludgy old fluid trapped in that isolated section of the cooling system.
Let the engine idle in your driveway. As the engine warms up, keep a close watch on the temperature gauge. You will notice the fluid level inside your spill-free funnel drop suddenly as the engine reaches its operating temperature. This drop indicates that the thermostat has opened up, allowing the water to rush into the engine block while pushing the air out. Add more distilled water to the funnel to keep the level stable.
Allow the engine to run for ten to fifteen minutes after the thermostat opens. This ensures the water circulates through every passage, mixing thoroughly with any remaining old coolant and lifting loose debris. Turn off the ignition and let the engine cool down completely for at least two hours. Once the system is entirely cold to the touch, place your drain pan back in position and drain this initial rinse water out using the exact same method described in Step 1. The water you drain will likely be discolored, showing that it successfully gathered old fluid and loose contaminants.
Step 3: Applying the Chemical Radiator Cleaner
Now that the bulk of the old fluid is gone, it is time to tackle the stubborn, baked-on deposits, rust scale, and chemical sludge that are physically blocking the cooling passages. This requires a specialized chemical radiator flush agent.
Ensure the radiator drain petcock is closed tight or the lower radiator hose is securely reattached. Pour the entire bottle of premium radiator flush chemical directly into the open filler neck through your funnel. Most commercial cleaners are formulated to treat systems holding anywhere from eight to twelve quarts of liquid. If you have a massive heavy-duty truck with a large cooling capacity, you might need two bottles of the cleaner. Always read the specific instructions printed on the back of the product bottle.
After pouring in the chemical cleaner, top off the rest of the cooling system with fresh distilled water. Fill it until the fluid level is visible at the base of the neck or within the expansion tank lines.
Start the engine once again, keeping your cabin heater set to the maximum hot position. The chemical cleaner needs time and heat to activate its scale-dissolving properties. As the engine runs and warms up to its normal operating temperature, the chemical solution moves through the microscopic pathways of your radiator, chemically breaking down calcium deposits, mineral crusts, oxidized rust particles, and congealed antifreeze gel.
For a truly heavily clogged radiator, letting the car simply idle in the driveway might not provide enough agitation or fluid velocity to break through severe blockages. If your vehicle is safe to drive and not actively overheating, take it for a gentle twenty to thirty-minute drive around your neighborhood. Driving raises the engine speed, which causes the water pump to spin faster, creating higher fluid velocity and pressure inside the cooling passages. This high-velocity flow helps the chemical cleaner scour the walls of the radiator tubes, breaking loose stubborn blockages that idling alone might leave behind. Keep your eyes locked onto the temperature gauge during this drive. If the needle begins to spike toward the red zone, pull over immediately, turn off the engine, and let it cool down.
After completing the running time recommended by the chemical manufacturer, park the vehicle back in your designated workspace. Turn off the key and allow the machine to cool down completely until the components are safe to touch.
Step 4: The Multi-Stage Flush Process
Draining the chemical flush solution after its cleaning cycle will reveal a dark, dirty mixture filled with dissolved debris, rust particles, and suspended sludge. However, your work is not done yet. A single drain leaves behind a heavy concentration of the chemical cleaner and loosened debris inside the engine block. You must perform a multi-stage flush process to ensure every trace of chemical and dirt is gone.
Place your drain pan under the vehicle, open the drain valve or remove the lower hose, and let the chemical solution empty out completely. You will likely be amazed and disgusted by the color of the liquid coming out. It may look dark brown, black, or deep rust-red, proving that the chemical did its job of scrubbing the interior surfaces.
Close the drain and refill the entire system with pure distilled water. Start the car, turn the heater to maximum, and let it run for ten to fifteen minutes until the thermostat opens and cycles the clean water through the entire loop. Turn off the car, let it cool down completely, and drain the water.
Repeat this exact cycle of filling, running, cooling, and draining multiple times. For a heavily clogged system, you may need to perform this process four, five, or even six times. Do not stop repeating this cycle until the water draining out of the bottom of your radiator looks perfectly clear, clean, and completely free of discoloration or floating debris. If you stop too early, residual chemical cleaner left inside the system will continue to react with the metal surfaces, which can degrade your fresh antifreeze and cause premature corrosion down the road. Patience during this stage is the secret to a professional-grade result.
Step 5: How to Handle Stubborn Blockages
If your radiator was severely neglected, a standard chemical flush might not clear out tubes that are completely impacted with solid scale or thick, clay-like sludge. If your vehicle still shows signs of poor flow or localized hot spots across the radiator core after multiple flushes, you need to use more aggressive tactics: the reverse flush and the manual garden hose purge.
The Reverse Flush Method
A reverse flush involves forcing water through the radiator in the opposite direction of its normal operational flow. Over time, debris accumulates and wedges itself tightly against the entry side of the radiator tubes. Pushing water in the normal direction only wedges the debris deeper. Forcing water backward blows the debris out of the tubes through the wide entry paths.
To perform a reverse flush at home:
- Disconnect both the upper and lower radiator hoses completely from the radiator necks.
- Take your garden hose and insert it directly into the lower radiator neck or outlet. Use a clean rag wrapped tightly around the hose nozzle to create a temporary, snug seal inside the neck.
- Turn on the garden hose water pressure gradually. Water will flow backward up through the radiator core and erupt out of the top upper radiator neck, carrying heavy chunks of trapped scale, rust flakes, and thick sediment with it.
- Continue this backward flushing until the water exiting the top neck runs clear.
- Once finished, insert the garden hose into the top neck to flush it forward for a moment, then back through the bottom. Alternate until no more solid particles emerge.
Crucial Warning: Be extremely careful with municipal water pressure from a garden hose. Home plumbing can deliver pressures exceeding 50 to 60 PSI (pounds per square inch). Most automotive radiators are only rated to handle between 15 and 22 PSI. Never blast a garden hose at full pressure into a sealed or restricted radiator, or you risk bursting the internal tubes or blowing the plastic side tanks completely off the metal core. Keep the water flow moderate and ensure the opposite opening is completely unobstructed so water can escape freely without building up internal pressure.
Because you used a municipal garden hose for this aggressive clearing step, the radiator is now filled with tap water containing minerals and chlorine. You must purge this tap water. Pour two to three gallons of distilled water into the top of the radiator with the lower hose disconnected to push the mineral-heavy tap water completely out of the core before reassembling the system.
Step 6: Inspecting the Radiator and Related Parts
With the flushing process complete and the system completely clean internally, take this opportunity to thoroughly inspect all related cooling components. It makes little sense to have a clean radiator if a worn-out hose or a failing thermostat causes a breakdown next week.
Examine the upper and lower radiator hoses carefully. Squeeze them along their entire length with your hand. They should feel firm but pliable. If a hose feels extremely soft, mushy, or sticky, the rubber has degraded internally and is at risk of collapsing or bursting under pressure. If a hose feels rock-hard and brittle, or displays visible hairline cracks near the connection clamps, it needs to be replaced immediately.
Check the small cooling fins on the exterior front face of the radiator. These thin aluminum fins can bend easily from road debris, gravel, or high-pressure car washes. Bent fins block airflow, reducing the cooling capacity of your clean radiator. Use a specialized plastic radiator fin comb to gently straighten out any crushed or bent fins, restoring optimal aerodynamic flow through the core. Blow out any dead bugs, leaves, or dirt trapped in the fins using low-pressure compressed air or a gentle spray from a garden hose from behind the radiator looking forward.
Inspect your radiator cap. Look closely at the rubber sealing gasket on the underside of the cap. If the rubber is torn, cracked, swollen, or dry-rotted, the cap will fail to maintain the correct pressure, causing your vehicle to boil over at a lower temperature than intended. Check the small metal spring inside the cap; it should compress and rebound smoothly. When in doubt, buy a new radiator cap. It is a very affordable piece of insurance for your newly cleaned system.
If your vehicle has significant mileage and you have no record of it being changed, consider replacing the thermostat at this stage. A heavily clogged system often leaves crusty deposits on the moving parts of the thermostat, causing it to stick closed or open sluggishly. Replacing it requires removing a few bolts on the engine housing where the upper hose connects, providing ultimate peace of mind.
Step 7: Mixing and Refilling with Fresh Coolant
You are now ready to fill your clean system with fresh, high-quality coolant. You must use the correct fluid mixture to protect your engine from freezing in the winter, boiling over in the summer, and corroding internally over time.
Consult your vehicle owner manual to determine the exact cooling system capacity and the required chemical specification. Do not simply buy generic fluid based on color alone, as modern vehicles require specific formulations like Inorganic Additive Technology (IAT), Organic Acid Technology (OAT), or Hybrid Organic Acid Technology (HOAT). Mixing incompatible coolant types creates a chemical reaction that turns the fluid into a thick, gelatinous gel that will instantly clog your newly cleaned radiator all over again.
You can buy coolant in two forms: pre-diluted 50/50 mix or full strength concentrate. If you purchased pre-diluted fluid, you can pour it directly into the system. If you bought concentrated coolant, you must mix it yourself in a clean container with an exact equal amount of distilled water to achieve a perfect 50/50 ratio. Never pour pure concentrated coolant directly into an engine without diluting it, as pure antifreeze cannot dissipate heat effectively and will cause the engine to run hot.
Ensure the radiator petcock is closed completely and all hoses are tightly clamped in place. Attach your spill-free funnel to the filler neck. Begin pouring your 50/50 coolant mixture into the funnel slowly. Pouring at a slow, measured pace allows the heavy liquid to stream down the passages while allowing trapped air to lift up and escape through the funnel, minimizing the formation of stubborn air pockets deep inside the engine block. Fill the system until the fluid level rises up into the base of the funnel, leaving it about one-quarter full of liquid.
Step 8: Bleeding Air Out of the System
The final, and arguably most important, step in this entire procedure is bleeding the air out of the cooling system, a process often called burping. When you fill an empty system, massive pockets of air become trapped inside the high points of the engine block, cylinder head, and heater core. If you drive the vehicle with these air pockets present, they will create localized hotspots where no fluid touches the metal. This can cause rapid, catastrophic overheating, warped cylinder heads, and blown head gaskets.
With your spill-free funnel attached and filled one-quarter way with coolant, climb into the driver seat. Ensure the parking brake is locked and the vehicle is in park or neutral. Start the engine.
Turn the cabin temperature control to the absolute hottest setting and set the fan speed to its lowest position. Monitor your dashboard gauges closely throughout this process. Let the engine idle. As the engine warms up, you will see large bubbles of air begin to rise up out of the radiator neck and pop inside the spill-free funnel. This is the air escaping the system as the fluid circulates.
While the engine is running, walk around to the front of the vehicle. Carefully squeeze the upper radiator hose with your gloved hand several times. Squeezing the hose acts like a manual pump, helping to dislodge stubborn air bubbles trapped inside the upper cylinder head and forcing them toward the open radiator neck. You will likely see a sudden burst of bubbles emerge in the funnel each time you pump the hose.
Keep a close eye on the fluid level inside the funnel. When the engine reaches its operating temperature, the thermostat will click open. You will know this happens because the upper radiator hose will suddenly feel very hot to the touch, and the fluid level inside your funnel will drop rapidly as the liquid rushes into the newly opened cooling pathways. Immediately add more 50/50 coolant mix to the funnel to prevent the funnel from running dry, which would suck air right back into the system.
Continue to let the car idle with the heater running until bubbles stop appearing in the funnel completely. This process can take anywhere from twenty to forty-five minutes depending on the design of your engine. Once the fluid in the funnel remains perfectly still and bubble-free for several minutes, and your dashboard vents are blowing consistent, hot air, the system is fully bled.
Turn off the engine. Use the fluid stopper fluid plug that came with your spill-free funnel to block the bottom opening of the funnel, allowing you to lift the funnel off the radiator without spilling a drop of excess fluid. Pour any remaining fluid from the funnel into your overflow reservoir bottle, bringing the reservoir level up to the designated “Full Hot” line. Install your new radiator cap tightly.
Take the car for a short test drive around the block. Monitor the temperature gauge to verify it stays rock-steady in the normal range. After returning, let the car cool down completely overnight. Check the level inside the overflow reservoir the next morning when the engine is stone-cold. It is normal for the level to drop slightly after a drive as the final micro-bubbles dissolve. Top off the reservoir to the “Full Cold” line with your remaining 50/50 mix, and you are done.
Cooling System Reference and Comparison
To help keep your project organized, use these quick-reference guides to check your tools, evaluate your fluid condition, and select the right maintenance path.
Fluid Condition Guide
- Vibrant/Clear Green, Blue, or Orange: Healthy, operational fluid. No action required.
- Light Brown/Murky: Mild oxidation and aging fluid. Standard distilled water flush recommended.
- Dark Brown/Muddy Mud-Like Sludge: Severe rust, corrosion, and degraded additives. Heavy-duty chemical flush required.
- Milky/Frothy Light Brown (Milkshake look): Engine oil mixing with coolant. Indicates a blown head gasket or cracked engine block. Stop work and seek mechanical inspection.
- White Crusty Flakes/Chunky Sediment: Heavy mineral scale buildup from tap water use. Reverse flush and intensive chemical treatment required.
Procedural Choice Comparison
| Flush Method | Best Suited For | Distilled Water Needed | Chemical Required? | Process Duration |
| Standard Preventive Flush | Routine maintenance every 2-3 years, clear or lightly old fluid. | 5-10 gallons | No, water only | 1-2 hours |
| Heavy-Duty Chemical Flush | Vehicles experiencing mild overheating, brown fluid, poor heater performance. | 10-15 gallons | Yes, premium chemical flush formula | 3-4 hours |
| Aggressive Reverse Flush | Severe blockages, solid scale accumulation, persistent hot spots across the core. | 15+ gallons (plus garden hose) | Yes, heavy-duty scale remover | 4-5 hours |
Long-Term Maintenance to Prevent Future Clogs
Now that your radiator is completely clean and flowing perfectly, you want to keep it that way. Preventing future blockages requires simple, consistent maintenance habits.
Never use tap water to top off your cooling system in an emergency. Tap water contains dissolved minerals like calcium and magnesium. When subjected to the intense heat inside an engine, these minerals bake out of the liquid and form a hard, porcelain-like crust on the internal metal walls, insulated jackets, and radiator tubes. This scale acts as an insulator, trapping heat inside the engine and narrowing the diameter of the cooling pathways until fluid can no longer pass through. Always keep a gallon of pre-diluted coolant or pure distilled water in your trunk for unexpected top-offs.
Stick to a strict fluid replacement schedule. Over time, the protective anti-corrosion additives mixed into your antifreeze break down and lose their effectiveness. Once these additives are exhausted, the liquid becomes acidic, rapidly attacking the aluminum, iron, and copper components inside your engine. This oxidation creates the rusty scale and muddy sludge that causes catastrophic clogs. Change your cooling fluid at least every three to five years, or according to the specific mileage intervals detailed in your vehicle manufacturer service manual.
Regularly check the condition of your overflow reservoir tank. Inspect the color of the liquid at every oil change. If you spot early signs of darkening or small floating particles, perform a quick preventive drain and fill before the contamination has a chance to settle and bake into a solid blockage inside your radiator core. Keeping the cooling loop clean ensures your engine will run cool, perform efficiently, and last for hundreds of thousands of miles to come.
Frequently Asked Questions
Can I use regular vinegar to flush out a heavily clogged radiator at home?
While vinegar is a mild acid that can dissolve calcium deposits, it is generally not recommended for modern automotive cooling systems. Vinegar requires a long time to break down heavy scale, meaning you would have to leave it inside your engine for days to see results. More importantly, vinegar can be highly corrosive to the delicate aluminum components, internal rubber seals, and specialized gaskets found in modern engines if it is not neutralized perfectly. It is far safer and more effective to use a commercially formulated, acid-free radiator flush chemical. These products are specifically engineered to dissolve heavy rust and scale rapidly while containing specialized inhibitors that protect aluminum, brass, copper, and rubber components from chemical damage during the cleaning cycle.
What happens if I skip the step of bleeding the air out of my cooling system?
Skipping the air-bleeding process is a recipe for severe engine damage. When you refill a cooling system, large pockets of air become trapped in the high passages of the engine block and cylinder head. If you drive the car without removing this air, these pockets prevent coolant from touching those specific areas of hot metal. This creates extreme localized overheating within minutes. The temperature sensor on your dashboard might not even register the danger immediately because it needs to be submerged in liquid to read accurately. The intense heat can warp your cylinder head, crack the engine block, or blow the head gasket, turning an inexpensive maintenance project into a multi-thousand-dollar engine rebuild. Always take the time to run the engine with an open funnel until all bubbles stop escaping.
How can I safely dispose of the old coolant and flush water I drain from my car?
Antifreeze is a highly toxic hazardous waste that must never be poured down a household drain, into a storm sewer, or onto the ground. Pouring it into the environment poisons groundwater and local wildlife. Collect every drop of your old fluid, including the discolored rinse water from the first couple of flushes, into heavy-duty plastic buckets or jugs equipped with tight, leak-proof lids. Label the containers clearly as toxic waste. Take these containers to a local automotive repair shop, auto parts retail store, or your municipal household hazardous waste collection facility. Most of these locations will accept old coolant free of charge or for a very small fee, ensuring it is recycled or disposed of safely according to environmental safety laws.
Why is my car heater still blowing cold air after I completed a full radiator flush?
If your dashboard vents are still blowing cold air after a thorough flush, it usually means one of two things: you still have an air pocket trapped inside your heater core, or the heater core itself is still completely blocked with solid sludge. The heater core is essentially a miniature radiator located deep inside your dashboard, and its small, winding tubes are prime targets for collecting debris. To resolve a trapped air pocket, try bleeding the system again, ensuring the front nose of the vehicle is parked on a slight upward incline to encourage the air to move toward the radiator neck. If the issue is a solid blockage, you may need to disconnect the two dedicated heater core hoses at the engine firewall and perform a targeted reverse flush directly through the heater core using moderate pressure from a garden hose until the water runs clear.
Is it safe to drive my car with the chemical radiator cleaner inside the system?
It depends entirely on the specific product you purchased. Some light-duty radiator flushes are designed to stay in the system for several days of normal driving to slowly dissolve mild deposits. However, heavy-duty chemical cleaners intended for severely clogged systems are highly concentrated and aggressive. These fast-acting products are typically designed to remain in the system for only ten to thirty minutes while the engine idles or undergoes a brief, gentle drive. Leaving a heavy-duty cleaner inside your engine for too long can degrade internal rubber seals, water pump impellers, and fragile plastic components. Always read and follow the exact operational time limits printed on the back of your specific chemical bottle.