Have you ever woken up, grabbed your keys, rushed out the door, and hopped into your car, only to hear a sad, slow click when you turn the ignition? Your battery is completely dead. You just replaced it last year, you did not leave your headlights on, and the interior dome lights were definitely off.
Welcome to the frustrating world of a parasitic battery drain. It acts just like a tiny vampire, quietly drinking your car’s electrical energy while the engine is resting.
Finding this hidden thief might feel like trying to solve a spooky mystery, but you do not need to be a professional mechanic to fix it. All you need is a basic tool called a digital multimeter, a little bit of patience, and this step-by-step guide to tracking down the culprit.
What Exactly Is a Parasitic Battery Drain?
Before you start pulling things apart, it helps to understand what you are actually fighting. Your car is packed with computer modules, clocks, and security systems. Even when your vehicle is parked and the key is in your pocket, these systems need a tiny amount of electricity to remember their settings. This normal, healthy electrical appetite is called a parasitic draw.
A parasitic drain happens when something goes wrong with that system. A switch might get stuck in the “on” position inside your glove box, a computer module might refuse to go to sleep, or an aftermarket stereo might be wired incorrectly. Instead of taking a tiny sip of power, the broken component gulps down energy until your battery is completely empty.
Meeting Your Best Friend The Digital Multimeter
To catch an invisible energy thief, you need a tool that can see electricity. That is where the digital multimeter comes into play. This handy device measures various electrical properties like voltage, resistance, and current. For this specific job, you will be using it to measure current, which is the actual flow of electricity through a wire. Current is measured in units called amperes, or amps for short.
Understanding the Buttons and Dial
When you look at your multimeter, you will see a large dial in the center and a few ports at the bottom where your colored test leads plug in. For tracking a drain, you need to set the dial to the direct current amp setting, which is usually marked with a capital letter A and a straight line above it.
Setting Up the Test Leads
Plugging your wires into the correct holes is the most critical step of the entire process. If you put them in the wrong spot, you can pop a fuse inside your meter the second you touch the car battery.
- The black wire always goes into the port labeled COM, which stands for common.
- The red wire must move out of its usual voltage port and go into the high amp port, which is normally labeled 10A or 20A.
Gathering Your Safety Gear and Tools
Working around a car battery requires a bit of caution. Batteries store a massive amount of energy, and they contain acid that you definitely do not want on your skin or clothes. Prepare your workspace and gather your supplies before you begin.
Items You Will Need
- A digital multimeter with a 10-amp or 20-amp fused setting
- Safety glasses to protect your eyes from sparks or dirt
- Heavy-duty work gloves to shield your hands
- A wrench or socket set to loosen the battery terminal clamps
- A couple of jumper wires with alligator clips on both ends
- A pen and a notepad to write down your measurements
Preparing the Vehicle
Park your vehicle on a flat, level surface in a well-ventilated area. Engage the parking brake firmly so the vehicle cannot roll. Turn off every single accessory inside the car, including the radio, the air conditioning, the windshield wipers, and the interior lights. Take the key completely out of the ignition and place it on a nearby workbench so there is no chance the vehicle accidentally tries to start during your test.
Simulating a Parked Vehicle
This is where many beginners make a mistake. To find a drain, your car needs to think it is completely locked up and asleep, but you still need access to the fuse boxes.
Tricking the Door Latches
Open your car doors and locate the physical latch mechanism inside the edge of the door. Use a screwdriver to manually push the latch into the closed position, exactly as if the door had slammed shut against the car frame. This tricks the car computer into thinking the doors are closed, which turns off the interior lights. Do the exact same thing to your hood latch or trunk latch if your fuse boxes are hidden in those areas.
Waiting for the Computers to Sleep
Modern cars do not go to sleep right away. When you turn off the engine, the onboard computers stay awake for a while to run self-tests and save data. Lock the doors with your remote fob if that is how you normally park. Now, walk away and wait at least thirty to forty-five minutes. This gives every computer module plenty of time to enter a deep sleep mode.
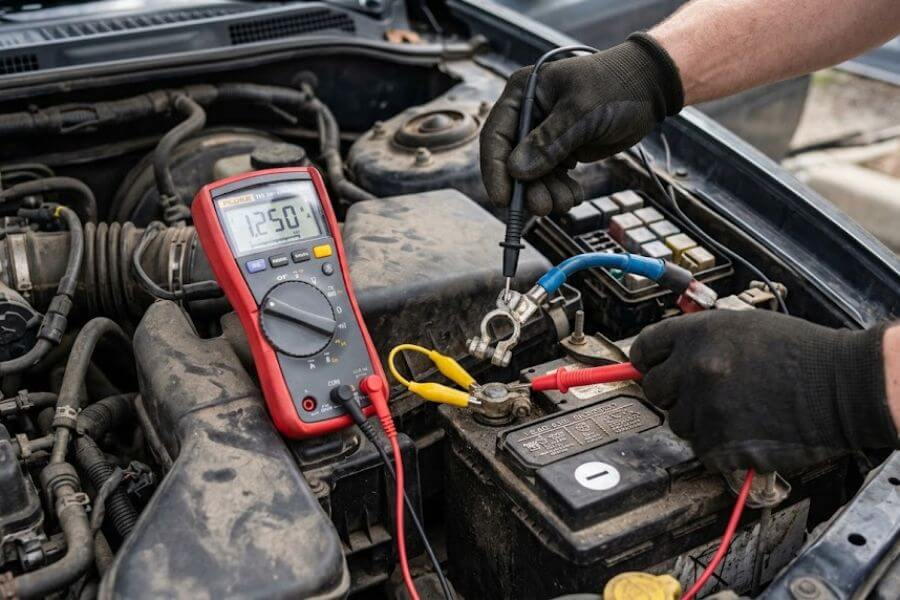
Connecting the Multimeter safely
Now that the car is fully asleep, it is time to connect your multimeter. To measure the flow of electricity, the meter must become part of the circuit. This means the electricity has to flow out of the battery, through your meter, and then back into the car.
Loosening the Cable
Put on your safety glasses and gloves. Locate the negative battery terminal, which is marked with a minus sign and usually has a black cable attached to it. Never use the positive red terminal for this test, because accidentally touching your wrench to the metal body of the car while loosening the positive side will create a massive, dangerous spark. Use your wrench to loosen the nut on the negative terminal clamp.
Creating the Bridge
Take one of your jumper wires with alligator clips. Clip one side to the metal negative battery post. Clip the other end to the negative cable clamp that you just loosened. Now, carefully lift the negative cable clamp off the battery post. Because of your jumper wire, the electricity is still flowing smoothly, and the car computers will stay fast asleep.
Introducing the Meter
Connect your red multimeter lead to the negative cable clamp. Connect your black multimeter lead to the negative battery post. Once both leads are securely attached, gently remove the jumper wire that you used as a bridge. The electrical current is now forced to travel directly through your digital multimeter.
Reading the Numbers and Spotting the Thief
Look down at the screen of your digital multimeter. You should see a number displayed in amps.
What is Normal?
A healthy modern vehicle should draw somewhere between 0.020 and 0.050 amps when it is completely asleep. In milliamps, that is twenty to fifty milliamps. This small amount of power keeps your clock accurate and keeps the keyless entry system listening for your remote.
What is a Drain?
If your meter displays a number higher than 0.050 amps, such as 0.350 amps, 1.2 amps, or even higher, you have officially confirmed that a parasitic drain exists. The higher the number, the faster your battery will die. A one-amp drain can completely flatten a healthy battery in just a couple of days.
The Fuse Pulling Elimination Method
Now that you know a thief is hiding inside the electrical system, you need to find out exactly which room they are occupying. You will do this by checking the fuses one by one.
Locating Your Fuse Boxes
Most modern vehicles have at least two fuse boxes. One is located under the hood near the battery, and another is hidden inside the cabin, usually under the dashboard or behind a panel near the driver’s left knee. Check your owner’s manual to find all the fuse box locations for your specific make and model.
Pulling the Fuses Wisely
Start with the fuse box inside the engine bay. Use a pair of plastic fuse pullers, which are often stored right inside the fuse box lid. Grip the first fuse firmly, pull it straight up out of its slot, and look at your multimeter screen.
- If the number on the screen does not change, the thief is not on that circuit. Push the fuse right back into its exact slot.
- If the number on the screen suddenly drops down to the normal range, you have found the problem circuit.
Write down the name or number of that specific fuse from the diagram printed on the fuse box cover, then put the fuse back in and continue testing the rest just to ensure there is not a second problem hidden elsewhere.
Investigating the Problem Circuit
Finding the fuse is a massive victory, but your job is not quite done. A single fuse usually protects several different things. For example, a fuse labeled “Body Control Module” or “Interior” might power your radio, your glove box light, your vanity mirror lights, and your digital clock.
Checking the Simple Things First
Look up the problem fuse in your vehicle repair manual to see a complete list of everything connected to it. Start with visual inspections. Look closely at the switches. Is the trunk light staying on when the trunk is closed? You can check this by setting your phone to record a video, placing it inside the trunk, closing it, and then checking the footage to see if the bulb turned off. Check if the glove box door is bent, preventing it from pushing its light switch closed.
Inspecting Aftermarket Accessories
If you recently installed a new dashcam, a custom car stereo, a trailer hitch wiring kit, or a security alarm, look at those components first. Aftermarket gear is the number one cause of parasitic battery drains. If these devices are wired to a wire that stays hot all the time instead of a wire that turns off with the key, they will continuously pull power day and night.
Advanced Troubleshooting with Voltage Drop Testing
Pulling fuses on older cars works perfectly, but on modern vehicles, pulling a fuse can sometimes wake up a sleeping computer module. When you plug the fuse back in, the computer boots up, draws a bunch of power, and ruins your test. To avoid this, you can use an advanced technique called a voltage drop test.
How Voltage Drop Works
Every wire and fuse has an incredibly tiny amount of electrical resistance. When electricity flows through a resistor, a tiny bit of voltage gets dropped across it. If a circuit is completely asleep and zero current is flowing, the voltage drop will be zero. If a circuit is awake and drawing power, there will be a measurable voltage drop across the two tiny metal tabs on top of the fuse.
Setting Up the Test
For this method, you do not disconnect the battery cable. Leave the battery completely connected so the car stays perfectly asleep. Set your digital multimeter to measure millivolts, which is marked as mV on your dial. This setting is incredibly sensitive.
Testing the Fuses
Take your two multimeter test leads and touch them directly to the two small, exposed metal pins on the back face of a plastic fuse. Hold the tips very steady. Look at the display.
- If the meter reads 0.0 mV, there is no electrical current traveling through that fuse. It is perfectly asleep.
- If the meter displays a number like 0.4 mV or 1.2 mV, electricity is actively flowing through that fuse.
You can look up a specialized fuse voltage drop chart online or in a repair book to convert that millivolt reading into actual amps based on the size and type of the fuse you are testing.
Summary of Testing Methods
| Feature | Fuse Pulling Method | Voltage Drop Method |
| Battery Connection | Must disconnect negative cable | Battery stays fully connected |
| Multimeter Setting | 10A or 20A Direct Current | Millivolts (mV) |
| Risk of Waking Modules | High risk when reinserting fuses | Zero risk to computer modules |
| Difficulty Level | Straightforward for beginners | Requires a very steady hand |
| Best Used On | Older vehicles with fewer computers | Modern vehicles with complex networks |
Fixing the Problem
Once you have pinned down the exact component that is draining your battery, it is time to make a repair plan.
Replacing Bad Switches
If a switch for your door, hood, or glove box is broken internally and keeping a light on, it will need to be replaced. These switches are usually inexpensive and can be unplugged and swapped out with basic hand tools.
Disconnecting Malfunctioning Gear
If the drain disappears when you unplug an aftermarket amplifier or a backup camera, you need to rewire that device. Make sure its main power wire is connected to an accessory circuit that only gets electricity when the ignition key is turned to the run position.
Professional Intervention
If the fuse points to a major computer like the engine control module or the transmission control unit, the module itself might have an internal short circuit, or it might be getting corrupted data from another sensor that keeps it from falling asleep. In these complex cases, taking your findings to a professional automotive electrician will save you a massive amount of time and money.
Frequently Asked Questions
Why does my multimeter screen show zero when I connect it to the battery?
If your meter displays an absolute zero and your car lights do not work either, you likely blew the internal fuse inside your digital multimeter. This usually happens if you accidentally touched the meter leads to the battery while the wires were still plugged into the standard voltage port, or if you turned on a high-power device like the headlights or tried to start the engine while the meter was connected in series. You will need to open up your multimeter case and replace the small glass or ceramic fuse inside before you can continue testing.
Can a bad alternator cause a parasitic battery drain?
Yes, a malfunctioning alternator is a highly common cause of a hidden battery drain. Inside your alternator, there are components called diodes that act like one-way electronic gates. They allow electricity to flow out of the alternator to charge your battery, but they stop it from flowing backward. If one of these diodes breaks down and shorts out, it creates a path for electricity to flow backward from the battery into the alternator coils all night long, getting hot and draining your battery completely. You can test this by safely unplugging the main thick wire from the back of your alternator during your amp test to see if the high reading drops to normal.
Is it safe to leave my multimeter connected for hours to catch an intermittent drain?
You can leave your meter connected for an extended period, but you must monitor it closely. Intermittent drains are tricky because they happen randomly, like a security module that decides to wake up every three hours. If you leave your meter connected, make sure it has an automatic power-off feature disabled so it does not turn off right before the drain happens. Also, ensure your meter leads are securely clamped so they cannot slip off and short against the metal body of the vehicle, which could damage your electrical system.
Why can I not just disconnect my positive battery cable instead of the negative one?
Safety is the main reason you should always use the negative cable for electrical testing. The entire metal body, frame, and engine block of your vehicle are connected directly to the negative side of the battery. If you are working on the positive terminal with a metal wrench and your tool accidentally bumps against the metal fender or engine, you will create a direct electrical short circuit. This causes massive sparks, can instantly melt your tools, damage the battery, or cause severe burns to your hands. The negative post is safe because if your wrench hits the frame, nothing happens since they are already at the same electrical potential.
How long should a healthy car battery be able to sit before it dies from normal draw?
A healthy battery in a modern car that has a normal parasitic draw of around thirty milliamps should easily be able to sit parked for three to four weeks and still start the engine without any trouble. If your battery is getting weak due to age, or if you live in an area with extreme winter cold or extreme summer heat, that time frame can drop significantly. If your vehicle is going to be parked for longer than a month, it is always a wise idea to connect a smart battery maintainer to keep the charge topped up.


