Picture this: You are driving down the street, enjoying your favorite music, when suddenly a high-pitched shriek pierces through the air. Everyone on the sidewalk turns to look at your vehicle. You press the gas pedal, and the noise gets even louder, sounding like a chorus of angry birds trapped under your hood.
That embarrassing sound is your vehicle screaming for help. More than likely, your serpentine belt, along with its close friends the tensioner and the idler pulley, have reached the end of their lives.
Your vehicle relies on a system of parts working together to keep you moving safely. While a noisy engine bay can feel intimidating, you do not have to park your car and wait for a tow truck. Grabbing a few basic tools and learning how these parts connect will give you the confidence to fix this issue yourself. This guide walks you through every single step to quiet that noise and get your vehicle running smoothly again.
Understanding Your Vehicle Belts and Pulleys
Before you roll up your sleeves and dive into the engine bay, you need to understand exactly what you are looking at. Your engine creates power, but that power needs to travel to other vital parts of your vehicle. This is where the serpentine belt system comes into play.
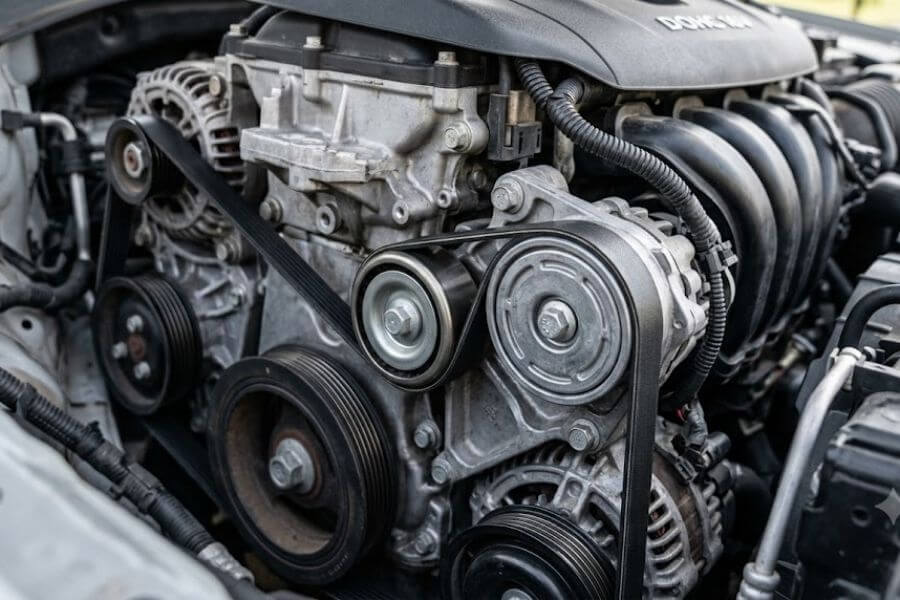
The Serpentine Belt
Think of the serpentine belt as the ultimate multi-tasker. It is a long, continuous rubber loop that snakes its way around various accessories on the front of your engine. As the engine runs, it spins the main crankshaft pulley. This motion drives the belt, which in turn spins the alternator, the power steering pump, the air conditioning compressor, and sometimes the water pump.
Without this single belt, your battery would not charge, your steering wheel would become incredibly heavy to turn, and your air conditioning would blow warm air. If the belt snaps completely, your engine can overheat rapidly, leaving you stranded on the side of the road.
The Automatic Belt Tensioner
Rubber belts naturally stretch and wear out over time. To keep the belt tight against all those spinning accessories, your vehicle uses an automatic belt tensioner. This part features a heavy-duty spring housed inside a metal arm. Attached to the arm is a smooth or grooved wheel.
The tensioner constantly pushes against the belt with just the right amount of force. If the tensioner spring gets weak, the belt slips and creates that awful squealing sound. If the internal bearing of the tensioner wheel fails, it can seize up completely and shred your belt into tiny pieces.
The Idler Pulley
An engine bay is a crowded space. The serpentine belt cannot always run in a straight line from one accessory to another. The idler pulley is a freestanding wheel bolted directly to the engine block. Its sole purpose is to guide the belt, redirecting its path so it wraps perfectly around the other pulleys.
Just like the tensioner, the idler pulley contains a small bearing inside that allows it to spin at thousands of revolutions per minute. When this bearing loses its grease, it begins to wobble, squeak, or grind.
Recognizing the Warning Signs
Your vehicle will almost always tell you when something is wrong under the hood. Catching these signs early prevents a minor noise from turning into a major breakdown.
The Classic High-Pitched Squeal
The most obvious symptom is a loud chirping or squealing sound. This noise usually happens because the belt is slipping across the pulleys rather than gripping them securely. You might notice the sound is loudest right after you start your car on a cold morning, or when you turn the steering wheel all the way to one side, which puts extra stress on the power steering pump.
Physical Damage to the Belt
Pop your hood and look at the belt with a flashlight. Look closely at both the smooth top side and the grooved underside. If you see deep cracks across the grooves, chunks of rubber missing, fraying strings along the edges, or a shiny, glazed appearance on the smooth side, your belt is living on borrowed time.
Visible Wobble or Heavy Corrosion
With the engine safely turned off, look at the tensioner arm and the idler pulley. If you notice the tensioner arm bouncing violently while the engine runs, the internal spring is shot. Look for rust bleeding out from the center bearings of the pulleys, or a pile of fine metal dust around the front of the components, which indicates severe mechanical wear.
Battery and Steering Issues
Because the belt powers your alternator and power steering pump, a slipping belt can cause your dashboard lights to flicker or your battery warning light to illuminate. You might also feel a sudden tightness or jerking sensation in your steering wheel while making tight turns at low speeds.
Safety Guidelines for Working on Your Vehicle
Working on a vehicle is a rewarding experience, but safety must always be your absolute highest priority. Before you touch a single bolt, review these essential safety measures to protect yourself and your property.
- Let the Engine Cool Down Completely: Your engine operates at incredibly high temperatures. Components like the radiator, engine block, and various brackets can burn your skin instantly. Wait at least one full hour after driving before opening the hood to work.
- Disconnect the Battery: You will be working very close to the alternator and other electrical components. To prevent accidental sparks, short circuits, or the engine turning over unexpectedly, always disconnect the negative battery terminal before starting your project.
- Secure the Vehicle: Park your vehicle on a flat, level concrete surface. Set the emergency parking brake as tightly as possible. If you need to raise the vehicle to access the belt from underneath, always use heavy-duty jack stands and place wheel chocks behind the rear tires. Never rely solely on a hydraulic floor jack to hold the weight of your vehicle.
- Protect Your Eyes and Hands: Wear sturdy safety glasses to shield your eyes from falling dirt, rust flakes, or snapping tools. Mechanix-style gloves will protect your knuckles from sharp metal brackets while still allowing you to feel small bolts.
- Avoid Loose Clothing and Hair: A spinning engine accessory can grab loose items in a fraction of a second. Tie back long hair, remove dangling jewelry or lanyards, and tuck in loose clothing before leaning over an open engine compartment.
Gathering Your Tools and Parts
Nothing derails a Saturday afternoon repair faster than realizing you are missing a tool or a part midway through the job. Take a few minutes to organize your workspace and gather everything you need.
Required Tools
- Socket Wrench Set: A standard socket set with metric and standard sizes will help you remove the bolts securing the tensioner and idler pulley.
- Serpentine Belt Tool or Long Breaker Bar: The space between your engine and the frame of your vehicle is often very tight. A dedicated serpentine belt tool is a long, flat metal bar that fits into tight spaces to give you maximum leverage against the tensioner spring.
- Combination Wrenches: Standard box wrenches are helpful for tight spaces where a socket wrench cannot fit.
- Torque Wrench: This tool ensures you tighten your new pulley and tensioner bolts to the exact specifications required by your vehicle manufacturer.
- Flashlight or Under-Hood Work Light: Clear visibility is crucial for routing the belt correctly and inspecting your work.
- Screwdrivers and Plastic Trim Tools: You may need these to remove plastic underbody shields or air intake components to access the belt system.
Required Parts and Supplies
- New Serpentine Belt: Choose a high-quality, name-brand belt made from EPDM rubber, which resists cracking and heat wear much better than older neoprene options.
- New Automatic Belt Tensioner Assembly: It is always smartest to replace the entire tensioner assembly, not just the pulley wheel, to ensure the internal spring is fresh.
- New Idler Pulley: Replace this at the same time to ensure all your primary spinning components wear out at the exact same rate.
- Degreaser and Clean Rags: Helpful for cleaning up any oil or grease spills inside the pulley tracks before installing your fresh belt.
Locating and Mapping Your Belt Layout
Before you take anything apart, you must map out exactly how the belt winds through the engine compartment. If you skip this step, you will face a confusing puzzle trying to figure out which way the belt loops around each wheel.
Finding the Belt Diagram
Many vehicle manufacturers place a handy sticker under the hood that displays the exact routing path of the serpentine belt. Look on the underside of the hood, on the plastic radiator shroud, or near the front strut towers. If your vehicle is missing this sticker, look in your owner manual or search online for a diagram matching your exact year, make, model, and engine size.
Drawing Your Own Map
Never rely completely on memory. Take a piece of paper and a pen to draw your own custom diagram. Sketch out every single pulley as a simple circle. Label each circle based on what it does, such as “ALT” for alternator, “WP” for water pump, “TEN” for tensioner, and “IDL” for idler pulley. Draw a line showing exactly which side of the pulley the belt touches.
Paying Attention to Ribbed vs Smooth Pulleys
As you map the layout, notice that some pulleys have grooves or ribs, while others are completely smooth.
| Pulley Type | Belt Side Contact | Typical Accessories |
| Ribbed Pulley | Grooved Side of Belt | Alternator, Crankshaft, Power Steering Pump, Air Conditioning Compressor |
| Smooth Pulley | Flat Side of Belt | Idler Pulley, Backside of Tensioner Pulley, Water Pump (on some vehicles) |
Step-by-Step Replacement Guide
Now that you have your tools, parts, and diagram ready, it is time to begin the actual replacement process. Work steadily, take your time, and follow each phase carefully.
Step 1: Disconnecting the Battery
Open your hood and locate the vehicle battery. Use a wrench to loosen the nut on the negative battery cable terminal, which is marked with a minus sign. Slide the cable completely off the terminal and tuck it safely to the side so it cannot spring back and make contact with the metal post.
Step 2: Gaining Access to the Belt System
Depending on whether your engine sits longitudinally (front-to-back) or transversely (side-to-side), your access space will vary.
- Front-Wheel Drive Vehicles: The belt system faces the passenger side wheel well. You may need to jack up the vehicle, support it safely on jack stands, remove the front passenger tire, and pop off a plastic splash shield to gain clear access to the crankshaft pulley and tensioner.
- Rear-Wheel Drive Vehicles: The belt faces the front radiator. You may need to remove the plastic air intake ducting or the upper radiator fan shroud to give your arms enough clearance to work comfortably.
Step 3: Releasing the Belt Tension
Locate the automatic belt tensioner. Look for a square hole directly in the arm, or a large molded hex nut on the front of the assembly.
Insert your long serpentine belt tool or breaker bar with the correct size socket into this point. Grasp the end of the long tool and slowly rotate it. On most vehicles, rotating the tool clockwise or counter-clockwise pushes the tensioner arm away from the belt, compressing the internal spring.
As the spring compresses, the tension on the serpentine belt drops instantly. Use your free hand to slip the loose belt off the topmost accessible pulley, which is usually the alternator. Once the belt is clear of that first pulley, slowly ease your tool back to its original position to let the tensioner arm relax completely. Remove your tool from the tensioner.
Step 4: Removing the Old Serpentine Belt
Carefully unloop the old belt from all the remaining accessories and extract it from the engine bay. Be careful not to snag it on any sharp metal brackets or plastic clips. Once the belt is out, lay it flat on the ground next to your new belt. Match them up to verify they are the exact same width and have the exact same number of grooves. Hold them out tight to check that the overall length is virtually identical.
Step 5: Removing the Old Idler Pulley
Locate the idler pulley. Most idler pulleys have a plastic or metal dust cap covering the center bolt. Use a small flat-head screwdriver to gently pry this cap off.
Select the correct socket size for the center mounting bolt. Turn the bolt counter-clockwise to loosen it. Because the pulley spins freely, you may need to hold the outer edge of the wheel with a gloved hand to keep it still while you break the bolt loose. Spin the bolt out completely, pull the old idler pulley off the engine block, and save any washers or spacers that came off with it.
Step 6: Removing the Old Belt Tensioner
Look closely at your new tensioner assembly to see where the mounting bolts are located. Some tensioners use one large central bolt, while others use two or three smaller bolts around the perimeter.
Locate these matching bolts on your old tensioner inside the engine bay. Use your socket wrench to remove them. Keep track of which bolt came from which hole, as they can sometimes be different lengths. Once the bolts are out, wiggle the old tensioner assembly off the engine mount.
Step 7: Cleaning and Inspecting the Workspace
Take a clean rag sprayed with a small amount of automotive degreaser and wipe down the mounting surfaces where the tensioner and idler pulley sit. Look for any signs of engine oil or coolant leaks coming from nearby gaskets. If you find fluid leaks, they must be repaired, as oil and coolant will degrade your brand new rubber belt very quickly. Inspect the remaining accessory pulleys, checking that their grooves are clean and free of embedded rocks or old belt debris.
Step 8: Installing the New Belt Tensioner
Align your new tensioner assembly with the mounting holes on the engine block. Many tensioners feature a small locating pin on the back side that must drop into a matching hole on the engine block to ensure proper alignment.
Insert the mounting bolts by hand and spin them clockwise several turns to prevent cross-threading. Grab your torque wrench and tighten the bolts to the exact torque specifications listed in your repair guide. Proper torque ensures the assembly will not shake loose from engine vibrations.
Step 9: Installing the New Idler Pulley
Place any spacers or washers back into position on the engine mount. Position the new idler pulley over the mounting hole, insert the center bolt, and hand-thread it. Use your torque wrench to tighten this center bolt to specification. Spin the pulley with your hand to make absolutely sure it rotates smoothly, quietly, and does not rub against the engine block. Snap the protective dust cap back over the center bolt.
Step 10: Routing the New Serpentine Belt
Grab your new belt and refer directly to your drawn diagram or the factory sticker. Start at the lowest point of the engine, which is almost always the large crankshaft pulley. Loop the grooved side of the belt around the crankshaft grooves, ensuring it sits perfectly centered.
Route the belt upward, wrapping it around the various accessories according to your map. Leave one easily accessible smooth pulley, like the idler pulley or the water pump, as your final stop. Double-check that every ribbed section of the belt sits completely nested within the corresponding grooves of every ribbed accessory wheel.
Step 11: Setting the Tension
Insert your serpentine belt tool back into the new tensioner arm. Apply steady force to rotate the arm and compress the internal spring fully.
With the tensioner compressed and held open, grab the remaining loose loop of your new belt and slide it over your final smooth pulley. Carefully and slowly release the pressure on your belt tool, allowing the new tensioner arm to swing back down and press firmly against the belt. Remove your tool from the engine bay.
Step 12: Final Alignment Inspection
Take your flashlight and inspect every single pulley wheel one last time. Look closely from the side to verify the belt is not sitting halfway off any pulley edge or riding up over a lip. If even one section of the belt is misaligned by a single groove, it will shred or snap the moment you start the vehicle.
Step 13: Reconnecting the Battery and Testing
Reinstall any plastic splash shields, air ducting, or fan shrouds you removed earlier. Reconnect the negative battery cable to the battery terminal and tighten the nut securely.
Before starting the engine, double-check that no tools, rags, or loose bolts are lying inside the engine bay. Step into the vehicle, make sure it is in park or neutral, and turn the key to start the engine. Let it idle. Step outside and listen closely. The engine bay should be completely quiet, with no squeaks, chirps, or grinding sounds. Watch the belt move to confirm it runs perfectly straight without wobbling.
Frequently Asked Questions
Can I change just the belt without replacing the tensioner and idler pulley?
While you can technically replace just the rubber belt, it is generally not recommended. The tensioner, idler pulley, and belt are designed to have similar lifespans. If your belt has worn out, the internal spring of the tensioner has likely weakened, and the bearings inside the pulleys are nearing the end of their functional life. Installing a tight new belt on an old, worn tensioner can cause the old bearings to fail rapidly, forcing you to do the exact same job all over again a few weeks later. Replacing all three components together provides complete peace of mind.
How do I know if my noise is coming from the belt or an accessory like the alternator?
A simple test involves running the engine briefly while listening closely to the noise. Carefully spray a tiny mist of clean water onto the grooved side of the belt while the engine runs. If the squealing noise disappears instantly or changes pitch dramatically for a few seconds before returning, the issue is a slipping belt or a weak tensioner. If the noise remains completely unchanged, or sounds like a heavy metal grinding, a bearing inside an accessory like your alternator, water pump, or air conditioning compressor is likely failing.
What happens if my serpentine belt breaks completely while I am driving?
If your belt breaks while driving, you will lose power steering instantly, making the vehicle incredibly heavy and difficult to turn. Your alternator will stop charging the battery, causing your dashboard lights to fade and your engine to eventually die from a lack of electrical power. Most critically, if your belt drives your water pump, your engine will stop circulating coolant and overheat within minutes, which can cause severe, permanent engine damage. If your belt breaks, pull over to a safe location immediately and turn off the engine.
Do I need any special grease or lubrication for the new belt or pulleys?
No, you should never apply grease, oil, belt dressing, or any other lubricants to a modern serpentine belt or its pulleys. Modern EPDM belts rely purely on friction and a clean, dry surface to grip the pulleys. Applying belt dressing or lubricants might quiet a squeak for a few minutes, but it will eventually attract dirt and road grime, cause the belt material to degrade, and lead to even worse slipping and noise issues. Keep all components completely clean and dry.
