That annoying, high-pitched squeal coming from your dashboard isn’t a ghost. It is your car heater blower motor begging for retirement. When winter hits, or when summer demands full blast air conditioning, you need that fan working perfectly. Instead of handing over hundreds of hard-earned dollars to a mechanic, you can handle this project right in your own driveway.
Replacing a noisy blower motor under the dash might look intimidating with all those wires and plastic panels, but it is entirely manageable. Grab your toolbox, move your front seat back, and let us get that cabin quiet again.
Understanding Your Vehicle Climate Control System
Before you start twisting screws, it helps to understand what this part actually does. The blower motor is the heart of your vehicle heating, ventilation, and air conditioning system. It is a small electric motor attached to a plastic fan, which looks a lot like a squirrel cage.
The Role of the Blower Motor
When you turn the dial on your dashboard to crank up the heat or air conditioning, you send an electrical signal to this motor. The motor spins the squirrel cage fan at high speeds. This action forces air through your heater core to warm it up, or through the air conditioning evaporator to cool it down, before blasting it out of your dashboard vents.
Why Do Blower Motors Get Noisy?
Motors do not last forever. Over years of constant spinning, the internal bearings wear down. When those bearings lose their lubrication, they create friction, leading to that classic chirping, squealing, or grinding noise.
Sometimes, the noise is not the motor itself but debris. Leaves, twigs, and even mice can find their way past your cabin air filter and get trapped inside the fan blades. When the fan spins, the debris creates a loud thumping or vibrating sound, like a playing card stuck in bicycle spokes.
Gathering Your Tools and Supplies
You do not need a garage full of heavy machinery for this job. Most blower motors located under the passenger side dashboard can be swapped out with a few basic hand tools. Gathering everything beforehand ensures you do not have to stop halfway through the job with your dashboard taken apart.
Essential Tools
- A Quarter-Inch Ratchet Set: A small ratchet is crucial because the space under the dash is incredibly tight.
- Metric and Standard Sockets: Most modern cars use 5.5mm, 7mm, or 8mm bolts for under-dash components.
- Screwdrivers: You will want both a flat-head and a Phillips-head screwdriver, preferably with short handles.
- Torx Bit Drivers: Many European and American cars secure climate control parts with T15 or T20 Torx screws.
- A Good Flashlight or Headlamp: It is dark under the passenger footwell. Hands-free lighting is a lifesaver here.
- A Trim Panel Removal Tool: This plastic tool helps you pop off dashboard clips without scratching or cracking the plastic.
Required Supplies
- The Replacement Blower Motor: Make sure to buy one that matches your specific car year, make, and model. It usually comes with the new fan wheel already attached.
- Safety Glasses: You will be lying on your back looking straight up under the dash. Dust, rust, and plastic bits will fall directly toward your eyes.
- Work Gloves: Thin, grippy gloves protect your knuckles from sharp metal brackets under the dash.
Preparing Your Workspace for Safety
Working on a car requires a safe environment, even when you are just working inside the cabin. You will be twisting into some strange physical positions, so setting things up correctly makes a massive difference.
Park and Secure the Vehicle
Choose a flat, level surface to park your vehicle. A driveway or a well-lit garage is perfect. Set the emergency parking brake firmly so the car cannot roll anywhere while you are working inside.
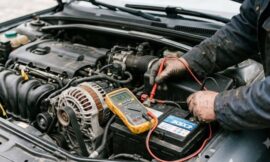
Battery Safety First
Whenever you work around electrical components under the dash, you must disconnect the car battery. This prevents short circuits, blown fuses, or accidental airbag deployment.
- Open the hood and locate your car battery.
- Use a wrench to loosen the nut on the negative battery terminal, which features a minus sign.
- Pull the cable off the terminal and tuck it away so it cannot accidentally spring back and touch the metal post.
Create Maximum Legroom
Open the passenger side door as wide as it can go. Slide the passenger seat all the way back toward the rear row. If your seat can tilt, recline the backrest down to give yourself extra room to maneuver. Lay a thick blanket or yoga mat over the door sill and floor mat. You will be spending a lot of time lying on your back with your head tucked where your feet normally go, and a little cushioning goes a long way.
Step-by-Step Guide to Removing the Old Blower Motor
Now that you are safe and comfortable, it is time to dig in. Take your time during this process. Plastic dashboard pieces can become brittle over time, so gentle patience is your best friend.
Step 1: Remove the Under-Dash Trim Panel
Look underneath the glove box. Most vehicles have a plastic or felt trim panel that hides the blower motor and wiring from view.
- Locate the plastic push-pins or small screws holding this panel in place.
- If they are push-pins, use your trim tool to pry the center pin out, then pop the whole clip free.
- Gently pull the panel straight down and set it out of the car.
Step 2: Disconnect the Electrical Connector
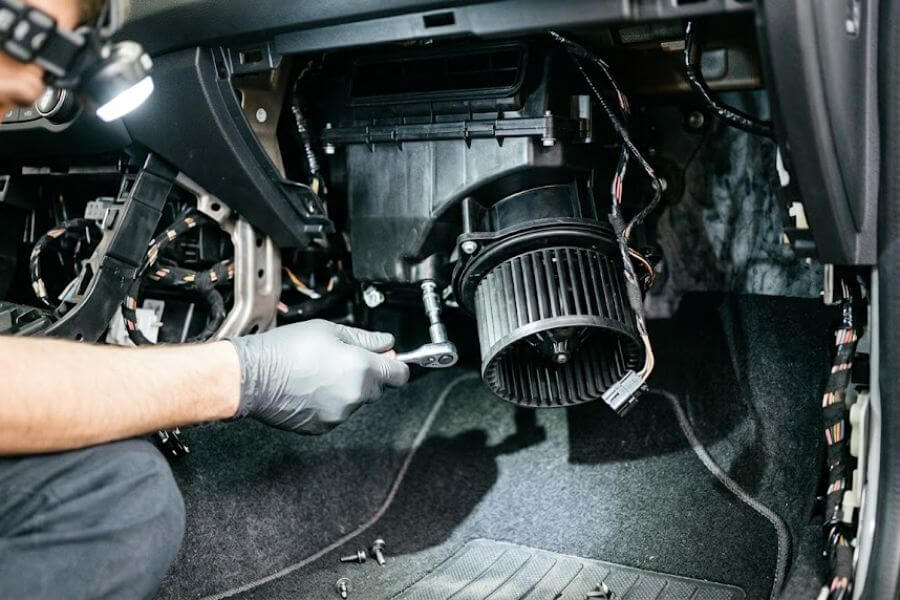
With the panel gone, look straight up. You will see a round, cylindrical plastic housing. That is your blower motor. Coming out of the bottom or side of it will be a wiring harness with a plastic plug.
- Find the release tab on the plastic electrical connector.
- Squeeze the tab firmly with your thumb or a pair of pliers.
- Pull the plug straight down out of the motor. Do not yank the wires themselves, always pull from the plastic plug.
Step 3: Remove the Cooling Tube (If Equipped)
Many vehicles feature a small, flexible black rubber tube that runs from the blower motor housing back into the main climate control box. This tube channels cool air into the motor to prevent it from overheating.
- Grasp the tube where it connects to the motor.
- Twist it slightly and pull it away. It should pop off easily.
Step 4: Unfasten the Mounting Screws
The blower motor is typically secured to the climate control box by three or four small screws around its outer rim.
- Position your flashlight so you can see every single screw clearly.
- Use your small ratchet or short screwdriver to loosen the screws.
- Support the bottom of the heavy blower motor with one hand while you remove the final screw so it does not fall on your face.
Step 5: Lower the Blower Motor
Once the screws are out, the motor might slide down immediately, or it might need a gentle twist to unlock it from the housing tabs.
- Carefully lower the motor straight down into the footwell.
- Watch out for nearby wiring harnesses or dashboard brackets that might snag the plastic fan blades.
Inspecting the Old Part and Cleaning the Housing
Do not just throw the new part in right away. Taking a few minutes to look over the old component and clean out the empty housing can prevent you from having to repeat this entire job next week.
Check for Debris
Look inside the plastic cage of the old motor you just removed. Are there leaves, pine needles, or mouse nesting materials crammed inside? If you find a massive pile of junk, that debris might have been the sole cause of your noise and vibration. However, if the fan blades are clean but spinning the fan by hand feels rough or makes a grinding sound, the motor bearings are definitely shot.
Clean Out the Blower Motor Housing
Stick your gloved hand or a vacuum hose up inside the empty plastic housing under the dash where the motor sits. Wipe down the interior walls with a clean microfiber cloth. If debris fell down into the housing when you pulled the motor out, cleaning it now ensures that junk won’t immediately ruin your brand-new fan.
Installing Your Brand New Blower Motor
Putting everything back together is mostly the reverse of taking it apart, but there are a few critical details you must get right to ensure a leak-free and rattle-free installation.
Align the New Motor Correctly
Pick up your new blower motor and compare it closely to the old one. Make sure the screw holes, the electrical plug orientation, and the cooling tube port line up perfectly.
- Lift the new motor up into the under-dash housing.
- Gently rotate it until the screw tabs on the motor line up exactly with the screw holes in the dashboard housing.
- Ensure the rubber gasket around the rim of the new motor stays flat. This gasket prevents air leaks and annoying whistling noises later.
Secure the Mounting Screws
- Thread the first screw in by hand to hold the motor weight up.
- Hand-start the remaining screws to avoid cross-threading them into the soft plastic housing.
- Use your ratchet or screwdriver to tighten the screws down. Snug them up firmly, but do not overtighten them. Overtightening will strip out the plastic holes, causing the motor to wobble and vibrate when turned on.
Reconnect the Electrical Plug and Cooling Tube
- Push the flexible rubber cooling tube back onto its plastic port on the motor housing.
- Take the main electrical wiring harness plug and push it straight into the new motor connector until you hear a distinct plastic click. Give it a gentle tug to verify it is locked in place.
Testing Your Handy Work
Before you reinstall all the plastic trim panels and pack up your tools, you need to verify that everything works exactly as it should.
Reconnect the Car Battery
- Go back around to the front of your car and open the hood.
- Slip the negative battery cable back onto the negative battery terminal post.
- Tighten the nut securely with your wrench so the cable cannot wiggle.
Fire Up the Climate Control System
- Climb into the driver seat and turn your ignition key to the run position or press your start button. You do not necessarily need to start the engine, but having it running provides full voltage.
- Turn your climate control fan dial to the lowest speed setting. Listen carefully. You should feel a gentle breeze from the vents and hear a quiet, smooth hum.
- Gradually click through every single fan speed level up to maximum high.
- Listen for any vibrations, squeals, or weird knocking noises. If the air feels strong and the cabin remains peaceful, your installation was a total success.
Put the Finishing Touches on the Dashboard
- Slide back over to the passenger footwell.
- Take the plastic under-dash trim panel and align it with its mounting points.
- Push the plastic trim clips back into place or tighten the small retaining screws.
- Give the panel a quick tap to make sure it is solid and won’t rattle down the road.
- Slide your passenger seat back into its normal position.
Troubleshooting Common Installation Issues
Sometimes things do not go perfectly on the first try. If you turn on your fan and something sounds or feels wrong, do not panic. Use this quick guide to diagnose and fix the issue.
| Symptom | Potential Cause | Easy Solution |
| Fan does not spin at all | Electrical plug is loose or a fuse blew | Check the plastic plug connection under the dash; inspect the blower motor fuse under the hood. |
| Fan only works on high speed | Blown blower motor resistor | Replace the resistor block, which sits right next to the blower motor. |
| Loud vibration on high speed | Motor is misaligned or housing is loose | Loosen the mounting screws, realign the motor gasket, and tighten the screws evenly. |
| Airflow is very weak | Fan spinning backward or cabin filter clogged | Verify part compatibility; check and replace a dirty cabin air filter. |
Frequently Asked Questions
Why does my new blower motor smell like burning plastic when I first turn it on?
A faint mechanical or warm plastic smell is relatively normal during the first few minutes of operation. New electric motors often have a protective oil coating or residue from the factory on their internal windings. As the motor warms up for the first time, this residue burns off. The smell should disappear completely after twenty to thirty minutes of use. If the smell persists, gets worse, or is accompanied by visible smoke, turn the system off immediately and check your wiring connections for short circuits.
Can I replace just the noisy bearing instead of buying a whole new motor?
While it is technically possible for advanced electronics hobbyists to press out old bearings and source matching replacements, it is not practical or cost-effective for most car owners. Blower motors are factory-sealed units. Taking the motor casing apart often ruins the delicate plastic housing or balances on the squirrel cage fan. Buying a complete pre-assembled motor unit saves massive amounts of time and guarantees that your new fan is factory balanced, preventing future vibrations.
Do I need to remove my glove box to reach the blower motor?
This depends entirely on the design of your specific vehicle. On many cars, the blower motor sits completely exposed underneath the glove box, requiring you to only remove that lower trim panel. However, on certain models, dashboard brackets or structural bars block your access. In those situations, removing the glove box is necessary. Luckily, most glove boxes are held in by just a few visible screws or plastic tabs that pop out without any hassle.
What happens if I keep driving with a noisy blower motor?
A noisy blower motor will eventually fail completely. The noise indicates that friction is building up inside the spinning parts. Over time, that friction will lock the motor shaft up entirely. When the motor stops spinning, you will completely lose your ability to defrost your windshield in the winter or cool your car down in the summer, which can become a serious safety hazard. Additionally, a seized motor can pull excessive electrical current, which can blow your fuses or overheat your blower motor resistor.
How do I know if my noise is caused by the blower motor or the resistor?
The blower motor is the actual spinning fan mechanical part, while the resistor is an electronic control module that manages the fan speeds. If you hear squealing, grinding, clicking, or thumping, that is a mechanical noise coming directly from the spinning motor or trapped debris. If your fan is completely silent but only blows air when set to the absolute highest speed setting, your motor is usually perfectly fine, and the electronic resistor module is what needs to be replaced.
