Pop open your car’s hood, and you will find a dense, mechanical world. It is full of metal pipes, thick hoses, spinning belts, and heavy machinery. At first glance, this view can feel intimidating. You might worry about touching the wrong part or making a mistake. However, taking care of your vehicle does not require a professional engineering degree. Inside that metal body, your vehicle relies on a few key liquids to run smoothly, stay cool, and stop safely. Think of these liquids as the lifeblood of your machine. Checking them yourself is one of the best ways to keep your ride running perfectly, save money on repairs, and build confidence in your own skills.
Maintaining your vehicle is all about observation and patience. Regularly looking under the hood helps you catch tiny issues before they turn into massive, expensive breakdowns. If you learn how to read the gauges and dips, you can handle the basic upkeep entirely on your own. It is a fantastic habit that transforms how you relate to your machine. Instead of relying blindly on a mechanic, you gain complete control over your own safety on the road. Let us walk through the process of inspecting and refilling every single vital liquid under your hood safely, step by step.
Setting Up Your Workspace for Success
Before you even reach for the hood release lever, you must prepare yourself and your environment. Working on a vehicle requires an orderly space. If your workspace is messy, you risk losing parts or tracking dirt into clean systems. Start by parking your vehicle on a completely flat, level surface. A level surface is absolutely necessary because liquids shift when parked on an incline. If your car sits on a slope, your dipsticks and clear plastic reservoirs will give you false readings. You might think a tank is empty when it is actually full, or you might overfill a system by accident. A flat garage floor or a level driveway is the perfect spot.
Once the car is parked, turn off the engine completely. Pull the emergency brake up firmly to ensure the vehicle cannot roll while you work. The most critical safety rule of this whole process is to let the vehicle sit and cool down. A running engine generates intense heat. The metal parts become burning hot, and the liquids inside build up high pressure. If you open a cap on a hot engine, scorching liquid can spray out and burn you. Let the vehicle sit for at least thirty minutes after driving. Touch the outer metal skin of the hood first; if it feels cool, you are ready to proceed.
Next, gather your tools and safety equipment. You do not need expensive machinery, but a few basic household supplies will make the job smooth. Grab a clean pair of safety glasses to protect your eyes from accidental splashes. Find a pair of thin, durable gloves to keep grease and harsh chemicals off your hands. You will also need a big stack of clean paper towels or a few lint-free microfiber rags. Finally, locate a set of plastic funnels. Using a funnel ensures that you do not spill chemicals onto the hot engine parts, which can cause smoke, bad smells, or even small fires. Keep these items on a small table or a clean patch of ground next to your car so they are within easy reach.
Mastering the Art of the Oil Check
Engine oil is the absolute single most important liquid under your hood. Inside your engine, metal pistons move up and down thousands of times every single minute. This rapid movement creates incredible friction and extreme heat. Engine oil coats these moving metal surfaces, allowing them to glide against each other without grinding down. It also helps cool the lower sections of the engine and traps tiny bits of dirt so they do not scratch the machinery. Without oil, your engine would experience a catastrophic breakdown within a matter of minutes.
Locating and Cleaning the Dipstick
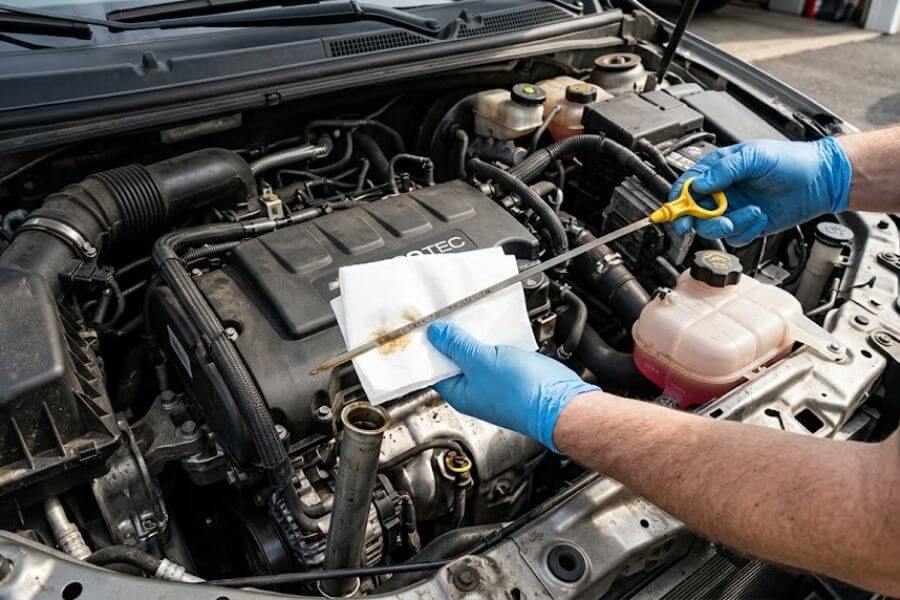
To check your oil, you must look for a specific handle sticking out of the engine block. This handle is usually shaped like a small loop or a bright ring. Manufacturers often color it bright yellow, orange, or red so it stands out against the dark gray metal components. Pop your hood, stand in front of the engine bay, and scan the top of the motor. Once you spot the colored loop, slide your gloved finger through it and pull the long metal rod straight up out of its tube.
When you first pull the dipstick out, the liquid on it will look messy and smeared. This initial reading is inaccurate because oil sloshes around inside the tube while you drive. Take your clean paper towel or microfiber rag, wrap it tightly around the metal rod, and wipe the oil away from the bottom tip completely. Now, look closely at the clean metal tip. You will see specific markings stamped into the surface. Some brands use two tiny drilled holes, others use engraved lines, and some feature a cross-hatched pattern that looks like a tiny metal grid. The space between these two marks represents the safe operating zone.
Reading the Level and Filling the Reservoir
Insert the completely clean dipstick back into its tube. Push it down firmly until it clicks or seats all the way back into place. Wait two seconds, then pull it straight out again in a steady motion. Hold the stick horizontally so the oil does not run up or down the metal rod. Look closely at where the wet oil ends. If the wet line falls right between the two markings, or if it sits near the upper mark, your engine has plenty of oil. If the line drops below the lowest mark, your engine is dangerously low and requires an immediate refill.
+--------------------------------------------------------+
|                   DIPSTICK READING GUIDE               |
+--------------------------------------------------------+
|  [ Low Mark ] <------- SAFE ZONE -------> [ Full Mark ]|
|       |                                        |       |
|  Add Oil Immediately                   Do Not Add Oil  |
+--------------------------------------------------------+
To top off your oil, locate the large, heavy plastic cap sitting directly on top of the main engine valve cover. This cap usually has a small picture of an old-fashioned oil can stamped on it, or it will display the specific weight designation, such as 5W-30 or 0W-20. Twist this cap counter-clockwise to remove it. Place a clean funnel into the open hole. Pick up the correct type of engine oil specified in your vehicle owner manual. Pour in a small amount, roughly a quarter of a quart at a time. Poured oil takes a minute to trickle down to the bottom pan, so wait a brief moment. Recheck the dipstick. Repeat this until the line sits firmly within the safe zone, then twist the fill cap back on tightly.
Inspecting the Engine Coolant System
While engine oil keeps the internal parts moving smoothly, engine coolant prevents the entire motor from melting under its own heat. Combustion generates intense thermal energy. Coolant is a specialized mixture of purified water and antifreeze chemicals that flows through channels in the engine block. It absorbs the excess heat and carries it forward to the radiator at the front of your car, where rushing air cools the liquid back down. Without functional coolant, your engine will quickly overheat, warping metal components and ruining the motor.
The Clear Expansion Tank Check
When checking your coolant, look for a semi-transparent plastic tank located near the radiator or mounted on the side of the engine bay. This tank is known as the coolant expansion reservoir. It connects directly to the radiator through a thin rubber hose. Because the plastic is see-through, you do not even need to open the cap to inspect the volume. Look closely at the outside wall of the plastic container. You will see two molded lines raised on the surface: one labeled “Full Hot” and another labeled “Full Cold.”
Since your engine has been resting and is completely cool, the liquid inside should sit right at or slightly above the “Full Cold” line. The liquid itself should look bright and colorful. Depending on the brand and model of your vehicle, coolant can be bright neon green, vibrant orange, deep pink, or royal blue. If the fluid looks muddy, dark brown, or has rusty flakes floating around inside, the chemical mixture is old and dirty. It will need to be flushed out by a mechanic soon. If the tank looks low but clean, you can easily top it off yourself.
Adding Fluid Safely to Avoid Pressure
If the liquid drops below the cold mark, you must add a matching mixture of antifreeze and water. Never open the heavy metal radiator cap directly on top of the radiator if the car is warm; always use the plastic expansion tank instead. Twist the plastic reservoir cap off slowly. If you hear a small hissing sound, stop turning and wait. That hiss means there is still trapped air pressure inside. Once the sound stops, remove the cap completely.
Always use a bottle labeled as a fifty-fifty pre-diluted mixture. This means the antifreeze is already perfectly blended with distilled water. If you use pure antifreeze, it cannot cool the engine effectively on its own. Insert your clean funnel into the plastic tank opening. Slowly pour the colorful fluid in until the level reaches the raised “Full Cold” line. Remove the funnel, wipe away any tiny drips with a wet rag, and screw the cap back down until it locks.
Checking the Power Steering System
When you turn your steering wheel while parked or moving slowly, you might notice it takes very little physical strength to move that heavy piece of machinery. This effortless movement is made possible by your power steering system. Many modern vehicles use a hydraulic system, which relies on pressurized liquid to help push your front wheels left and right. If this fluid drops too low, your steering wheel will suddenly become incredibly stiff and heavy, making it difficult to turn corners safely. You might also hear a loud, annoying whining or groaning sound whenever you turn the wheel.
Spotting the Reservoir Controls
To inspect this fluid, scan the outer edges of the engine bay for a small, cylindrical plastic or metal tank. The cap on this reservoir will typically say “Power Steering” right across the top, or it might feature a tiny icon of a classic steering wheel. Some vehicles feature a clear plastic tank with maximum and minimum lines stamped onto the outer wall, just like the coolant reservoir. Other cars utilize a solid black tank with a miniature dipstick attached directly to the underside of the cap itself.
If your car uses the clear plastic tank design, simply peer through the side to check the level. If it uses the black cap with the built-in stick, unscrew the cap entirely and pull it up. Wipe the small plastic stick clean with a paper towel, insert it back into the tank fully, and remove it once more. You will see markings on the stick. Interestingly, power steering dipsticks often feature two different sets of marks: one side reads “Hot” and the reverse side reads “Cold.” Since your car is cool, look exclusively at the “Cold” side markings.
Topping Off the Steering Liquid
If the wet line sits below the minimum mark on the side of the tank or below the cold line on the built-in dipstick, you must add more fluid. Power steering systems are highly specific. Some cars use a specialized fluid, while others actually utilize automatic transmission fluid in their steering systems. Check your owner manual carefully to ensure you bought the exact correct type.
+-------------------------------------------------------+
|              POWER STEERING CAP DESIGNS               |
+-------------------------------------------------------+
|  Style A: Clear Tank     |  Visible lines on side     |
|  Style B: Attached Stick |  Dipstick built under cap  |
+-------------------------------------------------------+
Set a small, clean funnel into the neck of the reservoir. Pour the fresh power steering fluid in very small amounts. This tank is usually quite small, so it fills up incredibly fast. It is easy to accidentally overfill it if you rush. Pour a splash, check the level, and pour a bit more if needed. Once the liquid sits right on the target line, pull your funnel out. Tighten the cap back down firmly to keep dust and moisture from entering the system.
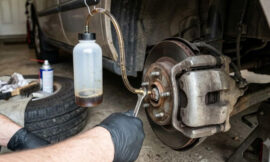
Testing the Brake Fluid Quality and Volume
Your brakes are the single most important safety feature on your vehicle. When you push down on the brake pedal with your foot, you are not pulling a physical wire to stop the wheels. Instead, you are pushing against a column of liquid. Your foot forces fluid down through narrow metal lines out to the wheels, clamping the brake pads tightly against the spinning metal discs. This hydraulic pressure halts thousands of pounds of moving steel instantly. Because brake fluid carries such immense responsibility, keeping it clean and full is a major priority.
Identifying the Translucent Master Cylinder
To find your brake fluid reservoir, stand on the driver side of the car and look near the very back of the engine compartment. It sits high up on the firewall, which is the metal wall separating the engine bay from the passenger cabin. Look for a rectangular, semi-transparent white plastic tank attached to a heavy metal unit called the master cylinder. The cap is usually wide and round, made of dark black or yellow plastic, and it will have words warning you to clean the cap before opening.
Because the plastic container is transparent, you should avoid opening it unless you absolutely have to add fluid. Brake fluid is highly hygroscopic, which is a scientific term meaning it acts like a sponge for moisture in the air. If you open the cap constantly, moisture from the air will dissolve into the liquid. Water lowers the boiling point of the fluid, which can cause your brakes to feel soft, spongy, or even fail completely during hard braking. Look through the side of the plastic tank to verify that the fluid level sits comfortably between the “Max” and “Min” lines.
Color Inspection and Level Correction
Take a close look at the color of the liquid through the clear plastic wall. Fresh, clean brake fluid is almost completely clear with a very light amber or yellowish tint, looking similar to pale white grape juice. Over years of hard stopping, the fluid absorbs heat and microscopic debris, turning dark brown or black like old coffee. If your fluid looks dark brown, it still works, but you should plan to have a mechanic flush the system soon. If the fluid level is simply low, you can bring it back up to spec.
If the liquid sits near the lower mark, wipe the outside of the cap carefully with a clean cloth before opening it. This prevents dirt from falling inside. Unscrew the cap and set it down on a clean surface. Open a brand-new, sealed bottle of brake fluid. Never use an old bottle that has been sitting open on a garage shelf for months, as it has already absorbed damaging moisture. Pour the fresh liquid into the reservoir slowly until it reaches the maximum line.
Important Safety Note: Brake fluid is an intense chemical solvent. If you spill a single drop onto the painted surface of your car, it will eat through the shiny clear coat and destroy the paint down to the bare metal. Always keep a wet rag handy. If you spill any, wipe it away with soapy water immediately.
Once you hit the line, replace the cap immediately and twist it until it locks into place.
Examining the Automatic Transmission Fluid
Your car’s transmission is a complex gearbox that transfers the raw rotating power of the engine down to the driving wheels. It uses a series of heavy gears to make sure your car can move at low speeds or cruise on the highway without overworking the engine. The transmission fluid serves multiple roles: it acts as a hydraulic fluid to shift the gears automatically, cools the moving components, and lubricates the heavy gear teeth. Checking this fluid requires a special method that is different from every other liquid under the hood.
The Special Engine Running Check Method
For almost every other fluid, the engine must be completely cold and turned off. However, checking automatic transmission fluid often requires the exact opposite approach. To get an accurate reading on most traditional automatic cars, the transmission fluid must be warm, and the engine must actually be running while you perform the check. This is because the fluid expands significantly as it warms up, and the internal pump needs to be actively pushing liquid through the gears to show the true operating level.
Start by driving your vehicle around your neighborhood for roughly ten minutes to bring the transmission up to its normal operating temperature. Park the vehicle on that perfectly flat surface we discussed earlier. Leave the engine running completely in “Park” and set the emergency brake firmly. Open the hood carefully, keeping your loose clothes, hair, and fingers far away from the front spinning belts and cooling fans.
Pulling the Transmission Dipstick
Look deep into the engine bay, usually further back and lower down than the engine oil dipstick. The transmission dipstick handle is often colored bright pink, orange, or yellow, and it might have a tiny picture of a gear stamped onto the loop. Pull the stick straight out of its long tube. Just like the engine oil, this first pull will be messy. Wipe the long metal blade completely clean with a fresh paper towel or a lint-free rag.
+-------------------------------------------------------+
|             TRANSMISSION DIPSTICK LEVEL               |
+-------------------------------------------------------+
|  [ COLD ZONE ]              |        [ HOT ZONE ]     |
|  Only use if car            |        Use when engine  |
|  just started up            |        is warm & running|
+-------------------------------------------------------+
Look at the markings on the tip. You will see a “Cold” zone and a “Hot” zone. Since you just drove the car and it is warmed up, you will look exclusively at the “Hot” section. Insert the stick back down into the tube completely, wait a brief second, and pull it out smoothly. Check where the wet line stops. It should fall squarely within the “Hot” box or between the two upper lines.
Take a moment to smell the fluid on the rag and look at its color. Fresh transmission fluid is a beautiful, clear cherry red color. If it looks dark black or smells like burnt toast, the internal clutches might be wearing out, and the fluid needs to be changed. If the red fluid is just low, place a long, thin funnel into the open dipstick tube. Pour a tiny amount of the exact transmission fluid recommended by your manufacturer. Add a little bit at a time, as overfilling a transmission can cause the fluid to foam up, which leads to slipping gears. Recheck the stick until it reads full, then slide the dipstick back home securely.
Topping Off the Windshield Washer Fluid
While washer fluid does not keep your engine running or help your vehicle stop, it is still a massive safety feature. Rushing down the highway behind a large semi-truck can coat your front glass in sticky mud, dusty dirt, or salt crust during the winter. If you cannot clear that debris instantly, your vision drops to zero, creating an incredibly dangerous driving situation. Keeping this reservoir full ensures you can always maintain a crystal-clear view of the road ahead.
Locating the Windshield Spray Icon
Finding the washer fluid tank is usually very straightforward. Look around the outer edges of the engine compartment for a large white or clear plastic tank. The plastic cap is almost always bright blue or bright yellow. To make it completely clear, manufacturers mold a small universal symbol right into the top of the plastic cap. This symbol looks like a miniature windshield with a tiny dotted line spraying up through the center, mimicking your car’s spray nozzles.
   \  |  /
    \ | /
   -------
  |       |  <- Universal Washer Symbol
   -------
This is the single most forgiving system under your hood. You do not need a dipstick, and you do not need to worry about the temperature of the engine. Simply flip the plastic cap open with your thumb. Look down into the neck of the tank. If you cannot see any liquid, or if the level looks low, it is time to fill it up to the top.
Choosing the Right Fluid for Your Local Season
Grab a jug of dedicated windshield washer fluid. Do not use plain tap water from your garden hose. Plain water contains natural minerals that can clog the tiny spray nozzles over time. More importantly, plain water will freeze solid inside the plastic tank during cold winter weather, which cracks the expensive tank and ruins the electrical pump.
+-------------------------------------------------------+
|             WASHER FLUID SEASONAL GUIDE               |
+-------------------------------------------------------+
|  Summer Blend |  Blue/Green |  Dissolves bugs & sap   |
|  Winter Blend |  Purple/Red |  Melts frost & ice      |
+-------------------------------------------------------+
Choose a formula that matches your local weather. Summer blends are often bright blue or green and contain special detergents designed to dissolve smashed bugs and sticky tree sap. Winter blends are often purple or red and contain alcohol mixtures that melt frost and keep the liquid from freezing even when temperatures drop well below zero. Place a large funnel into the tank opening and pour the fluid all the way up until you can see the liquid rise near the top of the filler neck. Snap the plastic cap back down tightly until it clicks.
Final Review and Cleaning Checklist
Now that you have inspected and topped off every vital liquid, it is time to wrap up your work carefully. Do not rush to slam the hood shut just yet. Take a moment to perform a quick visual sweep of the entire engine compartment. Check every single cap you touched: the oil fill cap, the coolant reservoir cap, the power steering top, the brake master cylinder lid, the transmission dipstick, and the washer fluid cover. Ensure every single one is twisted on tightly and locked in place. An unsealed cap can allow fluids to splash out while you drive, creating a huge mess or dangerous conditions.
Next, look around for any tools or rags you might have left sitting on top of the engine block. A loose paper towel or a misplaced plastic funnel can get caught in the spinning belts or touch hot exhaust pipes, creating a major safety hazard. Pick up your bottles of fluid and seal the caps tightly so they do not spill in storage.
If you noticed any small puddles or drops of fluid on the metal engine parts from your funnels, take a clean, damp cloth and wipe them away completely. Cleaning up these accidental drips makes it much easier to spot real, active fluid leaks in the future. Once the bay is clean and clear, lift the hood slightly, release the metal prop rod if your car has one, and lower the hood down until it sits a few inches above the latch. Drop it firmly so it clicks into its primary and secondary locks completely. Step inside the car, start the engine, and look at your dashboard to ensure no warning lights stay lit. You have successfully taken charge of your vehicle upkeep.
Frequently Asked Questions
Can I mix different brands or colors of engine coolant together?
No, you should never mix different colors or types of engine coolant. The different colors represent distinct chemical formulas, such as Inorganic Acid Technology or Organic Acid Technology. These chemical blends are designed for specific types of metal inside different engines. If you mix green coolant with orange coolant, for example, the chemicals can react poorly to each other. This reaction can create a thick, gel-like sludge that clogs the tiny passages inside your radiator, causing your engine to overheat and suffer severe damage. Always check your owner manual and use the exact color and type already present in your vehicle.
What should I do if my brake fluid is consistently low?
If you notice that your brake fluid level drops low every time you inspect it, you should have your vehicle inspected by a professional mechanic immediately. The braking system is a completely sealed network. Unlike engine oil or washer fluid, a car should not consume or burn brake fluid during normal operation. A low fluid level usually points to one of two distinct things: either your brake pads are heavily worn down and need to be replaced, or there is an active fluid leak somewhere in the metal lines or rubber hoses. Because stopping safely is critical, never ignore a dropping brake fluid level.
Why does my engine oil look milky or look like chocolate milk on the dipstick?
If you pull out your engine oil dipstick and notice the oil looks thick, milky, or resembles a light brown chocolate milkshake, you have a serious engine issue. This milky appearance happens when engine coolant leaks into the oil system and mixes together. This internal mixing is almost always caused by a blown head gasket, which is an internal seal that keeps the two liquids separated. When coolant mixes with oil, the oil loses its ability to lubricate the moving metal parts, which will quickly ruin the entire engine. Stop driving the car immediately and have it towed to a repair shop.
Is it safe to use plain water in my windshield washer fluid tank?
While plain water will work to clear your windshield in an emergency during warm summer weather, it is not a good long-term choice. Plain water lacks the specialized cleaning detergents required to cut through greasy road grime, oily film, and squashed bugs, so it often just smears the dirt across your glass. More importantly, plain water freezes solid at thirty-two degrees Fahrenheit. If water freezes inside your reservoir during cold winter weather, the expanding ice will easily crack the plastic tank, break the fluid lines, and destroy the electric spray pump, resulting in a costly repair.
How often should I check the fluids under my hood?
A fantastic habit is to check your vital under-hood fluids at least once every single month, or right before you embark on a long road trip. Many drivers wait until a bright warning light pops up on their dashboard, but by that time, the fluid is already dangerously low, and damage might already be occurring. Inspecting the levels monthly takes very little time and allows you to spot slow, tiny leaks early before they become massive, expensive problems on the side of the highway.
